May 21, 2020 Lada.Online 43 906 13
One of the popular modifications among LADA car owners is the installation of a remote three-level voltage regulator (TRV). We'll tell you about its purpose and how to install it yourself.
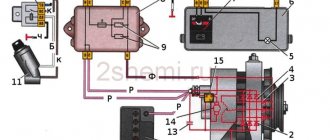
Connection diagram and operating principle
The voltage regulator on most cars is connected to the on-board network according to the diagram below.
The operating principle of a voltage regulator (VR) is the same as that of a relay. In other words, it opens and closes an electrical circuit. That is why the device is also called a relay regulator. It is triggered when a predetermined voltage value coming from the generator changes.
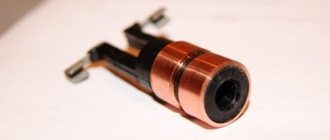
The first regulators had an electromagnetic design. These were real relays. Modern devices are made on the basis of semiconductors. They are small in size, and in addition, they work much more accurately and efficiently. Some of them are even equipped with special alarms that allow the driver to monitor their performance.
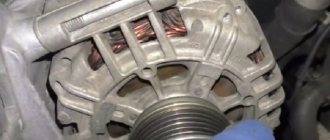
Voltage regulator VAZ-2110
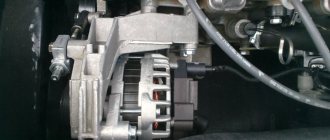
The "tens" launch vehicle also has a semiconductor design. It is integrated into the generator, which allows you to maintain the required voltage directly at the output of the device.
The stock “tens” regulator is available under catalog number 1702.3702. It can also be used in generators of all Samar models.
On new modifications of the VAZ-2110, the voltage regulator may be marked 1702.3702-01. This is a new generation of relays that are manufactured using MOSFET technology, which can significantly reduce output power losses. In addition, these devices are characterized by increased reliability and resistance to overheating.
Voltage regulator - its main functions
On a VAZ 2110 car, the voltage potential in the generator is formed under the influence of alternating current. This phenomenon becomes possible due to the presence of silicon diodes in the generating device of the vehicle. The generator rotor (the rotating component of the mechanism) operates according to the following diagram:
- First, the crankshaft begins to function, which is affected by the current;
- the crankshaft sets the movement of the rotor;
- After this, the generating device itself begins to work.
All stages of the sounded process are monitored by a voltage regulator, which is also often called a relay. It is this that is considered the main control unit of the generator.
Without a regulator, the current-generating mechanism of the VAZ 2110 will not perform its tasks, which are listed below:
- starting the generator;
- control (in offline mode) of current supply;
- “holding” in a certain voltage range.
The described relay cannot be repaired. In the event of a breakdown, the regulator must be replaced, which is done after checking the functionality of this unit.
Technical characteristics of the VAZ-2110 launch vehicle
The voltage regulator relay for the VAZ-2110 generator has the following characteristics.
Regulation voltage with battery at a temperature of 25 o C and a load of up to 3A, V
Regulation voltage with battery at a temperature of 25 o C and a load of more than 3 A, V
Operating temperature range, o C
Maximum output circuit current: standard/agreed with the manufacturer, A
Permissible long-term exposure to high voltage, V
Permissible exposure to high voltage for up to 5 minutes, V
Signs of LV malfunction
In VAZ-2110 cars, the voltage regulator breaks quite rarely, but if this happens, signs of its malfunction may be:
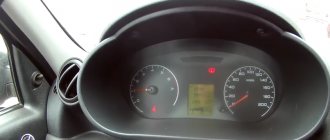
- Failure of the control panel backlight.
- Exceeding the battery charging voltage.
- Insufficient battery charge voltage.
If the voltage regulator relay of the VAZ-2110 breaks down, the fuses responsible for the safety of the power supply circuit of the instrument panel may blow out. If the backlight lamps do not light up when the ignition is turned on, there is a possibility that the LV is to blame.
The same can be assumed when the voltmeter needle, indicating the battery charge level, deviates from its usual position, i.e., shows higher or lower voltage.
How to find out that it is the relay that is broken and not the generator itself
Many people believe that if the battery does not hold a charge, then the problem is in the generator. However, sometimes this can be caused by a faulty relay regulator. To check what exactly is not working, you need to do the following:
- Open the hood of the car.
- Start the engine. Put 2 or 3 speed on the gearbox.
- Remove the battery terminal.
Note: this is necessary to ensure that a short circuit does not occur in the system.
- If after this the machine still works, then the relay is faulty. But if the car stalls, then the reason is still in the generator.
Advantages of a three-level relay
The voltage regulator is mounted on board the machine, while the generator brushes and panel are mounted directly into the generator. Thanks to these three levels, the battery will remain charged for a long time, and its service life will increase significantly. These levels are:
- Minimum level. It is necessary for the car to work even in the hottest conditions. That is, it will not stall even in areas where the air temperature exceeds +20 degrees. In addition, the car can withstand even the highest slopes.
Note: this level is required in the summer.
- Level "norm". Allows the machine to operate under normal conditions.
- Level "maximum". Necessary for using the machine even at sub-zero temperatures. At the same time, the car will be able to start even with a discharged battery.
How to check the pH on a VAZ-2110 without removing it
If you find at least one of the listed signs, do not be lazy to check the voltage regulator on your VAZ-2110. This procedure will not take more than 10 minutes. To do this, you will need a voltmeter or multimeter turned on in its mode, as well as an assistant. The verification procedure is as follows:
- We start the car engine and warm it up to operating temperature.
- Without turning off the engine, we connect one voltage probe of the generator, and the second to the “ground” of the device.
- We ask the assistant to turn on the low beam headlights and press the accelerator pedal, keeping the speed at 2000-2500 thousand rpm.
- We measure the voltage with the device.
For the VAZ-2110, the voltage regulator should produce 13.2-14.7 V. This is the norm. If the voltmeter readings differ from those shown, diagnostic measures should be continued.
Monitoring the performance of components
To perform this operation, it is necessary to remove the device from the vehicle and clean it of dirt. The verification procedure is as follows:
- We switch the multimeter to resistance measurement mode. We install the positive probe on terminal “30”, and the negative probe on ground. Readings close to zero indicate that the bridge or generator stator has failed.
- Positive diodes are checked by installing a positive probe on the terminal of one of the rectifier unit mounting bolts, and a negative probe on ground. Zero or close to zero instrument readings indicate that the diode bridge is faulty.
- To check the rotor, it is necessary to measure the resistance between the slip rings. In working condition it should be within a few ohms. If the resistance is near zero, then a short circuit has occurred in the winding.
The diode bridge and other faulty elements of the generator must be replaced with new ones from spare parts.
Checking the removed voltage regulator
To make sure that it is the LV that has failed, and not the generator itself, it should be checked separately. To do this, you will need to disconnect it from the main device. The procedure is as follows:
- Remove the negative terminal from the battery.
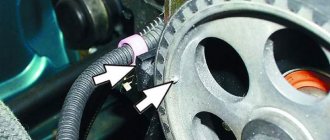
- We find the place where the launch vehicle is attached to the generator. Unscrew the 2 screws that secure it.
- Disconnect the yellow wire going from the regulator to the generator.
- We dismantle the launch vehicle.
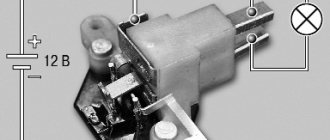
To diagnose the device, you will need a power supply with the ability to adjust the output voltage, a light bulb (12 V) with a socket and a pair of wires. The verification algorithm is as follows:
- We assemble a “control” from a lamp and wires and connect it to the regulator brushes.
- Set the voltage on the power supply to 12 V.
- We connect the “plus” from the power supply to the “D+” terminal of the regulator, and the “minus” to its “ground”.
- We look at the lamp: it should be lit.
- We increase the voltage on the power supply to 15-16 V. If the regulator is working properly, the lamp should go out. If this does not happen, the LV must be replaced.
What is a generator voltage regulator?
The voltage regulator is a relay that closes and opens the electrical circuit at the right times. In cars, this relay works to limit the output voltage. The fact is that a generator with a certain rotor speed can produce a specific voltage. Since the rotor speed constantly depends on the crankshaft speed, the voltage changes accordingly. To maintain a given voltage, a special device was developed that helps create an output voltage within the range of 12 - 14 Volts.
The first voltage relay was made in the form of an electromagnet, which opened with a change in the input value, and closed again when the voltage dropped, thus, the voltage in the electrical circuit of the on-board system was kept within a strictly specified range. This range is necessary for the correct operation of electrical devices. If you increase the voltage to values exceeding the nominal values, the device will simply fail.
Another stage in the development of mechanical relays was the emergence of a semiconductor device, which works much more accurately and reliably. A semiconductor relay has smaller dimensions and a special indicator that indicates whether the device is working or has failed.
The main difference between a mechanical relay and a semiconductor relay is the ability to make adjustments. If the output voltage of the supply circuit has changed, then by changing the position of a special device, you can set new values that will allow the relay to operate for a long time.
If the regulator relay fails, it must only be replaced.
Malfunctions and checking regulators on a VAZ
During operation, the voltage regulator may fail. In VAZ 2110 cars of all editions, a semiconductor relay is used, which contains graphite generator brushes. A relay malfunction can lead to the following consequences:
- Failure of all vehicle network devices. Usually, the first thing that happens is that all the lamps in the lighting devices burn out. If this suddenly happened, the relay has failed because the output voltage exceeded the rated values.
- Recharging the battery . Overcharging a galvanic cell is also unacceptable. This can lead to boiling of the electrolyte and subsequent damage to the battery.
- Small charge . As many car enthusiasts say, “undercharging” occurs. A weak battery will not be able to fully ensure reliable engine starting.
In total, there are only two malfunctions of the voltage regulator relay. These are: failure of the relay (charging does not occur, or the battery is overcharged) and its incorrect operation (the relay works, but passes too little voltage, which is not enough to charge the battery). All relay malfunctions can be identified by many external signs, as well as through diagnostics.
The most reliable way to check the voltage regulator is to measure the electrical value at the battery terminals with the engine running and idling. The normal voltage is considered to be between 13.5 and 14.2 Volts. If the voltage level exceeds these values or is lower, it means that the voltage regulator is faulty and must be replaced.
In addition, there are other signs of a relay failure, after which the device usually begins to be checked:
- The charging indicator light came on while the engine was running. As the speed increases, the lamp goes out.
- Dim headlights when the engine is running. Likewise, as the speed increases, a brighter glow can be observed.
- Too bright headlights and subsequent burnout of the lamps also indicate incorrect operation of the relay.
- If the battery charge is sufficient for a small number of starts, it means that the relay does not fully provide the required charge.
Troubleshooting
Lack of charging can be caused by a wide range of reasons, which we will talk about today.
These reasons include:
- Weak contacts;
- Winding breaks;
- Short circuit on the rotor housing;
- Interturn short circuits;
- Mechanical breakdowns;
- Closing the positive clamp on the body;
- Short circuit in the phase winding;
- Short circuit of the stator to the housing.
Let's look at these situations in more detail to determine the true cause of the breakdown specifically in your case.
Start by turning off all additional equipment in your car that is not included as standard - DVR, navigator, audio system, etc.
Next, we perform the following operations.
- Measure the current output when the vehicle is cold, not running and all life support systems are disconnected. If there is no return at all, that's good. But this rarely happens. Almost always on tens there may be insufficient contact, some kind of short circuit, due to which there is recoil, but it is small. It’s much worse if the recoil is impressive and leads to battery discharge in one night spent in a parking lot or garage.
- If everything is normal, there are no strong current leaks or they are insignificant, and the battery has retained its charge, then you can return all the devices to the places that were installed additionally.
- Recheck the recoil. If at the same time the instruments show an active leak, then the reason does not lie in the battery and is not related to the generator. The culprit of the problem is one of the additionally connected devices.
- If no recoil is observed, then you need to carefully inspect the generator.
- There are many sources of trouble that can lead to generator failure. These include:
- Insufficient contact between the rotor rings and brushes;
- There was a break in the excitation winding;
- An interturn short circuit has occurred on the field winding coil. In this case, the generator will hum and get very hot;
- The field winding closes to the rotor housing;
- The stator shorts to the housing;
- A break occurs in the stator phase winding;
- The diodes have broken through in the rectifier block, that is, the diode bridge;
- The plus is shorted on the body;
- Mechanical problems have occurred.
Replacing the generator regulator on a VAZ 2110
After detecting all of the above faults, it is necessary to replace the relay. To do this, you need to know exactly which relay is installed on your car. The fact is that depending on the car model, different generators are used. Modifications of the VAZ 2110 also have different generating devices.
Conventionally, regulators can be divided into two types: for injection cars and carburetor cars. They have few design differences, but the parameters on the basis of which they work may differ.
After determining the type of relay, the exact same new regulator is purchased. Then, disconnect the negative terminal of the battery and remove the plug from the relay connector. Unscrew the two screws securing the relay and unscrew the ground wire nut. Remove the old brushes and install new ones in their place. Installation is carried out in reverse order.
This completes the replacement of the VAZ 2110 voltage regulator.
Repairing a generator on a VAZ 2110 car with your own hands is quite possible. You can either partially repair the element or completely replace it. It all depends on the specific situation and the degree of wear of the device.
According to the operating manual, a routine check of the condition of the generator should be carried out every 50 thousand kilometers. But this is provided that the device is working properly.
Device diagram
What else could it be?
Often, the culprit for charging problems may not be the regulator itself, but its terminals; over time, like many on a car, they oxidize - which prevents the generator from working normally and recharging our battery, so first, before changing this unit, try to clean it, remove oxides and other deposits. By the way, this also applies to the battery terminals; they need to be cleaned and protected at least once a season.
Therefore, first of all, if the multimeter gives you 11 or slightly below 12V at the terminals of the machine, try cleaning the terminals and contacts first, then measure again. It is quite possible that this is the reason.
This is where I end the article, I think it was useful, read our AUTOBLOG.
( 39 votes, average: 4.26 out of 5)
Similar news
Spark plug gap. What should it be and what does it affect?
DIY brake caliper repair. Plus detailed video
Is there an automatic clutch? Let's look at the technical components.
Examination
It happens that the generator begins to act up ahead of schedule and the battery does not charge properly. Actually, it serves to ensure the operation of the source of electricity to power all cars - the battery.
We advise you to rely not only on our instructions, but also on video lessons that will allow you to carry out repairs and replacements with your own hands, even without much experience.
Troubleshooting
The first step is to determine whether your generator is actually the source of the problem. To check, you need to carry out a series of sequential activities.
- Start the engine and let it warm up to operating temperature.
- Increase the crankshaft speed to approximately 3 thousand rpm.
- Turn on all the headlights, activate the high beams, start the heater, emergency lights, heated glass, and wiper blades. That is, all electricity consumers should be turned on as much as possible.
- Measure the voltage on the battery.
- If the device shows less than 13V, then a short circuit or break has most likely occurred in the generator windings.
- Another option is a breakdown of the voltage regulator, oxidation of the contacts of the excitation winding ring.
You can check for breaks and the condition of other elements of the generator only by dismantling it. But if you don’t have any experience in disassembling a generator, then you shouldn’t try to go there with your own hands. Replace the entire assembly or entrust the repair to professionals.
Dismantling
To disassemble, remove and repair or replace the generator, you will need to do the following.
- Drive onto an inspection hole or overpass to have access to the bottom and engine compartment.
- Remove the battery, otherwise it will not allow you to get to the nut that holds the generator you are looking for.
- Next, the same nut and adjustment bar are removed. Here you will need a 17 mm wrench. Use an extension cord. This will make the task easier; you will have to apply less force to unscrew the fastener.
- In the engine compartment, remove the shield that performs dirt protection functions.
- Now the drive belt is removed and the wires are disconnected.
- Be sure to remove the protective cap and use a 10mm wrench to unscrew the nut that holds the tip and positive cable of your battery.
- There is another nut on the fixing bracket, which will also have to be unscrewed.
- That's it, you can remove the generator. Just remember to pull out the long bolt first.
- When removing, keep an eye on the buffer sleeve. It won't be good if you lose it.
Dismantling works
This completes the procedure for removing the generator. You can proceed with partial repairs or complete replacement of the unit.
Belt
Often, the solution to a poorly functioning alternator is simply adjusting the belt.
Belt
- For the device to work effectively, it is necessary to ensure normal deflection of the belt;
- The deflection size should be 6-10 millimeters with a force of 98 N or 10 kgf;
- To adjust or replace the belt, you need to move the generator slightly to the side, towards the cylinder block;
- By rotating the adjusting bolt, you can adjust the belt tension.
Types of relay regulators
There are two types of them, which work on the same principle, increasing or decreasing the on-board voltage of the car depending on the load.
- A device placed directly on the generator housing and combined with the brush assembly.
- Relay installed separately in the engine compartment. A wire runs through the device from the generator to the battery.
The first type of relay-regulator is only non-separable (the electronic components located inside are filled with epoxy resin). As for the second type, mechanical devices were previously made, but due to reliability they were later abandoned, and today you can find a non-separable electronic version, where the “insides” are also filled with compound.
If your battery does not charge (or the process goes very poorly), or, on the contrary, the light bulbs burn out and the electrolyte boils away, you must first understand whether the voltage regulator is really to blame. This can be done in two ways: directly on the machine or after dismantling the device. Each option is worth considering in more detail.