07/18/2021 7,367 Auxiliary systems
Author: Ivan Baranov
Parktronic is a device designed to help motorists park a vehicle. Drivers, as they say, are divided into two types - those who never recognize such a device and those who simply cannot park without it. So how is it installed, what do you need to know about the parking sensor operation scheme - read about it below.
[Hide]
Operating principle and types of parking sensors
The principle of operation of the parking sensors is that the electronic unit processes signals received from wireless transceiver sensors installed on the car’s bumper and presents them on the display in a form convenient for the driver.
In the simplest parking sensors, the information is an intermittent sound signal, the frequency of which increases as the vehicle approaches an obstacle.
In the most common parking sensors, information with an audible signal is supplemented by a monitor or display, on which the distance to the obstacle in meters is displayed in graphical or graphical and digital form. You can see the structural wiring diagram of such a radar in the photograph. Expensive models of parking sensors additionally have a video camera, the lens of which constantly has to be wiped clean of dirt, which in practice negates all its advantages.
Distance measurement sensors in parking sensors are used in two types - tape and ultrasonic. Tape sensors are a metal strip attached to the inside of the bumper; they detect an obstacle only at a distance of less than 30 cm and do not work well in a wet environment, so they are practically not used.
There are types of wireless parking radars in which the signal from the electronic unit to the monitor is transmitted using a radio signal. The price of such parking sensors is an order of magnitude higher, and the apparent ease of installation is deceptive, since it is still necessary to supply the supply voltage to the devices using wires, which practically negates the advertised advantage. In addition, such a system is susceptible to radio interference, which reduces the stability of the parking radar as a whole. I immediately refused to buy such parking sensors.
Design and principle of operation of an ultrasonic parking sensor
Ultrasonic parking sensors are unpretentious and can confidently detect any obstacle located at a distance from the car closer than 2 meters. The ultrasonic sensor is similar to a telephone headset, only the speaker and microphone are installed in the same housing.
The sensor works as follows. A burst of pulses with a frequency of 40 kHz is periodically supplied from the electronic unit to the sensor emitter. If an obstacle is encountered along the path of the pulse, it is reflected and picked up by the microphone. It is then transmitted to an electronic signal processing unit, which measures the time interval between the moment the pulse is emitted and the time it returns from the obstacle. The further away the obstacle is, the longer it takes for the signal to return to the sensor. The distance is determined in this simple way. The electronic unit can only convert the travel time of the pulse into meters and display the information on the display.
The distance at which the parking sensor can detect an obstacle depends on the power of the emitted pulse and the sensitivity of the microphone.
The angle of radiation of the pulses is limited, therefore, to completely cover the blind spot, at least four ultrasonic sensors must be installed on the bumper.
Types of radars
Parking assistants that are commercially available can be of various types, or rather, configurations. They differ in the number of sensors and functionality. The more sensors a particular model has, the more “dead zones” the system can see. However, a large number of sensors entails certain difficulties during the installation process.
Most models of parking sensors are equipped with ultrasonic sensors, but there are also so-called tape models on the market. They do not have separate sensors. Instead, one common antenna in the form of a ribbon is used. However, these are more expensive solutions that are not popular.
The models presented on the modern market differ in how the driver warning system about an obstacle is implemented. Above we looked at systems with LED warnings. However, you can find the most primitive front parking sensors, where there is only a sound signal. As you approach an obstacle, the intensity of the sound signals increases. There is no display included, just a beeper.
More expensive models have displays or LED indicators. The functionality of these devices is the same, regardless of brands and models. The difference between them is only in the design and method of mounting in the car interior. In some expensive models, information may be displayed not on the display, but on the windshield or rearview mirror.
For beginners who have just gotten behind the wheel, it is recommended to purchase front and rear parking sensors with 8 sensors. This way you can protect yourself as much as possible from damage to your or someone else’s car. 8 sensors (four each at the rear and front) provide greater visibility.
Which parking sensor to choose and where is it cheaper to buy?
When the car moves forward, all obstacles are clearly visible, so there is no point in installing parking sensors on the front bumper. Based on the above, for self-installation in my car, I chose parking sensors with four ultrasonic sensors for installation on the rear bumper, with a sound alert and display of graphic and digital information on the display.
After determining the radar configuration that satisfied my requirements and searching for parking sensors on the Internet, I found one that was suitable for price and quality in the Chinese online store AliExpress. As a result, taking into account self-installation and the cost of materials, my costs for installing parking sensors in the car amounted to a little more than $11.
The photo shows a set of components for installing parking sensors in a car. The kit even includes a special cutter for drilling holes in the bumper for installing ultrasonic parking sensors.
What do we need for installation?
To install parking sensors with your own hands, you do not need any professional skills. An ordinary car enthusiast can cope with this task. All you need to do is drill a few holes evenly and connect the wires correctly. Most of the necessary tools can be found in any driver's garage.
The set of most parking radars consists of:
- sensors (from 2 to 8 pieces)
- connecting cables
- screen
- signal processing unit.
Also included with some models is a cutter for drilling holes for sensors and various useful little things.
But if it is not included in the kit, this is not critical - you can measure the diameter of the sensor and purchase a drill at the nearest store. However, it must be taken into account that the diameter of the cutter should be 1-2 mm larger than the diameter of the sensor. To install and connect the parking sensors we will need:
- the device itself
- cutter for drilling holes for sensors (often included with parking sensors)
- drill (you can also use a screwdriver)
- a set of keys
- pencil, electrical tape or clamps, tape measure and tester.
All cars are different and each case is unique, so you may need other little things, such as pliers, a soldering iron or a car electrical diagram.
Checking the parking sensors before installing them in the car
Before installing parking sensors in a car, to avoid surprises, it is necessary to check its functionality. To do this, you need, in accordance with the above block diagram, to connect all sensors and a display to the electronic control unit and apply +12 VDC supply voltage to it, observing the polarity, from a power supply designed for a current of at least 0.3 A or a battery. It is impossible to make a mistake here, since all the connectors are different, with the exception of the connectors for connecting parking sensors. But when checking, the order in which the sensors are connected does not matter, since they are interchangeable.
If the sensors are left lying on the table, then it will be impossible to check the parking sensors in operation. Therefore, you need to simulate their installation on a car bumper. To do this, you need to drill four holes in a sheet of corrugated cardboard or any other sheet material using the cutter from the kit and install ultrasonic sensors in them, as shown in the photo. The distance between the holes should be more than 10 cm.
Next, direct the sheet with sensors into a space two meters free from obstacles and turn on the parking sensors. All that remains to check is to walk in front of the sensors and see what is displayed on the monitor. If everything works, then you can begin installing the radar in the car body.
For interest and to evaluate the quality of the parking sensors, I opened the control unit, its printed circuit board is in the photo. The presence of markings of elements, neat installation, high quality soldering and voltage reserve of electrolytic capacitors pleased us.
How to install front parking sensors
Installing front parking sensors with your own hands is a procedure that requires care and precision. The driver needs to make small holes in the bumper to insert sensors into them. The work is performed with the bumper removed, since there is electrical wiring inside the shell.
The cables, in turn, must be routed through the engine compartment. They should not come into any contact with the cooling radiator and exhaust manifold. It is best if the driver places the cables in a sleeve and attaches them to the wiring harness.
After installing the sensors, the car owner should once again check the correct installation and routing of cables. If some parts have not been connected correctly, elements will light up on the display indicating the location of the problem.
Display
The information display is placed in the car after the sensors are installed. The scoreboard is either an LCD screen or a block with indicators.
Monitor installation instructions:
First you need to choose a place on the dashboard. Nothing should block the driver's view.
After this, you should think about the cable route to the controller.
Before installing the display, the surface should be cleaned of dirt.
Remove the protective film from the device and install it on the dashboard.
Connect the patch cable.
The wiring to the monitor is pulled under the pillar and runs along the ceiling to the luggage compartment.
Sensor installation
Most often, the control unit is installed in the trunk. The installation process begins from the rear of the car. As already mentioned, the bumper needs to be removed and washed from dirt and dust. Modern foreign cars are already equipped with markings for attaching sensors. Older cars do not have it, so the markings are applied independently.
Having made the markings, the driver must drill holes and widen them slightly with a cutter. The sensors are inserted into the holes, and the wiring is secured with clamps. The main thing is to ensure that the sensors are located at an angle of 90° to the ground.
Connection
There are several options for connecting the front parking sensors: with a button, turning on the gear, or by pressing the brake pedal. The simplest method is the first. The method is considered the most effective. To implement it, you will need a button that is installed in a convenient place inside the cabin.
The power comes from the same place where the power comes from, for example, the DVR. When the engine starts, power begins to flow. When the engine is turned off, the system turns off. The operating principle is simple, but not ideal. According to the rules, the system should start automatically if the car is moving at a speed of 20 km/h or less.
Choosing a location for installing the monitor and electronic parking sensors
When parking in reverse, the driver usually looks at the side mirrors and rearview mirror. Taking the parking sensor monitor in my hands and sitting in the driver’s seat of the car, I began to look for the most rational place to install it. As a result, taking into account the need to lay wires to the electronic unit, it was decided to mount the monitor on top of the rear view mirror.
Ultrasonic parking sensors are installed in the rear bumper, and the supply voltage is most easily supplied from the reversing light, since the parking sensors should only work when reverse gear is engaged. Therefore, it was decided to install the electronic unit in close proximity to the sensors - in the luggage compartment.
As a result, the wiring diagram of the ultrasonic parking radar shown in the photograph was created. Now all the questions regarding the installation of parking sensors have been worked out and you can begin installing it in the car.
Each ultrasonic parking sensor, depending on its installation location on the bumper, must be connected to its own connector on the electronic unit. Therefore, the connectors must be marked in advance in accordance with the inscriptions on the body of the electronic unit.
Instructions for installing parking sensors on a car with your own hands
The technology for installing radar on cars of different manufacturers and models is not much different, and therefore the instructions given for self-installation of parking sensors using the example of a Hyundai Getz car will be useful to the owner of any car.
Laying the wire from the monitor to the electronic unit
It was decided to stretch the cable from the monitor to the electronic parking sensor unit between the ceiling trim and the roof of the car. This is the shortest route and does not require removal of the casing.
The ceiling trim near the rear-view mirror was moved down a couple of centimeters and a piece of foam plastic was inserted into the resulting gap for ease of work.
At the ceiling of the trunk door, the trim was freed from the rubber seal and also moved down a couple of centimeters. Next, an attempt was made to stretch a steel wire with a diameter of about two millimeters through the resulting gaps from the trunk to the rear-view mirror. But, unfortunately, the wire rested on something and despite numerous attempts it was not possible to thread it through.
I solved the problem by pulling the wire in several stages. First, from the rearview mirror into the gap that I made by freeing the headliner at the top of the driver's door from the rubber seal, then through the second gap at the left rear door and then through the gap in the trunk. The rope was first stretched using wire.
To prevent damage to the monitor connector, it was attached to a rope using electrical tape, as in the photo. All that remains is to carefully pull the rope and the wire will easily pass behind the trim to the trunk. I completed this job in a parking lot in the yard of the house in 15 minutes.
Removing plastic panels
To conceal the wiring from the ultrasonic sensors and supply power to the electronic unit, it is necessary to free the left side of the trunk from the plastic panel.
The first step is to recline the rear seats and remove the trunk floor covering. It is secured with several screws and clips. Can be removed without difficulty.
Next you need to remove the plastic panel on the rear wall of the trunk. To do this, all visible screws and bolts are unscrewed, and the panel moves upward with considerable force. It is held on by four clips and can be removed easily.
To begin installing the parking sensors, all that remains is to remove the left side panel of the trunk. Again you need to unscrew all visible screws. Next, from the left door side, pull it away from the car body and when the two clips are released, pull the panel towards you.
Installing ultrasonic parking sensors on the bumper
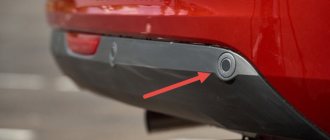
Radar manufacturers recommend installing rear parking sensors at a height of 50-70 mm from the road surface. Thus, the sensors could be installed on the black molding or on the top of the bumper. I chose the second option.
The photo shows a drawing with recommended installation dimensions for radar sensors. Depending on the width of the car, the dimensions need to be adjusted.
Since the diameter of the sensors was 22 mm, a 40 mm indent was made from the top line of the bumper. The drill hole centers were marked directly on the bumper surfaces using an alcohol marker.
Since the end mill had a drill bit in the center, it was easy to accurately drill the holes using an electric drill. The edges of the holes turned out neat, without burrs. You can also use a cordless screwdriver for drilling.
There was a hole in the rear wall of the trunk through which the wire from the rear fog lamp passed. It was decided to lay wires from the ultrasonic sensors through it. The rubber o-ring was removed and a rope was pulled through the drilled hole next to the fog light using a steel wire.
Next, the wire was threaded through the hole for installing the outermost sensor into the hole for installing the central sensor, and then the rope was pulled.
The sensor connector was attached to the rope using insulating tape, as shown in the photo, and the wire was pulled through it into the trunk. Pulling should be done effortlessly so as not to damage the wires and sensor connectors.
To prevent the sensor wires from rubbing against the steel edges of the car body and to seal it, a slot was made in the sealing ring with a knife through which the wires were threaded. Next, the seal was installed in place.
When installing sensors in the bumper, they must be oriented so that the arrow on their housings points upward.
An attempt to mount the ultrasonic sensor in the bumper was unsuccessful the first time. The sensor did not want to hold on. It turned out that the silicone clips were designed for mounting on a thin wall, and the thickness of the bumper was 2.5 mm. I had to use a knife to remove part of each clamp so that the gap between them and the sensor flange was 2.5 mm. After modification, the sensors were firmly fixed. It was impossible to pull them out with a fingernail. Therefore, no glue was needed.
After attaching the ultrasonic rear sensors to the car's bumper, the wires coming from them were tied together using plastic clamps with the wires coming from the fog lamp.