Lada Priora Hatchback Zug-zug › Logbook › Replacing the alternator belt and engine mounts (guitar).
It's been a long weekend, why not get busy installing all sorts of goodies that you carefully purchased in advance and have been collecting dust in the trunk for almost a month?
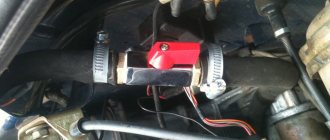
Let's get started: the generator + air conditioning belt made obscene sounds in humid weather, such that the yard dogs began to howl.
Replacing the belt is a favorite pastime of the pelvic driver - who would think of hanging the engine (!) to change the belt? That's right, only to the glorious chief designer of AvtoVAZ.
I unscrewed two star bolts (another know-how - torx heads). I would especially like to note that unscrewing the long bolt “cushion-engine bracket” turned out to be useless - getting to the head from below is extremely problematic, especially lying on the grass, and it’s very long. First I unscrewed the nut from it, then spat and screwed it back.
Jacked up the right wheel. Made a support out of shit and sticks from bricks and pieces of wood.
I made a video - the original lubricant in it, apparently, had dried out and turned into marmalade.
How did I drive with such a belt O_o?
A new roller was installed for maintenance by Gates T39176 Tensioner roller, serpentine belt “DriveAlign®”
However, it seems to me that the video was not original at all, its streams are crooked. UPD: everything is fine, the belt and the roller are friends.
Excellent, according to reviews, Mitsuboshi 6PK1115 strap Poly V-belt Here you can see how the outer part of the belt is bent - one rivulet on the roller is smaller than the rest. UPD: after 500 km, the belt got used to the roller rivulets like a glove.
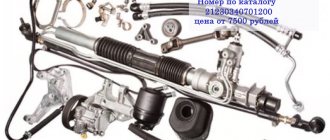
Well, ok, the roller with the belt is screwed in, it’s time for the most delicious piece of hardware - a new type of engine mounting rod! 2112-1001300-02 Ordered through an official dealer and the pair traveled for more than 3 weeks. As they say, the difference is obvious.
Source
Assembly of a 16 valve VAZ 2112 engine
EXECUTION ORDER
|
| EXECUTION ORDER |
We assemble the engine in reverse order.
| previous page 4.35. Removing the engine from the car | to contents | next page 5. Cooling system |
Copyright 2007-2019 All rights reserved. All trademarks are property of their respective owners.
VAZ 2110 engine assembly
Assemble the engine on a VAZ 2110 car as follows. Place a clean cylinder block on the stand and screw the missing studs into the cylinder block. Install the generator mounting bracket and secure it with two bolts. Lubricate the bearing shells and thrust half rings of the crankshaft, as well as the pistons and oil seals with engine oil. When assembling the engine after repair, install new crankshaft oil seals. Install liners with a groove in the 1st, 2nd, 4th and 5th seats of the cylinder block, and liners without a groove in the 3rd seat of the cylinder block and in the main bearing caps. Place the crankshaft in the main bearings and insert the thrust half-rings into the seat of the middle main bearing (Fig. 2-18).
Warning The half rings must have their grooves facing the thrust surfaces of the crankshaft (an antifriction layer is applied to the surface of the half ring on the side of the grooves).
A cermet half-ring (yellow) is placed on the rear side of the crankshaft middle support, and an aluminum-steel half-ring is placed on the front side. Install the main bearing caps in accordance with the marks on their outer surface (Fig. 2-19).
Types of supports
The Lada Priora has 4 airbags installed on the left and right of the engine, as well as in the front and rear. It should be noted that only engines with 16 valves have 4 supports, while in an 8-valve engine there are only 3 supports.
Right
The right (upper) support is located near the gas distribution mechanism (GRM). Designed to connect the engine to the car body via rubber, to cushion it and dampen vibrations. This support also limits the longitudinal movement of the engine in the engine compartment.
Left
The left support (lower) is installed between the gearbox and the car body. It serves in the same way as the right one to dampen engine vibrations during its operation, as well as to limit its longitudinal movements during movement or work.
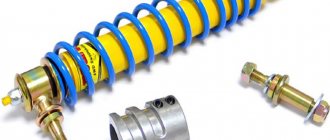
Top bar (guitar)
The top support is shaped like a guitar, also called a rod. This support is designed to fix the engine and prevent its lateral movements. Made from metal and rubber. This pillow was produced in several versions from a metal body (on new Prior models) and metal (on older versions).
The upper guitar is located near the right glass of the stand near the support bearing. It is bolted to the glass and on the other side to the engine bracket.
Lower rod
The lower guitar has the same structure as the upper one. It should be noted that the upper and lower supports are interchangeable with each other.
Where are the engine mounts located?
First, let's look at where the supports are located in the engine.
- The right airbag is located near the timing belt. It connects the engine to the body, creating the necessary shock absorption, helping to dampen vibrations. In addition, such a support does not allow the engine to make longitudinal movements under the hood.
- The left cushion is installed between the car body and the gearbox. Its functions are the same as those of the right support.
- Top cushion (also called " guitar " because of its shape). Reliably fixes the engine, preventing it from making lateral movements. Made of durable metal and rubber. It is located at the right side of the strut near the support bearing.
- The lower “guitar” is structurally no different from the upper one, since these parts are interchangeable. This support is located under the power steering or air conditioning pump. It is attached to the motor bracket, and on the other side to the beam.
In 8-valve Priora engines, the last two airbags are replaced by one. It is attached to the gearbox and the bottom of the car.
Prices and articles
Below is a table of prices and article numbers for Lada Priora engine mounts depending on the model, type and manufacturer.
| Support type | Manufacturer | vendor code | Price, (rubles) |
| Left | BRT | 2110-1001242/55 | 540 |
| Right | BRT | 2110-1001242/14 | 495 |
| Rod (S.O.) | VIS | 2112-1001300 | 705 |
| Rod (N.O.) | Drive | 2112-1001300 | 660 |
| Gearbox support 8kl. | SEVI EXPERT | 5104 | 660 |
Valve tuning: features of implementation
This engine, like any other, has valves
They are an important component of it and are responsible for the operation of the entire system. Moreover, they come in several types: 8 and 16
Depending on which one is used, such are the characteristics of the motor. And, of course, the whole car. When choosing valves for tuning, preference should be given to those with a larger diameter or lighter ones. In this case, it is necessary to take into account the rotation of the motor. If it exceeds 6000 rpm, then it is better to install stiff springs on the valves. Also in this case, both sports and modified plates, which are made from titanium, are suitable.
When replacing valves, you can use parts from other car models. For example, the 8-valve engine functions perfectly with BMW parts. In this case we are, of course, talking about valves. This modification option is often practiced. And, as experience shows, it is quite successful.
Before choosing valves, you need to evaluate your financial capabilities, since there are many parts. They differ not only in their characteristics, but also in cost. If you prefer an inexpensive option, then titanium products are suitable. They can be purchased ready-made and ordered according to individual requirements and sizes.
If you decide to use standard products, then you need to carry out additional manipulations with them. They should be significantly lightened and ground in. The manufacturer does not include these stages in the production process. Therefore, this gap must be filled on our own.
Replacement
The process of replacing Lada Priora engine mounts is described below, as well as the tools that will be needed to carry out this work. By following these step-by-step instructions, work on replacing the Priora engine mounts can be carried out without much effort in the shortest possible time.
Required tool:
Replacing the right support
Install the new support in reverse order
Replacing the left support
Replacing guitars
Replacing guitars is quite simple and effortless.
Replacing the lower support on 8-valve internal combustion engines
Work on replacing the lower support on 8-valve engines must be carried out from the inspection hole.
Source
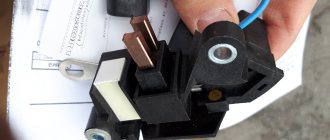
Instructions for removing and replacing the computer
The need to dismantle the ECM unit 16 of the ten valve engine arises if repairs are necessary when faults are identified. The repair process itself will depend on what exactly happened in the operation of the ECU. For example, if the contacts on the module connector have oxidized, the unit must be dismantled to clean or replace them. If the reason lies in damage to the housing, then the device must be removed for replacement; if water has gotten inside, then the module should be removed in order to dry it. Only after you have dried the block can it be tested.
If the problem lies in the performance of the board and some burnt-out elements, then you can try to repair it yourself by re-soldering some components. But we would still recommend turning to specialists for help, especially if you have never encountered such a problem before (the author of the video about repairing the control controller is Vyacheslav Chistov).
Tools
To replace the module, you will need:
- socket head 10;
- ratchet handle;
- Phillips screwdriver.
Work sequence
Before dismantling the device, you should disconnect the negative terminal from the car battery:
The vehicle must be placed on a flat surface, without slopes, and the parking brake must be set. The following stages of work are performed inside the car
You will need to carefully unplug the wire connector from the control box, but before doing so, you should unplug the latch. When you get directly to the powertrain control controller, using a wrench you will need to unscrew the two nuts that secure the module to the bar
After these nuts are unscrewed, you will need to move the bar itself slightly to the right side, this will allow it to be released from engagement. After completing these steps, the control controller can be dismantled. If you are replacing a device, then if it breaks down, you should replace the module with a similar one that was installed. That is, if you had a January 7.2 ECU, then the same module is installed. If the unit is subject to repair, it should be repaired and then reinstalled. The installation procedure is performed in the same way, only in reverse order.
Do not repair the control unit if you have never had to deal with such a task before!
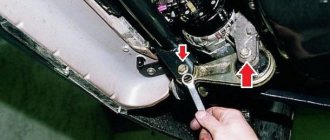
Replacing the upper engine mount of a Priora “guitar”
Greetings, car enthusiast on the RtiIvaz.ru blog! In today's video we'll look at the process of replacing the upper engine mount on a Priora 16-valve engine. Please meet the author of the video, Yuri Fedorov, changing his “guitar”.
The support itself was previously purchased, an excursion was made to the Internet for advice on replacement, and now the upper mount of the Priora engine is being replaced with your own hands.
Before starting the replacement, the “guitar” itself, which is to be replaced, is shown in close-up, so that it is clear that there is nowhere else to pull and it is no longer safe to operate the car with such a support. It can be seen that the inside of the rubber cushion was simply torn into several parts and the Priora engine began to have free movement in space.
To work, you will need a wrench and a socket - x 15. It is not possible to adapt a large wrench with a head, since the tubes located nearby get in the way. Let’s use a “ratchet” and a more compact head at x 15. To strengthen it, we put a spanner on the handle of the ratchet and used it as a lever, which ultimately helped, we managed to tear the bolt from its stuck place, and then it began to unscrew more or less freely.
The nut on the second mounting point of the rubber cushion was unscrewed with an adjustable wrench. Actually, they set it off, and then it went on easily, almost by hand. After unscrewing the nut, remove the fastening bolt itself and pull out the support.
It is clearly visible in the video that the inner, vulcanized part of the rubber is cracked and almost separated from the central part where the fastening bolt passes.
We install a new support in the brackets and insert the fastening bolts.
When tightening the far bolt of the support (towards the engine compartment shield), a small pad came out. The bolt was not completely centered in the nut and did not go quite along the thread, moving the nut itself from its place of fastening. The nut is fixed with the help of cast tendrils that hold it by the edges. The nut turned in the tendrils and began to spin.
The fastening nut is square and had to be fixed with improvised means in order to unscrew the bolt that was not threaded. The bolt was eventually turned out, the nut was passed several times along the threads of the bolt with lubricant so that it would not bite when tightened.
Turning the nut over to the other side, where the thread remains, fixed it. The bolt was precisely centered on the nut, and everything was tightened, creating a reliable connection.
At this point, Yuri Fedorovich finished showing and telling the video how to change the “guitar”. Subscribe!
Good luck, dear readers of the RtiIvaz.ru blog and see you soon!
And also see the photo of the rubber cap from the coil to the spark plug for the Priora VAZ 2170 car.
Source
Car engine
The engine was not created from scratch, but on the basis of 21083, as a result, manufacturers received a 16-valve engine, and the VAZ-2112 feels more confident with it.
The geometric characteristics of the base engine are preserved, but there are differences in power, efficiency, and throttle response. Advantages:
Compensators are installed on the engine - now the driver is freed from adjusting the valves every 10 thousand km. Environmental standards fit into the Euro-3 standard. The injector makes it possible to forget about servicing the latter for a long time - there are far fewer worries than with a carburetor on a “classic”, for example
This ensures smooth running of the machine in all modes. When the engine revs above 3 thousand, the engine has better throttle response and dynamics compared to its predecessor. Due to the modified combustion chamber, the anti-knock qualities of this engine have been improved, and this is important considering that gasoline at gas stations is not of good quality. This measure of design changes extends the service life of the engine until the next major overhaul. Stable operation of the cooling system in any weather allows you to maintain the desired temperature regime.
It is noteworthy that very famous automobile brands were involved in its creation. This, however, did not relieve the design from some shortcomings:
- Low torque at low speeds.
- The belt drive is not reliable and if it breaks on a 1.5-liter engine, it bends the valves, which cannot be said about a 1.6-liter engine. This drawback ends up costing the car owner a lot of money: the cylinder head has to be repaired.
- The engine has two camshafts: intake and exhaust. They open and close the valves, intake and exhaust, respectively. There are not two such valves, as on the “ten”, but four for each cylinder. This, of course, significantly improves engine performance by supplying more combustible mixture to the cylinders, and there is also improved exhaust gas removal to the exhaust manifold. This is both an advantage of the engine and its disadvantage at the same time, since despite obvious advantages in operational characteristics, its repair is more expensive. If the 8-valve engine has always been famous for being unpretentious in maintenance, the same cannot be said about the 16-valve engine.
The timing belt (timing belt) is longer than on the base engine, therefore more expensive. If on the previous model one pressure roller and one timing gear were used, then on this one the number of mentioned parts has doubled.
How to replace a guitar on a Prior
I began to unscrew the bolt that secures the guitar to the body. I twist and twist, but it feels like the nut is spinning.
I started looking at the instructions:
1. Using a 17mm wrench, unscrew the bolt securing the rear support rod to the body, holding the cage nut so that it does not fall out of the box.
2. Remove the nut and bolt.
Hello dear readers of VAZ Repair, as well as guests of our site. Today in the “Prior Repair” section I will talk about how to replace the upper engine mount at home. As always, first, a few words about what we will change, why, etc.
The upper engine mount (guitar) serves as the link between the car body and the engine. Using supports (pillows), the engine is securely mounted in the engine compartment. The configuration of the pillows is a durable frame with rubber inserts in the inside. The latter are necessary to dampen vibration coming from the motor. By and large, engine mounts are large silent blocks that serve to reduce shock vibrations and other vibrations coming from the engine to the car body and transmitted to the cabin. Without airbags, driving in a car would not be so comfortable, and due to strong vibration, the driver would get tired very quickly.
Replacement of the upper engine mount, which is also called the “guitar”, is carried out in the following cases:
To work, you will need a new “guitar”, a set of keys, WD-40, a supply of patience and about an hour of time, depending on professionalism.
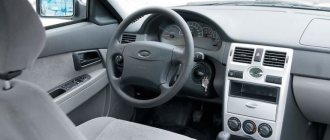
Interior of the car
The interior of the twelfth model collected all the best from its previous “brothers”. Changes:
- The rear seatbacks are separated. Each of the backrests folds (moves forward as needed).
- The trunk has become significantly larger. Due to these changes, it became possible to transport long items, which summer residents like so much.
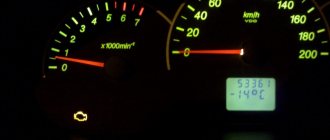
- Car owners complain that it is a bit dark in the cabin and the dashboard is not very visible.
- The assembly seems to be of high quality, but there are still pure VAZ noises and panel squeaks when driving.
- The power windows are controlled by buttons in close proximity to the handbrake, and this is not entirely convenient: it would be more appropriate to place them on the car door cards. In addition, such a drive is only on the front windows, and the rear windows are opened with “oars” - handles, and even then not in the basic configuration.
- There is an almost complete lack of sound insulation. However, almost all VAZs suffer from this. Even with loud music, you can hear the engine, chassis and rustling wheels in the cabin.
- As for the front seats, their performance is good, although the adjustments are very inconvenient. People of large build feel comfortable in this car - both the driver and the passenger on the right.
- The trunk is very convenient when loading - there is no shelf in the way.
- The driver has an excellent view.
- The rear seats are comfortable for passengers, although the gap between the roof and the passengers' heads is small.
The pedals are quite closely spaced. The driver experiences the greatest inconvenience from this in winter, when the shoes are wider.
This is interesting: Miss Tuning 2014 winner Veronica Klimovits
From the edge of the brake pedal to the console there is just over 100 millimeters, and many drivers have to press the accelerator pedal while keeping their right foot in an unnatural position, otherwise it can get caught in the brake pedal. The most interesting thing is that there are no such shortcomings in the “ten”. It is very possible that the convex panel on the side of the tunnel is to blame.
The interior looks much more modest in comparison with foreign cars of the same class.
How to replace the upper engine mount on a Lada Priora - step-by-step instructions
In general, the work is not difficult, but it requires certain skills and patience. With the right approach, no problems should arise; it is a little inconvenient to unscrew the bolts and, on top of that, the air conditioner lines were in the way, but, as they say, not fatal. After replacing the upper engine mount, all the unpleasant moments associated with vibration described at first disappeared. The ride became comfortable, and the cabin became a pleasure to be in.
That's all for me, thank you for reading to the end. We would be grateful if you share this article on social media. networks using the special buttons located below this article.
Lada Priora is a modernized version of the VAZ 2110; the design of these cars has many of the same parts, for example, doors or body parts. This allows you to adopt some improvements from the “ten”, one of which is the installation of an additional gearbox cushion.
On 8 valve engines the factory installed a rear gearbox mount, but on 16 valve engines they have already abandoned it. As practice and reviews from VAZ 2110 owners show, installing an additional gearbox support is a useful modification that can make the operation of the car more comfortable.
On Priors with 16 valve engines, the rear gearbox mount is also missing, but the attachment points to the body remain.
Features of removing a generator on a car with air conditioning
In a Lada Priora car with air conditioning, the air conditioning compressor and generator are driven by one belt. The design feature is such that it is impossible to dismantle the generator without removing the compressor. You must first disconnect the air conditioner pump from the bracket. This is the first difficulty encountered.
Generator Lada Priora from Bosch
A possible second problem awaits at the lower mounting of the generator. If the bolt is installed with its head towards the engine, it will not be possible to completely remove it . It is so long that it rests on the engine mount, and it is impossible to remove the generator. To remove the bolt, you need to jack up the engine and unscrew the mount. We advise you not to use this method. It’s easier to buy a new bolt and cut off the old one with a grinder. When installing the generator, install a new bolt, but with the head facing outward. This way you will save 10-15 minutes of your time in the future.
Reviews after installing the rear gearbox support
The purpose of the rear mount of the power unit with the engine is to reduce the load on the front and rear engine mounts and reduce the rolling of the gearbox. In other words, after installing the additional gearbox support:
Many Lada Priora car owners notice that after installing an additional airbag, vibration appears at idle, the reasons may be the following:
Have you installed an additional gearbox cushion on your Priora? Share your feelings after revision. Let us remind you that body reinforcements/struts are also very popular among car enthusiasts?
Source
Chassis
Many drivers believe that the suspension has become too soft, that is, there is no “feedback”. For decades, the car owner has become accustomed to feeling every bump on the road in a VAZ - this gives confidence in driving, since the driver “feels” the road and the car.
This effect appeared due to the modified suspension system
Nevertheless, the car handles perfectly, and this is felt even with a slight turn of the steering wheel. But at low speeds and during maneuvers at the very beginning of the movement, the steering wheel is a bit heavy. ABS is not provided.
The brake system is still the same:
- front disc brakes (with vacuum booster);
- drum brakes at the rear;
- Braking is confident and effective, and the system itself is simple and easy to maintain.
The car, with all its existing shortcomings, is still quite successful, especially if you take into account its reasonable price