The vacuum brake booster on a VAZ-2114 is faulty: what to do
Today, the automotive spare parts market is replete with VUTs for VAZs (it is worth mentioning that the information presented in the article is applicable for the VAZ 2115 and VAZ 2113) from a variety of manufacturers - from cheap Chinese models of dubious quality to very expensive models.
In general, VUT of more or less acceptable quality will cost you about 1 thousand rubles. We can confidently recommend for purchase “SPORT” vacuum cleaners from Polytech-Auto (Togliatti), the quality of which has been tested by numerous car enthusiasts. The warranty service life of such VUTs is one year, but in practice, they last much longer. According to reviews, replacing a VUT with a VAZ does not take about 3-4 years.
From this article you will learn how to change the vacuum on a VAZ 2114 with your own hands, without spending money on service stations.
Reasons for replacing the brake booster
Brakes are a whole system. Therefore, as soon as you have checked the amplifier, do not be lazy and check whether the brake fluid is leaking and whether the pedal itself is in order. Maybe it's worth looking at the brake master cylinder and generally running diagnostics. And if, nevertheless, you have not found any problems in the brake system, then you can think about how to change the vacuum on a VAZ 2114.
It is important to understand that replacing the vacuum on a VAZ 2114 or any other VAZ model is a mandatory process. If the unit is malfunctioning, then the engine is also malfunctioning. The power that the engine will produce depends on the correct functionality of the amplifier. What Russian doesn't like driving fast? As they say, if you love to ride, you also love to change the vacuum.
Replacement of VUT VAZ 2114
After diagnostics, you can proceed with replacement. You will need the following set of tools:
- Pliers.
- Keys for “10”, “13”, “17” (open-end, socket heads, sockets).
- Screwdrivers, flat and Phillips.
Pay attention to the condition of the fittings, clamps, and pipes. Replace them if necessary
All do-it-yourself repairs can be carried out at home without any particular difficulties; there is no need to turn to the services of a service station.
Repair stages:
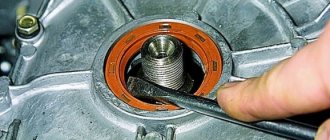
- Remove the rod connecting the VUT and the brake pedal. It is necessary to pry the plate with a knife or flat screwdriver, and then unscrew the bolt.
- Having opened the hood, disconnect the GTZ (brake master cylinder) and the vacuum pump of the VAZ 2114. Usually simple nuts are used for the connection. Further dismantling is carried out either by disconnecting all pipes from the GTZ, or “live”. In the first case, of course, it will be much more convenient, but after repairs it is imperative to bleed the entire system.
- Remove the hose connecting the amplifier to the manifold.
- Using a socket on “13”, unscrew the nuts from the interior that secure the amplifier to the body.
- Remove the amplifier.
That's all, at this point the dismantling process can be considered complete, assembly is carried out in the reverse order. Usually this device is not repaired, but is immediately thrown away. Its price is not very high, and its service life is significant. Therefore, it turns out to be easier (and safer) to install a new VUT.
First you need to figure out what this vacuum amplifier actually is.
- This is a casing within which the valve is located. The element is structurally divided into two parts, which are separated by a layer of rubber - the diaphragm;
- One part of the amplifier is atmospheric, and the second is vacuum - it is connected to the inlet pipe from the power unit;
- The amplifier valve is a plastic casing containing the main elements that are subject to wear. It is because of them that the operation of the gearbox is disrupted. To be more precise, the gearbox begins to rattle;
- The composition of the valve is as follows: there is a rod on the bushing, adjacent to the buffer and piston. There is also the valve itself on the pusher and return springs with a filter.
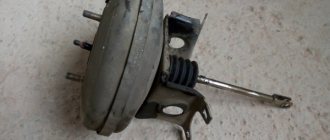
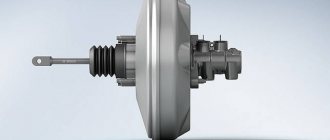
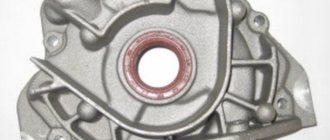
Appearance of the device
Main signs of VU failure
It is quite possible to check the vacuum booster yourself. However, to obtain more reliable data, it is recommended to use the services of specialists or use special diagnostic equipment. In this section we will look at how to determine the performance of the mass absorption mechanism in artisanal conditions. The main sign of a breakdown of this mechanism is the inability to form a vacuum in the working cavity. As a rule, the source of this problem can be damage (breakage, destruction, chafing, etc.) of the elastic pipeline connecting the VU with the motor manifold or depressurization of other segments of the system. The malfunction can also be caused by defects inside the amplifier.
Start the power unit and turn it off after a few minutes. Hold down the gas pedal, then release it and repeat the procedure. During subsequent presses, the pedal stroke should gradually decrease. If there is no difference, this indicates that additional force is not provided in the GTZ, therefore, repair of the amplifier is required.
Signs of a malfunction of the vacuum brake booster of the VAZ 2114
Brake booster malfunctions have several fatal negative consequences:
Significant reduction in vehicle control during braking cycles. In the absence of the amplifier, the load on the gas pedal increases proportionally - the pedal goes hard, and the braking effect is significantly reduced. For an unprepared driver, such behavior of the car can come as a shock and lead to a traffic accident due to the increased braking distance; If the brakes malfunction, a car loses significant braking potential and becomes practically uncontrollable;
The gas pedal is slow. When moving, the pedal is very difficult to press. This is a clear sign of a malfunction of the amplifier housing diaphragm chamber.
In this case, the car must be operated with great care, since it has lost a certain effectiveness of the braking system;
A sign indicating a faulty brake system lights up on the dashboard at short intervals. This symptom may also relate to other malfunctions in the brakes, but in combination with a tight brake pedal it clearly indicates a faulty booster
The electronic unit of the car constantly monitors all systems for operability (and although on the VAZ 2114 model this unit has not been considered modern for a long time with its functions, it copes with its functions at a good functional level and with high efficiency despite the small number of sensors);
Deterioration in the braking performance of the system, along with other signs, indicates a direct involvement of a faulty brake booster in the risk of an accident. This symptom is the main one among all the others; however, operating a car with a very weak brake system is very dangerous - the circuits in this case do not receive additional force and cannot effectively brake.
Troubleshooting most often involves replacing the faulty element with a new unit - this will save repair time, since resuscitation of an old product will require no less time and a slightly lower cost of parts. That is why car enthusiasts most often resort to complete replacement of a failed part.
Replacing the vacuum brake booster of a VAZ 2109 Replacing VUT on a VAZ 2108-2115 yourself Vacuum brake booster of a VAZ 21099 is the cause of air leaks. Part 2
Cost and how to spot a fake
If we talk about the VAZ-2109, a vacuum brake booster costs from 1.2 to 1.5 thousand rubles. You can buy it in any store or online. A VAZ-2110 vacuum brake booster will cost exactly the same. The exception is the yellow “Sport” amplifier. It is sold for 2.3 thousand rubles. We also note that the amplifiers are interchangeable on VAZs. For example, the vacuum seal from the “eight” is ideally installed on the “nine”, 13, 14 and 99 models. The amplifier for the “ten” is also suitable for “Lada” 11th and 12th models. If we talk about manufacturers, Pekar and DAAZ have proven themselves well. The so-called sports amplifier works in the same way as regular factory ones. Therefore, there is no point in overpaying money for it.
When purchasing, it is important to pay attention to the packaging. It should be made of corrugated cardboard. There is always a label on the box that says:
- Item release date.
- Manufacturer's name.
- Batch number.
- Factory article number.
Replacement of VUT VAZ 2114
After diagnostics, you can proceed with replacement. You will need the following set of tools:
- Pliers.
- Keys for “10”, “13”, “17” (open-end, socket heads, sockets).
- Screwdrivers, flat and Phillips.
Pay attention to the condition of the fittings, clamps, and pipes. Replace them if necessary
All do-it-yourself repairs can be carried out at home without any particular difficulties; there is no need to turn to the services of a service station.
Repair stages:
- Remove the rod connecting the VUT and the brake pedal. It is necessary to pry the plate with a knife or flat screwdriver, and then unscrew the bolt.
- Having opened the hood, disconnect the GTZ (brake master cylinder) and the vacuum pump of the VAZ 2114. Usually simple nuts are used for the connection. Further dismantling is carried out either by disconnecting all pipes from the GTZ, or “live”. In the first case, of course, it will be much more convenient, but after repairs it is imperative to bleed the entire system.
- Remove the hose connecting the amplifier to the manifold.
- Using a socket on “13”, unscrew the nuts from the interior that secure the amplifier to the body.
- Remove the amplifier.
That's all, at this point the dismantling process can be considered complete, assembly is carried out in the reverse order. Usually this device is not repaired, but is immediately thrown away. Its price is not very high, and its service life is significant. Therefore, it turns out to be easier (and safer) to install a new VUT.
Repair of auxiliary pumps
As mentioned above, when a mechanical vacuum pump partially fails, some car enthusiasts simply remove their rod, thereby turning them off and eliminating the knocking noise that occurs when the pump operates. In this case, the brake booster will work, but not as effectively, which will result in a harder pedal. Some car enthusiasts get out of the situation by turning the rod 180 degrees. Sometimes this helps because it is only present on one part of them.
As for electric vacuum pumps, these units are usually irreparable; accordingly, they are simply replaced with new ones. Did not find an answer to your question?
The design of the brake system of any car must include a booster. The most widely used in transport is the vacuum type amplifier, which provides additional force due to vacuum.
Signs of VUT malfunction
Partial output of the vacuum brake booster will certainly manifest itself, and from the worst side and quite clearly. So, symptoms of a malfunctioning amplifier include:
- Significant effort when pressing the brake pedal . To feel this for yourself, you can press the pedal four or five times with a known good vacuum seal and the engine turned off. At the last squeeze, the force on the pedal will increase significantly. Sometimes the opposite situation occurs - the pedal is too soft. This indicates “airing” of the brake system.
- The influence of the vacuum booster on engine operation . Since the VUT takes vacuum from the intake manifold, the engine can change its operating mode during braking (although this should not happen in normal mode). This happens because excess air is sucked into the manifold, affecting the composition of the air-fuel mixture.
- The vacuum brake booster hisses . In particular, hissing occurs when the pedal is depressed. A hissing sound clearly indicates the presence of depressurization either in the vacuum amplifier itself (for example, when the diaphragm ruptures), or in its pipeline or in the check valve (for example, when its rubber seals are significantly worn).
- Vacuum pumps knocking . If a mechanical vacuum pump fails, the usual sign of this is a hum emitted by its drive rod (error p1479 may also appear). If an electric vacuum pump is installed on a car, then motorists often experience overheating of its drive motor.
- Knocking noise when braking hard . Moreover, the sound is inertial in nature, since it is caused by the membrane fastening becoming loose.
Accordingly, the occurrence of one or more signs directly indicates to the car owner that it is necessary to check the vacuum brake booster and its components.
Error p1479
In modern cars equipped with an electronic control unit (ECU), an error code p1479 is often generated in the device’s memory - “Brake booster vacuum system mechanical malfunction.” Owners of a wide variety of cars encounter it - Audi, Volkswagen (Touareg, Passat), Ford and others. The cause of an error in the control unit can be very different. For example, when air is sucked in the hose between the intake manifold and the vacuum brake booster itself.
Another common option is the result of measuring the vacuum value with a vacuum sensor. In particular, it occurs if moisture appears inside the vacuum booster and/or its tubes. The solution is to clean and dry the tubes, and in rare cases, replace the sensor itself.
It also makes sense to check the integrity of the fuse going from the control to the sensor. Each machine will have its own electrical circuit, so it is impossible to provide specific information within the framework of this material.
Another option is the performance of the electric vacuum pump. In particular, its electric motor, impeller, bearings, fastenings, connection blocks, as well as relays and fuses.
Removal of VUT
- To access the VUT fasteners, you need to dismantle the engine filter housing. To dismantle, unscrew the two bolts securing the housing at the front, also loosen the clamp securing the pipe and remove the connector from the mass air flow sensor. Turn the front bolts by hand and loosen the clamp with a Phillips screwdriver.
Release the clamp securing the adsorber and move it to the side without disconnecting the hoses. It is convenient to loosen the clamp with an open-end wrench by ten.
Unscrew the 2 nuts securing the brake cylinder and, together with the expansion tank, move it to the side. It is convenient to unscrew the nuts with a thirteen wrench.
Remove the pipe from the check valve fitting. Unscrew the four nuts securing the amplifier from the body. It is convenient to unscrew the nuts using a wrench with an extension and a cardan. Thirteen head nuts.
Remove the spring pin retainer that secures the brake booster rod to the pedal.
Remove the pin and disconnect the rod from the brake pedal. Remove the VUT by pulling it towards you from its seat.
Unscrew the two nuts of the bracket that secures the amplifier to the body.
Troubleshooting methods
What signs may indicate that the unit requires replacement?
- When applying the same force, the braking process becomes more difficult.
- When you apply pressure to the brake pedal, the speed begins to drop.
- The engine is adjusting.
- The appearance of hissing noises when the brake is pressed while driving. In this case, it is possible to increase engine speed.
- Inadequate operation of the brake pedal.
- Increased fuel consumption.
The results of a simple inspection will tell you whether the device needs to be replaced.
- Method No. 1. With the engine off, vigorously pump the brake pedal to the floor 4-5 times. Detection of creaking or hissing or other extraneous noise during these manipulations indicates that there are serious malfunctions. After this, holding the pedal in the lowest position, turn on the engine. A vacuum will begin to create in the VUT chamber. The pedal should move on its own. If this does not happen, then the breakdown is serious and repair is inevitable.
- Method No. 2. Let the car idle for 3-6 minutes. Silence it. Fully press the pedal (creating a vacuum in the chamber of the device) and release. Repeat again. If the stroke of the lever changes with each subsequent press, it means that creating a vacuum is difficult. Therefore, replacement of the problematic device is required.
- Method No. 3. Start the engine and squeeze the brake lever all the way. Turn off the engine and release the pedal. If it doesn’t move within half a minute, then everything is fine. The opposite result is a signal of a malfunction.
Sometimes deviations appear due to a broken fastening, flange failure, or mechanical damage to the vacuum hose. Therefore, in order not to complicate the situation, the inspection should begin by checking these positions.
Changing a unit yourself is not difficult if you have at least some mechanical skill and understanding of the design of the car. To replace it yourself, you will need the vacuum unit itself, some tools and parts.
About malfunctions
The main factor in the malfunction of the “vacuum unit” is the inability to create a vacuum in the chamber. It may not be fully produced or may be completely absent from the system. Often the source of the problem is the loss of tightness of the hose that connects the engine to the amplifier.
But breakdowns are also possible due to loss of elasticity of the valve or damage to the working surface of the diaphragm. In any case, before replacing the vacuum brake booster, it needs to be checked. You can do this yourself.
Vacuum booster replacement process
In order to change the VUT, it is not necessary to unscrew the brake pipes leading to the brake fluid reservoir. Everything can be made much simpler.
- Step 1: Release the brake pedal; to do this, remove the small cotter pin at the top of the pedal;
- Step 2. Remove the barrel of brake fluid. First, disconnect the terminal located at the very top of the tank, and then unscrew the nuts that secure the tank to the vacuum booster;
- Step 3: You can start removing the vacuum seal itself. And this can be done in two ways: either unscrew the VUT itself from the bracket on which it is attached, or unscrew it together with the bracket, which is already secured to the body with 13 nuts. Here you can choose whichever is more convenient for you. The VUT is secured to the bracket with 17 nuts;
- Step 4: Disconnect the hose from the VUT, which comes from the intake manifold.
After dismantling, you can begin installing a new amplifier. If you unscrewed the old VUT together with the bracket, then move the bracket from the old to the new one and install everything in place in the reverse order.
https://www.youtube.com/watch?v=LmlbgzQtwNs
Diagnostics of VUT
If the vacuum reservoir is faulty, the brake pedal becomes harder and braking becomes less effective. Also, VUT malfunctions can affect engine speed, especially in idle mode. When you touch the pedal, the speed may drop or rise.
It is worth noting that the vacuum reservoir is one of the most reliable parts in the brake system. The average resource is approximately 100-150 thousand kilometers.
Let us note the three simplest methods of self-diagnosis:
- We press the pedal 5-6 times and while pressing the pedal we start the power unit. When the VUT is working, the pedal should fall 2-3 cm and remain in this position. If it goes to the floor, the amplifier needs to be replaced.
- We start the engine and let it run for 1-2 minutes. We turn off the engine and press the pedal three times. If after the third press the pedal is soft, it means that the vacuum reservoir is not working properly and is sucking in air.
- With the engine running, press the pedal and hold it. We turn off the engine and do not take our foot off the pedal. Further, if the pedal does not move up within one minute, it means that the VUT is operational. If the pedal starts to press on your foot, it means it is sucking in air. Also, when the engine is running, you may hear a hiss of air when you press the pedal.
How to check VUT VAZ 2115 for faults?
Inspecting the unit does not require absolutely any tools; it is enough to pay attention to the behavior of the brake pedal when it is pressed. If one day the driver discovers that to stop he needs to press harder on the pedal, then this indicates the need to check the VUT
The procedure is performed as follows:
- Turn off the engine.
- Press the brake pedal several times and lock it in the middle of its stroke.
- Without removing your feet from the pedal, start the car.
If the “vacuum seal” is working properly, the pedal will fall a little, but if this is not the case, then there are some problems with the brake system. As an additional measure when identifying a breakdown, a visual inspection is used, consisting of the following points:
- Check the tightness of the connection between the check valve and the pipe.
- Check the flange for damage.
- Inspect all bends in the pipes and replace them if cracks are found.
- Remove the carpet in the cab on the driver's side and check the protective cap of the shank seal under the steering column; if it sticks, the car may brake spontaneously.
- Remove the protective cap and start the engine, then pump the valve shank several times - the presence of a characteristic hissing indicates a breakdown of the part.
Internal breakdowns of the unit are also possible. Quite often there is a malfunction of the valve, the material of which hardens. Wear of the rubber of the diaphragm can lead to its rupture, then replacing the vacuum brake booster will be the only way out of the situation.
The functionality of the check valve is checked in the following way:
- disconnect the hose from the valve;
- remove the pipe from the VUT rubber seal;
- place the nose of a rubber bulb into the hole in the fitting;
- squeeze the bulb and release it after 4-5 seconds; if the bulb remains compressed, then the valve is working.
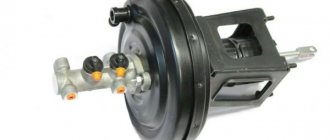
Vacuum brake booster device
KamAZ GTK for cab
Structurally, the vacuum brake booster is combined with the GTZ into one unit. For a person with developed intelligence, the scheme of action of the element in question will not present any difficulties. The body is divided into two parts, with the atmospheric part located on the side of the brake pedal, and the vacuum part on the side of the main brake cylinder.
Using a check valve, the vacuum chamber is connected to the intake manifold, which in turn is a source of vacuum. An electric vacuum pump is often used on diesel engines to ensure constant operation of the vacuum booster.
When the engine stops, the vacuum booster is disconnected from the manifold by the action of the check valve, which is why the vacuum brake booster is only able to operate when the engine is active. In the event of a malfunction or failure of the element in question, a similar disconnection occurs.
Due to the follower valve, the atmospheric chamber in its initial position is connected to the vacuum chamber and to the atmosphere when the brake pedal is activated. A pusher is connected to the brake pedal; due to it, the follower valve moves. A diaphragm is connected to the GTZ rod from the side of the vacuum chamber; it facilitates the pumping of brake fluid through the piston to the working cylinders.
Due to the return spring, the diaphragm moves to its original position at the end of braking. The amplifier design may also have an electromagnetic rod drive. The active brake booster is used in the ESP system and its main purpose is to prevent rollovers.
In general, the operation of a vacuum brake booster is based on the pressure difference in the atmospheric and vacuum chambers. It is due to this difference that the pusher is activated and promotes the movement of the GTZ piston rod.
Malfunctions of the vacuum brake booster.
The first thing worth emphasizing is that malfunctions of the unit in question cannot contribute to the complete deactivation of the braking system. As a result, driving the car becomes more difficult and the driver is forced to put more effort into pressing the brake pedal. Traditional faults include the following:
Traditional faults include the following:
- There is a malfunction inside the vacuum booster itself, for example, aging valve rubber or diaphragm rupture. In this case, the valve will begin to leak air.
- A break or depressurization of the hose connecting the engine manifold to the vacuum brake booster. In this case, you will be able to hear the hissing of the element in question. Be sure to check the tightness of the clamps and the hose itself for breaks or cracks.
How to check the vacuum brake booster?
If the engine starts to stall, diagnose the serviceability of the vacuum booster. Depressurization is often accompanied by air suction into the intake manifold pipe; therefore, the air-fuel system that enters the engine cylinder becomes sharply leaner. As a second diagnostic option, make about five strokes using the brake pedal with the engine not running. Then, in the middle of the stroke, lock the pedal and start the engine. If the pedal falls during startup, the vacuum booster is functioning
If it remains motionless, then it is necessary to replace or repair the vacuum brake booster
During a visual inspection, it is strongly recommended to pay attention to the presence of smudges that may appear on the vacuum booster housing. The vacuum brake booster must be adjusted periodically
For repair or replacement, it is necessary to prepare a standard set of tools or a corresponding kit.
Step-by-step repair procedure:
- Study the car's manual and determine the key design nuances of the vacuum booster.
- Disconnect the drive rod of the element in question from the brake pedal, which is located under the steering shaft.
- Remove the GTZ in the engine compartment.
- Depending on the malfunction, replace or repair this unit.
How to replace the vacuum booster on a VAZ 2115
The VAZ 2115 vacuum brake booster is one of the main operating mechanisms of the vehicle’s braking system. The effectiveness of braking, and therefore your safety, largely depends on its serviceability. Therefore, the vacuum brake booster must be checked regularly to detect malfunctions or malfunctions in a timely manner.
Checking the vacuum brake booster of VAZ 2115
In order to check the vacuum brake booster, you don’t need any tools, just pay attention to the brake pedal. If you once find that in order to brake you need to press harder on the brake pedal or that the brakes have become less effective, this is a clear sign of a faulty VUT.
1. To check the vacuum booster, stop the car and turn off the engine.
2. Press the brake pedal firmly a couple of times, then stop it mid-stroke.
3. Next, without taking your foot off the brake pedal, start the car.
If the vacuum brake booster is working properly, the brake pedal will fall down a little, but if this does not happen, there is something wrong with the booster or the brake system.
Visual inspection of the VAZ 2115 vacuum booster
1. Check the tightness of the connection between the pipe and the check valve;
2. Check that the flange is not damaged;
3. Next, inspect all bends of the pipes; if you find cracks or wet marks, replace them immediately;
4. If the shank seal, which is located under the steering column, is damaged, the car may begin to brake spontaneously. To check this, take out the mat and carefully inspect the protective cap; if it sticks, it can be assumed that it is faulty.
5. Next you need to remove the cap and start the engine. Rock the valve stem a couple of times; hissing is a sure sign of failure.
6. If you find the slightest hint of a malfunction, replace the vacuum brake booster of the VAZ 2115, given its low cost and simplicity of the replacement procedure, this will be better than hoping for serviceability and risking your own health.
How to replace?
For this process you will need the following tools:
- Simple screwdriver
- Pliers
- Spanners 13, 17
- Specific wrench for unscrewing brake pipes
- It’s worth buying new fittings and plugs
The question of how to change the vacuum booster on a VAZ 2114 is a very common one. If the perception of the text is not accurate enough for you, you can always rely on our article.
Step by step process:
The brake cylinder will interfere with removing the booster. Therefore, you can first remove it, or simply disconnect the tube fittings from it and move it to the side. It's whatever your heart desires. But the cylinder is not the main obstacle. Unscrewing the amplifier fasteners is, in principle, not an easy task, or rather inconvenient. We start with the valve: remove the hose mount, pull out the support sleeve and pull out the brake pin. Then we take the key to 13 and begin to unscrew the 4 fastenings of the amplifier. Having endured troubles and inconveniences, we are preparing to install a new one in its original place. But first, you need to install a special mounting frame on the purchased amp. We wake it up with a 17 key
and only then put the car inside. The assembly sequence is simple, but an important point from the point of view of convenience is the primary action of connecting the brake (pedal) and the amplifier (all this with just a finger). And then attach the entire unit to the fourteenth.
As a recommendation, you can take the following information: when replacing the brake booster, you need to change the vacuum hose. It also does not last forever, and its wear and tear can have a bad effect on the quality of the new amplifier.
How to check engine air leaks
Finding air leaks will be difficult if you don’t have a special device at hand to show leaks. One of these devices is called a smoke generator; it makes diagnostics much easier and is not that expensive.
Previously, air leaks were determined by eye. We spilled liquid on the intake manifold while the engine was running and looked for bubbles. If you have extensive experience working with a given brand of car, then you can use this method. The downside is that while the engine is running, liquid spilled on the collector will also bubble due to temperature and you can make a mistake. If at this moment the internal combustion engine is shaking, the situation becomes more complicated. If there is a slight loss of tightness, this test option may not help.
You can check the air leaks on the carburetor by covering the top with your hand or a rag, having first removed the housing with the filter. If the engine stalls, there are no leaks. If it continues to work, then there is an air leak and it needs to be eliminated. As a rule, on the carburetor, a lower plate leads along the plane, which is tightened with the manifold. It can be sanded or replaced with a new one. This procedure is sufficient to determine whether the carburetor is leaking.
Let's return to modern cars, where checking air leaks can take a long time and detecting a leak is not easy. The basic principle of detecting air leaks in the engine is to inject smoke into the intake manifold, which will come out where there is a crack, a loose pin or a torn rubber band. Checking an internal combustion engine with a smoke generator takes some time and takes place in several stages:
- Finding the inlet fitting or any other location on the intake manifold. This is necessary to connect the device itself and supply smoke. It can be difficult to find such an input and you have to use the vacuum booster channel on the intake manifold. With this connection, it is impossible to determine the air leakage from the shaft.
- Next, you need to fill the smoke generator with engine oil. The operating principle is based on heating the oil with a diesel glow plug. You can use any motor oil you have on hand. The main thing is not to overheat the candle, constantly turn the power on and off, or install a pulsed source.
- The standard design of the smoke generator involves supplying air to build up pressure through a compressor. You can use an electric pump from a car, or any other that creates a pressure of at least 1 atm.
- Plug the inlet pipe between the throttle body and the air filter. You can use the housing from an old mass air flow sensor. Fill it with polyurethane foam and you will get an excellent plug.
- Having completed all the preparatory procedures, turn on the device. After smoke under pressure fills the receiver and intake manifold, an air leak will immediately appear. It is advisable to use a flashlight to better see the smoke coming out and the location of the leak.
Thus, it is easy to check air leaks with a smoke generator. This is a very important and convenient procedure for troubleshooting the engine. Many diagnosticians ask questions about fuel correction when air leaks occur. This is one of the general indicators on the scanner and can indicate not only a leak, but also low compression and shifted valve timing.
There are other ways to check for air leaks with smoke. One of them is using a cigarette. There is even a special tool for this. It is a pistol for a compressor with an internal clip into which a cigarette fits. When you press the trigger of the pneumatic pistol, the cigarette lights up and emits copious smoke. The disadvantage of this method is that it burns out very quickly and there may not be enough time to catch air leaks in the engine and injector. But this option of checking air leaks with a cigarette also has its place.
You can determine air leaks in any engine using the old-fashioned method, by spilling liquid on the intake manifold and the injector area. Or the option with a cigarette, but all these methods are not accurate and not convenient.
The smoke machine itself costs a lot of money. Therefore, if your internal combustion engine shakes or the speed fluctuates, go to a service center that has a smoke generator. They will definitely help you identify the cause without extra costs.
How to check the vacuum booster?
The first cause for concern will be tight pedal pressure and poor brake performance. At idle, when you press the brake pedal, does the engine speed drop or increase? Most likely, the fault lies in the VUT. There are several ways for self-diagnosis:
- It is necessary to turn off the engine, start pressing the brake pedal (5-6 times), then fix it in the pressed state. We start the engine and at this moment the pedal should go down 2-3 cm and remain in that position. If it goes to the floor, then the vacuum seal is faulty.
- The engine should run for 2-3 minutes after starting. Then turn off the car and press the brake 3 times. If the pedal is soft on the 3rd press, then the VUT is faulty and there is an air leak somewhere.
- With the engine running, press the brake pedal all the way and hold it. After turning off the engine, keep it for about 1 more minute; if the pedal does not begin to press on your foot in an attempt to rise up, then the VUT is operational. Also, when pressed there should be no hissing sounds of air.
When you have carried out diagnostics and discovered one of the listed reasons, it is better to immediately engage in repairs. At some point, due to a malfunction, you may have too tight a brake or lose it completely, and you won't be able to maneuver quickly when you need to. Thus, you can create an emergency situation or harm someone.
Causes of failure
So:
Note. It is important to remember that when this mechanism exits normal operation, the brakes continue to do their job. This is one of the advantages of such a system. In such a situation, the driver of the VAZ 2115 will simply have to apply a little more force to the brake pedal. On the other hand, there may be some difficulties with the controls, but they are minor.
- One of the reasons for element failure may be a rupture of the hose or even a crack in it. As you know, this same hose plays a very important role, connecting the power unit manifold and the amplifier. If a hose ruptures or other problems associated with it, the entire system depressurizes.
Checking the VU hose
Advice. To be able to determine that this is depressurization is not difficult. The characteristic hissing sound is evidence of this. The vacuum amplifier tends to hiss in this case.
- Depressurization is eliminated in the following way: the hose is inspected, breaks and cracks are wrapped, clamps are carefully checked, which can also be relaxed.
- Another reason for the failure of this mechanism is the rupture of the diaphragm located directly inside the mechanism. If air begins to escape from the valve, then this is a symptom.
Checking the operation of the amplifier
To check the functionality of this element, it is recommended to do the following:
- Press the brake pedal several times (5-6) when the car is not yet started. Thus, by pressing the brakes, we create the same pressure in both cavities, close to atmospheric.
- Hold the pedal with your foot and start the engine. If the vacuum booster is working properly, the pedal should move forward randomly.
- If the pedal does not go forward automatically, then you need to check the fastening of the hose tip, as well as other points that negatively affect the efficiency of the amplifier.
- If nothing helps, then the vacuum booster is damaged and needs to be replaced.
Vacuum booster cost
In a situation with instability of the dollar exchange rate, it is best to find out all prices in specialized stores. To make it easier for you to navigate, we note that the minimum cost of VUT starts from 2,000 rubles and above. Accordingly, the higher quality the part, the more expensive it will cost.
If you install the amplifier at a service station, then get ready to shell out an additional thousand rubles.
The frequency of replacing a part usually depends on the quality of the roads, driving style and general wear and tear of parts in the car. To prevent unexpected breakdowns, diagnose your vehicle in a timely manner and, if necessary, carry out repair work.
To summarize the article, we note that you now know how to replace the vacuum booster on your VAZ-2114, as well as how to diagnose a system malfunction. How to carry out the replacement, yourself or at a service station - this is your choice.
How to determine the malfunction and replace the vacuum booster. Do it yourself!
Checking the vacuum brake booster of VAZ 2114
1
.
Press the brake to the floor 4-5 times with the engine not running. This will create uniform pressure in the two parts of the amplifier. When you press the brake, the valve will immediately show itself: if it squeaks, then you need to seriously think about it. 2
.
After the pressure has become uniform, start the fourteenth. But at the same time you need to keep the brake to the floor. If everything is in order with the brake booster system, the pedal will rise after the engine starts. If this does not happen, then repair is definitely required. 3
. In the event that you realize that there is a problem with the amplifier, you need to look to be sure how the hose is secured and what condition the flange is in. If the fastenings at any point do not correspond to the norm, this may affect the fact that the pedal does not lift, and in fact the fault will be on a separate incorrect fastening, and not on the entire system as a whole.
Checking the serviceability of the amplifier
In this section we will tell you how to check the performance of the vacuum brake booster on a VAZ-2114. All of the recommendations given can be used when checking the unit, both on the thirteenth and fifteenth car models.
To check, follow these steps:
- Press the brake pedal all the way about 5 times with the engine off. This action will create uniform pressure in both components of the VUT. When the brake is pressed, the valve will immediately release itself. If you notice a squeak, this is a clear signal that the part needs to be replaced.
- As soon as the pressure is uniform, you need to start the car while holding the brake pedal to the floor. If everything is fine with the unit, the pedal will rise after starting the internal combustion engine. Otherwise, repairs will need to be made to replace the device.
- When you have already realized that the part needs to be replaced, you need to additionally check how well the hose is fixed, as well as the condition of the flange. If these elements are in a condition that does not meet the standard, this may affect the performance of the amplifier. Accordingly, in this case, you may need to tighten the fastenings and the problem will solve itself.
We recommend: Instructions for reupholstering car seats with your own hands
Functionality check
This instruction will be relevant when checking the vacuum booster on VAZ models from 2113 to 2115. So the technique is clearly universal.
- Press the brake pedal all the way to the floor about 4-5 times. In this case, the engine should not be started. Due to these presses, you will create equal pressure in two sections of your vacuum booster. The valve will report problems as soon as you start pressing the pedal. If you hear squeaks while pressing, this indicates a serious malfunction.
- Once the pressure is even, start the engine while keeping the brake pedal to the floor. If the brake booster system is working properly, then the pedal will rise by itself after the engine is started. If this does not happen, then you will definitely have to face repair work.
- If the check shows problems with the amplifier, do not forget to additionally check the quality of the hose fastening and the condition of the flange. When the mount is abnormal, this may result in the brake pedal not lifting.
Article on the topic: Installing and adjusting headlight hydraulic adjustment on a VAZ 2114: instructions for beginners
Sometimes poorly fixed fasteners cause quite expensive and actually unnecessary repairs or replacement of the vacuum booster. Conduct a preliminary check so as not to complicate your life.
When to change the amplifier
Brakes are a whole system that consists of many elements. Each of them must function correctly and efficiently.
In addition to checking the vacuum booster itself, you should inspect the condition of the brake fluid pipes, make sure there are no brake fluid leaks, and look at the current condition of the brake pedal.
If no faults were found in the braking system, you can think in more detail about the issue of replacing the vacuum booster.
There is no point in repairing the element. It's easier to start replacing right away. The functionality of the car and the power that your engine is capable of producing depend on the quality and timeliness of the work performed. Lack of power negatively affects the speed and comfort of movement around the city and beyond.
How does he work
Before you begin to repair or replace a particular component or unit, you need to understand how it functions.
The vacuum booster works as follows:
- The driver presses the brake pedal all the way to the floor;
- At the same time, the piston and pusher move, opening the space between the two sections of the device;
- After this, a vacuum section moves into the formed space and takes all the air;
- The air presses on the damper between the parts of the amplifier, which causes a pressure difference in the two parts;
- The pressure difference causes the stem and valve to move;
- When the pedal is lowered, all elements return to their places, the system turns off.
A decision regarding repair or replacement of the vacuum booster can only be made on the basis of the inspection performed. It is quite possible to inspect the device yourself.