According to the installation method, modern car radios come in two types: built-in and stationary.
- Built-in car radios are usually equipped with a removable front panel or a special curtain - the devices are simple, but effectively protect the radio from theft.
- Stationary car radios are usually installed by car manufacturers on the assembly line. Their original shape and non-standard sizes save them from theft.
When installing a car radio with your own hands, you need to consider the following features.
Firstly , you need to connect the radio only in accordance with the instructions. Failure to comply with this rule may lead to its failure or even fire. In this case, you should not use installation instructions for other car radios, since even the same manufacturer may have different plugs and wire markings depending on the model.
Installing a radio on a VAZ 2114
You need to know the following if your car is under warranty and you decide to install a radio on it. Then you need to install only radios that have a certificate of conformity. Installation should only be carried out at authorized service centers. And upon completion of the installation, you must make an entry in the “Special Notes” section of your car’s service book. If your car is no longer under warranty, then you can proceed with the installation yourself.
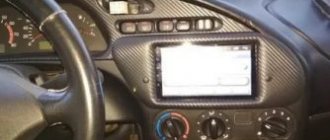
And so we decided to install a 2-din radio tape recorder on a VAZ 2114 car. First, we need to cut out the required hole for the radio tape recorder in the so-called “torpedo”. We need to know that when installing the radio, we will need to move the stove control devices to the place of the radio. And so we cut out the required hole; you can cut it either with an angle grinder using a machine or with a jigsaw. If your hand trembles during the cutting process, then the defects can be corrected by painting, or by soldering plastic to the necessary places.
Installation and connection of front and rear PTFs on VAZ 2113, 2114, 2115
Before you begin installing fog lights, you will need to select a certain list of tools and additional elements. You can purchase a ready-made connection kit or select the necessary spare parts separately. When everything is prepared, you can mark on the front bumper a place for installing future headlights. The VAZ 2115 comes with standard holes from the factory, but in the case of the VAZ 2113 and VAZ 2114 you will need to work with a tool (a jigsaw or a drill). If you don’t want to damage the bumper, you can install the lighting fixtures on special brackets.
To install foglights in the front bumper, you need to make holes using a jigsaw or drill with drill bits, having previously completed the markings
Installation Tools
- file;
- drill and drill bits;
- electric jigsaw;
- roulette;
- marker.
Installation materials
As a rule, the kit for installing PTF on VAZ 2113, 2114, 2115 includes the following elements:
- headlights with bulbs;
- set of wires;
- electromagnetic relay;
- PTF power button;
- ties and clips for fixing wires;
- PTF connection diagram VAZ 2113, 2114, 2115.
Product delivery options
Note! Below are the shipping methods available specifically for this product. Payment options may vary depending on the shipping method. Detailed information can be found on the “Delivery and Payment” page.
Parcel by Russian Post
Available payment methods:
- Cash on delivery (payment upon receipt)
- Using cards Sberbank, VTB, Post Bank, Tinkoff
- Yandex money
- QIWI
- ROBOKASSA
Shipping throughout Russia. Delivery time is from 5 to 12 days.
Parcel by Russian Post 1st class
Available payment methods:
- Cash on delivery (payment upon receipt)
- Using cards Sberbank, VTB, Post Bank, Tinkoff
- Yandex money
- QIWI
- ROBOKASSA
Shipping throughout Russia. Delivery time is from 2 to 5 days. More expensive than regular delivery by Russian Post, approximately 50%. Parcel weight up to 2.5 kg
Express Parcel EMS
Available payment methods:
- Cash on delivery (payment upon receipt)
- Using cards Sberbank, VTB, Post Bank, Tinkoff
- Yandex money
- QIWI
- ROBOKASSA
Shipping throughout Russia. Delivery time is from 3 to 7 days. More expensive than regular delivery by Russian Post, approximately 100%.
Transport companies
Available payment methods:
- Using cards Sberbank, VTB, Post Bank, Tinkoff
- Yandex money
- QIWI
- ROBOKASSA
Delivery is possible to any locality where there is a representative office of the transport company. Delivery time is from 2 to 10 days. Sending large parcels is approximately 50% more profitable than by Russian Post.
Pickup from our warehouse
Available payment methods:
- Cash upon receipt
- Credit, installments
- Using cards Sberbank, VTB, Post Bank, Tinkoff
- Yandex money
- QIWI
- ROBOKASSA
Pickup times must coincide with store opening hours.
Tuning the interior of a VAZ 2115 with your own hands, internal tuning of a VAZ 2114, tips for improving the interior of a VAZ 2113, VAZ 2115, VAZ 2114. Tuning is an improvement in factory characteristics. Despite the fact that Lada Samara 2 cars are successful, these cars still have shortcomings, so car owners very often resort to tuning vases with their own hands. In our sections you can get acquainted with some improvements on your own. All materials are divided into categories and contain detailed instructions for modifying the main components of the VAZ 2115 car: engine tuning, body tuning, interior tuning, gearbox tuning, suspension and brake tuning, and you will also find sections on VAZ tuning with photos. Welcome to the VAZ 2113 tuning and modification sections.
There is a wide selection of audio head units available for sale. All of them are equipped with a radio receiver and differ from each other in the type of audio signal media used (compact cassette or CD), as well as the ability to connect additional sound-reproducing equipment (external amplifiers, filters, CD changers, etc.) and the characteristics of their own amplifier Materials on choosing a head unit and speaker systems can be found in the “Behind the Wheel” magazines. We will limit ourselves to describing how to install the simplest sound reproduction system. This approach is justified by the fact that if you decide to install an audio system yourself, then it is better to go from simple to complex and, accordingly, more expensive equipment, which, in turn, requires higher qualifications for a successful and high-quality installation. In addition, due to subjective characteristics, each person perceives and evaluates the quality of the sound reproduced by the system differently, and there is a possibility that you will not feel the difference between the sound of an expensive and a complex and inexpensive, but high-quality audio system. In this case, it is illogical to pay extra money for something that cannot be used. It is better to spend free funds on something more significant. So, our audio system will consist of a head unit (a CD player with a radio, also called a CD receiver) and four speakers. All system components will be installed in the locations specified by the vehicle manufacturer. Here we should make a small digression and remember the warranty conditions of the car manufacturer. This is important to consider if your car is new and the warranty has not yet expired. Firstly, products that have a certificate of conformity issued by Gosstandart of Russia or other authorized Russian bodies are allowed for installation. The question about the availability of a certificate must be asked to the seller of the product. Usually, if the equipment is certified, then there is a corresponding mention in its documentation. In addition, the Gosstandart logo is present on the product itself (including imported ones). Secondly, the installation of any additional electrical equipment must be carried out by personnel of specialized enterprises that have a certificate confirming the right to perform this type of work. Thirdly, after installing the equipment, a record of the work must be made in the vehicle’s service book in the “Special Notes” section, as well as the signature of the person in charge and the stamp or seal of the company that performed the work. At the same time, the service book also indicates the date of completion of the work and the certificate number. In addition, the installation and connection of the equipment must comply with the requirements of both the manufacturer of the equipment being installed and the vehicle manufacturer. All these conditions for a car with a guarantee must be met, since otherwise the obligations of the car manufacturer will be considered prematurely terminated. If the warranty period has expired, you can get down to business after adequately assessing your technical abilities. Since incorrect installation may result in electrical equipment failures and, in some cases, a fire (due to a short circuit), subsequently you will only have yourself to blame for what happened.
The power supply wires indicate the purpose of each wire. Yellow - constant +12 V power supply Blue - power supply to the antenna Orange - radio backlight control Black - ground Red - +12 V power supply when the ignition is turned on We install a head unit on the car, the delivery package of which includes: a CD player with a radio receiver (hereinafter referred to as the player), a slide for its installation, a removable panel and a panel covering that performs a decorative function (closes the gap between the device and the instrument panel console).
To connect the player to the car wiring, we use special connectors. The block for connecting the speakers is 8-pin. There are two plugs for each speaker - so we can connect four speakers: two in the front (in the doors) and two in the back (in the rear parcel shelf). The turntable's power supply in our case has five plugs (the maximum number is eight). The number of plugs may vary depending on the design features of the head unit. The connectors for connecting speakers and power are standard; the purpose of each plug is specified for them. As a rule, the delivery package of the head unit includes both blocks with short connecting wires. When connecting the head unit wires, we use special connectors. When using such connectors, there is no need for soldering or the use of special tools for installing lugs. The connector is designed to connect an additional wire to the existing one in the vehicle wiring (insertion into the electrical circuit). The connector has two channels. The wire from the factory wiring harness is laid in the through hole, and the additional one is inserted into the blind hole. The contact part of the connector has two slots for clamping the current-carrying wires.
We find the place of insertion into the standard wiring according to the electrical connection diagram of the car.
This is what an insert into standard wiring using a connector looks like. The connector allows you to connect one additional wire to one wire of the car wiring. The connection diagram for the audio system head unit is given in the installation manual. After inserting into the car wiring, we check the presence of +12 V voltage and ground at the corresponding contacts of the block. To do this, we use the simplest probe: a car light bulb with an operating voltage of 12 V with two wires connected to it.
We combine the wires of the blocks for connecting the player into a bundle using insulating tape.
It is also advisable to connect the wire blocks for connecting the amplifier that were not used during installation with insulating tape. We lay the resulting harness in such a way that the terminals for connecting the player can be pulled out of the compartment in the instrument panel console without excessive tension on the wires.
We pass the wire harness for connecting the player and the antenna cable through the slide and insert the slide into the socket of the instrument panel console. The slides must be installed without distortion. The outer flange of the slide should be adjacent to the edges of the player socket trim in the instrument panel console along the entire perimeter.
Use a screwdriver to bend the mounting brackets of the slide and make sure that the slide is securely fixed. Before installing the player, we once again check with a probe the presence of +12 V and ground on the corresponding contacts of the power supply.
Connect the antenna cable to the player.
Connect the wiring harness to the player. For ease of connection, the wiring harnesses of the speakers and the player's power supply are connected to each other.
We insert the player into the socket of the instrument panel console. To remove the player from the slide, the installation kit contains two pullers. The pullers are inserted from the right and left into the gaps between the walls of the player and the slide. To remove the player, simply pull the pullers towards you.
Installing the player panel trim.
Installing the player panel and...
...checking the functionality of the system.
It is better to protect the connection points of the player's wires with insulating tape that differs in color from other connections, for example, blue (see Security alarm).
Some tips
I recommend taking advantage of the opportunity while everything is sorted and carrying out some simple procedures to improve quality. These tips may seem trivial to you, but they will help extend the life of the new audio system for an extra year or two. First, tin the wires and solder them.
This procedure will prevent the sound from losing quality even during prolonged use. Use female/male connectors. This method will be more effective and easier than soldering. Use heat shrink tubing. They will help maintain the quality of wire connections and extend the time it takes to resolder.
How to check the ignition switch of a VAZ 2114
There are several ways to determine the source of the problem:
First you need to check the car's reaction to different positions of the key in the lock. To begin with, the key must be set to position number one, which is also the ignition. If the module is in order, all the car's electrics should work. However, in the case when all or part of the electrical system does not work, we can conclude that the lock is damaged.
In position number two of the key, the engine starts, for which the starter is turned on. If, when you turn the key, you do not hear the sounds of the starter operating (rotation), as well as the sound of the relay clicking, then either the ignition switch or the starter itself is broken. In this case, you need to run a diagnostic to get other details about the problem. In this case, you will need a multimeter set to ohmmeter mode. Also, before removing or installing the lock, you need to remove the steering column cover.
Pinout of the ignition switch VAZ-2114:
- +12V comes for the inserted key sensor microswitch;
- the mass comes when the driver's door is open;
- +12V goes to the starter (pin 50);
- +12V goes out after turning on the ignition (pin 15);
- +12V goes out when the key is inserted to pin 5 of the BSK;
- comes +12V to illuminate the lock cylinder;
- +12V comes from the battery (pin 30);
- not used.
- The first thing to do is disconnect the ignition switch power connector.
- After this, connect the multimeter to wires four and seven, and then do the same with wires fifteen and thirty, respectively.
- Turn the key in the lock to position number one. If during testing the node is not damaged, the multimeter should show a zero resistance value.
- Next you need to turn the key to position number two. The resistance on the multimeter screen, as in the case described above, should have a zero value.
In a situation where, after checking the lock with a multimeter, the resistance value in at least one of the cases was not equal to zero, it needs to be replaced. Otherwise, the lock is working properly and other components of the car should be checked for malfunctions.
How to connect and install
It is recommended to install and configure any musical device on the VAZ-2114 in accordance with generally accepted rules. Only in this case will the equipment work efficiently and perform all its functions.
Are you a car driver?! Then you can take this simple test and find out. Go to test »
Connection
To connect a radio to a VAZ-2114, just familiarize yourself with the procedure provided for any similar model (2115, 2109). The only difference will be in the location of one or another wire.
Connect the radio using this method:
- Connect the musical equipment connector to the positive and negative poles of the power source (battery). In this case, the cigarette lighter plug can be used for switching.
- Remove the cables from the speakers and connect them to the corresponding outputs on the device plug.
- As soon as the wiring is connected, all potentially dangerous places are isolated using special tape. You can additionally protect the cable from accidental contact and the negative effects of moisture by using a corrugated tube.
- An antenna is installed on the inside of the windshield or roof of the vehicle.
- The cable running from it to the dashboard is laid under various parts of the car's interior trim.
- The wire is connected to the radio directly or through an adapter.
Replacing the ignition switch of a VAZ 2114
Although replacing the ignition switch of a VAZ 2114 is an important and time-consuming procedure, nevertheless, any driver can carry it out independently, without contacting a car service center. This procedure is useful not only from a budget point of view, but can also be exciting for some car enthusiasts and be of some “sporting” interest. This unit, which is a kind of “switch” of the car, plays a very important role in the starting system of the car. It takes part in the operation of a variety of electrical circuits, such as the starter, headlights, turn signals, and window lifts. As a result, its failure leads to the fact that the car becomes impossible to drive. Let's consider what to do if this trouble does occur.
Possibility of installing 2 din in VAZ-2114
The radio for 2114 is an excellent solution for improving the comfort of the car. In this case, it is best to entrust the installation of the device to professionals. Doing this yourself is recommended only for those who have certain skills and knowledge in this area.
The main advantages of installing a 2 din radio in a VAZ 2114 include:
- ability to connect to the Internet;
- possibility of data transmission via bluetooth channel;
- the ability to use GPS functions;
- possibility of installing a rear view camera, TV tuner and DVR;
- more functions of the standard radio.
The 2 din radio is easily installed in the VAZ-2114. To do this, it is enough to have the most minimal skills and knowledge. But if necessary, you can turn to professionals for help.
Features of Chinese radios
In general, there is absolutely nothing wrong with a Chinese radio. This can be explained very simply.
Almost all car radios can be considered Chinese. Why? Everything is elementary. Leading manufacturers, including Japanese, European and American brands, prefer to carry out assembly in China. This is due to financial gain. Collecting everything in China, including radios, is very cheap. Hence the conclusion that the majority of radio tape recorders offered on the market are from China.
But here it is also important to determine which Chinese product we are talking about
All car radios can be divided into several categories. Moreover, I advise you to study this issue separately in more detail.
Price is a largely determining factor in choice. When buying a Chinese radio, you actually choose one of 3 options.
- Radio tape recorders manufactured to order from leading manufacturers. These include Sony, Pioneer, Kenwood, etc. There are clear regulations, rules and standards from which the contractor (factory in China) has no right to deviate. This allows you to obtain very high-quality devices at low manufacturing costs for the brand owner;
- Chinese brands. These are well-known companies that offer radios under their own brands on the international market. The quality may be a little lower, but the price is appropriate. In most cases, they copy or make radios as similar as possible to devices from leading radio manufacturers;
- Unknown Chinese brands. These are radio tape recorders with an incomprehensible name and the same origin. If this is your first time hearing about the company and you can’t find anything really about it on the Internet, it’s better not to mess with such a 2 din radio.
Drawing conclusions, I can say that the best solution would be to buy a radio for your car from category 1 or 2.
Choosing a car radio
The modern market can offer a huge range of radios for every taste. Before deciding which specific model of radio to choose for your car, set for yourself the maximum price level for purchase. The cost of the model is critical. It is based on the price that the decision will be made on which car radio to choose in the end. The car radio market is confidently divided into two conditional groups of manufacturing companies:
- Clarion and Pioneer companies produce the most expensive and high-quality models. Their products always have the highest sound reproduction characteristics.
Apparently, the cost on the secondary market really evaluates the reliability of the product and the stability of consumer characteristics.
For example, the Pioneer DEH-P88RS model has the highest quality sound reproduction, is equipped with a 4x50W MOSFET amplifier and a 16-band 16B GEQ L/R Independent & Common sound equalizer. The model is designed in Hi-End style. The cost is not higher than 250 USD.
- The companies Prology, Kenwood, JVC have received widespread and well-deserved recognition in the post-Soviet space for their relatively low price and decent product quality. The price range for car radios ranges from 100-120 USD. A typical inexpensive and relatively high-quality product from Prology is the CMD-160U model. It has a very good FM/VHF CD/MP3 USB/SD/MMC receiver and a 4x50 W amplifier.
Options for choosing car radios
- If you need an inexpensive model, then you need to pay attention to the budget series of car radios.
- The car is equipped with a 1DIN connector, and the owner wants to purchase a device with a large color display, then you need to give preference to modifications with a retractable display.
- If you need to talk on the phone while driving, you should give preference to car radios with the Hands-free function.
We also don’t forget about the designs and the possibility of installing a frame for the radio to improve the appearance and interior.
vote
Article rating
Rules for choosing a radio
Before choosing a car radio, be sure to consider the following details:
- Radio settings. They must meet all the parameters of electrical equipment and acoustic systems;
- Standard size. The width of the basic audio devices is the same - 180 mm, and the height of the device can be 1 DIN (50 mm) and 2 DIN (100 mm);
- Maximum power. This parameter plays an important role when choosing a radio, but it must be used with extreme caution. When selecting an audio system, you need to take into account the cost of the device and the brand. Bipolar converter that allows you to increase power. It is not installed on budget models;
- Number of output channels. It determines the number of speakers that can be connected to the car radio. Four-channel devices are not much more expensive than two-channel devices, which is why such products are very popular among car enthusiasts;
- Display type. The segment screen is the most budget option, but it is capable of displaying only minimal information on the musical composition. When choosing an audio system with a segment screen, you need to pay attention to the color of the backlight. Many models provide the ability to select backlight colors. The LCD display is similar to a tablet screen. It is capable of displaying any information. Many car radios are equipped with Bluetooth and can play audio files from a smartphone.
