Lada Priora cannot be called a miracle of engineering in terms of technical equipment. For the most part, this model inherited the components and assemblies of its predecessors. The cooling system was no exception. On the Lada Priora it is combined: liquid with partial natural and forced air cooling. In this case, the type of engine does not matter: for the 8-valve and 16-valve power units it is almost identical.
Replacing the heater radiator on a Priora without and with air conditioning. This is AvtoVAZ
- The heat exchange device is represented by a radiator, through which the external air entering the cabin is heated;
- A fan driven by an electric motor promotes air circulation in the cabin;
- Damper that regulates the flow of incoming cold air;
- Dampers that regulate and distribute the flow of incoming warm air into the cabin.
- Disconnect the vehicle from the battery;
- Now you can start removing the windshield trim;
- The windshield wiper arms will interfere with operation, so they need to be removed;
- You also need to remove the plastic fluid supply tubes to the injectors;
- To remove the decorative trim of the windshield, you need to unscrew the seven screws that secure it;
- After this, you can remove the hood seal;
- There is a screw installed in the middle of the lining that tightens both halves of the lining;
- Next, use a screwdriver to pry off the plugs that cover the screws, unscrew them and remove the trim from the body;
- After this, you should begin to remove the sound insulation of the engine compartment; to do this, you should unscrew the screws that secure it, and then remove the left and right linings;
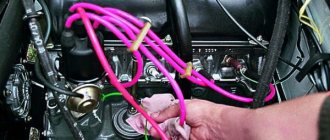
- Now let's move on to the pipes going to the heater radiator. You should loosen the clamps and remove the pipes. Place a container under them, as antifreeze may spill. The removed pipes should be plugged in an accessible way;
- Next, you should disconnect all connectors with wires that go to the heater;
- After this you will need wrenches. Using a socket wrench set to “10” you should unscrew three nuts, and one nut will be used for a wrench “8”;
- The wiring harness interferes with removing the heater. You need to remove the holder and take it to the side along with the wires;
- Now the work will continue inside the car. You will need a “13” socket wrench to remove the bracket with the brake pedal, which then needs to be moved to the side;
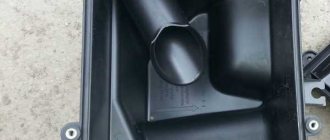
- The heater is accessible and can be removed for repair and maintenance;
- To remove the radiator, you need to use a Phillips screwdriver to use three screws, after which it can be easily removed. In many cases, it is dirty, so it should be cleaned with a brush and blown with compressed air.
- Installation is carried out in reverse order.
- Remove the rubber seal from the windshield lining;
- After this, they begin soundproofing the engine compartment. Some screws are not easy to get to, be patient, be careful and everything will work out;
- Now you can begin to remove the foam gasket on the pipes;
- After this, you can remove the plastic radiator cap; to do this, you need to unscrew three screws;
- Once access to the pipes is available, you can begin to remove them. You should not completely drain the antifreeze from the system; you can substitute a small container and drain it from the heater radiator and expansion tank, and then plug the pipes.
AutoFlit.ru
Airlock
An air lock in the SOD is the formation of air in the system, which does not allow it to function properly. A plug is a cavity of air that forms in the heater radiator and most often negatively affects the operation of the interior heater.
How to remove a traffic jam?
The SOD device in Priora does not imply air pockets; during operation, they are independently removed by the system without any intervention. All you have to do is run the car for a few tens of minutes and the traffic jam will go away.
There is also a way to remove the plug much faster. You need to drive your car up a hill so that the front of the car is slightly higher than the rear, open the expansion tank cap and keep the engine speed around 2000-2500 rpm. The air lock will come out.
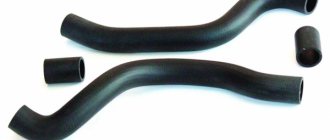
Reviews of silicone engine cooling hoses
- ─ increased service life (increased wall thickness and several layers of reinforcement);
- ─ the silicone pipe remains stable in operation regardless of the ambient temperature;
- ─ when tightening it with a clamp, you can clearly feel the force and it will not be possible to tighten the pipe;
- ─ individual coloring of the engine compartment.
- ─ high price (the kit is about 2 times more expensive);
- ─ loss of manufacturer's warranty.
- Silicone pipes with reinforced thread.
- Silicone - rubber pipes.
xn—2111-43da1a8c.xn—p1ai
Replacing the radiator of a heating device in a Lada Priora car
Almost every motorist who owns a domestic vehicle discovers a malfunction of the car’s heating unit in the winter. After all, only with the onset of severe cold does a person begin to think about how to avoid freezing while driving a car. Naturally, everyone uses a stove for this. However, what should those for whom this very device has ceased to function properly do? After all, only the heater can ensure that the cabin maintains a normal temperature, allowing for comfortable movement. In this article we will look at only one reason why the heating device stops working, we will learn about the principles of repairing and replacing the heater radiator installed in a Lada Priora car.
If the motorist is sure that it is necessary to replace the heater core, it may take a lot of time to eliminate the faulty object, since most likely, in the process it will be necessary to replace not just a blown fuse, but to carry out more serious repair work. True, you should not immediately despair because of your ignorance; the material contains detailed instructions to help everyone understand how to replace the stove radiator in a Priora with and without air conditioning.
VAZ online stores, discounts for site users
- Accessories
- Spare parts
- Tuning
- Body kits
- Cases
- Studio
- Carbon tuning
- Flocking
Online stores for VAZ accessories
Online stores for VAZ spare parts
xn—2111-43da1a8c.xn—p1ai
Car engine cooling system repair
Operating principle of the engine cooling system
- Engine cooling radiator, which is designed to cool heated coolant with air flow.
- A radiator fan that increases the cooling intensity of the coolant in the radiator.
- The heater radiator, which is the source of heat for the car interior.
- An expansion tank, which serves to compensate for changes in the volume of coolant due to temperature. You won't be able to add antifreeze without it either.
- A pump or centrifugal pump that circulates coolant in the system.
- A thermostat, which is designed to regulate the amount of coolant passing through the radiator, thereby ensuring optimal temperature conditions in the system.
- The coolant temperature sensor is one of the cooling system control elements.
Diagnose the engine cooling system and identify problems
xn—2111-43da1a8c.xn—p1ai
Checking the Thermostat
Most often, drivers notice a thermostat malfunction during the cold season. Since a car engine at low temperatures cannot heat up to operating temperature. Based on the fact that the engine temperature is below normal, the heater will not be able to heat the interior to a comfortable temperature.
We start the engine and touch the lower radiator pipe
It should be cold, not warm, but cold is very important. When the temperature reaches 85 degrees, the lower pipe should become hot
If the check on your car shows the opposite, then the thermostat is most likely faulty.
The thermostat will also be faulty if, when starting the engine, after some time the lower radiator hose becomes warm, then most likely the thermocouple is jammed or does not completely close the large circuit.
see also
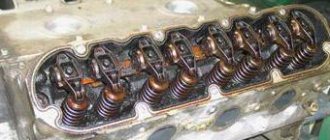
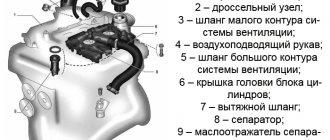
I have long noticed oil stains on the cylinder block near the breather outlet (crankcase gas pipe), it was time to replace the pipe, but since it doesn’t affect the speed, I didn’t want to go there. There was also some slight fogging at the inlet of the breather pipe into the valve cover and the upper pipe entering the throttle sleeve, and near the oil pressure sensor. The other day on Drive, the topic of engine fogging came up, and I decided not to put it off any longer and still start replacing the pipes. Since the car does not have an air conditioner, there is access to the lower clamp of the breather pipe, although it is not entirely convenient. I knew that I would rip everyone off again, but I put up with it, just so as not to crawl under the car and remove the protection, because... I have neither a pit nor a lift. Replacement is not difficult, see photos for details.
This beauty of oil and dust has grown on my cylinder block!
The breather pipe inlet into the valve cover is almost dry.
The outlet from the valve cover is also covered in oil, but the inlet to the throttle sleeve is dry.
The thin hose is also snotty.
Oil at the inlet of a thin hose into the receiver.
I bought two new pipes and a bottle for washing the engine.
The pipes were, as they say, dry. I decided to put them on sealant.
Heroes of the occasion!
I also decided to inspect the knock sensor, because... Periodically, error 0327 (low signal level of the knock sensor) appears on the on-board vehicle. I haven’t noticed any changes in engine performance yet, but I feel that the sensor will soon be replaced.
I took off the block, the terminals are dry, the wires are intact.
Before applying the sealant, all fittings were thoroughly cleaned and degreased with gasoline.
The new pipe is in place. Engine washing liquid doesn’t do a very good job with such a layer of dirt; I wiped it with a rag as best I could.
Rinse the top. There is not a lot of dirt, the engine was washed quite recently.
Another additional seal. Self-adhesive D-shaped profile (the thickest), placed on the top bar of the grille. There is a benefit from it, since the installed seal from the classics still allows splashes and dirt to pass through the center.
I washed all the snotty places, sealed the pipes and hoses with sealant. Let's see how long the engine stays dry.
https://www.drive2.ru/l/3685250/
Removal
1. We prepare the car for work.
2. Remove the air filter.
3. Disconnect the electrical fan wiring harness block.
Comment
On cars with air conditioning, disconnect the wiring harness block by pressing the latch
and remove the block of the electric fan wiring harness from the side member by squeezing the clamps of the block holder.
4. Using a 10 mm wrench, unscrew the two bolts of the left fastening of the fan casing.
5. Using the same key, unscrew the lower nut of the right fastening.
6. Using a 10 mm socket wrench, unscrew the upper nut of the right fastening.
7. On cars with air conditioning, use a 10 mm wrench to loosen the clamp securing the hose to the upper radiator pipe.
Warning!
During the following operation, a small amount of coolant will spill out. To avoid this, you can partially drain the coolant.
8. Disconnect the hose from the radiator and move it slightly to the side.
9. Remove the electric fan assembly with casing.
Disassembly
1. Using an 8 mm socket wrench, unscrew the nut securing the impeller to the electric motor shaft, holding the impeller with your hand from turning.
2. Remove the impeller.
3. Using a Phillips screwdriver, unscrew the three screws securing the electric motor to the casing.
4. Remove the wiring harness from the casing groove.
5. Remove the electric motor.
Removal
We assemble the electric fan in the reverse order.
Installation
Install the electric fan in reverse order.
Replacing elements
Structurally, the Lada Priora engine cooling system has a simple design. Therefore, we will consider replacing only individual components, with which certain difficulties are possible, especially for beginners.
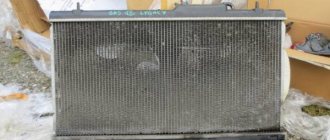
Replacing the cooling system radiator
This unit on cars rarely changes. Typically, this procedure is necessary when a leak occurs that cannot be eliminated. Its service life can be 10 years or more. Cases when replacing the radiator are simply necessary are as follows:
- unprofessional repairs in the engine compartment, during which the radiator cooler tubes were damaged;
- damage as a result of an accident;
- Increased pressure in the system caused the leak.
Removing the old and installing a new radiator, as well as replacing antifreeze on a Priora with air conditioning, is somewhat more difficult. Therefore, to save time and nerves, it is better to entrust this matter to professionals. If there is no air conditioning, you can change the radiator yourself.
- Unscrew the drain plug at the bottom of the radiator and drain the antifreeze into a suitable container.
- Show all the pipes that go to the radiator.
- Unscrew the fastening nut from the top and right side.
- The fan can be left on the radiator; it can be removed at any time.
- Move the radiator towards the engine and lift it up, thereby removing it from the engine compartment.
If the fan remains on the radiator, you need to disconnect the terminal from it. Installation of a new radiator is carried out in the reverse order of removal. If necessary, you can change the antifreeze.
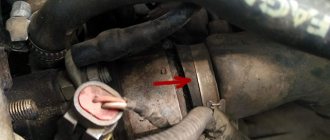
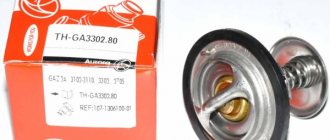
Replacing the thermostat
Another important element of the cooling system, which can be changed independently. This is done as follows.
- The car needs to be placed on a viewing hole, or at least hang the front part so that it is possible to crawl up from below.
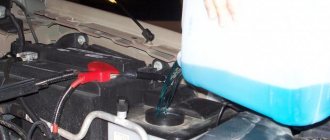
- Unscrew the cap of the expansion tank.
- Remove the engine protection (if there is one) and unscrew the drain plug on the cylinder block from below (not visible from above).
- Before unscrewing the drain nut, you need to place a suitable container under it. Then you can unscrew the plug and drain the coolant. Work is carried out on a cooled engine, otherwise there is a high risk of getting burns.
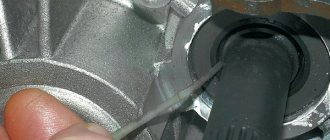
- Under the air filter to the right of the cylinder block you need to find the thermostat and, by loosening the clamp nuts, remove the pipes from it.
- Using a hexagon, unscrew the thermostat fasteners and remove it.
Before installing a new thermostat, you should pay attention to the rubber seal where it is attached to the block. To improve the tightness, it is necessary to coat it with a silicone gasket sealant. Next, all that remains is to install a new thermostat, connect all the pipes and fill in the coolant. After this, you need to start the engine and warm it up to 90 degrees, then inspect the thermostat and pipes for leaks. If necessary, you need to add antifreeze and remove the air lock, if any.
After replacing the thermostat, all that remains is to check its functionality. If the thermostat is working properly, the lower radiator hose should be cool when starting and running a cold engine. You need to let the engine run until it reaches operating temperature.
After the pointer on the instrument panel shows 90 degrees, you need to touch the lower pipe again. It should heat up smoothly. If this does not happen, the thermostat is faulty.