How to determine that the steering tips have exhausted their service life and need to be replaced?
It is worth noting that this element is a weak point in the steering system of any car.
The part is part of the steering rod structure. But the rod itself rarely fails, but its tip should be changed after 35-45 thousand kilometers. This figure is approximate and depends on the nature of the vehicle’s operation, the condition of the road surface and the quality of manufacture of the part itself. Diagnosing a car's steering system is not difficult, since most faults appear at the initial stage, informing the driver about the presence of a control problem. Common symptoms indicating steering problems include:
- Uneven tire tread wear, with tires wearing out much faster.
- The appearance of third-party noise in the front of the vehicle. It is worth noting that this symptom is common to most car chassis breakdowns. However, it is a direct prerequisite for diagnosing the suspension and steering system of a car.
- Vibration and beating of the steering wheel, which are especially noticeable when performing various maneuvers.
- Problems with driving the car (pulling to the side, violating the trajectory of movement, difficulty turning the steering wheel and its delayed response to the force applied by the driver).
Note that the described symptoms may not only be evidence of wear on the tips, it is quite possible that the steering rack elements, as well as suspension parts, are damaged. The design of the tips is represented by an ordinary hinge joint, the wear of which negatively affects the operation of the entire steering mechanism. You can correctly determine the malfunction yourself, without the use of complex diagnostic equipment.
Symptoms of malfunctions
If you do not pay attention to the wear of the tie rod ends, the ball pin will become loose and jump out of its socket at the first decent bump. There is no need to explain for a long time what this entails: the wheel will become uncontrollable, and the driver will lose control of the car. How to determine that there are problems with the hinges and the car’s chassis needs to be checked:
Note. Unfortunately, such signs are observed not only as a result of problems with the steering rack, but also as a result of wear of the bearing of the rotary bipod and the pendulum. The exact result will be shown by a check performed by car service employees or independently in a garage.
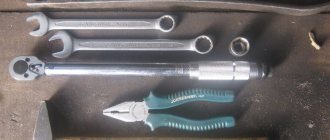
If you find one of the listed symptoms in your own car, you should not delay diagnosis. Especially if the tips have served more than 40 thousand kilometers. To perform the check, you will need an inspection ditch; hanging the car on a jack will not allow you to swing the rod in the desired direction.
To check the tie rod ends yourself, use the step-by-step instructions:
Advice. When swinging the rod, do not confuse the hinge play with free play of the steering rack or a broken pendulum bearing.
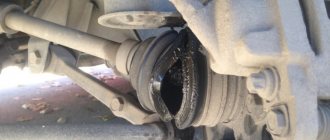
To check the integrity of the anthers, an inspection hole is not needed. It is enough to turn the wheel and lift the car with a jack. The hole in the rubber boot is discovered thanks to thick lubricant, which is squeezed out from the inside through a gust.
Replacing the steering tip is also not a big problem; the only special tools you need are a puller to push the ball pin out of the steering knuckle eye. Please note an important nuance: after replacing the linkage, the camber angles of the wheels must be adjusted. You cannot make the adjustment yourself, so you will have to visit a car service center.
Source
Troubleshooting methods
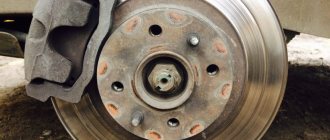
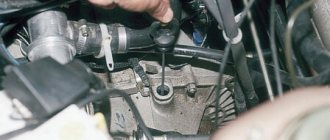
The main diagnostic method is a visual inspection of the condition of the elements. By this concept, most vehicle owners mean that the problematic part must be removed. But, it is not necessary to do this. To inspect, for example, the right tip, you need to turn the steering wheel as far as possible in the opposite direction. The inspection begins with an examination of the protective rubber boots, which do not allow dirt and various abrasive particles to penetrate inside the ball joints. Their damage is evidence of the need to carry out the procedure for replacing the tie rod ends.
We move on to the next stage of diagnostic measures. To do this, you need to jack up one of the front sides of the vehicle so that the wheel is in a free position and does not touch the ground. We find the element and pull it with our hand from side to side. If the part is not worn out, there should be no play at all, otherwise the tip must be replaced. Note that they need to be changed on both sides, otherwise repairs may not bring the expected effect. It’s better to save on a car service and install the kit yourself than to change them one by one.
Sequence for replacing tie rod ends
To do this, you need a minimum set of tools, a jack, and a special device for removing the steering pins. But, you can do without a puller by using a hammer and a small pry bar, although you will have to suffer a little. There is also a risk of damage to nearby steering components. The main thing is to do everything carefully and slowly.
Replacement of tips is carried out as follows:
- it is necessary to jack up the front of the car and remove the wheel;
- The junction between the steering knuckle and the tie rod end should be cleaned of dirt. To facilitate the dismantling process, the threaded connection can be treated with WD-40;
- remove the cotter pin that secures the nut. To do this you will need pliers;
- Unscrew the nut, then use a puller to remove the pin securing the rod end. If such a device is missing, the finger can be knocked out with a hammer. True, this requires a swing, which is not always possible. You will have to adapt, spend a lot of effort and time to release the rod with the tip;
- the tip is screwed to the steering rod with a bolt that needs to be unscrewed;
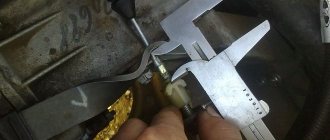
- Before dismantling the worn tip, you should measure the distance between it and the squeegee. This will help you install the new part correctly;
- the new tip is installed in the reverse order;
- after replacing the part, install the wheel in place and remove the jack;
- The tie rod end on the opposite side is changed in the same way.
Disassembling the steering mechanism
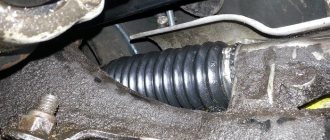
We disassemble the steering mechanism when repairing it. Remove the steering mechanism (see “Removing the steering mechanism”). Remove the steering gear boot (see “Replacing the steering gear boot”).
Remove the steering rod support. We insert the bit into the groove of the crankcase pipe mounting nut.
We unscrew the nut, striking the beard (right-hand thread)…
...and remove the crankcase pipe.
Use a screwdriver to press out the two clamps of the bushing located inside the pipe...
Remove the two rubber rings from the bushing (arrows indicate the bushing clamps).
If it is necessary to replace the nut, use pliers to remove the locking rings... ...and remove the locking ring... Remove the pipe securing nut.
Remove the rubber plug from the rack stop adjusting nut. Using a scraper, remove the jammed metal in the locking areas of the stop adjusting nut.
Using a special 24mm wrench with an external octagonal head, unscrew the stop nut.
We take out the stop spring. Using a screwdriver...
...remove the O-ring.
By hitting the crankcase against a wooden block, we knock out the rack stop. Using a screwdriver...
...remove the liner from the stop. A rubber ring is installed in the groove of the stop.
Remove the rubber ring from the crankcase that seals the hole for the steering mechanism on the front panel.
Remove the boot from the gear shaft. Use a 6mm hexagon to unscrew the two screws (shown by arrows)…
...and remove the crankcase cover.
Remove the separator with the thrust bearing rollers.
Remove the sealing ring of the cover.
We remove the rack from the crankcase.
We press out the gear shaft by holding the shaft in a vice with soft metal jaw linings and pressing the crankcase upward with the mounting blade.
We remove the gear shaft with bearing from the crankcase. We pry it off with a screwdriver...
...and remove the bushing retaining ring.
We take out the gear shaft bushing assembled with the support plate.
If it is necessary to replace the needle bearing, use a drill with a diameter of 4 mm to drill two diametrically located holes in the crankcase so that they extend to the end of the outer ring of the needle bearing. Through the drilled holes, using a rod of the appropriate diameter, we knock out the outer ring of the bearing from the crankcase.
Using a puller, we press the ball bearing of the gear shaft with the inner ring of the roller thrust bearing.
Use a puller to press the inner ring of the needle bearing off the shaft.
Using a screwdriver, pry and remove the gear shaft oil seal from the crankcase cover. If the outer race of the roller thrust bearing needs to be replaced...
... use a scraper to remove the extruded metal in four places and take out the ring. We generously lubricate the bearings, rack and gear teeth, and the plastic rack bushing with Fiol-1 lubricant. We assemble the steering mechanism in the reverse order. We press the outer ring of the needle bearing into the crankcase using a mandrel of suitable diameter. To seal holes in the crankcase, you can use “fast steel” or “cold welding”. We press the gear shaft with the ball bearing into the crankcase using a piece of pipe of a suitable diameter or a high head, applying force to the outer ring of the bearing. You can press the gear shaft into the crankcase, resting the outer ring of the bearing on the jaws of a vice. Then we put the crankcase on the bearing...
...and press the crankcase with light blows of a hammer through a wooden block.
We press the gear shaft seal into the cover through a mandrel or head flush with the end of the cover. We insert the rack into the steering gear housing. We install the pipe.
After tightening the pipe fastening nut, tighten the nut.
Scheme for monitoring the gap in the engagement of the rack and pinion shaft:
1 – dial indicator; 2 – indicator mounting bracket; 3 – nut; 4 – sealing ring; 5 – steering gear housing; 6 – needle bearing; 7 – gear shaft; 8 – bushing; 9 – crankcase cover; 10 – rack; 11 – liner; 12 – rack stop; 13 – indicator leg; 14 – spring
We rotate the gear shaft so that the flat on it is located on the right side. We move the rack so that the steering rod support mounted on the rack is located in the middle of the pipe groove. We insert the rack stop, the stop spring and tighten the stop nut. It is recommended to replace the stop nut with a new one. We adjust the gap in the engagement of the gear with the rack. To do this, set the rail in the middle position and block it from moving. Insert the leg of the dial indicator into the hole of the adjusting nut of the stop until the tip of the leg touches the stop of the rack. The diameter of the tip of the indicator leg must be at least 3.5 mm...
...so that the leg rests against the end surface 1 of the stop, and does not fall into its hole 2 (for clarity, shown on the dismantled stop). We apply a torque of 15 N m (1.5 kgf m) to the gear shaft, while the gear pushes the rack and stop. Based on the indicator readings, we determine the amount of movement of the stop, which corresponds to the actual value of the gap in the engagement. If it exceeds 0.05 mm, tighten the adjusting nut, achieving the specified amount of movement of the stop. After this, having unlocked the rack, we check the ease of rotation of the drive gear throughout the entire range of travel of the rack.
How to install steering rod plugs on a Lada GrantaLink to main publication
Removing the tie rod end:
1. Before starting the procedure, the car must be put on the handbrake, and bricks or other thrust blocks must be placed under the rear wheels.
2. Begin replacing the part by hanging up the corresponding front wheel and removing it. If the car is tall, then some people manage to remove the tie rod end without dismantling the wheel (see the video below for more details).
3. The nut securing the tie rod to the swing arm should be cleaned. Then apply WD-40 type fluid to the threaded connection. This will make it easier to remove.
5. Next, you need to disconnect the ball joint pin (we recommend using a puller for this) from the swing arm, and you need to press it out (the ball joint pin) in advance.
6. Unscrew the tie rod end on the car, first unscrewing the bolt securing this part. We recommend that when performing this step, you accurately count the number of revolutions made. This action will help you in the future when installing it back, it will maintain the approximate alignment of the wheels. The removal of the part has been completed, now all that remains is to replace it with a new one.
7. Then carry out the procedure for installing the new tie rod end in the exact reverse order of removal. Before tightening the rod end mounting bolt by pressing in the outer rod end joint, pay attention to the fact that the bearing surface of the swing arm “b” must be parallel to the plane of the joint “a”. If this condition is not met, move the hinge to the appropriate position.
8. And, finally, you should tighten the ball joint pin nut to the required torque, then tighten it until the nearest slot in the nut for the cotter pin matches. After you install the tip, check the wheel alignment angles. If they do not match, adjust them.
Brief description and video
- First, use a can of WD 40 to spray the fasteners. If you don’t have a wedge on hand, use water, wet a cloth, put it on the fastener and wait for it to get wet
- Let's start by loosening the rod end locknut. Loosen it and leave it in the same place.
- We unscrew the steering tip nut on the steering knuckle, holding the hexagon to prevent the finger from turning.
- If desired, use a ball joint puller and press the pin out of the steering knuckle arm. An alternative is a heavy hammer, tap it on the end of the fist boss from the side along the axis of the lever, alternating blows on the fasteners from above
- Pull the finger out of the swing arm socket
- We screw the new one in the reverse order of removal, until the locknut is installed in the place where it was before.
- We place the hinge pin in the socket of the steering knuckle lever, and tighten the new pin well, holding it from turning
- Tighten with good force, do not break the thread of the lock nut of the rod end
- Having completed the work on both sides to replace the steering tips, we go to a technical service, where we set the angles of the car’s wheels
Replacing Renault Logan steering wheels incorrectly
Video on youtube:
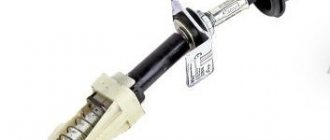
How to identify faulty or worn steering tips?
A rack or gear mechanism is responsible for turning the front wheels of the car. The unit simultaneously transmits force to both steering knuckles through rods with hinges at the ends. These 2 parts are the weak link of the control system - the service life is 20–80 thousand km, depending on the make of the car and operating conditions. Car enthusiasts should learn to recognize the signs of faulty steering tips in time, since their technical condition is directly related to the safety of passengers.
The plastic liner allows the ball pin to rotate in different directions, and the spring selects the play that appears during operation. When a fault is detected in the steering tips, the parts are usually replaced, preferably in pairs. There are also collapsible hinge designs that allow you to change a worn-out insert, but they are unreliable in operation.
Logan steering wheel from Febi Bilstein
Continuation of the topic of today's videos - replacing Logan steering ends.
Before carrying out the work, steering tips were purchased in advance, which have been lying in the garage for almost six months now, waiting to be put to work.
These are products from Febi Bilstein (Germany). The company's mark is stamped on the back of the tip under the finger.
Included with the steering end are nuts for fastening the pins with a self-locking insert and for connecting to the rods. I installed the original pin nuts that were included in the kit on the car when I lubricated the steering pins under the protective covers. Then the rubber boots were removed, and lubricant was replenished into the assembly. Therefore, I purchased new nuts, also with a locking insert.
The nuts are made from the Belibeysky plant, Republic of Bashkiria.
The plastic cover on the steering pin must be removed before installing it as it is for transport purposes only. Retains boot and threaded part of tip.
Every time you replace a Renault Logan steering wheel, you need to install new nuts.
And one more useful tip. If the rubber boot of the steering link breaks, you can install a boot from the steering tip of a VAZ 2108 car.
The tips on the right and left are mirrored. Since they are different, you need to pay attention when buying, choosing the right or left. In order not to confuse the tips, there is 1 notch on one of them near the anthers, and 2 on the second.
With 1 notch there will be a right tip in the direction of travel of the car, and with 2 notches it will be on the left.
Tip replacement work
For ease of work, we will need to jack up the front wheels and remove them, not forgetting about the sliding shoes for the rear wheels and the safety net for the body.
Which tie rods to choose
When choosing spare parts, you should decide whether to install factory or analog parts. Often, parts installed from the factory last much longer than those we install as replacements. However, sometimes even original parts last less than expected.
- Left steering tip 11180-3414057-00 (VAZINTERSERVIS /OAT/) price from 450 rub.
- Right steering wheel end 11180-3414056-00 (VAZINTERSERVIS /OAT/) price from 450 rub.
Good quality and very popular tips from TRACK
- Left tip TR70-107 price from 400 rub.
- Right handpiece TR70-108 price from 400 rub.
If it is not possible to purchase original factory tips, you can choose analogues:
- HOFER HF 812002 price from 700 RUR set of 2 pieces
- BELMAG BM1118-3414056/57 price from 800 RUR set
You can also immediately purchase tips from the company TRACK TRST-110 in a set of 2 pieces, price from 850 rubles per set