Method No. 1: replacing the Lada Granta heater radiator with removing the panel
- We remove the terminals from the battery to avoid a short circuit in the circuit.
Removing the terminal from the battery
- We unscrew the drain plug in the radiator, cylinder block, and grind the antifreeze into a plastic container.
- We unscrew the four screws, remove the heating system filter and casing.
Location of screws
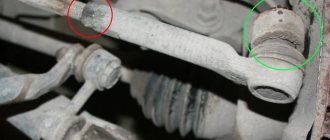
- We release the clamps, remove the two rubber pipes “supply” and “return” from the radiator fittings.
Supply and return pipes
- Inside the car, pry up and remove the cover of the fuse box.
Removing the fuse box cover
- We remove the plastic lining of the tunnel and the steering column frame.
Steering column frame
- Remove the dashboard in the central part.
Central part of the dashboard
- We dismantle the rubber seals on the doorways.
Rubber seals on doorways
- We pry up and remove the side (left) plastic trim of the instrument panel.
Plastic instrument panel trim
- By analogy, remove the trim on the right side.
- We dismantle the upholstery of the front left and right pillars.
Front pillar trim
- We dismantle the lighting beam control knob.
Dimmer knob
- Unscrew the nut and pull the regulator out towards you.
- Using a screwdriver, pry it up and remove the glove box cover from its regular place.
Glove compartment lid
- We remove the glove box.
Glove box
- On the left side, under the casing, we find the mass fastening, unscrew the nut (key set to “10”).
Ground attachment
- Using a “10” head, unscrew the left and right console mounting bracket.
Console mounting bracket Unscrew the bolts
- We press the side clamps, disconnect the block with wires from the brake light switch.
- By analogy, disconnect the accelerator pedal.
Accelerator pedal
- Disengage the clutch pedal.
Clutch pedal
- On the right side, press the latch and disconnect the wire block from the controller.
- Using a “13” socket, unscrew the bolts securing the instrument panel to the body element.
- We remove the instrument panel from the car interior and carefully place it on the surface of the workbench for work.
Replacing the radiator of the Lada Granta stove with your own hands is completed.
Some motorists practice not removing the entire dashboard, but only the plastic lining. The process is similar to the one described above. In fact, the dashboard frame remains in place, and all plastic linings and inserts are removed.
Audio preparation Grants of different configurations
In the “standard” configuration, the Lada Granta has pre-installed power wiring harnesses, which are located in the console opening. Electrical wires are connected only to the radio, so don’t be surprised if you don’t find them in the doorways. To wire to the doors, you will need to pull power wires, which are located under the console panel
In this configuration of the Lada Granta, the stereo system can be installed independently, if due attention is paid to it
In the Lada Granta Norma, the power wires coming from the console are already routed to the doorways. You only need to connect the audio system in accordance with the assembly diagram. It's not uncommon for the stock door wiring to not match up with some speaker connectors. To solve this problem, you need to purchase suitable wires and replace them in the doorway. Lada Granta Norma has a trim with a special pattern for the speakers. Based on it, you can cut the opening yourself.
During assembly at the factory, the Lada Granta luxury version is equipped with a touchscreen multimedia system and speakers. The improved radio tape recorder is complemented by Bluetooth function and a 5-inch display with line output. In addition, the built-in radio allows you to connect a USB 2.0 flash card, through which you can listen to recorded music.
The standard radio for the Lada Granta model is an improved device, the design basis of which is the “Sirf Atlas” processor, supplied by the well-known. In addition to the presence of a radio receiver, the device is equipped with a large touch screen and has the ability to connect an external source via a video input by replacing the software and performing firmware. However, in the basic configuration of a domestic car there is only a push-button radio. Many owners are not happy with this fact and want to connect a more modern radio. This article will tell you how to install a radio.
To change the torpedo trim, it is not necessary to remove it completely!
How to remove the stove VAZ 2106 video
So let's get started, let's focus on the panel overlays, which are divided into:
Euro-1, another name is “Caprice” and has an index of 21104. The features of this lining are that it does not have a passenger shelf.
Euro-2, index 2110L, cover but already comes with a passenger shelf.
Euro-3, a cover without a shelf, but under the instrument panel of Kalina, Priora, and has a climate control module with 3 knobs and an emergency stop button.
There are also exclusive panel overlays that make the interior of the VAZ 2110 similar to the Nissan Primera, where the instrument panel is in the center.
In addition to these Euro-overlays, there are overlays that are installed on top of them. For example, the overlay of the Chestnut panel.
It is not difficult to install the Kashtan overlay on the dashboard, so we will not dwell on this, but changing the old panel overlay to the Euro one is already more difficult.
The euro overlay for the panel consists of:
- On the masonry itself
- Inserts for buttons (small insert 2110L-2120031, large 2110L-2120032)
- Air ducts (2114-81080623)
- Device panel trim (2110L-5325124)
- Double button for turning on the headlights and low beam
- Key for turning on the rear fog lights (with fixation)
- Rear window heating switch (latching)
- Key pads - 2 pcs.
- Plugs instead of keys - 6 pcs.
- Wiring harness for connecting the dual side position switch and low beam headlights
- Block
- Device panel fastenings
- It may be necessary to purchase separately different keys for the VAZ-2114 and pads for them.
The cover gives the impression of a high quality product. It is softer than the old pad and, as the developers say, is more injury-proof. They also promise improved air flow to the side windows.
Now we are moving towards installation, and here we can distinguish 2 methods, each of which has its own advantages and disadvantages:
Let's prepare a new dashboard trim for installation
To do this, we cut off the remaining material of the Euro lining. There is no need to cut out any space under the dashboard, otherwise there will be a gap between the control column and the trim. In this place you simply need to make 2 cuts on the sides so that this part of the lining can be slightly bent as needed. Also, there is no need to cut off 10 mm from the sides of the lining in the area of the side air ducts; these places must be adjusted to the location.
We measure the panel overlay and adjust it as necessary. At this step, it is recommended to use anti-creak (soundproofing the panel). This way, you will insure yourself against squeaks in the future.
To install the dashboard in the Euro trim, you can use one of the methods:
- Use fasteners from the Euro lining kit.
- Use fasteners from an old lining (from drilling).
- We connect connectors and Europanel keys according to the instructions:
When the overlay is ready, let's try to install it. Fastening the Europlate in positions 1-7 of the diagram. We fix 35mm screws on top, which are then hidden under a plastic cover.
The advantage of this method is time. If you dismantled the panel, then you will spend no more than 3 hours changing the lining. If this is the first time you are faced with a similar type of work, then about five hours.
In the interior of the VAZ 2110, the dashboard is the most noticeable part. Every driver wants to sit in a stylish and well-maintained interior. But the standard panel looks angular and gray. This is especially noticeable after long-term use, when abrasions, scratches and cracks appear on the panel. Motorists solve this problem in different ways - some install another standard dashboard from a VAZ 2110, other drivers prefer to install a Europanel - this is the name of the trim from a third-party manufacturer. The trim allows you to transform the interior and turn the “ten” into a foreign car, at least on the inside. Whatever you choose, removing the panel is a must. In this material we will tell you how to properly dismantle the standard panel and install the Euro version.
Removing the panel (dashboard) of Lada Granta
How to remove a catalyst on an 8 valve grant
Required tools: flat and Phillips screwdrivers, 13 and 24 socket heads, marker.
Disconnect the negative cable from the battery. Remove the cigarette lighter (squeeze the lock and remove the cigarette lighter socket, disconnect the block with wires). Remove the head unit of the audio system (radio tape recorder) and disconnect the block with wires from it.
Remove the central panel trim (dashboard). Remove the glove compartment cover and remove the screws securing the inner panel.
Remove the pillar trim. Then remove the central tunnel. Then remove the steering wheel. Remove the steering column cover and steering column switches. Remove the exterior lighting control unit (first remove the fuse box cover, then unscrew one screw and disconnect the connector.)
Remove the headlight hydraulic corrector regulator (remove the handle, unscrew the fastening nut, remove the hydraulic corrector regulator).
Remove the instrument cluster. Then.. Remove the 4 screws securing the air duct damper control unit to the instrument panel. Remove the 18 screws securing the decorative panel to the frame (Figure 11.13). Move the decorative panel away from the frame as far as the air ducts attached to its inside allow.
| Place your hand under the panel and use a long Phillips screwdriver to remove two screws No. 1 (Figure 11.14) (one on each side) securing the front side glass air ducts to the decorative panel. Remove the ends of the air ducts from the nozzle pipes No. 2, and then remove the inner ends of the air ducts from the pipes of the heater body. |
Pull the panel towards you, and bending air duct No. 4 of the windshield, transfer it through box No. 2 (Fig. 12.1) for supplying air to the central deflectors on the heater body. Remove the decorative instrument panel.
| To make it easier to reinstall the panel in the future, remove two screws No. 3 (Figure 11.14). |
- Remove air duct No. 4 (Fig. 11.14) of the windshield.
- Remove the two bracket nuts from the panel brackets.
- And move them to the air duct brackets - this will allow you to install the decorative panel in place without the air duct, and secure the air duct to the panel after its installation by screwing in the screws from the interior side.
Figure 11.13. Location of Lada Granta panel screws.
Figure 11.14. Decorative instrument panel (view from the inside):
Tuning the multimedia system
In addition to the ESUP, you can also reflash the multimedia system. After the procedure, new functions will become available to the car enthusiast, and the system itself will be more modern. After the procedure, you can install rear view cameras, you will be able to access the Internet, and the player will read new file formats. You can install navigation.
Dear forum users, since they broke me, I’ll try to restore my hat over time.
Post edited by svyatoi30
— 24.06.19, 10:18
Cat for 30 thousand km somewhere. I just left right away and felt the difference! PS I was flashing 20 tons of km, the consumption was very high and the climate is generally a problem!
Post edited by vet67
— 16.03.15, 20:51
Dear experts, I have a question about the mms grant, maybe someone knows and has disassembled the device. I can’t figure out what the chip is and what it does. Details in the photo.
Is it enough to install the instrument cluster and steering column switch for cruise control to work?
Questions for people: 1) how many legs are there on our canbus chip? 2) who called them? 2.1) is there an output to the BDM connector? 3) who has clear photos of the board from the chip side?
I found some photos.
Post edited by Lobster163
— 25.03.15, 08:50
Method No. 2: replacing the Lada Granta heater radiator without removing the panel
- Unscrew the expansion tank cap and release the pressure in the system.
Expansion tank plug
- We unscrew the plug in the cylinder block and grind the antifreeze into a plastic container.
- We disconnect the block with wires from the pedal unit: brake, accelerator, clutch.
- In the engine compartment, turn off the mass air flow sensor.
Mass air flow sensor
- We saw off the upper and lower pipes of the heat exchanger.
- We recess the pedal module and remove the heater from its original place.
- We clean the seat and blow out the cavity.
- We install the new radiator in its original place.
- We install pipes - connectors.
- Fill in 8.0 liters of pure antifreeze. We start the engine and check the system for leaks.
The process of replacing the radiator of a Lada Granta stove with air conditioning is similar to that described above.
Is it better to do it yourself or contact a service station?
Considering the simplicity of the process, replace the radiator yourself. If necessary, additionally read the recommendations outlined in the article, watch video tutorials, and get advice from specialists.
Undocumented capabilities of the Lada Granta heater
Unlike a number of other foreign cars, the Lada Grant has only four heater control switching modes. For example, there are six of them in Audi and Opel.
The air supply lines are connected in such a way that the windshield is heated at any position of the regulator. There is no such option in domestic transport.
In winter, when the air conditioning is activated, most of the air is automatically directed to the feet, in summer to the windshield for blowing. In Grant the flow is of the same type.
In order to warm up the side windows on the Lada Grant as quickly as possible in winter, you need to redirect the deflectors towards the glass. After the glass has thawed, we move the deflectors to their normal position.
The second speed mode of the regulator is not enough - we transfer it to the third to speed up the frequency.
According to the recommendations in the operating instructions, it is necessary to dismantle the heater when the dashboard is disassembled. However, the method is not as effective as the one presented above.
Kia Rio
But with this model you will have to seriously tinker. Since the deflector is attached to screws that are hidden by the visor. It must first be removed.
The tools you will need are Phillips and slotted screwdrivers, a flashlight and a construction spatula.
The process involves some combination of activities. Watch in detail how this work is done in the video.
Video: removing the instrument panel visor on a Kia Rio
Only then can you remove the central deflector. It is attached to pistons and screws. Two screws at the top, two pistons at the top and one at the bottom. After the deflector is removed, you need to disconnect the plug.
Before dismantling the left deflector, remove the left panel and the panel under which the fuse box is located. The deflector is attached to the side with two self-tapping screws. Before dismantling the right panel, open the glove compartment and remove the right panel, unscrew the screws. Now, by prying with a screwdriver, you can remove the deflector.
Video: dismantling the central and side heating deflectors
This is how the air duct deflector is removed on different cars. Of course, within one article it is impossible to give complete instructions for all car models. From all of the above, we can conclude that the amount of work that needs to be done to remove the air duct deflector is not the same. In some cars, the deflector is removed simply by pulling it out (Renault Logan), in others you have to remove the dashboard or other large elements (Lada Vesta, Kia Rio).
Wind deflectors on the Grant Liftback are not included as standard. The owner installs the accessory himself, having previously purchased it at a car dealership.
The gluing process is not complicated and intuitive. Every driver can cope with the task. Contacting the service center is not necessary at all. If you have accessories and rags, the work will take no more than ten minutes.
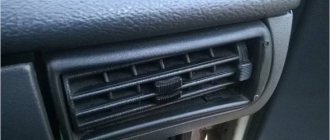
Removing the deflector on VAZ cars: step by step
The most common problem faced by owners of VAZ cars is the breakdown of the plastic curtains on the central deflector, as well as the air intake clogged with debris and dust.
On VAZ 2106
The rotary air duct deflectors on the VAZ 2106 are round and are located on top of the instrument panel. It is held in place by three plastic snap fasteners.
Layout of deflectors on the VAZ 2107
On the classic, there are two deflectors (33) in the center, separated by a plastic partition. They are inserted into the sealing rubber inside and held in place by compression. Plus there are small floating clips on the top and bottom. Easy to remove. At the attachment points they are pryed with a screwdriver and pulled out. The side deflectors (5) are removed in the same way.
On old-style cars VAZ 2110, 2111, 2112, everything is also very simple. The grille is held in place by latches, so you just need to pry the grille with a screwdriver and it will snap off. You must first remove the plastic cover on the slider. The deflector on new cars cannot be dealt with so easily, since the grille is additionally fixed with screws. To remove it, you will need a Phillips and slotted screwdriver.
- The fasteners that need to be unscrewed are located behind the plastic cover.
- Pry it off with a flathead screwdriver.
- Under the insert you will see two screws, you need to unscrew them with a Phillips screwdriver.
- After removing the screws, simply remove the grille; it is no longer secured in any way.
Video: removing deflectors on Lada Granta
On Priora and Kalina, air duct deflectors can also be removed without additional labor costs. On Kalina, for example, they are attached with two screws: from the top.
Top mount
Bottom mount
However, Lada Vesta will throw up a lot of surprises in this sense. Since the air duct deflectors are additionally fixed there, and the screws of the side air ducts are located in hard-to-reach places.
| Removing the plastic cover | First, remove the cover shared with the radio. It is held in place by fasteners. We pry it up with a screwdriver and gradually unclip it around the perimeter. |
| Fasteners | Under the cover you will see 4 screws that hold the deflectors in place. Unscrew them. |
| Vesta with deflectors removed | Remove the grille. |
How to remove the dashboard for sizing
Recently a guy asked how to remove the dashboard for sizing. I want to share my impressions about this process. Suddenly someone wants to do this too. So here it is. I removed the panel last summer. Also for sizing. I did everything alone. I’ll say this: you can remove/install it alone, but it’s very messy. It's easier with two people, but I don't think it's much easier. Don't believe the repair book, it's much more complicated than it says. Too much will have to be removed in addition to the panel itself: the central trim, air duct tubes, gearbox housing, handbrake housing, floor tunnel, passenger airbag (if equipped), A-pillar trims, tidy. There are a lot of different screws and self-tapping screws, during assembly it is easy to get confused as to which ones were screwed in where. If I'm not mistaken, there are 26 screws alone for securing the panel itself! There are two treacherous screws on the left and right right under the windshield, which you can’t unscrew with a regular screwdriver, you can’t get under them. While the panel is being removed, you are left without glass blowing, and in current weather conditions this is fraught with consequences, including an accident due to fogged windows. If you just park the car. In terms of time: removal took 3 hours, installation took 4 kopecks. The steering wheel gets in the way. The left air duct pipe did not want to fall into place, it rested either on the body or on the windshield, it took me a whole hour just to do this. According to the results: the panel became a little more assembled, but after a WEEK it began to crunch again. In addition to this, the airflow on the windshield has become uneven - it blows weaker in the middle than at the edges. I’m generally silent about the numerous scratches on the dashboard and front door trims. You can remove them with an autogen lighter, but still the appearance is no longer marketable. Summarizing all of the above, from the bottom of my heart I HIGHLY DO NOT RECOMMEND doing this. You'll only make it worse. But this is purely my opinion, and then see for yourself. Maybe if you have experience in this matter, it will be easier for you. But I wouldn’t do this again now for any money, there are too many body movements and nuances
Adviсe
Antifreeze leaked into the cabin
To prevent problems with the heater core, you need to carefully monitor it. For example, from the first days of buying a car, periodically look under the car to see if there are dark spots there. And in the engine compartment it would be a good idea to observe the condition of the cooling system hoses. If you notice traces of antifreeze in any of these places, you need to immediately seek help, or carry out repairs yourself.
If possible, the hoses for connecting the heater radiator should be replaced with new ones, having coated the connection points with sealant. But some do not agree with this opinion. After all, sealant from the hose can get inside the cooling system and cause damage to the pump. As a result, the timing belt will break and the valves will meet the pistons.
The stove heating system on the Lada Granta car functions quite well, the owners have no complaints. The stove radiator is reliable and durable. However, there comes a time when the process of metal corrosion begins and the seams peel off. A faulty heating system can cause a lot of trouble, especially in sub-zero temperatures.
Frosting of windows and cold inside the cabin are the first symptoms of unstable operation of the heating system. Prevention is necessary.
Let's look at the step-by-step process of replacing the heater radiator on a Lada Granta car.
Advice from car enthusiasts and recommendations from experts
I have already removed the card several times myself, laid out the wiring, no complaints. The fit is tight, the first time I broke one pin, I installed a new one. No complaints.
Michael
https://remont-avtovaz.ru/snyat-obshivku-s-dverej-na-lade-grante-liftbek/
The car is not even six months old, but I have already removed the cards twice and sealed the joints. You can hear knocking and vibrations on the paving stones. Additionally, I pasted over the noise reduction. I can't recommend the quality.
Ivan
https://remont-avtovaz.ru/snyat-obshivku-s-dverej-na-lade-grante-liftbek/
Now the clips on the doors are different. cone with latch. When removed, all the clips came off without breaking (I removed the trim on all 4 doors). And these black brushes keep the cover in the trunk, after removing them I had to throw them away (they didn’t fit back tightly and the petals were partially covered) and buy them from foreign cars.
Alex
https://club-lada.rf/granta-remont/181-snyatie-obivok-dverey-granta.html
On my new Grant, the handle mount was not like on the nines and classics; you need to bend the ring from the round washer and pull the locking ring in the direction opposite to the direction of the handle.
Alexander
https://ladakalinablog.ru/snyatie-obshivki-zadnej-dveri/
I haven’t yet met people who have had difficulty removing door trim from Granta’s doors.
Zhenya
https://1ladagranta.ru/remont/snyat-obshivku-dveri.html
The process of removing the trim from the front and rear doors of the Lada Granta is simple, so even an inexperienced motorist can cope with it. In order to deal with one door, it is enough to spend 10–20 minutes, it all depends on your qualifications.
Removing and installing the dashboard of a Lada Granta car
We remove the instrument panel when it is necessary to change the wiring or when repairing the interior heater; we also remove the panel during body work
We prepare the vehicle for work. Disconnect the negative terminal of the battery.
Drain the coolant from the engine cooling system.
We remove the filter of the heating and ventilation system.
Using a Phillips screwdriver, unscrew the four self-tapping screws that secure the heating system filter casing to the instrument panel.
Loosen the clamps securing the heater hoses and remove the hoses from pipes 2 of the heater radiator.
Using a 10mm socket, unscrew nut 1 of the stud securing the flange of the heater radiator pipes to the front panel.
Removing the cover of the mounting block
Removing the instrument cluster
We disconnect the steering column from the instrument panel frame and lower it to the floor of the body or remove it completely
We take out the seals of the front door openings
Unfastening it from the clips, remove the left side trim of the instrument panel.
We also remove the right side trim of the instrument panel
Use a screwdriver to pry up the upholstery of the left front pillar, separating it from the pistons, and remove the upholstery.
We also remove the right front pillar trim.
Remove the headlight beam direction control knob
Using a 21mm socket, unscrew the nut securing the regulator to the instrument panel
Remove the headlight dimmer from the panel hole
Using a screwdriver, press out the two latches on the glove box and remove the top edge of the box from the instrument panel
We open the glove box completely and, applying force, pull the box off the split hinges
Near the left door opening, use a 10mm head to unscrew the nut of the ground wire tip and remove it from the stud
Using a 10mm socket, unscrew the two nuts securing the terminals of the ground wires to the right bracket of the panel console
Alternative torpedo
The alternative dashboard is softer than the standard “tens” dashboard, but the main advantage is the absence of unpleasant grinding and squeaking. Motorists decide to get rid of the standard one precisely because of the squeaking. For the VAZ 2110 car there are several types of panels that differ in design.
The panel is sold as a set:
- The panel itself, which is an alternative to standard plastic.
- Buttons, brackets and inserts for blowers and instrument panels.
- A set of wires and a block for a double switch.
- Buttons for low beam, heating, dimensions and fog lights.
- Plugs for buttons are installed in places where keys are not needed.
➤ Grant rear door trim - removal and installation
The rear door card is most often dismantled due to deformation, failure of the window lifter guides, or the handle. The process of replacing the rear door yourself is within the power of every car enthusiast, but it requires care. The mounting pattern is typical on all models of the Lada Granta family.
Preparatory stage before removing the rear door on the Lada Grant
Required materials, tools for disassembly:
- set of car keys, sockets, ratchet;
- rags;
- liquid WD – 40;
- new rubber seals, plastic clips (as needed).
Stage No. 1: remove the casing
- We place the car within the perimeter of the repair area, remove the terminals from the battery.
- Open the rear left (right) door and raise the glass all the way up.
- We unscrew the blocker - the so-called soldier.
- Use a screwdriver to pry up the plastic window handle.
- We remove the latch and remove it from the grooves.
- We dismantle the handle assembly.
- Use a screwdriver to pry up the body of the outer door handle and unscrew the two bolts - the retainer.
- We remove the lower right corner of the card and remove it from its seat. We carry out the work carefully, since the plastic clips are fragile and can be damaged (10 in total).
- Remove the card counterclockwise.
- We remove the door lock rod from the card.
- Using a Phillips-head screwdriver, unscrew the two screws securing the handle to the body part.
- We remove the base of the handle from the seat.
- We remove the rod, the handle lever.
- On the inside of the seal, unscrew the screw to remove the plastic decorative insert and remove it.
- Remove the rubber seal from the rear guide.
- Using an “8” socket, unscrew the bolt securing the guides at the rear of the door, from the end.
- We remove the guide from the door opening.
- We remove the piston from the hole in the door and remove the seal.
- Align the glass and unscrew the bolts securing the holder.
- After the door card is removed, raise the glass to the upper position and secure it with masking tape for safety purposes.
- Remove the foam pad from the handle shaft.
- Using the “8” socket, unscrew the three bolts securing the window regulator module to the door body.
- By analogy, unscrew the two nuts at the bottom of the mount.
- We remove the window lift mechanism from its regular place.
Window lift mechanism
Stage No. 5: dismantling the outer handle
- Using the “8” head, unscrew the handle fastening from the back side.
- By analogy, we unscrew the bolts from the front part.
- We move the handle to the side and remove the rear door trim on the Lada Granta.
- We remove the metal rod from the plastic holders.
- Using a Phillips screwdriver, unscrew the intermediate fastening of the locking rod.
- We remove the rod from the clamp.
Unscrew the bolts
- From the end of the door, unscrew the three screws that secure the lock to the body.
- Disconnect the block with wires and remove the electric drive assembly.
- We disconnect the plastic corrugation from the door pillar.
- Disconnect the block from the wiring.
- Using a spanner wrench set to “17”, unscrew the upper and lower fastenings, having previously unfastened the limiter.
This completes the process of dismantling the body element and its components on the Lada Grant.
We install the rear door in the reverse order.
Catalog articles for rear door components
The given dimensions are calculated in mm
For most drivers, the standard sound system is sufficient, as are the speakers. But lovers of high-quality sound practice installing podiums and spacers.
The installation process on the rear doors is similar to the installation on the front doors. We carry out the work ourselves, the principle of operation is intuitive.
- We clearly determine the size and shape of future speakers. For this purpose, we remove the map, apply speakers to the holes, and calculate the parameters of the podiums. How to dismantle the card on the Lada Grant is written at the beginning of the article.
- We cut out the blanks ourselves according to the drawings or purchase standard designs in the store. We join it to the body with foam.
- We connect the speakers to the block with wires; the manufacturer initially laid the cables in the rear circuit.
- We install protective nets and check that they are working correctly.
Choosing the right radio size
We carry out installation either independently or by contacting specialists at the service center. In the second case, the service is paid.
By default, all VAZ and Lada models are equipped with a 1-DIN radio. The opening dimensions correspond to: 180 x 50 mm. This is an old standardization that has been in force since the times of the USSR. Modern audio modules can be purchased complete with a pre-installed LCD display. The size of the opening must comply with the standard: 180 x 100 mm, that is, doubled in height. Size marking: 2-DIN.
To install the radio in the Granta liftback, cut out the top pocket, remove the plastic, and install the assembled module. For a beginner, the process will seem somewhat complicated, so strictly follow the instructions.
Adviсe
Antifreeze leaked into the cabin
To prevent problems with the heater core, you need to carefully monitor it. For example, from the first days of buying a car, periodically look under the car to see if there are dark spots there. And in the engine compartment it would be a good idea to observe the condition of the cooling system hoses. If you notice traces of antifreeze in any of these places, you need to immediately seek help, or carry out repairs yourself.
If possible, the hoses for connecting the heater radiator should be replaced with new ones, having coated the connection points with sealant. But some do not agree with this opinion. After all, sealant from the hose can get inside the cooling system and cause damage to the pump. As a result, the timing belt will break and the valves will meet the pistons.
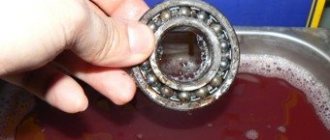
We dismantle the radiator of the Lada Granta stove
This radiator eventually leaked into the car interior. And antifreeze vapors are harmful!
Despite the fact that there are usually no complaints about the quality of the stove, breakdowns can still occur. If you focus on the radiator, it may clog or leak. In any case, you need to immediately begin dismantling the stove, after which it will be possible to inspect it in detail and understand the causes of the breakdown.
Most of the work will have to be done on the top of the engine compartment, as well as from inside the car. In fact, in this case we will not need a pit, a jack, or a lift. Just keep in mind that access to the engine compartment will be extremely difficult.
- To begin, unscrew a couple of clamps that secure the heater pipes to the heater radiator. This frees them up so we can remove the pipes completely.
- Now we will have access to draining the coolant from the radiator. Naturally, you will have to take care in advance of the container where this liquid will be drained.
- If possible, we move the pipes to the side. In principle, most of the work in the engine compartment is completed here.
- Next comes work from inside the car. Near the handbrake you can find one self-tapping screw that secures the tunnel, as well as another self-tapping screw for fixing the parking brake housing. Unscrew them completely. In addition, on the driver's side and on the passenger's side there will be two more screws that secure the tunnel on both sides.
One self-tapping screw under the handbrake tunnel
Unscrew the two screws. One is visible in the photo, the second is to the right, closer to the gearshift knob
Three pedal mounting bolts
Gained access to the heater radiator pipes
We saw off the radiator tubes to remove it
Installation of a new Lada Granta radiator
We carefully cover its perimeter with foam rubber, after which we begin to work with the window in the stove body.
Carefully cut a small window of a suitable size, closer to the bottom of the stove body.
After this, the new radiator will fit into place very well. All other parts are assembled in reverse order.
Selecting a new heater radiator (verified articles)
A model specifically for the Lada Granta Luzar under the symbol LRh 0190b would be a good fit for the role of a standard heater radiator.
It is completely made of aluminum alloy, and the price of this radiator is about one and a half thousand rubles. In addition to the Lada Grant, it is also suitable for installation in the second version of the Lada Kalina.
In general, so far, alternatives are rarely found on the domestic market. So car enthusiasts have to be content with this radiator. However, it performs quite well, especially if you do not use special additives to “repair” it, which seal the liquid supply channels.
Radiators of the so-called new type are characterized by mounting features. In addition, such radiators are not solid, but consist of two parts. They are assembled together using three self-tapping screws.
As for the “old” radiator model, it has a completely solid structure. However, most of the fastening elements are the same as the new type, so installing any of them should not lead to any difficulties.
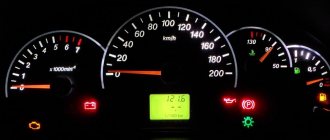
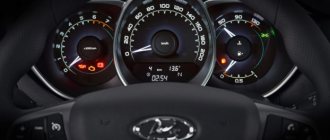
Dashboard
To display the technical health of the vehicle and monitor its condition, there are visual indicators that are located on the dashboard. If any breakdown occurs in the car, a certain sensor will notify the driver.
The Priora dashboard has maximum information content and contains the required number of indicators. Each sensor on the panel is illuminated from the inside in a different color; alarm signals are usually colored red.
The lighting is provided by a set of light bulbs mounted on the other side of the dashboard.
Indicator interpretation
In order to easily navigate this particular state of the car, it is necessary to understand the purpose of all indicators. This will also help to understand the breakdown of the device and its cause. The following signal indicators are located on the Priora dashboard:
- speedometer – informs about the speed at which the vehicle is moving;
- tachometer - shows the crankshaft revolutions per minute, the red zone reports a critical excess of the indicator;
- battery condition – the normal state of the sensor is off; if it lights up, then there is a problem with the battery itself or the power supply (except for the moment the ignition is turned on);
- oil pressure – lights up when the lubricating fluid pressure in the engine is critically low; further operation of the vehicle is highly discouraged;
- parking brake sensor – yellow indicates that it is on;
- coolant temperature – normal needle position is 80-90 ℃, above 100 ℃ the cooling system overheats, engine operation is prohibited;
- presence of fuel in the gas tank – informs about the amount of gasoline.
Additional sensors
A few more important information indicators on the Priora dashboard:
- button for controlling the car’s daily mileage and navigation between modes;
- alarm - the normal position is characterized by a pressed button without light indication;
- a malfunction in the power steering - if this device breaks down, the sensor will signal when the ignition is on;
- high beam headlight indicator – lights up blue when activated;
- side lights – notifies that the side lights of the vehicle are on;
- faulty airbags - when the ignition is turned on, an indicator lights up on the Priora dashboard, the system scans the integrity of the airbags and if the result is satisfactory, the indicator goes out;
- belt sensor – signals a violation of driving safety, the driver is not fastened with an appropriate belt;
- brake system malfunction - vehicle operation is prohibited;
- breakdowns in the ABS system - you can move, the braking system is normal, but it is better to eliminate the problem of the braking assistance mode;
- internal combustion engine malfunction (Check Engine) - an extensive list of malfunctions that affect the operation of the engine; prompt diagnosis and immediate repair are required.
To illuminate the instruments in this vehicle, two types of light bulbs are installed: conventional and with a VDO category socket.
Sometimes they burn out, the reason may be overvoltage in the car's electrical network, strong vibration of the body, the end of their service life or poor quality of workmanship (which is most often).
To determine the type of light bulb being mounted, you need to remove the instrument panel and unscrew the burnt element on its back side. The light components themselves are the same. However, their contacts, in the form of very thin wires, are soldered to the cartridge contacts.
Replacing light bulbs
Replacing the Priora dashboard light bulbs can be done in two ways. The first is the easiest: just buy a light bulb along with a socket and easily replace it. In the second case, you will have to arm yourself with a soldering iron and patience, since the wire contacts of the light element are soldered to the socket.
It is necessary to unsolder the old contacts, free the socket from the burnt out lamp and solder a new one
It is important to pay attention to polarity during assembly. If connected incorrectly, the light bulb will burn out and you will have to start all over again, including purchasing a new light element