Gas-filled hood struts wear out over time. Weaker parts tend to fail in cold weather because gas pressure drops in low temperature conditions. In hot weather, such racks will work fine, but it is still better to replace them.
When purchasing new parts, keep in mind that the thrust struts for the trunk and hood lids may differ in length and types of fastening. Some have a hinged connection at the ends; there are models with a combined fastening, combining hinges and a rigid fastening with a permanent loop. There are products with a flattened support at the end of the rod, connected to a fixed mounting pin.
It is necessary to measure the length of the stops on the car in the extended position and buy a new part with the same dimensions. It would be even better to take the old stop with you to the store.
Prices for branded, high-quality shock absorbers (supports) for the hood or trunk of a foreign car in online stores vary between 2500–2800 rubles per pair. For domestic cars VAZ, Lada, etc. their cost can start from 300 rubles per piece.
After purchasing new suitable parts, you can begin replacing the stop. The following instructions will help you complete it.
Reasons for replacing old shock absorbers
It is impossible not to notice that one of the racks is broken. Most often, the door stops locking when lifted, which causes inconvenience for the driver. If you do not replace it in time, you may be injured when using the roof rack. Typically breakdowns occur for the following reasons:
If the shock absorber is working properly, when lifted, the cover moves up on its own to its original position. The door should not rise any further, even if you push it. Faulty stands usually do not hold the lid at all. Also, a broken door may not lift all the way or move beyond its original position when lightly pressed by hand.
Which trunk shock absorber to choose and what to look for when purchasing
It is advisable to first remove the part and go to the store with it. Another option is to measure the length and height in advance; you can even make a pattern on paper. Before purchasing, you should study the instructions for the car; important parameters are indicated there:
There are many trunk shock absorbers, and they are different
Depending on the method of suppressing vibrations, shock absorbers are divided into hydraulic and dynamic. Hydraulic models slow down the movement of the lid sharply. Dynamic ones work smoothly.
Many motorists ask on forums whether it is worth replacing old oil stops with more reliable gas ones . It is important to consider that they will be more expensive, but their advantage is stable operation even at subzero temperatures. Value for money and acceptable quality - gas-oil models. Their difference from gas ones is only that in cold weather they are more susceptible to breakdowns, but they are more reliable than conventional oil ones.
Gas shock absorber for VAZ 2121 “Niva”
Sometimes there is no model of stops on sale with the ejection force of the original ones. Instead of 450 N, you can take 470 or 430 Newton. On domestic cars, it is not advisable to install shock absorbers with plastic fasteners and bolts that are held in place by clamps. When opening a heavy trunk of a Volga or Niva, the struts may break out. You need to choose parts with metal hinges that will be securely fixed.
Both pushers need to be replaced at once , although it may seem that even when installing one new one, the cover holds quite well.
In fact, soon the problem will arise again, and the second shock absorber will have to be replaced. Therefore, it makes no sense to save, especially since the cost of the part is usually about 200-400 rubles. If you wish, you can install stops for VAZ on foreign cars or purchase imported shock absorbers for domestic cars. Such replacement does not affect the service life of components. However, many note that stops for foreign cars are superior in quality. It is important to remember that the price of imported spare parts is always several times higher.
Main qualities
Hood stops are characterized by three main properties, which determine their main advantages:
- Reliability. When creating them, only quality-tested materials are used, which is why we get shock absorbers that work reliably both in the north and in the south of Russia;
- Quality. The most important attention is paid to this, because all the elements and mechanisms that are located in the engine compartment are always susceptible to the aggressive effects of the various components present here: thermal loads, salt fog, humidity. That is why it is most important to purchase high-quality parts that have an anti-corrosion coating;
- Any driver who has installed such a part in his car knows firsthand what accessibility to the engine compartment means. At the same time, all repair work and inspection of parts can be carried out with maximum comfort for yourself.
This comfort is characterized by the following:
- The hood can be opened with one hand. You don't need to make a lot of effort for this. Now, even in the most extreme weather conditions, access to the engine compartment will open quickly;
- The lifting height of the hood lid remains comfortable;
- The hood stops ensure that the lid rises smoothly, after which it is securely fixed in this state;
- Installation is also very easy.
Ease of installation
The process may only require two wrenches. Installation of shock absorbers involves several basic steps:
- Install the brackets in their original place;
- Mount the shock absorbers themselves there;
- Fix.
And that's it... No more fasteners, threads and the like. This process will only take 10-15 minutes, but there will be so much benefit later.
How to replace a trunk shock absorber on a foreign car - step-by-step instructions
On a 2003 Skoda Octavia, the operation is performed in 15-20 minutes. It is advisable to carry out the installation in the warm season, since in frosty weather the lid closes worse, and there is no way to check the operation of the mechanism.
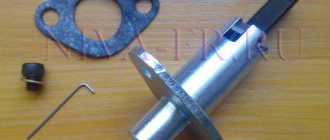
There are latches on both sides of the shock absorber that hold it in place. First, use a screwdriver to remove the lower retaining ring. In new models, there is no need to remove the locking rings ; the stops simply snap into place.
Then remove the same bracket from above. Lifting the back cover, the stop is pulled out.
Using a flathead or Phillips screwdriver, remove the latch on the new part.
The new shock absorber is first pressed against the upper ball pin and rotated until the element locks into place. The part is then attached to the bottom.
INSTALLATION
1. If the gas stop is fixed by a composite socket, follow these steps:
- Start by securing the rod end connection
(bottom connection) of the air spring. To do this, place the end joint lumen on top of the ball pin. No tools required. - Gently press the end connection connector onto your finger.
Do not use a hammer or vice . Light hand pressure is enough to secure it. - Repeat these steps on the other side.
2. If the gas stop is secured by an all-metal socket with a wire safety clip, do the following:
- Start by securing the rod end connection
(bottom connection) of the air spring. To do this, place the end joint lumen on top of the ball pin. No tools required. - Gently press the end connection connector onto your finger.
- Insert the straight end of the clamp fully into the small hole located on the side of the connector.
Then rotate the curved part and snap it around the neck of the connector. This will keep it firmly in place. - Repeat these steps on the other side.
Note: For informational purposes only. We do not accept any responsibility for any problems caused by your interpretation of this material.
How to replace a trunk shock absorber on a domestic car
When removing shock absorbers from a car of a Russian automaker, in addition to a screwdriver, a wrench with a diameter of 13 mm is used. The following describes the procedure for Lada Samara cars:
On each side, the trunk lid stops are held in place by two ball-head bolts. These bolts need to be unscrewed.
The bolts at the bottom of the mount are also unscrewed.
Then the new shock absorbers are screwed in exactly the same way. Those with a hydraulic mechanism are screwed with the rod down. If the machine did not previously have stops, you will have to drill holes for the bolts. There will be a gap at the bottom at the connection point. Therefore, it is advisable to install a washer that will press the bolt.
Videos with step-by-step instructions:
Making a double-hinged stop
When the preparation is complete, replacing the old stops will take no more than 10 minutes. These swivel ends are usually held together by some kind of clamp: either a flat C-clamp that fits through the back of the cracker and grips the bottom of the ball, or a wire C-clip that slides through the bottom of the cracker and under the ball to prevent liberation.
Inserting a large screwdriver between the metal and the ball joint and acting as a lever is not a good way to push the stop out. Use either needle nose pliers or the smallest screwdriver you have and gently pull or lift the clamp away from the biscuit. Then simply pull the cracker off the ball. Do the same with the other end. Save the clips if they are not damaged. Sometimes there is an additional clamp.
Pull the locking clip away from the support stand to remove the stop. You may have to pull or push the clamp to release it.
Be careful when working with the trunk supports attached near the rear window defroster. If a screwdriver or pliers accidentally slips off, you may damage the heating element.
Recommendations for installing trunk supports
To ensure that the lid closes and opens smoothly in any weather, you can adjust the trunk and wrap the torsion bars with electrical tape. If the door begins to open too much and touches the roof, it is better to attach a gas strut travel limiter. It is easy to make from nylon rope.
Sometimes it happens that shock absorbers are sold without mounting bolts. In this case, the missing elements must be removed from the old stops. If the model is not designed for disassembly, you will have to cut the body of the old stop. To connect an old bolt to a new part, you must:
Tips for long-term use of shock absorbers
Sometimes motorists complain about squeaks when opening the lid . To avoid such problems, you can try lubricating the stops and hinges. But in most cases the reason is the low quality of components or their obsolescence. At low temperatures, the viscosity of the working substance increases. Therefore, in winter, when operating in northern regions, you need to open the trunk with a smooth movement.
Often, after replacing one shock absorber, you have to apply more force when closing the door. Therefore, some drivers decide that one stand is enough. In fact, the load will be distributed unevenly, and the mechanism will begin to wear out faster. To avoid having to replace it again soon, it is better to immediately install two shock absorbers .
If the shock absorber no longer holds the door, it is not necessary to throw it away. You can make simple repairs to temporarily postpone the purchase of a new part for a while. Before you begin restoration work, you need to prepare tools - a cordless drill and a metal drill.
When carrying out a simple repair, you will first need to pull the piston out and drill a hole in the housing. In this case, it is important to get into the area located in front of the piston. Then you need to wait until the air comes out from inside. The oil is also drained through the hole.
The drilled hole will allow you to determine the position of the piston. You need to drill a second hole, which will be located exactly under the piston. It is made end-to-end.
A nail on a string is tied to the stop with electrical tape. After lifting the trunk, a nail is inserted into the hole, so the lid is fixed. To lower it, the nail is removed.
Inserted nail in repaired stop
Do-it-yourself repairs should only be done as a last resort and, if possible, new components should be supplied as quickly as possible. No maintenance is required after installation.
In order for gas struts to last as long as possible, it is important to check that the trunk lock is closed before traveling. Otherwise, the cover may open along the way, resulting in damage to the glass and the stops breaking out.
DIY rear door shock absorber repair
In the vastness of the forum, there are different ways to relieve pressure from the rack before disassembling, but there is not a single detailed one. Write down who does it and how, in detail, so to speak “competitively”, so that later you won’t be offended by the repair you just made, or worse, by a damaged eye.
A thin drill bit and a drill at low speed. True, I was dismantling a shriveled gas strut. Otherwise, the GP from the office chair was understood in the same way. Drill so that the future hole is located above the oil level. If you are afraid for your eyes, put a protective shield cut out of cardboard over the drill. However, I drilled without anything and there was nothing but zilch.
Why be wise? Drilled and pricked with a needle. If it didn’t puncture, I still drilled it. Drill 1-1.5 mm. I used to drill with a 0.25 drill bit, but it's difficult without breaking it. It drills where it is cut. And so, my grandfather sawed such a stand on the balcony, using a file in a circle. Then he told how someone fired a gun at him and showed off the bruise. It’s good that he at least said what he did, otherwise I might have believed it.
Where is the sealing ring located on the rod plug? I ask because it is necessary to maintain the maximum length of the pipe. Where should I drill? Here are two photos:
Honestly, I don't remember. I was drilling a stand that was already leaking, there was a little oil in it, a cube at most. You let it lie down in a horizontal position so that as much oil as possible drains off the top wall. Once the air is released, the oil will no longer flow, it will only ooze. Cover the pipe with rags if you are afraid of getting something dirty, but I don’t think they will be useful. I can’t tell you where to drill - I drilled in the middle, I was just curious what was inside
Yes, they drilled her hole and that’s it. There is no more than a couple of cubes of oil. Don't be afraid of it, while you're drilling it will all flow down. The hole definitely won't have it.
Judging by the photo, the stand is stretched, made of a round coin, like a 12 gram can. This means the walls are a little thicker, but not by much.
Drilled. It turned out “the devil is not so scary.” “The drill was really dull, I didn’t sharpen it, I drilled for about 3 minutes, and at the same time I was watching a movie on TV, when it “bumped” I didn’t even have time to get scared - I was distracted. By the way, the “zilch” is similar to what happens if you hold the fitting of a car pump with your finger, pump and release the fitting, that is, the sound is quite quiet and nothing is splashed with oil. If anyone is interested, after complete disassembly I will post a photo of the giblets, if not necessary, I will destroy the thread.
This shriveled stand (it was easily pressed in) was removed using a dirty but safe method - the rod in the place number “1” was ground off with sandpaper, then it was pressed against the floor with the rod and pressed. I naturally bleed it down the machined rod along with the oil =) well, this was all done in the garage using old rags. I disassembled the next one by FINISHING it with a hacksaw in the place numbered “2”. file the current at one point (and not in a circle.) or it’s even easier to drill with a thin 1mm drill. when it hisses, don’t get scared and don’t throw it away (if it’s in a vice, you can cover it with a rag and step aside. If you’re drilling on the floor, you can put the stand in a thicker pipe, leaving only the tip into which you’ll drill), otherwise it will turn over and splash oil =)
Be sure to use safety glasses.
At one time I drilled into a stud along its axis. A small spritz and a drop of oil. All!
Trunk lid shock absorber: briefly about the device, breakdowns and replacement
Suspension shock absorbers are integral components of modern cars, without which it is completely impossible to imagine them. However, shock absorbers have also found application in car body elements - the hood and trunk lids. True, shock absorbers for hoods and trunks rather make using the vehicle even more convenient and, to a certain extent, safe. Although they are designed quite simply and fail less often than suspension components, they can still bring a lot of trouble to the car owner if they break down. Let's try to figure out why trunk shock absorbers are needed, how they are checked and how they are selected and replaced if necessary.
Let's estimate the amount of work
Large modern auto parts stores often have parts catalogs hanging at the end of each aisle. So you can search for the necessary devices yourself. If not, please contact the seller for assistance. In any case, be careful. Hood and trunk lid struts come in different sizes and with different end attachments.
Some use a swivel joint at each end. Others have various combinations of the following mounting methods: a swivel joint, a rigid mount with a permanent hinge, or a flattened support at the end of the piston rod that connects to a fixed mounting pin.
Some hood stops even have two stages. For example, on a Volvo 960, if you remove the plastic clip on each stop, the hood will continue to rise above the vertical position, allowing greater access to the engine for repairs and maintenance.
Measure the length of the stops on the car when they are fully extended before running out to get replacements. Then check the length of the new stops before you go home. Better yet, take one of the old stops with you for comparison. Then you won't have to go back. Please be advised that some of the thrust struts for older vehicle models are no longer available at regular auto parts stores. (For example, 1981 Datsun 310GX.) If this is your case, you can contact your sales agent. Or maybe you'll get lucky and find the stops you need in the JC Whitney catalog.
With the appropriate parts in hand, open the hood or trunk and prop it up with a sturdy piece of wood. If you are replacing a single stop, a piece of wood will be the only thing keeping the edge of the lid from hitting your head. If you are replacing two stops, it will allow you to work on either side without worrying that the other stop may not hold the hood at the same time.
A little about the trunk supports
The trunk lid, as well as the hood of the vehicle, can treacherously drop at the most inopportune moment, causing injury to the motorist. The description of such a nuisance was reflected in many jokes and even movies, but it never promised anything good to the car owner himself. Automakers have found a simple and elegant solution - install special shock absorbers that simplify access to the trunk or engine compartment, and also guarantee safety during operation. They have several names: the most common “shock absorber”, the often used “stop”, “torsion bar”, less often “gas spring”. The most correct name is “pneumatic-hydraulic stop”, although both buyers and sellers use it very rarely.
Car trunk shock absorbers take on a number of tasks:
Popular shock absorber models
As you know, today products from several manufacturers are entering the market. Let's take a closer look at the models and find out their strengths and weaknesses.
DELLO from Germany
DELLO is a manufacturer of various spare parts for Volkswagen, Audi and other European cars. It is a brand from the first letter in Hamburg, as well as throughout Germany. The products, including shock absorbers for the cargo compartment and hood, are very popular in Russia.
It will be useful to know that some of the DELLO assortment is produced by third-party companies, but under a patent. Such products are sold under the AutoMega brand.
Spare parts from this German company are unrivaled, but sometimes unflattering reviews are heard. According to experts, if you take into account the cost of products, DELLO shock absorbers are a very profitable option with good quality. On the other hand, to be completely honest, the quality of the products somehow reaches 3 on a 5-point system.
MONROE
A very well-known manufacturing company in Russia. The design of Monroe products is always based on special technology. It is always head and shoulders above its competitors.
It will be interesting to characterize one of the manufacturer’s models:
- The buoyant force of the model from Monroe ML5809 is 410N.
- The internal working component is gas.
- The length of the cylinder is 19 mm.
- Product length – 536 mm.
The cost of this model rarely exceeds 700-800 rubles, although in some areas of the country they can be more expensive.
In general, if you ask the users of Monroe products themselves, they will call the price of shock absorbers quite affordable. But the most important thing that attracts people from Monroe products is the ability to modernize them. For example, if you need to repaint the fasteners so that they do not glow with the shine of chrome or for other reasons, this can be easily done.
Nakayama
A Japanese manufacturer that produces products at very low prices. Shock absorbers for the lid from Nakayama at one time could even be bought for 100 rubles.
Many motorists, owners of VAZ models, manage to install products from Nakayama along with springs from the trunk. As a result, this combination gives an amazingly effective result. The lid is fixed very securely at any angle.
On the other hand, even without the VAZ spring, the Nakayama shock absorber functions excellently, although the cargo compartment lid of some car models will only be securely fixed at the highest point.
Not all models are listed above, and not only the best. They are simply often more in demand than products from other manufacturers in Russia.
A little about electronic trunk shock absorbers
Electronic trunk dampers can be found on some two-box vehicles rather than the more common gas and oil filled units. Their main advantages : ease of installation and increased comfort. Main disadvantages : high price, low prevalence and average service life of the entire system (the shock absorber must be installed together with a number of other elements). The Electronic Stop Installation Kit includes the following:
There is no point in talking about the buttons - they are needed to control the shock absorbers. But the sensor strips cannot help but attract the attention of the car enthusiast. They play the role of additional protection against possible pinching. The special sensor included in the kit is an integral part of the system, so if it fails, it will simply be impossible to get close to the trunk. The installation of an electronic trunk shock absorber can be carried out by the car enthusiast himself. All the necessary information is in the manual that comes with the kit. However, if there is a problem with installation, you can turn to professionals. The same electrician will cope with the task of installing such a shock absorber, and will also check the operation of the mechanism and, if necessary, make adjustments.
Restoring struts: collapsible and non-dismountable shock absorber
A simple automobile shock absorber has the following design:
- lug body;
- rod with casing and mounting eye;
- piston, compression and return valves, rings;
- cylinder with valves;
- seals and fastening nuts.
First of all, the main problem of the shock absorber is leakage of oil or boost gas. As a result, the rack leaks, a knocking sound is heard during operation, and deformation of the rod is also possible. Violations of tightness and defects lead to changes in characteristics (partial or complete loss of performance). As a result, the car handles and brakes poorly, rolls, and does not hold the road, since the struts do not dampen the vibrations and sway of the body.
The main malfunctions include: free movement of the rod in the pipe, play during compression or rebound (workout in the rod or cylinder), damage to the shock absorber valves. It is also impossible to exclude external damage (case cracks, dents, etc.).
To repair, you need to remove the strut, remove the spring and release the shock absorber. Next, you should understand whether the shock absorber on the car is collapsible or non-dismountable. If the body is solid, then such a rack cannot be repaired. It is officially prohibited to open the body and try to weld the shock absorber after repair. If there is a nut or retaining ring in the place where the rod enters the pipe, this stand allows for repairs or maintenance.
To repair a gas and gas-oil collapsible shock absorber in a garage, you will need a compressor for supplying air (you can use a bicycle pump), a fitting for supplying compressed air, and a pressure gauge
Please note that you will have to work with high pressure, you should protect your eyes, hands, and face in advance
Repair of a collapsible type rack begins with the rack being clamped vertically in a vice, washed of dirt, and the entry point of the rod is also blown with air. Next, disassembly of the shock absorber begins and the protective cap of the rod is removed. Then you need to fill the shock absorber under pressure; for this you need a pressure gauge.
The shock absorber can be filled with nitrogen, carbon dioxide and compressed air. In the garage, it is optimal to use compressed air for repairs. First, the rack is disassembled, cleaned, the O-rings are checked, and the condition of the inner wall of the pipe is assessed.
If the shock absorber has damage to the rod, seals or valves inside the strut, you can buy a repair kit for dismountable shock absorbers, remove “live” parts from another strut, etc. The main task is to install all functional parts to obtain complete tightness, while cleanliness is extremely important during assembly (debris and shavings will quickly damage the restored rack).
By the way, it is always better to replace the oil seal with a new one, even if the existing one does not cause any complaints. Next, all that remains is to pump oil or air into the shock absorber, after which the strut needs to be pumped.
Shock absorber bleeding is required
Please note that shock absorber repairs must be done in pairs, just like replacements. In other words, repairing rear shock absorbers or repairing front struts involves manipulating both the right and left sides, that is, you need to restore both struts on the same axis
Now let's move on to how to disassemble a shock absorber and how to repair a non-dismountable shock absorber. Let us note once again that such parts are not officially repaired. However, repairs are possible, but they require skills and special equipment. In fact, usually non-separable shock absorbers are simply converted into collapsible struts.
If there is equipment, the repair comes down to the fact that it may be necessary to change the main part of the rack (cartridge), it may be necessary to replace the rod (sometimes to install a reinforced one), oil seals, seals, etc. In general, the process is reminiscent of repairing struts with your own hands in the case of collapsible shock absorbers.
In fact, it all comes down to replacing worn components, reassembling and pumping gas/oil. The main difference is that you need to remove the “cover”, which is not removable. There are many ways, from drilling holes to converting the rack from permanent to collapsible by installing a rod protection cap.
In any case, such repair of the shock absorber strut (if it is successful) allows you to restore performance, but it is difficult to guarantee the reliability and service life of the repaired strut. The main reason is that, in fact, it is necessary to make changes to the design, since the restoration of non-separable type shock absorbers involves disassembling and subsequent reassembly of the body, which initially does not provide such a possibility.
Checking the performance of the shock absorber
It is important to note here that, unlike the suspension shock absorber, the trunk and hood stops are not checked on special stands or by swinging. Visual inspection is ineffective if the gas stop is installed. However, you can check the shock absorber before it completely fails. The only caveat: a correct check is only possible in the cold season. If at low temperatures the shock absorber always works abnormally, i.e. he always has to “help”; replacement makes sense. In those cases when the stop works as if unstable, you can leave it - at positive temperatures everything will be fine with it. If a car has a gas shock absorber, instability in its operation always clearly indicates the need for replacement, because a gas-filled shock absorber does not depend on the vagaries of the weather.
Conclusion
Although the shock absorbers of the trunk and hood are resistant to mechanical stress, they fail on average once during the entire life of the car. Luckily, finding a new shock absorber is easy. Good analogues can be found in the catalogs of companies such as LUK, Finwhale, Blue Print, Monroe, Kraft, Magnetti Marelli. Inexpensive, mid-quality options can be found from AT, Sampa and FPS. There are quite a few options, but we still recommend buying shock absorbers from the most well-known companies, whose products are never cheap - here high quality is truly reflected in the high price.
Source
How to select and install trunk shock absorbers
To select a suitable trunk stop, you should first read the instruction manual - almost all the necessary information is contained there. The best way to search for a device is by car data: make and model, as well as year of manufacture. Here it is important for the car enthusiast to consider the following:
When you have a suitable shock absorber on hand, you need to figure out how to install it. To carry out all the work you need the following tools: a screwdriver or needle-nose pliers, a safety stop (several are possible). In some cases, a pair of open-end hex wrenches and a locking spring washer are required. It also makes sense to take silicone lubricant . The work is carried out in several stages:
If the stop is mounted on a rigid mount, then you need to unscrew the bolts one by one. Disassemble the pin fasteners using a pin, preventing the stop from slipping off the pin. To release the lock washer, you will need to push it in the desired direction. After installing the new trunk shock absorber in place, all that remains is to screw the lock washer until it clicks.
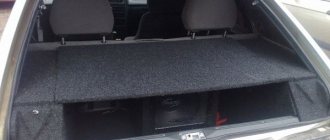
Lada 2115 › Logbook › Take care of your head, neck and back, or furniture stops in the trunk of a VAZ 2115
Hello again! My lengthy story with the trunk lid stops has finally come to an end. Alas, just like with the halogen lights in reverse, I couldn’t immediately come to the optimal solution, probably because I really didn’t want to drill into the car body. But when I came to the conclusion that this could not be avoided, I tried to make sure that there were as few holes as possible. Well, now in fact: I tried 3 methods: 1. Springs from the clutch of a VAZ 2101. 2. Gas stop from the trunk lid of a VAZ 2108. 3. Furniture gas stops with a force of 100 (I don’t remember the units of measurement VAZ have 300) The “stick in the trunk” method threw it away immediately. I also considered this method with gas stops from a VAZ 2108, or from a Niva:
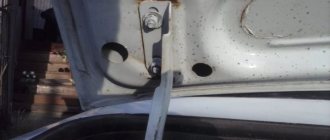
but after reading the comments and reviews (by the way, thank you very much for them and in general to everyone who paid attention to this topic), it turned out that some who installed it had gaps between the trunk lid and the rear view glass ((There was no limit to the frustration...((( As practice shows, Avtovaz cars are not only a designer for adults, but also a lottery: some people put it on - everything is fine, others - garbage. So I didn’t take the risk - I certainly didn’t want to play with this gap. And so according to what I punched: The 1st method looked like this:
“+”: 1. Cheap; 2. Easy to install. “-“: 1. They pinch the wire to the trunk lock drive (Green in the 2nd photo), why this is bad: in the best case, it will bite off over time, in the worst and more likely case, when it gnaws through the insulation and paint on the spring there will be a short circuit when opening the trunk using a button or key fob. 2. They chew the paint on the trunk lid pillar; 3. When opening, they accelerate the lid so much that it opens with a blow (you have to hold it when opening), but paradoxically, the springs did not always keep it open, when the car stood on a slight slope and the lid stood at an angle of approximately 45 degrees. Because of these results, I removed it on the same day that I installed it. Perhaps the 3rd point is one of the proofs that AvtoVAZ is a lottery, since the author of the article from which I took the idea happily wrote what it holds (although he did not specify how it holds on slopes).
My 2nd method looked like this:
“+”: 1. It is not necessary, or was not necessary, to drill the body, it does not spoil the paint on the car; 2. Reliably opens and holds the trunk lid; 3. Relative ease of installation.
“-“: 1. Hard (even a little tense) closing the trunk; 2. The lid did not always open by itself with the button, and not always the first time. To implement this idea, so as not to make unnecessary holes, I made a bracket for attaching the gas stop to the body from a strip of metal 3.5 mm thick (seen in photo 4). To be honest, it’s better than springs, but... somehow it bothered me, I didn’t install 2 stops since one was enough, and so the trunk closed tightly. In addition to being tight, it had to be closed by holding it with your hands as close to the stop itself as possible, otherwise the lid would play. Also, the trunk did not always open on its own; quite often he had to be helped. The lock itself stopped opening the first time (I had already come to terms with the idea that the electric drive itself was getting old). That is, sometimes the following situation arose: when the trunk was not closed successfully and it needed help when opening it, then with the engine running, when opening it with the button, it was stupidly unclear whether the trunk opened or not (you can’t hear the click when opening, and you can’t see the trunk lid)…(