Trunk lock VAZ 2107
The luggage compartment lock of the VAZ 2107 has a simple design and fails extremely rarely, but sometimes it may be necessary to adjust or replace the mechanism.
Trunk lock malfunctions
Malfunctions of the trunk lock on Zhiguli cars of the seventh model are usually associated with malfunctions of the cylinder. In this case, the lock will need to be removed from the trunk lid and disassembled to replace the part. As for the adjustment, it is carried out when the luggage compartment lid does not close well or knocks while driving.
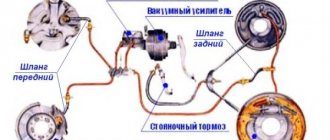
The trunk lock of the VAZ 2107 consists of the following parts: 1 - rotor axis; 2 — housing cover; 3 — drive extension; 4 — lever; 5 - spring; 6 - rotor; 7 — body; 8 — clamp; 9 — retainer plate
Trunk lock repair
To carry out repair work on the trunk lock, you will need to prepare the following list:
- wrench 10;
- installation;
- pencil;
- new lock or cylinder;
- Litol lubricant.
How to remove
To remove the luggage compartment lock, perform the following procedure:
- Mark the position of the lock on the lid with a pencil.
- Using a 10mm wrench, unscrew the 2 nuts securing the lock.
- Disconnect the mechanism and remove it from the car.
- By pushing the larvae inside the lid, it is dismantled.
- Remove the cylinder together with the spacer bushing.
- If necessary, remove the seal from the lock.
Replacing the larva
If the need for dismantling is due to replacing the cylinder, then before installing a new part, the mechanism is cleaned and lubricated with Litol. If the lock is completely replaced, the new parts of the product are also lubricated.
How to put
After lubricating the lock, it is installed in the following sequence:
- Insert the sealing element into the luggage compartment lid.
- Place the lock cylinder in the spacer sleeve.
- Mount the cylinder together with the bushing into the lock.
- Install the lock on the trunk lid in accordance with the previously made marks.
- Fasten and tighten the mechanism with two nuts.
How to adjust the trunk lock
If the trunk lid lock on the “seven” closes with difficulty, it needs to be adjusted relative to the locking element. To do this, loosen the fasteners and change the position of the mechanism so that the latch easily fits into the body and the lever secures it well, and there is an equal gap between the luggage compartment lid and the body over the entire area.
Adjusting the trunk lid
Sometimes it becomes necessary to adjust the trunk lid. It happens that the part is located above the rear wings or is shifted to the right or left. If the trunk lid can be moved to the sides by unscrewing the fastening nuts on the hinges, then with an incorrect height position the situation is somewhat different.
The trunk lid is adjusted using hinged mounting nuts.
To adjust the lid in height, you will need to open it completely and, holding the edge of the lid with one hand, apply force in the hinge area with the other. A similar procedure should be repeated on the other side.
If the trunk lid is not positioned correctly relative to the rear wings, the hinges must be slightly bent
The main thing is not to overdo it. Then close the lid and check the tightness of its fit. If necessary, repeat the procedure. To adjust the force of opening the trunk lid, the edges of the torsion bars of the springs are shifted to one of the teeth of the luggage compartment hinges.
Replacing the lock
The process of dismantling the old device and installing a new one will take no more than 30 minutes. Follow these steps:
1. Trace the outline with a pencil to accurately mark the position of the mechanism on the body. 2. Using a socket wrench, unscrew the two nuts that secure the device. 3. Carefully remove the lock without scratching the body covering. 4. Use your finger to push the cylinder inside the cover and remove it along with the bushing. 5. If necessary, remove the gasket. 6. Clean the new lock from dirt and dust, lubricate all its parts. 7. Put the gasket in place. 8. Insert the new cylinder into the bushing. 9. Install them in the lock. 10. Place the assembled lock in the place marked with a pencil. 11. Tighten the mounting bolts using a 10mm socket wrench.
If the trunk is difficult to open, you need to adjust the position of the lock in relation to the latch. To do this, the mounting bolts are slightly loosened and the mechanism is slightly moved so that the latch can easily enter and be securely fixed by the lever.
To adjust the force required to open the lid, the spring torsion bars are shifted by one tooth in the hinge using the installation tool.
Typically, the VAZ 2107 trunk lock is replaced after the lid stops closing the first time or starts knocking while driving. In some cases, the trunk lock must be removed and installed in order to replace its cylinder. For example, if the key is lost or the cylinder mechanism fails. So, what is needed to replace the lock and how to do this work yourself, without turning to the services of a service station.
Read more: Mitsubishi Pajero owner reviews
Thresholds
The main purpose of the thresholds is to protect the vulnerable sides of the car body. For this reason, thresholds are often susceptible to damage. In addition, when getting in or out of the car, passengers and the driver periodically come into contact with them, scratching the elements with their shoes. As a result, the paintwork comes off from them, which causes corrosion and rotting.
On the “seven”, the classic replacement or repair of a threshold begins with adjusting the door hinges. If this is not done, then it will not be possible to replace the threshold correctly due to the gap.
After this, the following is done:
- The doors are removable;
- The threshold is cut off (first the outer part, then the amplifier);
The new amplifier is welded through the holes on it, as in the photo below;
A new threshold is set.
The price for a set of thresholds for VAZ 2107 starts from 200 rubles. The thickness is usually 2-3 mm.
The remaining body parts of the VAZ 2107, such as doors and trunk lid, also have a significant place in the design of the body and its geometry.
Each of the body elements of the “seven” has its own ID number, casting pattern and thickness. So, for the roof - 0.9 mm, and for the rear wheel arches - 1 mm.
Simple ways to open a VAZ
Now let's get down to the methods. Conventionally, they can be divided into two groups: radical - when actions are decisive and not always justified, and delicate - calmer, conservative methods:
Open the door with wire
As you understand, it is better to use delicate methods, since more decisive and drastic ones will lead to the fact that you will have to pay for repairs. For example, if you break the lock to your vehicle, you will have to order it along with new keys and wait a long time until the order is fulfilled. Thus, you will not be able to use the car. Well, having broken the glass, you will have to install a new one.
Let's look at delicate methods
Method 1: Open the trunk
To open the trunk of a VAZ, you will need:
- Using an open palm, strike the area below the trunk lock. The blow must be strong and sharp enough.
- Take an awl (if it’s not there, then buy a nail file at the nearest stall, and you don’t have to open the trunk).
- Using an awl or nail file, try to get under the door seal and press the tongue.
- The door is open!
Method 2: Open the hood
- You will have to crawl under the car to get the lanyard connected to the hood latch. If you can't find it, try to find it through the radiator mesh.
- Mechanically press the tongue or simply pull the cable, the hood will open.
- On the car battery, find the terminals with the “minus” value, click them on the mount a couple of times.
- Since the body has a “minus” value, disconnecting it with the terminal will cause the doors to unlock.
Kit selection
Installation will not be possible if you do not have at your disposal a set of equipment necessary for installation. Buying it is not difficult, but you need to think about which specific option is best for you.
In total, 2 solutions to the current situation are being considered. Namely.
Safety kit
Category: Light trailers
- Factory set. Purchased from trusted and reputable manufacturers. The kit contains almost everything you need, so you don’t have to assemble different elements. But the price is naturally higher;
- Amateur kit. Here we are talking about independently preparing all the necessary components. The motorist is faced with the question of where exactly to get them and how to choose a set so that everything fits. It is difficult to do this without relevant experience and certain knowledge. But you can save a lot of money financially.
I don’t know what exactly you will choose, but I want to give one piece of advice. Buy an electric drive equipped with an inertia mechanism. This will allow you to turn off the drive when an obstacle appears in the path of the luggage compartment lid. Roughly speaking, the drive will not pinch your hand or head when you poke around in the trunk.
So the inertial mechanism is a very useful thing.
If we talk about assembling a homemade kit, then it is important to collect several basic elements. These include:
- power window module 2 pieces;
- 2 mechanisms for lifting glass;
- wires;
- diodes;
- electromagnetic relay;
- five-pin relays;
- four-pin relays;
- Relay connection block;
- springs for the lid lock;
- power tools;
- wiring;
- nuts, bolts;
- Bulgarian, etc.
As you can see, the set is quite impressive. Therefore, consider whether it is worth trying to assemble the kit yourself. Sometimes it is much easier and even more economical to purchase a ready-made factory kit with a guarantee and all the associated benefits. Price does not always play a key role.
Everything you need to close and open the trunk
To get started, you should decide on a list of what you will need to assemble the electric drive. First of all, you must have an electric drive mechanism in stock, and you can buy it in almost every car store in any country. Of course, the electric drive mechanisms are the same in their functions, but they often differ from each other. There are car owners who try to make this kind of mechanism with their own hands. For reliability and confidence in its performance, it is necessary to install a factory mechanism. The complete set of the mechanism consists of:
1. Electrical wiring.
2. Terminals.
3. Motor.
4. Documents with instructions.
5. Buttons with safety lock.
Immediately ask for warranty service or repairs. Quite often such services are not provided in markets, but in car dealerships it is just the opposite. A typical set of materials and tools will be needed for installation. There are times when you need to have additional wires because the factory assembly is not enough. To secure the wires, purchase items for one-time use, such as:
· Insulating tape;
· Tubes;
· Clips.
All of the above serves as the main material for fastening and installing the electric trunk drive. The electric trunk drive is a mechanism consisting of the following connected devices:
1. Motor.
2. Fuse.
3. Button with rod.
In order for the rod to work, several types of drive are known. Often there are mechanisms with magnetic plates and an electric motor. The electric one is long-lasting and of high quality, which is why it is the most consumed. When you want to buy an electric drive, think carefully about the purposes for which it will be used. In case of opening, thanks to the button located inside the vehicle, then you can use the standard model, and if suddenly using a remote control with an alarm (remote), then you should get more funds. In the Russian Federation you can find several types of electric drives:
1. With reinforced fastening.
2. Side mounting.
3. Standard.
Don't forget, you have to take your gear purchase seriously. If you buy a fake of poor quality, you will not receive guaranteed reliability and long-term operation. Do not ignore goods that are produced in the Russian Federation, as many buyers do. In modern times, domestic electric drives are produced no worse than foreign ones.
Subtleties of choice
When choosing a trunk, carefully study the types and information about the load capacity. If the trailer has a spring suspension of any design, which facilitates maneuvers over bumps and holes, then in the case of a roof rack on a car, with a shock-absorbing suspension of the car, it is separated by that very roof. It does not have pronounced properties to level out vibrations and take on the vector impacts of the load mass. But a body with inter-window pillars is a damper between the road and an additional high center of gravity. Therefore, they attach the trunk as low as possible to the roof, even one centimeter is important.
Trunk design
The golden rule: if the car has a pair of roof rails, then the corresponding cross members are selected. The dimensions must correspond to the distance between the rails
This is critical for even distribution where most of the weight is on key fasteners
If there are no elements, a set of fasteners is used to establish a connection between the trunk and the top of the car. The components of a basic trunk are few:
- Longitudinal arcs.
- Cross bars.
Support struts, which consist of:
- Brackets.
- Corners.
- Plastic platforms.
- Bolts, nuts and washers.
In practice, car racks come in different forms. The material used and the mechanical properties of the fasteners, together with the performance of the vehicle’s roof, determine the design and future purpose of the device.
Easy luggage rack selection
When purchasing a roof rack for your car, you should check:
- Vehicle make.
- Roof and body type.
- Year of manufacture of the car.
These parameters will help you avoid mistakes when purchasing. Subtleties follow
It is important to know what the roof rack supports and roof mounting rods are made of. They are made of steel and aluminum
When using the trunk for a short period of time, they stop with steel fasteners. With prolonged use, they become unusable and worsen their aerodynamic properties.
Advantages of aluminum racks:
- Anti-corrosion coating. With it, the service life increases significantly, therefore, the car owner saves money.
- Improved aerodynamics. The lower the air resistance, the more fuel the car saves.
- The aluminum basket is lighter. Installation and dismantling occurs quickly.
- An important parameter is the size of the structure. It is better to use a car trunk with adjustments.
Trunk mounting methods
Let's look at ways to attach a car rack to the roof:
- Full-time. When purchasing a car, the luggage rack fasteners are already included. And the mounting holes are hidden behind the door seal. This option is convenient and allows you not to waste energy searching for the necessary equipment. To ensure that the racks hold tightly, the set uses special bolts.
- Universal. Also called door. Installed using universal fasteners, fixed in the area of the body's counter-relief, which follows the bend of the door. This option is expensive to install and takes time. Only a specialist can select the exact model of a universal trunk.
- Use of roof rails. A large number of vehicles have roof rails. These are devices that run parallel along the roof on both sides, made of plastic or metal. With their help, even installing a car rack yourself is much easier. Sometimes roof rails are equipped with mounting points to facilitate the installation process.
Important points
Even after the above information, the economical driver will say: “So what? A special trunk is expensive, the box is small, and an expeditionary one is certainly not needed. I will assemble from different sets.” Today there are all luggage racks with all the components, but if such a car owner manages to assemble the suitable parts separately, after the fifth time, he will pass on his experience to his colleagues in the garage:
- Crossbars and roof rails are selected by measuring the roof.
- Simple supports are made of cheap plastic. Therefore, they are susceptible to destruction, since they cannot tolerate both heat and cold.
- It is more practical to use stands made of aluminum, steel or ABS plastic. They will last much longer without losing their properties.
- The larger the volume of the trunk, the more things it can hold.
It’s convenient to have a large trunk and not think about how much space is left in it, but:
- You will have to pay extra for the volume.
- Increased fuel consumption.
- The design will have deteriorated aerodynamic properties.
Any model has a permissible load. When purchased, an incorrectly selected car rack will lead to deterioration in vehicle control and rapid wear of the structure. The roof of the car also has a permissible load capacity.
Other options
If you don’t want to break anything, then do this:
- put on a glove;
- Punch your fist into the center of the license plate with all your might;
- a sharp blow can knock the tongue out of the groove.
The chance of success is one in three.
The next option is a little harmful - you need to carefully pierce the rubber sealing tape that seals the trunk lid in the lock area, a little to the right. Use a thick knitting needle or a sharp knife. Insert a piece of wire with a hook at the end into the resulting hole. Use it to feel the valve and pull it to the side, pressing the lid with your free hand.
If the trunk lock of the 2107 Lada is very old and holds weakly, then try pressing the tongue with a metal strip, a credit card or a ruler. Be careful - these improvised master keys often get stuck in the groove of the lid.
Some experienced motorists give the following advice:
- lift the cover on the right side;
- push it to the left as hard as you can;
- pull up sharply.
When the key is simply lost, then try using any other one at hand. If it’s tight, don’t push it in completely, so as not to lose it too. Dip literally half a centimeter into the larva and try to turn it. You don't have to use any force, but be sure to press down on the top of the lid.
Sometimes a piece of the key remains sticking out of the VAZ-2107 well. Grab it with pliers and twist it in the unlocking direction - this will certainly help.
Try all the methods described - one of them will most likely work.
How to install a power lock on the tailgate
Before installation, you should prepare a set of necessary tools and additional materials. So, we will need:
- Connecting wires.
- Terminals.
- Insulating tape.
- Safety fastenings.
- Set of wrenches.
- Several screwdrivers (flat and figured).
- Wire cutters.
- Pliers.
To begin self-installation of the electric trunk lid drive, you must dismantle the plastic lining located on its inner side, which blocks access to the lock. Almost always, when purchasing this device, sellers offer to additionally purchase a lock that has already been modified for it. You should not ignore this offer, since purchasing it will allow you to avoid a number of trivial problems when installing the entire mechanism and will additionally save a lot of time and nerves. The next stage of installation will be laying the wiring to the lock from the cigarette lighter power supply. The choice of a cigarette lighter is justified if this element is almost never used. In addition, if necessary, the device can withstand increased loads. In order to power the electric lock, it is necessary to disassemble the cigarette lighter input to install a fuse between it and the drive start button.
The drive button can be installed in any convenient location. After this, we move on to laying the power wires along the thresholds of the car. This will require about 3.5 meters of cable. The final stage of installation will be the installation of a modified trunk lock, followed by its connection to the network and configuration
When connecting the electric drive, it is important not to reverse the polarity, otherwise the armature of the electric motor will rotate in the opposite direction, as a result of which the mechanism will not function. It would also be advisable to install a fuse in the circuit directly in front of the electric motor in order to avoid its possible failure
Opening the trunk from the interior to the classic.
And so, in this article we will tell you in detail how to make the trunk open from the passenger compartment using a button.
For this we will need the following materials:
- drive (traction that will open the lock itself),
- button,
- relay,
- the wire,
- fuse 25A,
- terminals,
- electrical tape (heat shrink),
- cable,
- drill,
- drill,
- other tools (pliers, wire cutters, knife, file....).
First, let's look at the connection. Let's assemble everything according to the diagram below.
For convenience, I will describe in more detail:
The relay has 4 contacts 30, 85, 86, 87. Using terminals, we connect the wires as follows:
- Contact 85 is connected to “+” button,
- 87 contact to “+” drive,
- 86 and 30 we close and through the fuse to the battery,
- «-«
from the drive to the ground of the vehicle (screw it to any metal place with a self-tapping screw), - «-« from the button also to the ground of the car.
// for a three-pin relay the diagram is different:
87 - to “+” solenoid
30 — power supply “+” to the battery (for example, to the cigarette lighter) //
It should look something like the following:
After assembling all the electrics, we will check its functionality. We put the contacts on the battery and press the button. The thrust should be sharply retracted. If this does not happen, swap the contacts on the button.
Now we make a hole (wherever you like) on the tidy for our button, and mount it there.
We pass the wires under the panel and put the button in place. We also attach the relay to any accessible place.
We hide the wire from the drive under the box cover and take it out into the trunk.
The trunk lid has stiffening ribs. They are hollow inside. In them we will insert our wire to the center of the lid using a binding wire.
We mount our drive ten centimeters from the lock.
Now remove the trunk lock by unscrewing two bolts.
We drill (I did it with a self-tapping screw) a hole where indicated in the photo. This is done to center the drive cable.
We fix one edge of the cable to the back wall of the lock. Let's put it in its place. The other is to the extended drive.
After connecting to the battery
It happens that the spring in the lock is too tight and the drive does not have enough power to tighten it. (on average they have a thrust of about 6 kg). In this case, it is necessary to replace the spring with a weaker one, but not so much that the trunk opens randomly.
An example of what we got is shown in the video below.
What do you need for work?
A similar connection diagram for the trunk button attracts many.
To realize your idea, you need to prepare materials and tools.
The set consists of:
- electric drive (activator) of the luggage compartment lock;
- universal 4-pin relay;
- fuse blocks;
- fuse;
- wires;
- female type terminals;
- trunk opening buttons;
- heat shrink tube;
- electrical tape;
- plastic clamps.
The block is placed for safety reasons. Mounted on the positive wire. The fuse can be taken as standard, 10 Ampere. Do not need anymore.
Determine the length of the wiring individually. But practice shows that 5-6 meters is enough with a margin.
At any car market it will not be difficult to buy the entire set. It will cost 600-800 rubles. Maximum 1000 rubles.
Opening the trunk with a button with your own hands.
Hi all. Well, we finally got around to the trunk to open the trunk with a button. I’ve just been thinking about implementing this idea for a long time, but somehow there wasn’t enough time. Everything is done, it just takes a little time. We will do this using the example of a VAZ 2107 car. So, what do we need:
-Activator -Fuse block (I will drive the plus from the battery) -Fuse -Wire, I took with a reserve of 7m, -Button for opening the trunk of a VAZ 2110, -Terminals “Mother” -5-pin relay (you can have 4, later I’ll explain why I took exactly 5) -Well, you’ll also need electrical tape or heat-shrink tubing
I’ll explain why I took a 5-pin relay, it’s simple, because I opened the alarm book, namely the connection diagram, and it described how to connect a relay of this type, so I decided to take it so as not to look for connection diagrams on the Internet.
Here is my connection diagram:
I will say that this circuit is assembled to retract the activator, it can also be made to push it out, you just need to swap the blue and green wires. Elements of the circuit:
Trunk opening button, VAZ 2110, 3-wire
5-pin relay, 75.3777
After some leisurely work, the wiring is all ready, I took it with a reserve)
Let's get started, the installation process is quite quick, you can easily finish it in a day)
I decided to put the relay under the hood so as not to pull the positive wire too far, and I also have to look for a place under the panel for the relay :)
Through the main hole of all the wires I insert two wires, namely the wire to the button for opening the trunk, and the second directly to the activator itself, the positive wire:
I placed the relay in this place and attached the washer barrel to the mount:
I decided to make a conscientious terminal, so it was decided to buy a positive terminal:
I hid the wiring around the cabin under the carpet, you mean, it runs next to the standard wiring, and at the same time I ran the wires under the rear speakers so as not to disassemble 10 times:
Double wires are music, and the red one is our plus for the activator. In the trunk everything is simple, we carry it out together with the standard wires:
There is already a decent amount of wires collected, it’s worth stopping at this place. Unfortunately, I didn’t find the “mother” terminal like on the activator, so I decided to do it this way for now, then I’ll find the terminal and redo it:
The activator is made to retract. And on the minus I cut off the terminal and made another one:
Now about the location of the button. I didn’t think long and chose a place to the left of the seat, close at hand and not conspicuous.
The installation is too simple, I drilled a hole, put on the terminals and inserted it, we hooked the minus right there to the cover mounting bolt. We also run the wires under the carpet.
And now the most difficult part, for me it turned out like this, it was the relationship between the activator and the lock that slowed down my work, because I couldn’t drill the lock for a long time, I don’t know how everyone is, but I gave up on this matter and had to farm, because I don’t want to change it’s a native castle, who knows what quality you’ll find, but here it’s strong and hardened.
Equipping a domestic car with an electric trunk drive
If you install an electric drive for opening and closing the trunk on a domestic car (for example, a VAZ), the basic elements of the mechanism alone, which are already far from cheap, will not be enough. You will also need to install a trunk closer. Therefore, this method of improvement is irrational.
To bring this idea to life, you need to buy two ESP mechanisms (for example, consider products costing about three thousand rubles), a trunk lid control button (type 21100-3710620, cost 50 rubles) and a car window closing module (brand DenUp-RWC702m, price – 500 rubles).
In our example, power windows are installed in the luggage compartment of the Lada Priora using a simple connection. The rear edge of the ESP rail is connected by a threaded connection to the crossbar at the back of the seat, on which the shelf rests. The front end of the window regulator bracket with a welded nut is screwed to the rear window mounting beam. To do this, a groove is cut in the beam into which an M6 nut would fit.
As a result, the assembled structure works without problems when you press a button specially located in the interior or on the remote control.
The mechanism of two ESPs is free of these troubles. In some cases, the lock position will need to be adjusted.
Other options
If you don’t want to break anything, then do this:
- put on a glove;
- Punch your fist into the center of the license plate with all your might;
- a sharp blow can knock the tongue out of the groove.
The chance of success is one in three.
The next option is a little harmful - you need to carefully pierce the rubber sealing tape that seals the trunk lid in the lock area, a little to the right. Use a thick knitting needle or a sharp knife. Insert a piece of wire with a hook at the end into the resulting hole. Use it to feel the valve and pull it to the side, pressing the lid with your free hand.
If the trunk lock of the 2107 Lada is very old and holds weakly, then try pressing the tongue with a metal strip, a credit card or a ruler. Be careful - these improvised master keys often get stuck in the groove of the lid.
Some experienced motorists give the following advice:
- lift the cover on the right side;
- push it to the left as hard as you can;
- pull up sharply.
When the key is simply lost, then try using any other one at hand. If it’s tight, don’t push it in completely, so as not to lose it too. Dip literally half a centimeter into the larva and try to turn it. You don't have to use any force, but be sure to press down on the top of the lid.
Sometimes a piece of the key remains sticking out of the VAZ-2107 well. Grab it with pliers and twist it in the unlocking direction - this will certainly help.
Try all the methods described - one of them will most likely work.
All about the roof rack VAZ 2107
Cars of the VAZ “classic” family enjoy well-deserved love, including as economic “horses”. These cars carry trailers, building materials stick out of the windows, and, of course, every self-respecting summer resident has a special roof rack for transporting oversized and long cargo.
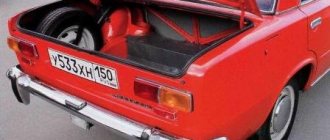
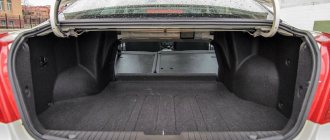
First of all, you need to decide on the dimensions of the VAZ 2107 trunk in order to know what maximum dimensions of cargo can be placed in the trunk with the lid closed. Here they are:
Everything that extends beyond these dimensions must be placed on the roof of the VAZ 2107 and transported on the top, removable trunk. This is especially true for long items. Materials such as boards, sticks, floor slats, if they do not exceed 4.5 meters in length, may not be marked with red marker flags. In the event that they protrude beyond the front and rear bumpers, they must bear the oversized load mark. This is especially true at the rear end.
There is an explanation for this: the front end is clearly visible to the driver, and he himself makes sure not to drive too close at the traffic lights.
The roof rack of the car is designed for a weight of no more than 50 kilograms. If the driver is sure that the road will be perfect, without the slightest holes, bumps and vertical vibrations, then you can put 75 and even in extreme cases 80-90 kg, but no more. Carrying heavier loads will cause deformation of the body structure, and this leads to disruption of the opening and closing of doors.
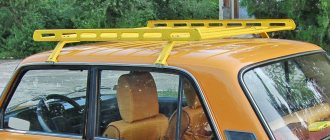
The photo shows an old trunk that was produced in the USSR. Its weak point is its “bowl-shaped” shape with raised edges. On such a trunk it is difficult to transport barrels placed on the roof, sheets of cellular polycarbonate rolled into cylinders due to the small number of points of contact.
Currently, all “classics” have high-strength and lightweight roof racks that fit all car models, from VAZ 2101 to VAZ 2107. They are made quite durable and lightweight, and are coated with anti-corrosion powder paints.
The supporting system itself, as a rule, is hollow box-shaped bars made of strong sheet metal, square in cross-section, which are located in a single row, in the amount of 6 - 8, connected at the ends by supports that give rigidity to the structure. Four support mechanisms, which have different designs, are attached to the supports. Most often they are made using eccentric - tightening screws.
In order not to scratch the profile of the VAZ 2107 drain, to which the trunk is attached, the contacting parts are equipped with inserts - polyethylene liners.
When installing a trunk on a VAZ 2107, you must follow two rules:
- The edges of the trunk should be at an equal distance from the windshield and rear window - this ensures correct alignment and distribution of the load on the roof;
- When tightening, you must maintain uniformity. There should be no unevenly tightened eccentrics;
It is even more important to follow the rules for securing cargo on the trunk.
The most important thing is that the loads are securely fastened in the anteroposterior direction
When the vehicle brakes in an emergency, heavy loads occur and cargo can be torn off the trunk. When driving with a loaded rack on roundabouts and long turns, you need to drive slower than usual and evenly, otherwise the angular acceleration may be too strong and the load will be torn to one side. When transporting long boards and whips, you must be very careful when starting, accelerating and braking, as the ends of the whips “play” and rock the car, causing vibration. Particular attention should be paid to transporting bulk cargo in strong winds - if possible, you should avoid this and wait for calm weather; Loads with a large area and resistance (rolled covering material, empty barrels) must be secured especially carefully; While driving, listen carefully to the sounds on the roof. Take the time to go out several times and check the reliability of the fastening of the cargo and the trunk itself.
By applying these simple rules, you can avoid troubles associated with a sudden drop and damage to the load, or - even worse - creating an emergency situation on the road.
Luxury or necessity
The automatic trunk opening feature is found in many new cars. Drivers like this feature, because you quickly get used to good things. To open the luggage compartment in a car, just press a button in the cabin. The lock comes into operation as a result of the operation of the electric drive.
This feature may seem like a small thing and an insignificant addition until the cold weather arrives. In cold weather, the lock on the trunk often freezes, making opening the compartment a difficult task. You have to spend time defrosting the mechanism. In the case of an electric drive, such problems will not arise. Also, such a mechanism makes car hacking more difficult, which is also an important advantage.
Mostly imported cars are equipped with this function, and not all of them. Domestic manufacturers have only recently begun to equip their models with such functionality. Every car owner can equip his car with an electric drive for the trunk. This will not be difficult to do, but you will still have to tinker.
How to open a VAZ2107 without a key
Hello. On my channel you need to have a great conversation while watching good videos
on various topics.
Next, at one end of the found wire we make a hook at an angle of 45 and about 2 cm long. After completing the preliminary work, we proceed to opening the lock. We plant the formed hook into the gap between the door and the glass.
If the wire rests against an obstacle (usually a locking device mechanism), we bypass the lock and search for a special mechanism to open the door. This is done in this way: without weakening the pressure on the wire when it rests against an obstacle, we move the hook to the right side right until the moment it falls through. After a while, we turn it to the right.
We find the mechanism for locking the lock, which without experience is done through countless attempts. If this mechanism has been found, then hook it with a hook and pull the wire. The lock should open. For those who are still wondering how to open a car without a key at home, we offer the 2nd method: You can open a car lock without a key by using a narrow rope along another fishing line (these things are definitely found among those guys who do). For this purpose, it is necessary to perform the following steps: At the base of the selected rope, or fishing line, we tie a loop, which must be the size of the internal door lock button.
Alternative trunk opening for VAZ 2107
Many owners of domestic cars, due to the lack of opportunity to purchase a more expensive vehicle, are trying to make their cars more comfortable. One of the options for improving the functionality of the VAZ 2107 is to control the trunk lock from the passenger compartment. This can be done either using a button or using a cable, which eliminates the need to open the mechanism with a key.
Opening with a button
As the owner of the “Seven”, equipping the car with a device for opening the trunk with a button will not be difficult. The positive aspects of the electric drive include the following:
- convenience;
- practicality;
- following fashion.
Installing a trunk lock control button allows you to control the mechanism from inside the car.
Some motorists believe that such an option on the VAZ 2107 is useless, but it’s still worth trying and seeing the usefulness of such a device. If you have decided to install an electric trunk drive, then first you will need to prepare the necessary parts:
- four-pin relay and a special terminal for it;
- activator;
- wires;
- button;
- female and male connectors, as well as electrical tape and heat shrink.
To install an electric lock on the trunk lid, you will need an electric drive, wires, connectors, terminals and a button.
The activator is an electric drive, the operation of which is based on retraction or repulsion, depending on the installation diagram. First you need to remove the lock and install the drive rod. In order to be able to influence the lock tongue, you need to drill a hole in the side of the mechanism and bend the rod itself slightly. Once the rod is secured, the lock can be put in place. To avoid adjusting the mechanism, you should first mark its location with a marker or pencil. Next, you need to secure the electric drive, which will require 2 screws and a plate included with the device. Having fixed the product on the lid, proceed to the connection stage.
To be able to control the trunk lock from a button, you will need to connect the electric drive rod to the tongue, and attach the activator itself to the trunk lid
Before starting electrical work, remove the negative terminal from the battery and study the connection diagram.
Installation of the electric lock is carried out according to the electrical diagram
The electric drive device is supplied with power directly from the battery or through a fuse. Electrical installation consists of the following steps:
- Voltage is supplied from the battery to the relay in accordance with the diagram.
- Relay contact No. 86 is connected to the electric lock control button. The button is located on the dashboard in a convenient place.
- Using a wire, contact No. 30 of the relay is connected to the green conductor of the electric drive using connectors.
- The blue wire of the electric lock is connected to the vehicle ground.
- Check the operation of the device.
Video: installing an electric trunk lock on a VAZ 2107
Exiting the trunk lock cable to the passenger compartment
The trunk lock on the “seven” can be opened using a cable pulled into the car’s interior. To implement this idea you will need:
- cable 4 m long and 1.2 mm in diameter;
- braid 4 m long from bicycle cables;
- braid ends and cable clamps.
In order to be able to unlock the trunk lock using a cable, it is necessary to make holes in the mechanism to thread the cable and secure it to the tongue. Then they lay a cable from the lock to the driver's seat through the trunk lid, and install a suitable lever to open the mechanism. As a lever, you can use the hood opening mechanism from the VAZ 2109, on which the cable is attached. All that remains is to check the operation of the design.
Photo gallery: installation and routing of the cable to the trunk lock
To control the trunk lock using a cable, you will need the cable itself, a braid and some components
The cable is attached to the tongue of the trunk lock to control the mechanism
The cable from the trunk lock is laid to the driver's seat
The cable control lever is installed near the driver's seat
Installing the trunk release button - step-by-step instructions
the process of connecting the trunk opening button by studying the instructions for the alarm. In the connection diagram, you should look at what color wire from the “signaling” goes to opening the trunk lid. In most cases this is a yellow-red wire.
If so, then the button connection diagram will look like this:
Next, you can begin choosing the location for installing the button and installing all the elements.
Let's look at the procedure for performing work using the example of a VAZ-2107 car:
- We install a relay in the engine compartment. This location will be optimal, since you will not need to pull the positive wire very far to the button, and it will be more difficult to find a place under the dashboard. You can attach the relay, for example, to the mount of the windshield washer reservoir. When installing all elements, it is very important to ensure reliable tightness and insulation of contacts;
- Next, through the standard hole of all the wires, we lay two new wires - to the button and directly to the activator itself;
- We carry out wiring to the luggage compartment through the cabin. The easiest way to do this is under the carpet, where the standard wires run;
- Along the trunk, we also connect the wires going to the activator to the main bundle of wires, and secure the bundle with electrical tape or clamps;
- We install the activator on the trunk lid lock. Here it should be taken into account that the electric drive can work both for retraction and pushing. To change the action performed, simply change the polarity of the connection.
- To connect the activator, you need to remove the lock by unscrewing two nuts and drill a hole in the side of the lock to engage the rod and connect it to the lock tongue. It would not be superfluous to cover the activator and the lock with a casing - this will protect the mechanism from dust, dirt and mechanical damage;
- Then we look for the most suitable place to install the button. In the VAZ seven, a good option would be to place it on the plastic cover to the left of the driver’s seat - this way the button will always be at hand;
- Installing the button is very simple: drill a hole in the plate, insert the button, and put on the terminals. The negative wire can be connected right there, to the cover mounting bolt - job done! Testing can be done.
VIDEO INSTRUCTIONS » alt=»»>
Useful tips
Before starting to work with electricians, you should determine for yourself whether the trunk lid will be opened from the button on the alarm key fob. If yes, then you need to establish what it outputs to the corresponding wire - “plus” or “minus”, since the electric drive can work both for retraction and pushing (depending on the polarity of the connection).
The choice of activator should also be approached responsibly. You should not buy cheap Chinese analogues; it is better to opt for the factory VAZ electric drive.