The light in the Kalina, to put it mildly, is not very comfortable, rather dim, only one lamp, no lighting under the feet, in the trunk on the left there is one dim lamp. It was decided to fight this.
The following parts were ordered on the Energomash website:
— Board PL 27 lampshade 51.3714
- 1 PC.
— 219.40 rub. — Board PL 57-01 lampshade 51.3714
— 2 pcs.
— 128.40 rub. — LED strip white glow, 20cm, 12 LEDs
— 4 pcs.
— 320.00 rub. — LED strip white glow, 50cm, 30 LEDs
— 1 pc.
— 200.00 rub. — Transportation costs
— 1 pc. — 110.00 rub.
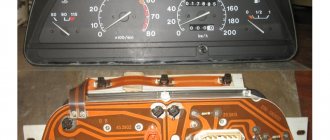
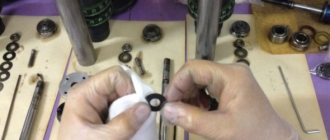
The PL 27 board and 2 57-01 boards are installed in the standard lampshade. Instead of conventional light bulbs, we get LED ones. At the same time, the light becomes much brighter, you can comfortably read something and find a lost item much easier.
Here are some before and after photos:
Next came the turn of the LED strips - they already come with wires and 3M tape on the back side, i.e. you just need to figure out where to glue them and connect them.
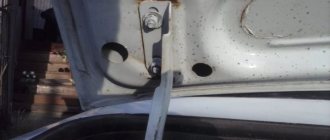
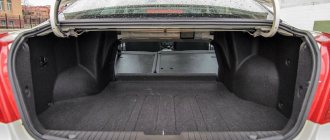
First of all, a long LED strip was installed in the trunk - a place was immediately found - for stretching. The wire was routed along a guy wire and soldered to the standard trunk light, which remained operational.
The effect is visible in the photo, everything in the trunk is visible.
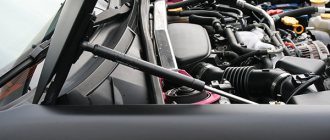
The most difficult thing for me was to make the illumination of the driver’s and passenger’s feet; initially I wanted to do it not only in the front, but also in the rear. After some deliberation, it was decided to connect to the interior lamp - i.e. The illumination of the space under your feet should work in exactly the same way as the interior lamp - when the car is disarmed, when the ignition is turned off, or when the lamp is forcibly turned on.
All wiring was done using WAGO terminal blocks, with the help of which you can reliably connect several wires and, if desired, easily disconnect them. For all this I needed 2 terminal blocks for 2 wires and 2 terminal blocks for 5 wires. I installed 2 terminal blocks for 2 wires next to the lampshade so that the lampshade could be disconnected at any time if necessary.
Then I ran the wires along the right post down in the area of the floor tunnel and there, using two 5-pin terminal blocks (+ and -), I connected 4 LED strips. (1 wire from the lampshade and 4 from the LED strips)
I glued the tapes themselves on the driver's side to the EUR unit, on the passenger's side under the glove compartment shelf. I glued 2 more strips to illuminate the legroom for the rear passengers on the driver's and passenger's seats, respectively. I carefully led all the wires into the floor tunnel area where I connected them all into terminal blocks.
Overall, everything turned out great, the car became more comfortable and you can always see what is where. Only one mistake happened, they sent me the wrong tape - instead of a white glow they sent a warm one, it was decided to put it in the driver’s seat.
Inspired by someone else’s idea and driven by our own needs, it was decided to ennoble
, and make using the trunk
convenient
and
pleasant
, and as it turned out later, every time the backlight was turned on, the mood only lifted. ^___^
From the beginning - we think
1. I
doubted
if it was possible to just connect the LED strip to the electrical circuit of the car, without any resistors.
- CAN!
The main thing is that the tape is designed for
12 volts.
2. Installation method
— the tape should be easy to install and remove — in the event of military operations and/or drunkenness.
Connecting the tape to the circuit should be easy (without using a soldering iron) and reliable (without tape or twisting of wires, and in accordance with GOST 10434-82) screw terminals
3. Connection diagram
- it will tell us how the wires will pass, how many wires are needed, the contact points, and if we think a little more, then the length of the wires can be calculated.
Choosing a belt for the machine
I will try not to pour water, but will briefly look at what to look for when choosing an LED strip.
LED Matrix Type
LED interior lighting . To illuminate the car interior, including the trunk, choose SMD 3528 60pcs/m (the size of one LED crystal is 3.5x2.8mm). Why she?
Firstly, we get an average power of 4.4-4.8 W per linear meter with a luminous flux of about 250-300 Lm. With such power, LEDs do not require heat dissipation and the LED strip can be easily mounted on plastic elements. And the luminous flux is sufficient to fully illuminate any interior elements.
If you don’t have enough brightness, take 120 pcs/m.
Secondly, this is the most common tape on sale, we buy it in the first store we come across.
Options like SMD 5050, 5630, 5730 are not suitable due to their high power. Unpleasantly high brightness and the need to mount a heat sink make them not the best choice for LED car interior lighting.
Exterior car lighting . Here we turn on the head. If there is LED lighting under the bottom of the car, you can choose more powerful LEDs - SMD 5050 30/60 pcs/m. The aluminum profile will be our heat sink (more about installation later). For LED illumination of license plates or (God forbid) headlights, this is a bad choice. Such LED lighting will be a bait for traffic police inspectors (read about installation rules and fines at the end of the article).
Regular LEDs or RGB - there is no difference. RGB is a little more expensive, it is more difficult to connect and requires an additional control controller (read more about connecting an RGB strip). But it allows you to change the backlight color.
Protection class
There are mainly three protection classes on sale - IP20, IP65, IP68.
- IP20 – open tape without protective coatings, suitable for use indoors in dry rooms. Afraid of moisture, dust, and any mechanical influences.
- IP65 – with a protective silicone layer that can protect against condensation.
- IP68 - sealed, waterproof LEDs that can be placed on the bottom of the car.
Parts selection
LED strip has become in demand and popular when tuning the trunk due to its excellent characteristics. LEDs are small and do not take up much space. They are moisture resistant and have a long service life. And most importantly, they are easy to install yourself and can be easily controlled directly from the inside of the car.
LED trunk lighting can be organized using:
LED set includes LEDs, toggle switch, remote control. The kit comes with an installation diagram that allows even a beginner to cope with the task.
It will be cheaper to purchase an LED strip and other required parts separately. In this case, it is only important to correctly measure the required length of the strip, so that later you do not need to spend money on material again or buy additional individual pieces. If you want to periodically change the color component of the backlight, you will have to purchase a tape of two colors.
We mount the LED strip with our own hands
Outside onto the car
Any external car lighting is an aggressive working environment. We select a protection class of at least IP65, install the tape with glue, with additional fastening with plastic ties.
For LED illumination of the bottom of the car, we choose a tape of the SMD 5050 class or any other with a power of more than 10 W/m. For such power, a heat sink is required. Experience shows that the most reliable installation method is an aluminum profile fixed to the body, onto which the diode strip is already attached with plastic clamps and glue. This installation method eliminates bridging the wiring with fasteners, but adds holes in the car body (if you fasten the profile with self-tapping screws).
The tape cannot be attached directly to the body. You will not achieve a good connection (there will be poor heat dissipation), sagging will appear - and this is before the first branch on the road.
do-it-yourself LED license plate This will allow it to be mounted in the plane of the license plate.
LED strip with side glow
wheels are illuminated along the end of the brake disc. The service life of such LED backlight is limited; the brake discs warm up to 80-130 degrees during operation, quickly killing the LED strip.
The LED strip is mounted on the brake disc only with heat-resistant glue, with the wiring leading out into the engine compartment.
If there is an internal protective casing for the disk, mount it on it; this LED backlight will last much longer.
Inside the car
When illuminating the interior, use low-power LEDs. Excessive brightness causes discomfort when driving. What are the options:
- Glove compartment lighting. If there is a standard backlight, then you can connect to the existing limit switch so that the LED backlight turns on when opened.
- Car dashboard lighting. It is important not to overdo it with power, otherwise the backlight will be in your eyes. Any low-power tape with a minimum protection class will do.
- Illuminated feet under the dashboard. We mount it on the bottom of the dashboard, connect it to the door limit switch so that the LED lighting turns on only when the door is opened.
- Door bottom and door audio pockets. Like the footlights, we connect through the door switch to trigger when the door is opened (about connection below).
Inside the car, the LED strip can be attached to its own adhesive coating. We degrease the installation site and additionally fix the fastening with hot glue, as shown below.
Connection nuances
The LED strip in the trunk must be mounted taking into account certain rules. The polarity specified by the manufacturer is important.
If you want to connect the backlight directly to the ignition switch, you will need to dismantle the torpedo. However, connecting to the battery does not turn off the backlight even after the key is removed from the ignition. To still turn off the LEDs, you will have to make a separate button.
Experienced electricians can modify the system and install an AC resistor. With its help you can adjust the brightness of the LEDs.
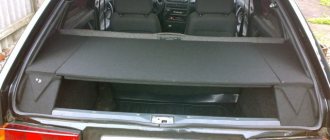
In order for the lighting to turn on automatically when the luggage compartment is opened, it is enough to install a switch under the trunk lid. And if you connect a second strip with LEDs of a different color, you can get a luggage compartment with multi-colored lighting.
There are many options for where to glue the LED strip in the trunk. It can be placed at the bottom, at the top or around the subwoofers. Each driver decides for himself how to decorate his car trunk.
We can say that it’s not too difficult to install LED strip lighting in your vehicle yourself, but it’s also not that simple. If you don’t understand anything at all about electrics and its connection diagrams, then you shouldn’t take on this alone. Let an experienced mentor be next to you, and if you don’t have one, then entrust this work to a professional.
Source
How to properly connect an LED strip in a car
You can connect the LEDs in your car to the on-board network or directly to the battery (not advisable, more on that later).
The on-board electrical network of the car does not correspond to the nominal power parameters of the LEDs, since the voltage taken from the battery reaches 14.5 Volts. This is not fatal for LEDs, but it significantly reduces their service life.
The second risk factor for direct connection to the on-board network is significant current drops. Any car has units with significant power draw from the battery - starter, head lighting, air conditioning, electric power steering. They consume hundreds of watts, and currents reach tens of amperes.
You've probably noticed how, when starting the engine, the headlights go out, the radio and on-board computer turn off, and turning on the air conditioner "cuts down" the volume of the music. And this is when the wiring lines are separated through a distribution box and there are current stabilizers in the equipment.
Use stabilizer
Any LED can operate for a long time only in a narrow range of currents and voltages. For example, an SMD 3528 LED element requires 2.8-3.4V and 0.02A for power supply. Thanks to the limiting resistors on the tape itself, they only feel comfortable at a mains voltage of 12V.
To connect the LED strip to the 12V of the car, use a stabilizer; it is connected to the gap in the positive wire from the battery. You can assemble it yourself. Below is a diagram using the example of a voltage stabilizer LM 7812. It has an output voltage of 12V and produces a current of up to 1A. This is an outdated model and requires additional cooling.
Work algorithm
Before starting work, you need to think through all the points and dismantle the rear seat for the convenience of pulling the wire from the luggage compartment to the front panel.
In general, the work algorithm looks like this:
Doing the lighting in the trunk with your own hands will be much clearer if you put the entire diagram on paper before starting work.
Legality of outdoor lighting and fines
In our country, laws are interpreted in favor of the interpreter. The wording is vague and can be interpreted in two ways. What you need to know.
There is no direct ban on installing underbody lighting . But there are a number of points that allow us to find fault with you and, unfortunately, there is nothing to oppose them with.
Making unforeseen changes to the vehicle design
Decree of the Government of the Russian Federation of October 23, 1993 N 1090 (as amended on August 27, 2018) “On the Rules of the Road.” Appendix: List of faults and conditions under which the operation of vehicles is prohibited. Clause 7.18.
Changes were made to the design of the vehicle without permission from the State Road Safety Inspectorate of the Ministry of Internal Affairs of the Russian Federation.
It is impossible to obtain official permission to install lighting (uncertified element). Punishment for violation: warning or fine of 500 rubles .
This is the most loyal point on which they can find fault with you. You will often get off with a warning.
Violation of the rules for installing lighting devices
You will fall under this clause if you install LED car lighting in prohibited colors.
According to the Russian Federation Traffic Regulations, section 3.6. External lighting devices. Installation is prohibited:
In front - lighting devices with lights of any color except white, yellow or orange; At the rear - reverse lights and license plate lights with lights of any color other than white, and other lighting devices with lights of any color other than red, yellow or orange.
In short, the following is allowed:
- The front is just white, yellow and orange;
- at the rear - the license plate is illuminated only in white, the rest - only in red, yellow or orange.
Violation of this clause of the traffic rules entails deprivation of a driver's license for a period of 6 months to a year .
Installation without permission of devices for supplying special light signals
Code of Administrative Offenses of the Russian Federation Article 12.5. Driving a vehicle in the presence of malfunctions... point 4.
Driving a vehicle on which, without appropriate permission, devices are installed to provide special light or sound signals (with the exception of a security alarm).
This is the most dangerous point and, if the evil inspector wishes, any additional lighting of the car can be adjusted to this wording. In practice, it is used very rarely (unless you put a red flashing tape in the radiator, this option will definitely be regarded as a special signal). It is difficult to challenge in court, but it is possible by replacing the punishment with a fine of 500 rubles.
Violation provides for deprivation of rights for a period of one to one and a half years , with confiscation of devices for signaling.
Should you use LEDs?
Some doubt whether it is worth taking LED strips or other types of LEDs to organize high-quality lighting in the luggage compartment.
In practice, LED devices are rightly considered the most practical and smart choice. They have a wide range of advantages, including:
If you are new to this type of tuning, it is recommended to buy ready-made kits for lighting the luggage compartment or luggage compartment lid.
If you want to achieve an original effect and unusual lighting operation, use RGB strips. Their peculiarity is that they can work in several color modes.
Having good lighting in the luggage compartment of a vehicle benefits the car owner. This way he will be able to find the necessary things, not lose any little things, and navigate the space. If you doubt your own strengths or capabilities, you can always turn to specialists for help.
Source