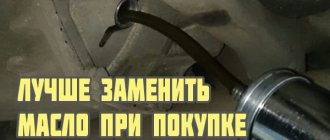
Changing the oil in the front axle of Niva Chevrolet
The manufacturer recommends changing the oil in the front axle gearbox every 45 thousand mileage; to change it you will need a 17 mm wrench, a 17 mm hexagon, a syringe and a container for old oil. It is best to change the oil in the Niva Chevrolet gearbox after a hot trip
Unscrew the drain plug of the front gearbox housing and drain the oil into a container, then screw the plug back
Unscrew the filler plug and fill in new transmission oil using a syringe to the level of the lower edge of the filler hole and screw in the filler plug. This completes the transmission oil change for Chevy.
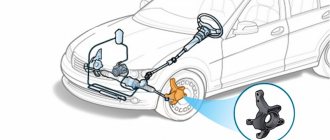
Procedure for replacing the front wheel bearing
The owner of a Chevy Niva will need to acquire several types of tools, including:
- Press;
- Suitable type of lubricant;
- Puller;
- Retaining ring remover;
- Mandrel for pressing;
- Hammer;
- Torque wrench;
- Hex head size 30;
- Screwdriver with a flat surface “minus”;
- Wrenches with standard sizes 17 and 19 .
Front wheel bearing replacement process
- In the first step, the car is placed on a level surface. It is best if it is a lift or a pit.
The wheel rim needs to loosen the nuts and bolts that secure it. Hanging is done first for the front part.
Replacing the wheel bearing of a Niva Chevrolet is very simple. The wheel rim along with the hub nut cover must be removed.
The next step is to install the opposite wheel in its place. The car is lowered using a jack until the second wheel is firmly hooked onto the support.
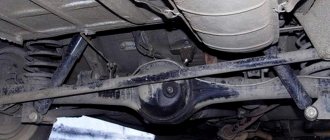
Front axle gearbox
The front gearbox of Niva 21213 differs from the rear gearbox: location, mounting method and design. In order to dismantle it, you will have to lift the car. Further analysis proceeds according to the following scheme:
- Remove the front axle suspension extension (unscrew both fasteners).
- Unscrew the adjusting hub nut and remove the lower shock absorber mount.
- Install the stop and release the ball joint (lower) from the lever.
- Pull out the shank.
- Unscrew the engine support and the axle mounting.
- Unscrew the fastening of the inner joint bearing cap and crankcase bracket to the bridge.
- Pry off the cover and remove the housing from the gearbox.
- Using a support, separate it from the left engine bracket and the cylinder block. Remove the gearbox from the front axle mountings.
After this, you can disassemble the gearbox itself and accurately determine the nature of the damage.
Replacing the bearing and oil seal of the housing of the internal joint of the front axle drive of a Chevy Niva
Before starting work, prepare a hammer, a bit, a circlip remover and sealant. To replace the bearing and oil seal of the inner joint housing, you will need to remove the front wheel drive and then
Remove the bearing retaining ring, using a hammer and a wooden spacer, knock down and remove the housing and bearing from the shaft
Using a hammer and chisel, remove the front wheel inner CV joint oil seal.
Lubricate the working edge of the oil seal with transmission oil, and apply a thin layer of sealant to the outer surface
Then, using a hammer, carefully press the oil seal into the body, install the removed parts in the reverse order of removal, and if necessary, replace the old Niva Chevrolet CV joint bearing with a new one.
Advice on how to remove drives without dismantling the Niva front gearbox
- To dismantle the drives, it is necessary to unscrew the fastenings of the gearbox (in this case, some kind of stop is placed under it).
- Then the steering knuckles are released. To do this, simply unscrew the shock absorber mount from the lower arm and the lower ball joint.
- To relieve the load, jack up the lower suspension arm.
- Unscrew the hub nut and remove the centering ring. The nut is too tight, so we use a wrench extension (for example, a metal pipe).
- We move the steering knuckle to the side. The drive can then move freely.
- To ensure free movement of the drive during removal, the gearbox must be moved back slightly.
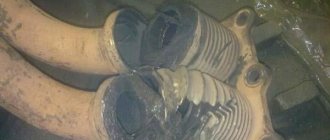
- We remove the drive, being careful not to damage the anthers. If the boot is torn, it must be replaced.
- The procedure for removing the right and left CV joint drives is similar.
Before dismantling, it is necessary to mechanically remove dirt from the inside of the steering knuckles and from the bottom of the car above the work area. The best option is to wash the bottom with a high-pressure apparatus one day before carrying out work.
Replacing the rear bearing
Replacing the rear wheel bearing of a Niva Chevrolet is impossible without the following tools:
- Pullers;
- Flat screwdriver;
- Pliers;
- Socket head with size 24 .
The work involves several preparatory stages:
- The wheel and brake drum are removed;
- The axle shaft is dismantled;
- The axle shaft is disconnected from the bearing and ring.
This sequence is used when removing a bearing with a ring with your own hands:
- The second jack is used to raise the second part of the bridge. This prevents oil leakage;
- The four fastening nuts are unscrewed;
- The ring and bearing are pressed off the axle shaft.
The condition of the oil seal deserves special attention. A screwdriver and hammer are used to remove the oil seal from the housing.
Then you can proceed to the procedure with the shank bearing itself:
- First you need to make sure that there is enough lubricant. If not, then add it if necessary.
- The appropriate mandrel size is the main element when pressing a bearing onto an axle shaft. You can use a pipe with a suitable diameter, at least half the length of the axle shaft itself.
- The retaining ring is installed next. It is recommended to preheat this part to at least 200 degrees. Then it is connected to the axle shaft. The operation does not cause problems if there are pipes or mandrels of the appropriate size.
- The installation of the axle shaft follows the reverse algorithm.
Removing the bearing, dismantling the bridge from the assembly
The procedure is largely similar to what was described in the previous paragraphs.
- First remove the wheel;
- To dismantle the brake drum mechanism, unscrew the bolts securing it;
- The bearing assembly is checked for play. The axle shaft moves;
- The four axle bolts are unscrewed using a 17mm wrench;
- Before unscrewing the axle itself, it is better to place a special stop under the bridge. This protects the gearbox from transmission oil leaks;
- Two plates or wide keys are installed under the flange. Two bolts M2 and M10 are evenly screwed into special holes;
- We observe the gradual detachment of the bearing from the seat;
- The axle is clamped in a vice to remove the lock washer. The locking element is being dismantled. A chisel and hammer are indispensable tools during this process. But such a simple option is not always feasible due to the fact that the parts stick;
- The element needs to be heated if it cannot be dismantled by other means;
- It is acceptable to use a grinder with small discs. It is also suitable for the steering shaft bearing.
After disassembly, a new bearing is installed in place. Assembly involves performing the steps in reverse order.
Below, watch a video review of breakdowns and malfunctions of the Niva axle shaft, as well as how to replace the rear bearing on a Niva.
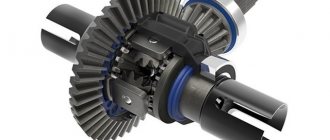
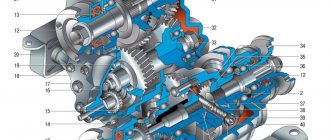
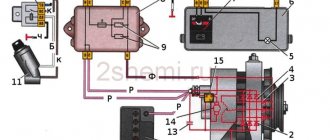
Operating principle
Torque is supplied to the gearbox (Gearbox) and transfer case of an all-wheel drive vehicle. From it, the force is directed to the front and rear axles. The NIVA cardan transmission supplies torque to the axles.
VAZ Niva
Gearboxes are installed on the axles, which translate the movement of the driveshaft into rotation of the wheel axles. Both units of the front and rear Chevrolet axles have a similar design: drive and driven gears located at right angles to each other. The gearbox gears are equipped with specially shaped teeth, and their design facilitates maximum transfer of forces between the shafts.
The gearbox itself is covered with a cast aluminum housing, closed with a metal cover. The gears are placed in a sealed space filled with transmission oil, which provides lubrication to the interacting parts and also dissipates heat.
Gearboxes installed on NIVA vehicles must have markings indicating the gear ratio.
Possible faults
The need to adjust the elements of the front axle is assessed by the presence of noise and vibration that occurs in different operating modes of the VAZ 21214. Therefore, conditionally, acoustic signs can be divided into two groups: Permanently registered; Fixed when engine braking or accelerating.
By their nature, sounds may resemble: Howling (wear of the main pair); Crunching, humming of the trolleybus (destruction or narrowing of the shaft bearings, unscrewing of the propeller shaft nut, axle bearings, incorrect adjustment of the main gearbox); Periodic rubbing (differential bearing). The difficulty of diagnosis in this case lies in the large number of extraneous noises produced by other parts of the car.
Replacing and disabling the front axle gearbox of a Chevrolet Niva (VAZ 2123)
The content of the article:
Replacing the front axle gearbox of a Chevrolet Niva (VAZ 2123)
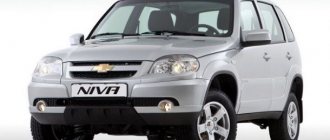
The previous one was purchased in Togliatti, it was not installed immediately, but was gathering dust for about 3 months, waiting in the wings. During installation, a jamb in the bridge was revealed that made a whine when coasting. Over 20 thousand km, the jamb did not go away, but only became stronger, so it was decided to install a new one. We have a new RPM for Shniva 14 tr. for a new model Niva (24 splines), the difference with Shnivsky is only in the bottom cover and the long side studs, 10 tr. Therefore, Nivsky was purchased. Plus a discount in the store, cost 9 thousand rubles.
Bearing selection by manufacturer
Experienced car mechanics know that it is better to choose a bearing that is completely identical to what was before. It would be good if it was an item with the original box and logo. Such parts often correspond to their counterparts that were originally supplied to the assembly line. The price of the bearing is not always affordable, because they are produced in a limited batch for a batch of cars.
But there are other bearing models whose characteristics are in no way inferior to the original ones. And the cost of non-original bearings is lower only due to the use of a different brand. Here are just a few bearing suppliers that have become popular in today's automotive market.
- SNR – French company;
- SKF is one of the largest manufacturers in the world;
- FAG is a German manufacturer, one of the largest companies;
- NSK - from Japan;
- NTN is another representative of the Land of the Rising Sun.
Manufacturers from Japan often deliver their parts directly to the assembly line. Therefore, practically nothing is known about them on the regular spare parts market. You can ignore the country of origin in the case of the companies mentioned above. It often lists one of many offices and branches around the world.
If a bearing manufacturer is allowed onto the assembly line, this is already confirmation that a strict selection process has been passed in the first stages. This means that the quality system meets the stringent requirements for manufacturers and their parts.
The most common and popular part numbers of Chevrolet Niva bearings
- The part number of the front wheel bearing is 2007108 (catalog number: 2121-3103020-10 , foreign equivalent: 32008 );
- The part number of the rear wheel bearing is 2403080 (catalog number: 6-180508AK2US9 , foreign equivalent: 62208.2RS );
- Clutch release bearing number - 21230160118000;
- The part number of the gearbox input shaft bearing is 50706 (foreign equivalent: 750706 );
- The generator bearing part number is 180201
(foreign equivalent:
6201-2RS
).
Replacing the shank oil seal Niva Chevrolet front axle
The crankcase covers are sealed with gaskets. Changing the oil in the front axle gearbox According to the service book, the oil in the front axle gearbox must be replaced every 45 km.
It is recommended to drain the oil immediately after a trip, while the front axle is still warm and the oil has good fluidity. Unscrew the drain plug and fill with fresh oil using a syringe to the level of the lower edge of the filler hole.
Before checking the leakage volume, check that the breather cap can move freely in all directions to ensure that the breather can be seen.
Check the oil level in the axle housing and top it up if necessary. Don't forget to tighten the oil filler plug.
If you are working in an inspection ditch, hang up the rear axle and place it on supports.
If more than 5 drops of oil leak out within 15 minutes, the oil seal must be replaced. Before replacing the oil seal, disengage the gear and stop the engine.
Drain the oil from the front axle housing, see. Do not forget to tighten the oil drain plug. Disconnect the front driveshaft from the drive gear flange of the front axle reducer.
Remove the housings of the internal hinges of the front wheel drives from engagement with the gears of the front axle reducer axle shafts, see. Determine the moment of resistance to rotation of the drive gear flange nut and replace the oil seal in the same way as replacing the rear axle drive gear oil seal, see. Install the removed components and parts in the reverse order of removal. Fill the gearbox with oil, see
Adjustment
It will not be possible to adjust the drive gear without a torque wrench and mandrel A.70184 . You will also need:
- level;
- calipers;
- flat feelers for measuring gaps;
- adjusting rings with a pitch of 0.05 mm;
- perfectly straight metal rod.
The drive gear is adjusted as follows:
- Align the crankcase mating plane horizontally (you will need a level);
- Install a metal rod onto the bearing bed.
- Place the adjusting rings and measure the distance from the rod to the mandrel.
- Install the adjusting ring. Its thickness is calculated as the difference between the actual clearance and the deflection value indicated on the new gear.
- Install the shaft and related parts in place, secure the drive gear flange.
- Using a torque wrench, tighten the nut with a force of 12 kgf.
- Using a dynamometer, check the moment at which the drive gear shaft begins to rotate. If this value does not correspond to 7.6 to 9.5 kgf, the nut needs to be tightened.
Important: the tightening torque should not exceed 26 kgf. If it is not enough, the spacer sleeve must be replaced.
Adjusting the gap between the parts of the main pair is carried out in several stages:
- Tighten the nut located on the driven gear side to completely eliminate the gap.
- Using a caliper, measure the distance between both covers.
- Tighten the second nut.
- Check the distance between the two covers. It should grow by 0.1 mm.
- By rotating the first nut, achieve a gap between the gears in the range of 0.08-0.13.
How to disable front wheel drive
There are two levers under the dashboard, one serves to change gears, and the second controls the transfer case. Below is the shutdown diagram:
To summarize, we can conclude that if this mechanism is not used, then significant disruptions will occur in the operation of the entire chassis system in the car; in order to avoid negative consequences, it is better to install this mechanism.
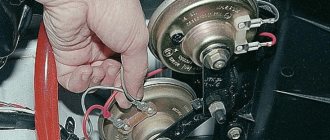
Generator bearing: replacement recommendations
The following recommendations are given for replacing the Niva Chevrolet generator bearing:
- The first step is to remove the generator itself. First, the generator mounts are loosened, then the adjustment bolt is released. The next steps are to remove the belt and disconnect the ground from the battery. We are talking about the negative terminal. It is also necessary to disconnect the wires from the generator itself. The structure is removed through the lower part. Why does the mount itself unscrew?
- After this, the master begins to disassemble the generator. The first step is to remove the pulley. The owner will need a screwdriver to lock the rotor. The main thing is a careful approach to work. The pulley is unscrewed with the appropriate key. You will need to pull back the latches to remove the cover. The part is pulled towards itself. All connections with bolts are additionally processed. Then it will be easier to unscrew them.
- The next steps are to unscrew the screws and remove the voltage regulator unit. You also need to get rid of brushes for a while. The generator cover is disconnected from the starter, otherwise it will not be possible to gain access to the bearings themselves. The main thing is not to damage the winding during such work.
- After complete disassembly of the generator, access to the bearings becomes available. It remains to check the parts for any defects that have appeared, including cracks and chips. Do the parts rotate easily? Is there any play between them? The seats may suffer from wear, so they also need to be inspected.
- Next, you need to knock the bearing out of its seat. To do this, tap the surface with a small hammer. The blows must be strong, but careful, otherwise the result will not be achieved. A piece of pipe of the appropriate size will make an excellent stand. Removing the rear bearings is impossible unless a special puller is used.
- The properties of old and new parts must remain similar. The same attachment is used when pressing into the body. The anchor is where the rear bearing is installed.
- When reassembling, proceed in reverse order.
Also interesting: Why does the laptop sometimes charge and sometimes not? — Habr Q&A
Below watch a video on how to disassemble and repair a Niva generator.
How to change?
If the mechanism is seriously damaged, it makes sense to replace it with a new one. To do this you will need a new gearbox and a small set of tools:
- wheel wrench;
- jack (if the work is done in an inspection hole);
- chisel:
- hammer;
- hex wrench 12;
- ring or open-end wrenches for 13, 17 and 27;
- syringe for filling transmission oil;
- container for processing.
Important: replacement or repair of the gearbox cannot be performed without a lift, inspection ditch or overpass.
Operating procedure
- Place a waste container under the gearbox.
- Unscrew the drain plug, then the filler plug.
- Wait until the entire transmission flows out of the gearbox.
- Unscrew and remove the front wheels.
- Unscrew the cardan shaft from the flange on the shank.
- Undocking and hanging the cardan.
- Unscrew the fastening of the right cover from the suspension cross member.
- Unscrew the fastening nuts and disconnect the shock absorbers from the front control arms.
- Unscrew the threaded connections holding the wheel drive bearing caps.
- Unscrew the nuts securing the brackets holding the gearbox.
- Unscrew the nut securing the left gearbox cover to the cross member.
- Remove the hub cap and unscrew the right wheel hub nut.
- Remove the centering sleeve.
- Compress the suspension spring and unscrew the ball joints.
- Move the steering knuckle to the side.
- Disconnect the exhaust pipe from the exhaust manifold.
- Pull the gearbox back.
- Remove the right wheel drive.
- Remove the gearbox from the machine
To install the new unit in place, you must perform the operations in reverse order.
Important: after installing the gearbox, do not forget to fill it with transmission oil. Otherwise, you will soon have to change it again with another one
It is not necessary to buy a new unit. You can replace the oil seals or gears yourself, and then adjust the mechanism. It makes sense to repair the mechanism if most of the parts are not worn out. Otherwise, it’s worth overpaying and installing a unit that is known to work, so as not to return to repairs.
To repair and adjust the front axle gearbox you will need:
- mark;
- hammer;
- spanners for 10 and 17;
- knob with extension;
- end attachments at 10, 17,19;
- punch;
- bearing puller;
- mounting blade;
- caliper;
- pliers;
- dynamometer;
- flat probe;
- level;
- vice.
You will also need new gaskets for the covers.