Signs of a muffler malfunction
A change in exhaust sound is a clear sign of problems. At the same time, it is extremely undesirable to ignore such problems, since muffler repair is usually advisable only at an early stage.
Typically a muffler:
- flogs;
- broken;
- burns out;
- collapsed from the inside.
- falls off.
When the muffler cuts, this indicates a loss of seal (often at the joints). In this case, the sound is chirping. If the muffler is broken, the exhaust sound is sharp, and the smell of exhaust gases in the cabin is clearly felt.
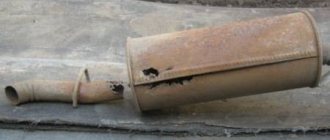
If the muffler is burnt out or completely rotten, the noise resembles the sound of a direct flow operation. In this case, the smoke will not come out of the pipe, but somewhere on the surface of the can itself. If the muffler falls off, its body simply swings on the hangers, no smoke comes out of the exhaust pipe, and when the engine starts, the sound is sharp and quite loud.
It also happens that the muffler is visually in order, but its internal structure is damaged. In this case, you can hear changes in the exhaust sound, gases come out unevenly, the tonality may change when driving over uneven surfaces, when the can sways (the sound changes from loud to low).
Replacing corrugations
Changing the corrugation without welding will not work. You can fix the device on clamps if there is no welding equipment, but such fastening will be unreliable.
What you will need
Items that will be required for replacement:
- rubber parts for exhaust pipe clamps;
- welding machine;
- Bulgarian.
Step-by-step instruction
Algorithm of actions for performing replacement:
- The nuts located on the studs of the collector device and the connections on the back side of the pipe are unscrewed.
- The receiving line is removed, and the old vibration compensating device is cut off using a grinder. When performing the task, you must be careful to remove only the weld seam. The grinder must not touch the flange and the pipe itself. If the corrugation is located under the collector device, these parts can be hooked.
- If some of the welds cannot be removed, their removal is done manually. For this you will need a chisel.
- The components of the receiving line are prepared, the parts are installed in the landing site and the rubber elements are replaced. When installing the corrugation, you need to make sure that no excess stress will accumulate on it. The element must not be compressed or stretched. Bends are also not allowed.
- When the receiving components of the device are secured, a new corrugation is installed and secured by welding. Then the receiving line is removed and the corrugation itself is welded around the perimeter.
Cutting off old corrugation
Installation and welding of a new
Basic moments
To replace the VAZ 2107 muffler as quickly as possible, you will need screwdrivers, a set of keys and sockets, as well as an inspection hole. If there is none, then you can raise the entire rear of the car as much as possible so that it is convenient to work under it. The main muffler is located at the rear of the car. Its edge is visible when looking at the car from behind. This element must be replaced either in case of severe deformation, as a result of which the ability to pass exhaust gases is greatly deteriorated, or if it is completely burned out, due to which exhaust gases escape from the muffler without being cleaned and noise reduced. Even if there are breakdowns or burnouts, the noise level increases many times. In this case, it is necessary to replace this element.
How to unscrew a stuck or rusted bolt or nut
To do this, you will need a wrench and a rag if you do not want to scratch the chrome or nickel surface of the nut. Although it is better to try to unscrew the nut by hand first. As a rule, it is not very tight. An adjustable wrench or a gas wrench will not work here; usually the nut securing the spout to the body is not very wide (indicated by a red arrow in the photo):
When unscrewing, you need to hold the key with one hand and the mixer body with the other so that the mixer does not turn. It is most difficult to unscrew the nut on in-line valve mixers, since the valve handles often interfere with this.
1a. Remove the handles.
2. Remove the spout by pulling it vertically up or down if it is a wall-mounted faucet.
3. Having removed the spout, you will see 2 rubber gaskets (indicated in the photo with blue arrows), ensuring the tightness of the joint, and 1 plastic gasket (indicated in the photo with a yellow arrow). With a large number of turns of the spout, the rubber gaskets wear out. This happens especially quickly if the gaskets were not lubricated when installing the mixer.
4a. Changing the gasket is easy; just buy an analogue at the nearest hardware store or construction market. To avoid going into the geometric subtleties required to describe the gasket, just put it in a matchbox or something and take it with you.
When you install the new gasket, be sure to lubricate it with good lubricant. This will extend the life of the gasket several times.
4b. There are times when it is not possible to find a gasket of the required diameter. In this case, 2 options are possible:
— If the gaskets are not very worn out, then you need to remove them and wind up 2-5 layers of plumbing synthetic winding, then put the gaskets in place, lubricate them and put the spout in place.
— If the gaskets are completely out of order, then in order not to completely change the mixer, you will have to abandon such a function as turning the spout. Wrap 15-20 layers of plumbing synthetic winding around the bottom of the spout. Insert the spout and tighten the nut. If water still leaks, then you need to add several layers of winding.
4s. If the rubber gaskets are normal, then most likely the bushing on which the rubber gaskets are placed has become loose:
You can tighten the bushing with a hexagon; in a set of hex keys, as a rule, you will always find the right one.
In some faucet models, the fitting to which the spout nut is screwed may become unscrewed:
You can tighten the fitting with any key.
If the problem was not in the gaskets or in the bushing or fitting, for example, in the mixer body or in the lower part of the spout tube there are cracks or cavities that cause leakage, then only change the mixer.
Modification of mufflers for VAZ 2106
When the muffler begins to “tire” from work, the driver will begin to notice this on himself: increased noise when driving, the smell of exhaust gases in the cabin, a reduction in engine dynamics... Replacing the muffler with a new one is not the only way to eliminate all these problems. Fans of experiments often tune the exhaust system, because this way it lasts longer and works better.
Today, car enthusiasts distinguish three types of muffler modifications:
- Audio modification is the name of tuning, the purpose of which is to enhance the “growling” sounds in the muffler while driving. This modification really allows you to turn the quiet “six” into a roaring lion, but it has little effect on the performance of the exhaust system.
- Video modification is a tuning aimed at external decoration of the exhaust pipe rather than at creating improved performance characteristics. Video tuning usually includes replacing the exhaust pipe with a chrome one and using nozzles.
- Technical tuning is the most effective in terms of performance. It is aimed at improving the performance of the exhaust system and even increasing engine power by up to 10–15%.
How to make a sporty muffler
A sports muffler is a straight-through muffler. It is necessary to create additional dynamic properties and give the model a special sporty look. The straight-through muffler has an extremely simple design, so you can easily make it yourself, even from a standard VAZ 2106 muffler.
To make a sports forward flow you will need:
- standard muffler;
- a pipe of a suitable size (usually 52 mm);
- welding machine;
- angle grinder (grinder);
- drill;
- metal cutting discs;
- ordinary metal sponges for washing dishes (about 100 pieces).
Video: how forward flow works on a VAZ 2106
The procedure for manufacturing a direct-flow muffler boils down to the following work:
- Remove the old muffler from the car.
- Use a grinder to cut out a piece from its surface.
- Remove all internal parts.
- On a 52 mm pipe, make cuts in the form of a herringbone or drill many holes with a drill.
- Insert the perforated pipe into the muffler and weld it securely to the walls.
- Fill all empty space inside the muffler with metal sponges for washing dishes made of metal.
- Weld the cut piece to the muffler body.
- Cover the product with mastic or heat-resistant paint.
- Install direct flow to the car.
Photo: main stages of work
A direct-flow sports muffler of our own production optimizes engine performance and makes the VAZ 2106 more sporty and dynamic. There is a huge selection of such modifications of mufflers in stores, so if you have no manufacturing experience, you can buy a new one.
Do-it-yourself and purchased nozzles for Glushak
Attachments, which are usually used as a decorative element, allow you to modify the muffler and optimize its performance. Thus, a correctly made and installed nozzle is guaranteed to improve the following indicators:
- the fuel burns out completely;
- less carbon deposits form on the spark plugs;
- the power of the power unit increases by approximately 15%;
- fuel consumption is reduced (by about 20%).
That is, the use of an attachment can improve the basic indicators of vehicle convenience and efficiency. Today you can find attachments of various shapes on sale; the choice is limited only by the financial capabilities of the driver.
The nozzles create an attractive appearance for the body and also optimize the operation of the entire exhaust system.However, you can make the attachment for the “six” muffler yourself. To do this you will need the simplest materials and tools:
- stainless steel sheet with a thickness of 1–1.2 mm;
- cardboard for template;
- Bulgarian;
- sandpaper and polishing materials;
- metal scissors.
A typical exhaust pipe nozzle has a round cross-section, so the easiest way to make just such an element is:
- Use cardboard to model the body of the future nozzle, taking into account the locations for fastening joints.
- Using a cardboard template, cut out a product blank from sheet material.
- Carefully bend the workpiece and fasten the joint with bolted connections or welding.
- Clean the future nozzle, you can polish it to a mirror shine.
- Install on the vehicle exhaust pipe.
Video: making a nozzle
The nozzle is usually attached to the pipe using a bolt and a through hole or simply on a metal clamp. It is recommended to lay fire-resistant material between the pipe and the nozzle to increase the service life of the new product.
How to unscrew a rusty nut
If a rusty nut does not unscrew, do not get excited and try to rip it off - there are many effective ways to unscrew it without wasting effort. The main reason for jamming of rusted connections is metal corrosion. During the process of metal rusting, the products of its oxidative reaction, or, more simply put, rust, increase many times in volume, tightly grasping together the parts connected to the threaded connection. The situation is further aggravated by the ingress of small particles of dust and dirt onto the threaded surfaces. Selection of tools Successful unscrewing of difficult-to-unscrew threaded connections largely depends on the tool used.
Do not try to unscrew a rusty nut using an open-end wrench. The weakness of the design of such a tool will lead to the fact that the jaws of the wrench will simply move apart and jump over the edge of the nut, and the short length of the tool will not allow you to apply the necessary force. In such a situation, it is better to opt for ring wrenches or use a set of sockets with a knob - and edges the nuts will be intact, and so will the hands. As for the integrity of the hands. To avoid injury, when unscrewing threaded connections in hard-to-reach places, applying force to the tool with your hand, you should avoid foreign objects in the direction of movement of the hand with a key or wrench. Dissolving rust If, despite the titanic efforts applied, the nut still does not unscrew, do not force the tool and exhaust yourself with excessive physical exertion. It is enough to moisten the rusted thread with a liquid that can partially dissolve the rust and thereby reduce friction forces. The arsenal of such liquids is quite wide: from special rust converters and the well-known WD-40 to gasoline, diesel fuel, kerosene, turpentine and brake fluid. By the way, ordinary table vinegar and an alcohol solution of iodine from a car first aid kit have an effective effect on rust. In extreme cases, even Coca-Cola containing orthophosphoric acid will do. After generously moistening the rusty joint and waiting from 10 minutes to half an hour, you can pick up the tool and try to unscrew the stubborn nut. If even after this the thread does not give in, and time allows, it is advisable to wrap the threaded connection with a cloth soaked in one of the listed liquids and leave it for an hour or two. Most nuts after this procedure are slowly unscrewed, especially if you influence them while working the tool back and forth, that is, rocking. Instead of unscrewing, twisting. An original and very useful method that allows you to destroy a layer of rust, using instead of unscrewing, slightly tightening the nut. After the nut moves at least a little in the direction of twisting, it, although tightly, but it will begin to turn out. Tapping the edges For this procedure you will need a small 100-gram hammer. Applying light blows with a hammer to the faces of the nut, you should alternately move from one face to another in a circle. Microcracks that appear during the tapping process will slowly but inevitably lead to deformation and destruction of rust. The main thing is to avoid strong blows with a hammer, which can damage the edges of the nut, bend the bolt, or even destroy the part held together by them. Heating Using a heat source (gas torch, blowtorch , lighters, matches, candles, soldering iron, hair dryer or ordinary boiling water), you need to heat the nut, being careful not to heat up the bolt or stud on which it “sits.” When heated, the nut will expand and increase in volume, becoming several microns wider bolt, which will greatly facilitate the process of unscrewing it. In addition, due to uneven heating, the layer of rust on the threaded connection will collapse and lose its former strength. Be extremely careful when working with open fire and heating devices! Destruction is an undesirable method, but in some cases, sometimes the only one, capable of solving the problem of rusted threaded connections. Armed with a hammer and a sharp chisel, it is necessary to punch grooves on the edges of a stubborn nut. Uniform insertion of the chisel from all sides will lead to its deformation and an increase in the internal diameter, which will allow you to unscrew it from the thread without much effort. In the end, the threaded connection can be destroyed by sawing the bolt with a grinder or a hacksaw; the nut can be knocked off by cutting the bolt with a sharp chisel , you can cut it in half along the axis of the bolt, or try to drill it out using an electric drill. In all these cases, the nut and bolt will be hopelessly damaged upon completion of the work.
From the washer to the muffler
To make a muffler from washing tubs, you will need:
- washing tanks (stainless steel);
- Bulgarian;
- drill;
- welding machine.
Now proceed with the following steps:
- Cut open the washing machine tank.
Parts of a cut tank from a washing machine
- Bend the resulting sheet fragment to the shape of the old muffler and weld the seams.
- Do the same for the other half.
The first half of the future muffler
- Make 2 perforated pipes of the required diameter and size from stainless steel, drill holes by hand or take ready-made metal (a tank from a foreign washing machine).
View of a homemade perforated pipe
- Cut the muffler walls and baffles to the required size.
An example of what shape you need to cut the walls for a homemade muffler
- Weld everything to each other along the edges.
View of the parts connected together (perforated pipe, tank and wall)
- Insert the first partition, previously connected to the second perforated pipe, and weld it so that the wall is not at the end of the first half of the barrel, but a little deeper; If desired, you can make holes on the partition.
View of the parts connected together (perforated pipe, tank and partition)
- Weld together the first and second parts.
Connect the parts and cook
- Weld the second baffle to the second perforated pipe and weld this structure to the second half of the muffler.
- Paint with heat-resistant paint (optional).
- Evaluate your work.
Muffler assembled from a washing machine
- Finally, weld the new muffler to the exhaust pipe.
DIY exhaust tip
If you want to make an exhaust pipe nozzle at home, then you will need:
- a piece of stainless steel of a suitable size, about 1 mm thick;
- cardboard;
- an angle grinder with a cutting disc or a jigsaw with a blade for cutting metal;
- electric drill;
- car tool kit;
- sandpaper and polishing materials.
There are many different options for making a nozzle; it can be of different shapes and from different materials, but the design principle is the same, namely:
- The required shape for the future nozzle is cut out of cardboard, taking into account the attachment to the pipe.
- A cardboard template is constructed.
- Using the template, the body of the future nozzle is cut out from part of a sheet of stainless metal.
- The workpiece is bent and the joint is joined.
- The nozzle is cleaned and polished to a shine.
Secure the product so that it fits tightly, but is easy to remove. This must be done so that later it will be possible to clean the case from dirt.
An example of a homemade nozzle
The muffler is an indispensable part of the car. Thanks to it, we drive cars comfortably, and its faulty operation puts people's lives in danger. Don't forget to take care of your car's exhaust system, and it will serve you for a long time and faithfully.
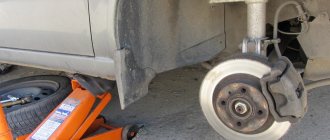
Exhaust system repair
Any work related to repairing this car system will require you to install the car on an overpass, since the entire network of pipes runs along the bottom. If it is necessary to remove the entire system or part of it, a number of measures should be taken:
- Unscrew the bolts that tighten the clamp. They are usually covered with rust, making them very difficult to unscrew. Usually they are simply cut off with a grinder, replacing them with completely new ones during each repair.
- Next, remove the graphite O-ring. If it shows signs of damage, then it should also be replaced; below we will describe how to do this.
- After this, the muffler is carefully removed from the hangers; they are special rubber bands, which it is also advisable to replace with new ones during repairs.
- Next, a new muffler is mounted and secured with rubber bands.
- A graphite O-ring must be installed at the joints of the pipes.
- Next, the clamp is returned to its place, which must be tightened tightly with bolts.
Using a similar scheme, you can also repair the resonator or replace it together with the muffler
It is important to remember that it is also advisable to replace small fastening devices that have been subject to wear, they are inexpensive and will protect your car from troubles for such minor reasons
Shooting when starting up
If you hear popping noises from the muffler, this may indicate a variety of problems - from a clogged air filter to an incorrectly adjusted carburetor. Accordingly, different repairs are applied:
- Replacing the filter.
- Carburetor adjustment - checking the fuel level in the chamber, the integrity of the float, cleaning the jets.
- Normalization of ignition - it can “shoot” if it is too late.
- Adjusting the thermal clearance of the cylinder head valves.
- Tightening or replacing the timing belt, toothed pulley, grinding valves.
Experts determine causes and consequences by conducting computer diagnostics; this is the fastest way to understand which part of the car is the problem.
Diagnostics of chainsaw Partner 350
Correct identification of a malfunction is already more than half of the repair. In case of malfunctions related to the fact that the saw does not start, the essence of the diagnosis is to check the spark and the presence of fuel in the cylinder, since in the chainsaw there is either nothing to burn or nothing to set on fire.
Spark test
To check the spark, you need to unscrew the spark plug, install it in the cap of the high-voltage wire and attach it to the cylinder (there should be ground on the spark plug). Next, pull the starter several times, while carefully looking at the spark plug. There will be no spark if the Partner 350 chainsaw has faults such as:
- defective spark plug (can only be eliminated by replacing it with a known good one);
- broken wires in the system;
- malfunction of the ignition control button;
- defective ignition coil;
- no gap between the coil and the flywheel;
- broken key between the crankshaft and the flywheel.
Checking the fuel
The first sign that the cylinder is not getting fuel is a dry spark plug. Having discovered a dry spark plug, the next thing you need to do to more accurately determine the malfunction is to try to run the Partner 350 chainsaw by pouring no more than 5 ml of gasoline into the cylinder, through the spark plug hole. If the chainsaw does not start after this, then most likely there is no compression in it or there is not enough compression to start the engine. Causes:
- CPG wear;
- thermal seizure of the cylinder or piston;
- scuffing due to foreign body entering the CPG.
If, after pouring gasoline under the spark plug, the saw starts, then the problem is in the carburetor or fuel line of the Partner 350. It is necessary to carry out a complete diagnosis of the fuel system.
Bearing diagnostics
When diagnosing a chainsaw, it is necessary to check the crankshaft bearings for play. To do this, you need to shake the flywheel up and down. If there is play, the bearings must be replaced.
Also be sure to check the crankshaft connecting rod play. To do this, you need to lock the piston in the upper position and gradually shake the flywheel from left to right, simulating its natural movement. If there is play, then the Partner 350 crankshaft must be replaced.
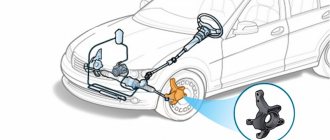
Features of operation and types of mufflers
There are two types of mufflers used in modern cars: resonant and direct-flow. Both can be installed in conjunction with a resonator (pre-silencer). In some cases, a straight-through design can replace a front muffler.
Resonator device
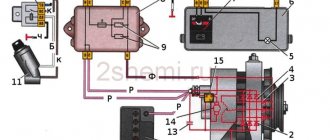
Structurally, the muffler resonator, which is also called a flame arrester, is a perforated pipe located in a sealed housing, divided into several chambers. It consists of the following elements:
- body (has a cylindrical shape);
- thermal insulation layer (exhaust gases have a very high temperature);
- blind partition (to turn the flow of gases);
- perforated pipe;
- throttle (allows you to change the cross-section of the exhaust gas flow).
Resonant muffler design
Cross-section of the muffler
Unlike the preliminary muffler, the main resonant muffler is more complex. It consists of several perforated pipes installed in a common housing, which are separated by partitions and located on different axes (see Fig. Silencer in section):
- front tube with perforation;
- rear tube with perforation;
- inlet pipe;
- anterior partition;
- middle septum;
- posterior septum;
- exhaust pipe;
- body (oval section).
Thus, a resonant muffler uses all types of transformation of sound waves of various frequencies.
Features of a direct-flow muffler
The main disadvantage of a resonant muffler is the effect of creating back pressure, which occurs as a result of redirecting the flow of exhaust gases (when it collides with partitions). In this regard, many motorists tune the exhaust system by installing a direct-flow muffler.
Direct flow muffler
Structurally, the direct-flow muffler consists of the following elements:
- sealed housing;
- exhaust and inlet pipe;
- perforated pipe;
- soundproofing material - fiberglass is most often used, which is resistant to high temperatures and has good sound-absorbing properties.
In practice, a straight-through muffler has the following operating principle: one perforated pipe passes through all chambers. Thus, there is no noise suppression by changing the direction and cross-section of the gas flow, and noise suppression is realized solely through interference and absorption.
Due to the unhindered passage of the exhaust through the direct-flow muffler, the resulting back pressure is very low. However, in practice this does not provide a large increase in power (from 3% to 7%). On the other hand, the car has a characteristic sports car sound, since the noise-absorbing technology present in it only eliminates high frequencies.
The comfort of the driver, passengers and pedestrians depends on how the muffler works. So, during prolonged use, increased noise can cause serious inconvenience. Today, installing a direct-flow muffler in a structure for a car moving within city limits is an administrative violation that threatens with fines and an order to dismantle the device. This is due to exceeding the noise limits specified by the standards.
Sound absorption technologies
The exhaust system, and in particular the muffler, can use one or several sound absorption technologies:
- change in gas flow cross section;
- changing the direction of gas movement;
- surface absorption of sound waves.
Depending on which frequencies predominate in the engine exhaust sound spectrum, this sound reduction method is used. For example, to suppress low frequencies, it is effective to use several resonator chambers with different volumes. The use of different sections of input and output pipes combats high frequencies well. But in principle, a muffler, like a good musical instrument, is customized exclusively for a specific brand of engine. Then the noise reduction efficiency is much higher and there is less power loss.
Direct flow muffler
Taking into account the fact that any standard muffler provides acoustic comfort, but takes away power, in some cases the muffler and resonator are modified.
On the one hand, the car in this case is noisy, but on the other hand, you can get an increase in power.
To put it simply, direct-flow mufflers or straight-through mufflers do not have partitions (walls). As a result, exhaust gases do not encounter resistance, it is easier for the engine to “breathe”, the cylinders are better ventilated, etc. By the way, if you additionally cut out the catalyst, install a tuning exhaust manifold or install a flame arrester, in general you can get a 7-10% increase in power.
Of course, such modifications are prohibited in many countries, as the car becomes noisy and exhaust toxicity increases noticeably. However, partial modernization, when only a quiet forward flow is installed, is quite acceptable. This allows you to make the exhaust sound “richer,” although you should not count on an increase in power after installing such a muffler “can.”
What is required to make your own design?
When thinking about how to make a roof rack for a car with your own hands, you should decide on the type of construction, prepare materials and tools.
Luggage racks that you can make yourself:
- crossbars for roof rails - a fairly simple but effective design;
- welded metal system - made with sides and bottom, capable of transporting large, heavy loads.
The best solution is the choice of lightweight aluminum parts that are resistant to corrosion. Considering the high cost of the material, you can give preference to profile thin-walled pipes.
Other materials, tools for making trunk:
- grinder - used for cutting profiles and metal;
- clamps designed for car mufflers will serve as the basis for fastenings;
- polyurethane foam and a sander - will be required to shape the crossbars;
- fiberglass - preferably with a high density of 300 g/m2, since the material is necessary for strengthening;
- paint – needed to paint the finished structure, matched to the body color, classic silver and black shades are also used.
Kinds
Resonators or additional mufflers are classified depending on the type of engine they are used on.
Therefore, there are 2 main types of devices.
- Designed for installation on two-stroke engines. If the vehicle is equipped with such a motor, which is not so common these days, then the resonator becomes a mandatory element of the exhaust system layout. If the resonator is missing, this will immediately lead to an increase in the amount of fuel consumed. The operation of the motor will change for the worse, speed and power will decrease. This is due to the fact that not only exhaust gas will be removed, but also incompletely burned fuel. Hence the drop in speed parallels the increase in fuel consumption.
- Resonators installed on four-stroke power plants. In the case of such engines, the resonator may not be beneficial to the car, but may create certain additional problems. Removal allows you to increase the engine power level by approximately 15%. Experienced motorists believe that on four-stroke engines the resonator only interferes with the normal operation of the engine. Yes, if you remove it, the power will actually increase. But at the same time, the environmental friendliness of the vehicle will deteriorate, and the exhaust will begin to pollute the environment. Therefore, 4-stroke engines still have resonators that allow them to achieve the required environmental standards.
There is one more additional classification that distinguishes resonators according to their design features.
Some cars are equipped with standard monoblock type elements. But gradually, almost everyone is switching to combined devices.
The second type of resonators consists of two main parts. This is a classic design with a pipe and partitions, as well as a chamber filled with special materials with noise-absorbing properties. Often, materials based on basalt fiber are used in structures.
Combined devices are more efficient, modern and useful in the operation of automobile engines and exhaust systems. Therefore, these types of resonators are found on most vehicles.
Small mufflers or muffler resonators are divided by their size. The following subcategories are distinguished:
- short;
- average;
- long.
Resonators are also sometimes classified depending on their volume. This is a useful classification method, since volume largely determines how effective a resonator will be in the design of an automobile exhaust system. If there is a volume deficit in the resonator, then when the driver sharply presses the gas pedal, the noise level will be extremely high. Some people like this sound, and therefore resonators are specially installed. But for reasons of safety of the exhaust system, as well as out of respect for people around, it is better to install devices with sufficient displacement.
Resonators or small mufflers are made from various materials. The most cost-effective designs are created on the basis of aluminized steel. Although in reality it is the simplest steel, on top of which a small layer of aluminum is applied. They look like full aluminum, but in fact they are not able to withstand significant loads. Requires more frequent replacement. The aluminum layer only temporarily prevents corrosion from forming on the device.
Car muffler resonator
If a motorist wants to get a truly high-quality, durable and efficient resonator, when the standard factory element is not satisfactory or has worn out, it is optimal to choose designs based on stainless steel with a double casing.
The exhaust system is constantly subjected to heavy loads in the form of high temperatures. As a result, malfunctions periodically occur in the normal operation of the entire vehicle. To ensure that the breakdown of a resonator or other component does not come as a surprise to the car owner, it is strongly recommended to carry out a preventive check and diagnostics of the unit’s performance. Having noticed the primary signs of malfunctions, you can take timely measures, carry out repair and restoration work, or simply completely replace the failed resonator.
Heat
Heating is very effective in such difficult areas as, say, a manifold, muffler or catalyst. The bolts really stick there due to high temperatures. You won't be able to unscrew them with WD-40, and it's difficult to use acid under the car. Therefore, here you need to act using the “wedge-wedge” method. That is, if it’s stuck due to heating, then you need to unscrew it through it.
If the mount is small, then it can be heated with a regular soldering iron and held for about 10 - 15 minutes. However, if the case is severe, this will not help. An open flame burner works great here - special cans are sold. The bolt heats up almost to a red color, the metal expands (the “sticking” effect is weakened), now it needs to be cooled sharply (preferably with a penetrating compound like WD-40), it turns out like a mini blow, you can safely unscrew it.
Purpose
As you know, the mixture ignites during operation in an engine. This fire is accompanied by a characteristic sound. During an explosion, colossal pushing energy is generated. It is so large that it can lift the piston to top dead center. In the last stroke of work, gases are released. They escape into the atmosphere under pressure. But what is the exhaust system for? It serves to dampen sound vibrations. After all, without it, the operation of even the most technologically advanced engine would be loud and unbearable. Thus, the exhaust system performs the following functions: Removing combustion products from the engine cylinders. Reduced gas toxicity levels. Preventing combustion products from entering the vehicle interior.
The structure of a typical millennium music center
Let's try to see how to fix a Samsung music center yourself. We came across a useful technical description and will read it. We'll leave the repair of Sony music centers for next time. The radio receivers in music centers are wide-wave, and the creators did not bother too much with the circuit; they made two paths:
- For amplitude modulation at medium and low frequencies.
- For frequency modulation on VHF.
We avoid describing the subtleties of dividing the ranges, just remember: small FM antennas receive a frequency modulated signal. Paths can be implemented on one chip (like KA2295Q) or separately. Before the detector, both paths are incompatible due to the specifics of signal processing. You can amplify a weak one and mix it with the local oscillator frequency, but don’t interfere with subtlety: each stage of the Earth still has a limited frequency band. We repeat, up to and including the detector, the paths go separately. The advantage of the integrated solution is described by its high specialization; automatic frequency adjustment eliminates worries about uncertain signal reception by the music center.
Many people cannot imagine a device that refuses to play cassettes. There are usually two decks, they work alternately for playback, and are controlled mechanically. At the circuit level, the amplifier switches to the desired head. The tape drive mechanism has one motor, pulls the tape, the reels are slightly spring-loaded. The recording and playback paths are separate, you can write:
- cassette tape;
- cassette receiver;
- laser disc reader-cassette.
Today a chip for decrypting MP3 and other formats is being added. The flow enters the low frequency amplifier. It is not difficult to notice the microcircuit; the case is placed under a good-quality heatsink of respectable size. Here the lion's share of the energy consumed by the music center is lost; other stages work with a low-amplitude signal.
Simultaneous playback from a tape recorder and a laser disc is not provided. Would make sense when mixing home original recordings. The microphone works in all modes. Allows you to record karaoke on tape and sing along with artists on the radio.
Read-write preamplifiers are assembled using one chip, for example, K22291. The film erase current is generated by a transistor generator. It is clear that the frequency differs greatly from the sound one. We must not forget about a software or microcircuit-implemented equalizer. Simpler than a steamed turnip, a cascade that places emphasis on a selected part of the spectrum of the recording being played. It is customary to listen to rock while showering your neighbors with bass; a low-pass filter makes a contribution.
The operation of the laser disc drive is controlled by a controller responsible for focusing and tracking tracks. Samsung uses the KA9220 microcircuit, which controls the motors through the KA9258 drive device and amplifiers. There are two drive motors, one rotates the disk, the second positions the head. The KA9220 controller directs the work and pre-deciphers the head signal. Further sound processing is carried out by the KS9282 signal processor, the waves are corrected and interpolated. To eliminate high-frequency interference, filtering is carried out using the KA9270 microcircuit.
The music center must have a system controller. A microcircuit that controls the operating modes of the equipment. Some Samsung music centers use MICOM LC866216 for these purposes. For interactivity, the controller is supplemented with an indication panel and keys. Through the interface, the user controls the music center. The infrared radiation receiver of the control panel is located on the front panel. It is worth noting: the central controller analyzes the position of the volume knob and generates signals for adjusting the low-frequency amplifier (a microcircuit on a large radiator). The control bus is digital, so you don’t need to look for a transistor-based volume control.
Switching power supply. Contains input signal filters, a high-frequency pulse generator that controls a transistor switch, output filters, and sometimes rectifiers using Schottky diodes. The voltages are stabilizing. The transformer and fuses are placed on a separate board. The device refuses to turn on - it’s logical to start repairing a music center with your own hands from here. There are several supply voltages, be sure to ring the secondary windings.