Car players that exist today have a huge selection in their functional qualities, appearance, cost and other technical, quality and social parameters. But no matter how much this device costs, what functions and options it has, how well the radio will perform its direct duties. Namely, the playback of sound and video recordings from various media of such information largely depends on how the said head unit is correctly connected to the power supply system of your car - the battery.
Scheme
How to connect the radio directly to the battery
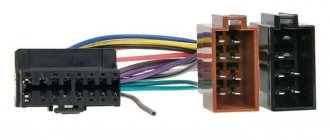
You can connect the radio directly to the battery yourself if you study the connection diagram. To connect the player, you must use universal ISO connectors if the device has standard inputs, or adapters if the player has a custom interface.
Why connect directly?
Sometimes, after installing additional speakers in the cabin, the quality of the sound reproduced by the radio deteriorates. The problem is especially noticeable at high volumes and low frequencies. Connecting the radio to the battery helps solve this problem.
In addition, this method minimizes current leakage, which can drain the battery in a few hours.
Often, motorists connect the head unit incorrectly - through the cigarette lighter. This switching method does not allow you to use all the functions of the car radio. In addition, problems may arise when playing music: the display blinks and the sound quality deteriorates. Therefore, experts recommend connecting “+” to the head unit from the battery, which allows you to get the best performance of its power supply.
How to connect correctly
Car radios have 2 positive wires:
Both cables are connected to the battery. They are combined near the interface output to facilitate connection to the fuse circuit. It is important to consider that the equipment will consume current in standby mode. If the indicators are left high, the battery will be discharged after 6-8 hours of “sleep”.
Another important aspect of proper connection is safety. Switching is done through a fuse, which helps to avoid short circuits. In addition, it is necessary to ensure that the wires used have the same diameter.
Pros and cons of the method
The advantages of the method are the simplicity of the operations, as well as the ability to listen to music even with the ignition off.
The main disadvantage of connecting the radio directly is that the player will drain the battery even when turned off, because in standby mode it consumes 0.2-1 A/h depending on the model. Therefore, this method of connecting the head unit is not suitable for owners of old batteries.
Alternative connection schemes
Many drivers are interested in the question of whether it is possible to connect the radio so that it does not drain the battery. The connection that satisfies this requirement is made through the ignition. It is necessary to connect the positive wires of the equipment to the terminal responsible for power supply of the contact group. This method is inconvenient because if you need to listen to the radio you will have to turn on the engine.
Connection to the battery via the “On/Off” key is carried out by a wire going to “+”, which is connected through a key with 2 positions. This method is optimal for managing the power supply of equipment. If you need to leave the car overnight or for a longer period, you need to turn off the power supply to the head unit by pressing the key. It is most often placed on a panel near the player. This switching scheme makes it possible to turn on the player regardless of whether the ignition is on.
READ Travel miles Rosbank how to connect
For the next method, you need to select a cable under the dashboard that is powered through the side lights. On most models, it is easier to connect through the glove compartment light bulb. To do this, the red cable of the player is connected to it through a relay. The yellow terminal is connected through a fuse to the power source. If the connection was made using this method, the player will only function when the headlights are on. When the lights are turned off, the current memory of the radio is not erased. In order to save energy, LEDs should be installed.
Source
. Correct power connection
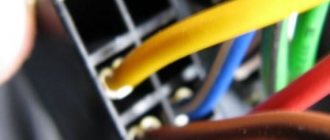
To supply power from the battery to the car receiver, three main wires are used: red, black and yellow. Where:
- The black wire corresponds to the negative charge (minus) of the battery.
- Wire in yellow braid, positive value (plus) of the battery.
- Red - positive wire from the ignition switch of a passenger car.
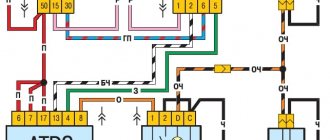
- The main way to fully answer the question of how to connect a radio via a battery correctly is the following diagram:
- The black cable is connected to any element of the car body convenient for these purposes, that is, to ground.
Optimal connection of the radio to the car battery directly
A radio is an indispensable attribute of any modern car. As a rule, more functional equipment is purchased instead of a standard device. In any case, the radio must be connected correctly. Note that there are several options for solving this problem. In this article we will list the main methods for connecting a car radio.
Almost all devices of this type today are equipped with a universal connector, thanks to which even a novice car enthusiast can handle the connection. There are also various adapters on sale that can make the task easier. Another option is to connect the wires according to a color scheme (usually it comes with the radio).
Connection to battery
Many motorists tend to connect the radio to the battery directly. In this case, you can provide the device with optimal power. This will also allow you to listen to music without having to turn on the ignition or a special button (we’ll look at these methods below).
Power is supplied through three main wires - yellow, red and black.
Important! Don't forget the fuse to avoid short circuit.
The disadvantage of directly connecting the radio from the battery is that when idle, the radio often consumes energy (especially Chinese products from little-known brands). As a result, one fine day your car’s engine may simply not start due to a completely discharged battery. That is why we recommend connecting using one of the methods below.
Optimal options for connecting a car radio:
Connection to dimensions
This is quite an interesting way. For this, you will need to find a suitable wire under the dashboard that feeds through the dimensions. On most models, the easiest way to connect is to the glove compartment light bulb. To do this, the wire from the red terminal of the radio is connected through a relay to a light bulb. The yellow wire is connected directly to the power source through a fuse.
Now the radio only works when the lights are on. At the same time, turning off the light does not affect the current memory of the head unit. To save energy, it is recommended to install LEDs in the dimensions.
Conclusion
. It is difficult to imagine a modern car without audio equipment. There are a large number of different devices on the market. At the same time, many drivers are wondering how to connect the radio directly to the battery. After all, there are quite a few methods; different methods are better suited for different machines. Do not forget that connection errors can lead to increased battery drain.
It is known that if the radio is incorrectly connected directly to the battery, this can lead to its discharge. But if you figure it out, anyone can make the correct connection. There are several ways. Let's take a closer look at the main ones to choose the most suitable one.
Connection specifics
It’s not enough to buy a good radio, you also need to connect it to the battery correctly. Otherwise, the capabilities of the audio device will not be fully revealed. If you simply connect the radio to the cigarette lighter, you will lose the sound quality and all sorts of functions inherent in modern equipment.
The connection is made through an adapter to avoid short circuits. Wires for connection must be of the same cross-section 2-4 mm. The radio has two positive wires. Power yellow is responsible for the device’s memory. Red is the manager. They need to be connected to a battery. To make connection easier, the wires can be combined. It is important that the current consumed by the radio in sleep mode is not high. Devices of this type quickly drain batteries.
We connect the radio through the ignition
This connection option will not allow the car radio to drain the battery. The positive wires of the device are connected to the power wire of the contact group. With this method, the radio is disconnected from the battery after the ignition is turned off, so there are some inconveniences in using the equipment.
Connection via button
For the most convenient use of the radio, a button is used. The positive wire is connected through a two-position button. This makes it possible to optimally use the radio regardless of whether the car's ignition is turned on. With this method, you don’t have to worry about draining the battery overnight (catalog of car chargers).
Separate button
One of the most suitable connection options is to output a separate button that will turn off/on the power to the car radio. In this case, the red wire should be soldered not to the ignition switch wire, but to one of the button terminals. The second pin of the button is connected to the battery. Essentially, you can control the power supply yourself. Before parking overnight, you just need to press a button. You will no longer be dependent on the position of the key in the ignition switch.
The option of connecting via an alarm system also has a right to exist. The bottom line is to use contact relays and a diode. This scheme is not very common, so we will not dwell on it in detail.
READ How to connect a water heated floor thermostat
conclusions
A sound system in a car is necessary because it makes travel much more comfortable. We looked at the most popular options for connecting a radio to a car battery. Which one to choose is up to you. In any case, we note that everything needs to be done carefully, because we are talking about an electrical circuit. You should not neglect safety rules, since a short circuit is not the most pleasant phenomenon, which can have very sad consequences.
Source
Video instructions for installing and connecting a car radio with your own hands
Car players that exist today have a huge selection in their functional qualities, appearance, cost and other technical, quality and social parameters. But no matter how much this device costs, what functions and options it has, how well the radio will perform its direct duties. Namely, the playback of sound and video recordings from various media of such information largely depends on how the said head unit is correctly connected to the power supply system of your car - the battery.
Scheme
How to connect (connect) a radio directly to a car battery
In any car of domestic or foreign production it is possible to install a radio receiver or music player that operates from the on-board network. To connect the head unit, standard ISO connectors or various adapters are used. To reduce the leakage current, which can discharge the battery in 5-7 hours, the car owner needs to know how to connect the radio directly to the battery.
Connecting the radio to batteries via side lights
An interesting, but not very clear (at least for the author of the article) connection method. The connection is made through the red terminal of the player to the power cable for the side signals running under the front panel (torpedo). Or to a lamp illuminating the interior of the glove box (glove compartment). With this connection, the yellow cable goes through a fuse to the positive terminal of the battery. With this connection, the radio only works when the lights are on?!
How to connect a radio to a battery at home
Since a car player is a mobile device, its scope of application does not end with the car interior. And throwing away a working receiver when replacing it with a new MMC is quite a shame. In such cases, an excellent solution would be to connect the radio to a household electrical outlet or an old but working battery, at the dacha or in a garage workshop. As a connection diagram, you can select the connection option via a button (toggle switch). If a suitable battery is not available, it can be replaced with a network adapter that converts standard 220 volts into the 12V required to power the radio. Or an uninterruptible power supply with a built-in 12 V battery. With this connection, the radio is not only provided with energy, but is also reliably protected from possible power surges.
Video instructions on how to connect the radio directly to a 12V battery.
Connection methods
The most optimal way is to connect the radio directly to the battery, which reduces the voltage drop and protects the power circuits using a built-in fuse. But the downside is the accelerated battery discharge, which occurs even when the head unit is turned off.
The standard connector to the radio contains 3 cables responsible for supplying power; the insulation colors are unified for all manufacturers. The red and yellow wires connected from the battery together make it possible to listen to music without turning on the ignition. The black wire connects to the point that provides negative power. There are special bolts welded on car bodies that are used to connect negative cables of electrical equipment.
We feed plus to the radio
Before connecting the cable to the battery terminal, you should install a tip that will ensure reliable contact at the junction. The tip is attached to the battery terminal using a standard bolt. A fuse rated for a current of 10-16 A is installed on the cable; the element is placed at a distance of 200-250 mm from the voltage source. The wire is then routed through the engine compartment and then fed into the vehicle's interior through a stock conduit designed for wiring or alarm harnesses.
If the additional cable is assembled from several parts, then the elements are connected by terminals, which are covered with an insulator on top.
To protect the harness from damage, it is recommended to use a corrugated plastic sleeve, which is attached with clamps to the standard electrical lines.
Contact of cables with hot or moving elements of the vehicle structure should be avoided. The cable brought into the cabin is equipped with a metal plug, which is used to connect the electrical wiring of the radio.
Through the ignition
To avoid draining the battery, the radio is connected via the ignition switch. When the ignition is turned off, it is impossible to use the head unit. For switching, a supply wire protected with red insulation is used. An additional yellow cable leads directly to the battery terminal.
If you cross both wires into a single circuit activated through the lock, then the settings will be reset every time you turn off the ignition.
Via button
The use of a separate switch to interrupt power to the car radio is used on vehicles equipped with an ignition switch without an ACC position. The power wire with a red sheath coming from the head unit is soldered to one of the terminals of the button, the other terminal is equipped with a cable going to the battery.
READ How to connect digital television in Elektrostal
The push-button switch is located on the instrument panel or center console. To start working with the player, you need to press the selector; you do not need to insert the key into the ignition switch.
To dimensions
In this case, the cable with yellow insulation is led to the positive terminal of the battery, and the red positive harness is connected to the side lighting circuit. The closest place for switching is the illumination lamp of the additional socket or glove box.
When the external lighting is activated, voltage is supplied to the radio, but if the light is turned off, it will not be possible to turn on the equipment. The advantage of the technique is the ability to listen to the radio without turning on the ignition, but the side lamps additionally drain the battery.
Connecting a car player via the ignition switch or button
These connections are recommended as an answer to the question of how to connect the radio so as not to drain the battery.
This is done through the ignition switch as follows:
- The yellow cable (plus) is fixed to the positive terminal of the 12V car battery.
- The red power wire is connected to the ignition (lock).
- Black (ground), goes to a car body part.
This connection is considered the most common and is recommended by experts. The positive and negative sides of this connection method are mutual. That is, the battery does not discharge while in a standby state when the car is parked. But you can listen to music only when the ignition is on.
Connection via a special button.
The wires are connected according to the diagram described above (ignition), with one exception. The red power wire is not connected to the ignition switch, but to the intermediate button. With a cable leading from it to the positive terminal of the battery. Thus, the player can be used without turning on the ignition, and also completely disconnected from the energy carrier (battery).
Other connection options
Another option for switching the radio is to supply power through an additional security alarm channel. A 5-pin relay is used as a switching device. The disadvantage of the circuit is the increase in current consumption in idle mode, so additional diodes are introduced into the circuit. The denomination and number of elements depend on the type of head unit and security system.
To supply power to the contacts of the radio connector, a cigarette lighter or socket is also used, intended for connecting additional equipment. A positive power pulse is supplied to the red wire, the yellow cable is output to the battery. On some cars, power is supplied to the cigarette lighter regardless of the presence and position of the key in the ignition, which allows you to turn on the player at any time.
It is possible to switch the radio through diodes, which are installed in the circuit of the red wire (going through the ignition switch).
When you turn the key, a positive voltage is applied to the player, allowing you to turn on the equipment. When turning the key back, no voltage is supplied to the ignition switch. The second diode is used to limit the supply of current to the turned off radio when the power unit is running.
On minibuses and minivans, it is common practice to install an additional radio tape recorder located in the rear of the cabin. To switch the player, additional plugs are required; sound is reproduced through separate speakers, since sharing nodes is unacceptable.
It is possible to use a separate switch that switches the acoustics to various sound sources.
The head unit is mounted in boxes for small items or niches, which are modified to fit the dimensions of the product. It is possible to manufacture an individual podium in which the radio and speakers are placed.
Which radios are suitable for use not only in the car, but also at home. Three ways to connect a radio at home via a step-down transformer, a stationary power supply or a power supply, usually a computer.
Search data for your request:
After the car fell into my hands, I began to suspect that something was going wrong. And only on the second day I understood. There is a standard Panasonic cq-cne radio. After talking with the former owner, it turned out that the radio seemed to be working, but there was no sound. And so it turned out.
Search data for your request:
Schemes, reference books, datasheets: Discussions, articles, manuals:
Wait for the search to complete in all databases. Upon completion, a link will appear to access the found materials.
WATCH THE VIDEO ON THE TOPIC: The radio does not work
Help me check my car radio at home
Most drivers place serious demands on the quality of the multimedia system. And for good reason, because a modern radio is the minimum comfort that should be in almost every car. Favorite musical compositions can brighten up prolonged downtime in traffic jams, or add new emotions to traveling behind the wheel of your car.
But, like all components and mechanisms, the elements of the audio system are subject to natural wear and tear during operation. Japanese cars are famous for their high service life and reliability of structural elements. But even in such machines, where everything works like a clock, various types of breakdowns occur. When problems arise with music, qualified help is not always required.
To eliminate a malfunction, the owner of the car often has enough strength, if he has the necessary set of tools at hand. We will discuss below why the radio in a Toyota Corolla most often does not work, and what to do in such a situation. One of the most common reasons why music stops playing in a car is the inability of the radio to read information from the disk. But don’t rush to blame the drive itself for everything.
Over time, the optical side of CDs wears out, so the reason for the lack of music may be hidden in a fairly scratched surface of the media. The likelihood of a drive failure increases if the disk itself is new and its surface is absolutely clean. The way out of this situation is as follows: disassemble the radio yourself and replace the drive itself if it has stopped functioning, or entrust this work to a professional technician.
In some cases, it is enough to clean the drive and its contacts from accumulated dust and dirt, after which the device will again fill the car interior with notes of musical compositions. But, if the procedure performed did not bring the desired result, it is necessary to continue searching for the cause in the power system. Recently, drivers, owners of Toyota Corolla in particular, have increasingly resorted to purchasing players capable of reading data from a flash drive.
Checking the correct functioning of the power system element is also relevant for this type of audio device. Owners of Toyota Corolla are often faced with situations where the radio and cigarette lighter do not work. This picture says one thing - there are problems with the car’s electrical network. An incorrect connection or power surges leave their mark on the operation of the car radio: it may turn on, but not turn off. There may also be problems with the functionality of the device: the display is on, but the music does not play.
In such cases, the first thing to check is the fuse and the protective diode. The first element of the network protects the car radio from voltage surges, since the device does not have its own protective mechanism.
It is necessary to check both fuses - under the hood and inside the car. If a burnt part is found, replace the protection with a new one. It is also important to ensure the integrity of the printed circuit boards located inside the audio system. The amplifier is one of the most sensitive elements in an audio system to voltage changes.
Any surge in the network can throw this extremely important mechanism out of action. In most cases, the board burns out or the fuse stops working correctly. The radio may function fully, but the driver will not hear the sound of musical compositions. Also, the microcircuit can burn out due to incorrectly connected speakers. If the radio works, but there is no sound, you need to disassemble the amplifier and check its microcircuit.
If, after the work has been done, the mechanism still refuses to fulfill its duties, there is nothing left to do but buy a new one. Panel buttons not working? There may be several reasons. One or several buttons may not work due to mechanical damage.
It is necessary to disassemble the front panel and ensure the integrity of their contacts. In some cases, the contact simply moves away from a button, which deprives it of its simplest functionality. If there was no damage, the contacts are in order, there is only one way out - replacement.
Sometimes one of the buttons gets stuck, thereby causing strange behavior in the car radio. For example, if the power key is stuck, the device will turn on spontaneously. It is enough to carefully pry it off with a flat screwdriver and the problem will be solved. A software failure is also possible, which can largely be resolved by resetting the settings. You need to reboot the audio system and reset the configurations to factory settings.
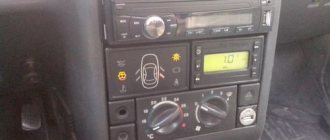
Setting up the radio
The main settings of the head unit include:
If an additional amplifier is used in the design of the car's speaker system, then you need to disable a similar device in the radio. Such manipulation is not required for all devices. Then the parameters of the external device are separately configured (in accordance with the instructions). Do-it-yourself settings and installation do not require special knowledge, but if the user is not confident in his own abilities, then it is recommended to visit a service center that installs speaker systems in cars.
Source
Home Inspection Options
There are several possible options for testing functionality. First of all, you need to prepare the power source. To check the radio at home, a fresh battery from the battery, a charger or a rectifier will do. The output voltage in all cases must be 12 V, and the current must be at least 6 A. The negative pole of the source is connected to the black wire. To make a positive connection, the red and yellow wires are connected together and connected to the positive terminal of the source.
You also need to prepare the antenna. For this, a piece of wire of sufficient length is suitable - at least 40 cm. To check the serviceability of the player section, you should prepare a flash drive with music files. The latter must be created in accordance with general requirements:
- format - MP3;
- bitrate - 128 or 320;
- sampling rate - 44.1;
- encoder - LAME;
- channels - stereo.
If you have a floppy drive, you should burn a CD-RW disc. Before testing both media, you should ensure they are readable by testing them on multiple devices. One end of the antenna wire is attached to a wall, ceiling, or other point in the garage or home that is isolated from the ground. The other end is carefully inserted into the socket. After all connections have been made, turn on the power by pressing the button. If the device does not respond, then the fuse built into the radio has blown.
After turning it on, you should figure out how to check the car radio at home. For example, you can evaluate the quality of a tuner by performing an automatic or manual search. The sound of a precisely tuned radio transmission must be of high quality, without noise, and the sensitivity of the tuner must be sufficient to receive stations located 30-60 km from the test site.
Next, the players are checked. Carefully insert the CD or flash drive into the appropriate slot on the radio. If the drive is working properly, it will pull the media into the device; reading will take a few seconds. The sound should be played smoothly, without pauses or jumps.