Probably many owners of front-wheel drive VAZ cars have at least once encountered such a thing as replacing a pump (also known as a water pump according to technical documentation).
During installation, there is such a small but very important parameter as the so-called “impeller overhang,” namely the distance from the blades to the response part of the pump. The performance of the pump is in an inverse cubic (!) dependence on this distance - the closer the blades, the higher the flow.
For Zhiguli, this parameter is described in the repair literature, but for engines that are installed on the front-wheel drive family there is no special mention in this regard.
But, if you scour the Internet, you can find the following information here: On engines of the 2108 family, which includes engines 2111, 21114, 2112, 21124, the gap between the water pump impeller and the cylinder block using the “minimum-maximum” method should be ranging from 0.62 to 1.71 mm, according to the probabilistic method - approximately from 0.9 to 1.2 mm
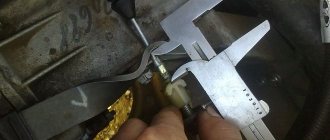
So, the old pump has been removed, the remains of the old gasket have been cleaned off. We try on a new pump without a gasket, install it and turn the shaft - if it catches, then you need to install it with a gasket, if, as in my case, it doesn’t stick, then to put your mind at ease, you can measure the gap.
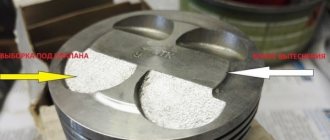
To do this, we sculpt plasticine onto the blades in this way:
Next, we insert it into the block, press it and then carefully pull it out. After these manipulations, we got the following casts:
Next, carefully use the blade of a stationery knife to partially cut off the plasticine in this way:
And we actually measure its height; this will be the size of the gap. In my case, with a 21114 pump with straight blades, the gap was 1.1-0.9 mm when measured without a gasket, which means that for good performance it needs to be installed with a sealant.
By the way, for reference, the thickness of the cardboard spacer (on the left) is 0.5 mm and the spacer with sealant is 0.8 mm (article 21100130704200)
Also a small educational program on the types of impellers. At the moment, there are basically 3 options for impellers: 1. Cast iron with 6 blades (aka 2108) 2. Plastic (polyamide) with 7 blades (aka 2109) 3. Plastic with straight blades (21114 for regular 8 class, 21116 8 cl and all modifications of 16 cl engines)
The latter is considered the most productive, although there are cases of breakage of the plastic impeller.
Which pump is better for the VAZ-2111 engine - with a cast iron 6-blade impeller or with a plastic 7-blade impeller?
A water pump with a 7-blade plastic impeller, in our opinion, is preferable. It has higher performance and at the same time less tendency to cavitation. As has been written about more than once, the formation of cavitation gas bubbles in the liquid flow reduces the performance of the pump; In addition, when these bubbles disappear, they “collapse”—microimpacts occur, gradually destroying the surfaces of the parts.
PS: On my 8 cl engine 21114 from the factory there was a TZA 2109 pump with an impeller like this
In the Lada Kalina model, as in any other car, with an 8-valve and 16-valve engine, the pump operating in the cooling circuit of the power unit has its own resource. It is advisable to replace it together with the same procedure regarding the timing belt. For this purpose, the manufacturer regulated an interval equal to 60 thousand km of the distance traveled. This kind of approach will allow the owner to avoid the need for additional disassembly of the timing belt assembly in order to replace a cooling circuit pump that has become unusable. Replacing the pump yourself is not a difficult task, so the owner can safely take on the task even with little experience. The main thing is to decide which pump is better.
Work plan for replacing the Lada Kalina pump
Remove the timing belt protection cover.
It is secured with 3 bolts - one on the left center, two on the back side. Now we need to remove the camshaft gear, since it will prevent the removal of the iron protection that presses the pump itself. This is the peculiarity of the 8-valve Kalin engines.
Unscrew the nut securing the tension roller and loosen the belt as much as possible. Let's move on to the gear. When removing, do not lose the key; try to do everything so that the belt does not jump a couple of teeth from both the crankshaft gear and the timing gear. Otherwise, you will have to install both gears according to the marks, and this is problematic.
Having removed the timing gear, unscrew the bolts securing the protection - two in the middle and three at the bottom. The bottom 3 also hold the pump itself.
We take out the protection. Having picked up the pump a little with a screwdriver, we pull it out too. We clean the place where the pump is mounted on the engine from the remains of the old gasket and dirt.
We install the new pump in the reverse order. If desired, the gasket can be coated with sealant for greater reliability.
Delayed action pump: what VAZ is keeping silent about
Domestic engines for Grant, Kalin, Prior, Vest and Iksreev, with the exception of VAZ-11183, belong to the “plug-in” category. What this means is that when the timing belt breaks, the pistons meet the valves. Read - it exploded and led the engine to destruction, which was expensive to repair.
Nowadays, new engines also use Korean pumps, which are rumored to be of better quality. But even if you cut me, not a single pump of 200 thousand comes out. I do not believe! Moreover, I see complete confusion in the service books, the lack of a unified approach to servicing the same gas distribution mechanisms from model to model and, most importantly, an indifferent attitude towards the consumer.
Disassembly and installation of a new part
First of all, you need to gain access to the timing mechanism, for which, using a No. 10 key, unscrew the 3 bolts securing the protective plastic cover. If you are disassembling a 16-valve Kalina model, you will have to remove 2 covers by unscrewing 5 bolts with a No. 5 hexagon.
Before further disassembly, you need to align all the marks on the crankshaft flywheel and the camshaft gear.
Otherwise, during the work you can disrupt gas distribution and create a new problem for yourself.
To align the marks, it is best to jack up the 1st front wheel, engage 4th gear and turn the crankshaft by turning the wheel manually. Before doing this, do not forget to remove the plug from the gearbox side that covers the marks on the flywheel. The mark on it should coincide with the groove on the body, and the camshaft gear mark should be vertical at the top opposite the slot. Further disassembly is carried out in this order:
- using wrench No. 17, loosen the roller and remove the timing belt from the camshaft gear (in a 16-valve engine with 2 gears);
- Using the same key, unscrew the bolt holding the gear, wedging it through the holes;
- remove the gear (both in the 16V model) without losing the key;
- dismantle the internal protective plate, in an 8V engine it is held on by 2 bolts, 16V by 5;
- unscrew the 3 bolts securing the pump and pull it out of the socket;
- remove the remains of the old gasket from the cylinder block.
If a cork gasket is supplied with the new pump, then it does not need to be lubricated with anything, but it is better to place a cardboard gasket on the sealant. The new pump must be inserted into the socket in the same position as the old one and secured with bolts. After this, you can put all the parts back, put on and tighten the belt. Double-check that the marks match before replacing the covers.
To prevent air pockets from forming when filling antifreeze, you need to remove the small pipe from the throttle valve heating unit. Filling is carried out until liquid flows out of it. Upon completion of assembly, it is recommended to check the system by starting the engine and warming it up to operating temperature.
Symptoms of a problem
A breakdown can be determined by several signs. They can appear both together and separately. Or it may not appear at all until the pump completely fails. Signs of failure are as follows:
- The temperature of the coolant increases;
- Bearing whistling;
- Knock from the pump;
- Fluid leaks on the pump or belt.
Sometimes a bearing may jam immediately. Then you can be congratulated on your large-scale repair of the gas distribution mechanism. A knocking sound when a bearing wears out is often confused with camshaft knocking, so diagnosing this symptom should be taken more carefully. Necessary tool
. To carry out repair work, you will need a set of keys, a mounting blade and special tools for unscrewing the camshaft and crankshaft. And also a device for adjusting the timing belt tension. It would be nice if you have an assistant available. Some actions are difficult to do alone.
Why does a car's water pump break?
You can determine that the pump has failed by increased engine noise, as well as by play in the water pump drive pulley.
Another reason why you should urgently replace the water mechanism is leakage of coolant through its rubber seals and gaskets.
The most common reason why a water pump fails is that coolant seeping through the rubber seal washes the lubricant from the bearing, causing its destruction. Incorrect installation of the pump can also lead to rapid failure. If low-quality coolants, water, or untimely maintenance of the cooling system are used, the impeller may be destroyed. Among other things, the pump may become unusable due to a leaking heater radiator or oil cooler.
Video with practical tips:
Having made sure that your VAZ 2110 car really needs to replace the water pump, we proceed directly to the dismantling and repair processes.
Symptoms of damaged water pump
- Motor overheating - the pump
is faulty, the drive belt is not working, the impeller is damaged. - The temperature arrow indicator is located closer to the middle. It is necessary to brake to check the radiator. For which the inoperability design is intended, the unit and the pump drive will heat up.
- Noisy, smell of antifreeze in the cabin.
- Low antifreeze circulation is the result of pump destruction. Diagnosis is carried out with the engine idling; you must immediately clamp and lower the outer radiator hose. During normal operation of the pump, a push of antifreeze in the hose will be felt.
- Large free play of the ball bearing of the pump - damage to the ball bearings.
It is necessary to change the water pump if the car's mileage is 90 thousand km.
Disassembly and installation of a new part
First of all, you need to gain access to the timing mechanism, for which, using a No. 10 key, unscrew the 3 bolts securing the protective plastic cover. If you are disassembling a 16-valve Kalina model, you will have to remove 2 covers by unscrewing 5 bolts with a No. 5 hexagon.
Before further disassembly, you need to align all the marks on the crankshaft flywheel and the camshaft gear.
Otherwise, during the work you can disrupt gas distribution and create a new problem for yourself.
To align the marks, it is best to jack up the 1st front wheel, engage 4th gear and turn the crankshaft by turning the wheel manually. Before doing this, do not forget to remove the plug from the gearbox side that covers the marks on the flywheel. The mark on it should coincide with the groove on the body, and the camshaft gear mark should be vertical at the top opposite the slot. Further disassembly is carried out in this order:
- using wrench No. 17, loosen the roller and remove the timing belt from the camshaft gear (in a 16-valve engine with 2 gears);
- Using the same key, unscrew the bolt holding the gear, wedging it through the holes;
- remove the gear (both in the 16V model) without losing the key;
- dismantle the internal protective plate, in an 8V engine it is held on by 2 bolts, 16V by 5;
- unscrew the 3 bolts securing the pump and pull it out of the socket;
- remove the remains of the old gasket from the cylinder block.
If a cork gasket is supplied with the new pump, then it does not need to be lubricated with anything, but it is better to place a cardboard gasket on the sealant. The new pump must be inserted into the socket in the same position as the old one and secured with bolts. After this, you can put all the parts back, put on and tighten the belt. Double-check that the marks match before replacing the covers.
To prevent air pockets from forming when filling antifreeze, you need to remove the small pipe from the throttle valve heating unit. Filling is carried out until liquid flows out of it. Upon completion of assembly, it is recommended to check the system by starting the engine and warming it up to operating temperature.
Drive 16kl. Kalina is like riding a powder keg, you never know when it will explode! I'm talking about the meeting of valves and pistons...
This can happen for several reasons - the main one is the destruction of the timing belt support (Polish) roller. The pump may also jam and, in very rare cases, the tension (Chinese) roller may fail. The belt is very reliable and can only break if hit by a foreign object.
In general, the plant declares the service life of the entire timing assembly is 200 thousand km. and does not imply replacement and inspection of rollers or timing belt during the warranty period. However, I don’t think that there will be such brave souls who will want to check the declared resource) I periodically looked through the relevant topics on the forums and wondered how to protect myself and avoid expensive engine repairs... And after all, I encountered valves with pistons for everyone at completely different mileages. Some people have 20 thousand km. Some people drive 70, others drive more than 100 and have no problems.
And since no one has any doubts about the belt, everyone is mainly thinking about what to replace the rollers with, there are many options - some fit without modifications, with some you have to put washers in and use special bolts. I didn’t bother to understand all this variety and decided to replace the set with exactly the same one at 60 thousand mileage. At the same time, I decided to replace the pump and the belt and pulley of the generator in order to forget about this problem of belts and rollers for a long time.
I ordered everything from Exist except the pump; I bought it at the Lada retail store, which is now plentiful all over the country.
The kit itself turned out like this:
Manufacturer - Article - Name
— price
1. Gates - K015631XS - Timing belt with rollers, kit
— 2940 rub.2.
Gates - 6PK1018 - V-ribbed belt (alternator)
- 293 rub.3.
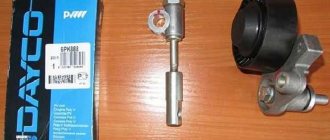
Ina - 531 0760 10 - Tensioner roller (generator)
- 510 rub.4.
TZA - 21126-1307010-20 - Water pump VAZ (1.6 l., 16 cells)
- 750 rub.
Original (factory) Gates rollers and belt are sold only as a set, and the main thing here is not to run into a fake, of which there are apparently quite a few. How to distinguish a fake from an original can be found HERE:
Gates kit - K015631XS consists of:
— timing belt — 5631XS (137 teeth)— Timing belt tensioner roller “Powergripr” (T43147)— Parasitic/drive roller, timing belt “PowerGripR” (T42150)
The Lada Kalina pump is a pump responsible for circulating water by cooling it. The unit is located in the front part of the cylinder block. If the pump is deficient, the motor overheats, which leads to boiling and breakdowns.
Replacing the pump on a Lada Kalina (8 valves)
On an 8-valve Kalina, you can change the water pump yourself. However, if the car owner does not have minimal experience in car maintenance, many questions may arise. For example, which pump to buy, how to choose the right tool, and is it worth draining the antifreeze from the system completely?
Which pump to choose
When the time comes to change the water pump, car owners begin to look at car dealerships for a worthy replacement. But which pump to choose so that it lasts as long as possible and does not cause problems for the owner?
It is important to choose original factory products. This is immediately visible from the packaging - an uncreased box, a warranty card, the date of manufacture and service life are indicated.
Original pumps are necessarily packaged in protective film and have holographic stickers.
In contrast, it will not last long - after 10 thousand kilometers the pump will need to be changed again.
At AVTOVAZ, designers install a TZA water pump on the Kalina. It has a long service life; drivers often change the pump only after 100 thousand kilometers. As an alternative, you can install more expensive German-made Bosch pumps - they are also famous for their quality and durability.
Where is the water pump located on Kalina?
Due to the fact that the pump is driven by the timing belt, it is part of the gas distribution mechanism. That is, you need to look for the water pump on the Lada Kalina from the side of the engine itself. Visually, before removing the belt, you can only see the pump pulley, which is involved in the gas distribution system.
Preparing tools
It is recommended to prepare a standard set of tools for removing bolts and unscrewing nuts. You will also need a 6-point hex key. To drain the antifreeze without contamination and inconvenience, it is better to immediately find a container for draining and a rag to blot up any drops that have fallen on the engine elements. To ensure reliable installation of the pump, you can use a sealant with good thermal conductivity properties.
How much coolant to drain/fill when replacing the pump
In any case, before dismantling the old pump, you will need to drain the antifreeze from the system. This is necessary in order to reduce the pressure in the hoses and not be injured during sudden releases of liquid.
If the water pump has not been changed for a long time, then it is advisable to immediately drain the entire volume of antifreeze from the system and replace it with a new one. If the car owner has recently filled in new coolant, then there is no point in completely draining it: just disconnect the hoses from the expansion tank and wait until the antifreeze comes out.
Operating procedure
First of all, you will need to install the machine on a flat surface. You can drive the Kalina into the inspection hole, you can simply lift the front right part on a jack. It is recommended to make sure that the car is securely secured; it is better to place additional supports under the body beam.
The work of replacing the pump on the Lada Kalina is carried out according to the following instructions:
Remove the engine splash guard.
Disconnect the negative terminal from the battery.
Unscrew the cap from the expansion tank and immediately remove the plug located on the cylinder block. Wait until the coolant drains out.
If all the antifreeze is drained, then unscrew the cap from the radiator and place a container under the drainage area.
After the antifreeze has been drained, screw all the plugs back on.
Remove the protective cover from the timing belt.
Loosen the belt by slightly tightening the timing pulley.
Remove the drive belt.
Remove the four bolts that secure the pump pulley to the cylinder block.
After removing the pulley, unscrew the last screws securing the pump.
Pull the water pump out of its socket along with the gasket.
Clean the planting site from adhering dirt and antifreeze drips.
Apply heat-resistant sealant to the edges of the hole and install a new gasket on it.
Place a new pump on the gasket and then proceed in the reverse order of removal.
Video: how to replace the pump yourself
When working with timing rollers and pulleys, it is recommended to immediately fix the working position, since the installation process can be very drawn out due to the length of time it takes to set all the marks.
Replacing antifreeze or antifreeze
Coolant reservoir
To perform fluid replacement work, you need to have special tools on hand to remove nuts and bolts. The Kalina car must be installed on a horizontal, flat surface. If this is not possible, you should try to position the car so that its front parts are clearly visible. Work is performed in a certain sequence.
- Remove the engine splash guard.
- Reset the negative terminal of the battery.
- Unscrew the plug from the expansion tank.
- Remove the drain plug located on the cylinder block. Place a container under the drain.
- Remove the ignition module along with the holder, because it interferes with access to the drain.
- Remove the drain plug from the radiator battery and wait for the coolant to drain.
- Tighten the drain plugs of the radiator and cylinder block.
- Remove the hose from the throttle heating fitting to drain the fluid by loosening the clamps.
- Pour antifreeze or antifreeze into the conservator until liquid flows from the removed hose. Now you can put the hose in place. After this, continue to fill the system with antifreeze or antifreeze. The liquid should fill the expander so that its level is a maximum of 3 cm below the specified level. Tighten the expander lock.
How to check the pump for malfunctions - three ways
The pump is a spare part of the invisible front. It works in the bowels of the engine, ensuring its cooling, and the results of its work are visible only by the arrow reading on the coolant temperature indicator. The pump is also insidious, it is a relatively inexpensive spare part (although the price depends on the specific car model, some are expensive), but changing it is expensive, because for this you have to disassemble a lot. This is especially felt on cars with a timing belt drive, because most often in such cars the timing belt turns the pump. But even in those cars where the drive is a separate belt, there is still a lot of hassle in replacing the water pump.
This feature has developed a certain rule among reasonable drivers - it is better to change the pump at the same time during large-scale maintenance or other work (most often this is replacing the timing belt) than to then change the water pump separately. The cost of replacing a pump with the timing drive removed is an order of magnitude cheaper than separate work to replace only the pump. Some drivers prefer to generally change the pump every time the belt is changed (for example, once every 60-80 thousand kilometers), but this seems like overkill. The service life of a pump is an unpredictable thing, it depends on the specific model, proper operation (pumps really do not like other types of antifreeze, as well as various mixtures) and simple luck. Even on the same car model, pumps fail at different mileages, literally from tens to hundreds of thousands of kilometers.
In order not to overpay and not change a part that can still serve and serve, we would suggest adhering to the following algorithm: with every serious disassembly of the gas distribution system or other large-scale work in the pump area, be sure to check its condition. If there is even the slightest sign of malfunction, then replace the pump preventively. Yes, maybe it would still serve, but the fact that it would last until the next large-scale work is no longer a fact. If there are no questions about the water pump, then you can let it work for another period.
So how can you spot signs of trouble?
1. Warm up the engine and, with the engine running, pinch the upper hose from the radiator by hand. A strong and rhythmic pulsation of coolant should be felt in the pipe. If the pulses are weak, infrequent, or absent altogether, this is an indication to replace the pump. For example, the impeller of a water pump may begin to fall apart. For the time being, this will not be noticeable, but the efficiency of the cooling system will inevitably decrease and the engine may boil under load. The verification method is, of course, somewhat subjective, but it has proven its right to life.
2. Inspection of the installation site. Most often, the pump does not physically collapse, but begins to leak in the area of the rubber seal. This is why we recommend assessing the water pump during large-scale work under the hood - a lot will already be taken apart and it will be possible to inspect the pump visually. Everything is simple here - any leak, signs or at least some hints of it, then the pump needs to be changed immediately. If the leak is not strong, then the loss of coolant by the level in the tank may not be tracked, but over time such a leak will most likely progress and the pump will not survive until the next “painless” replacement.
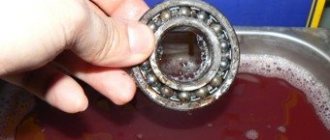
3. Checking the play. The third thing to rule out when checking the pump is problems with the bearing. This is especially true for cars with a timing belt drive, because for them a jammed pump can result in repairs to the engine block head due to the meeting of the valves with the pistons. But even without a “wedge” with a loose bearing, the pump is not a survivor. Any play is a clear indicator for replacement.
Of course, no checks and diagnostics will give a 100% guarantee that the pump will survive until the next large-scale maintenance, but the service life of these units on most car models today is long. With a timing belt replacement interval of 60-80 thousand kilometers, many pumps can easily survive two or even three belts. Changing the water pump every time you replace the belt in such a situation is wasteful. It seems to us that carefully checking the pump during work and leaving a spare part for another period for which there are no questions is a more rational approach. But at the same time, if there is even the slightest suspicion that something is wrong with the pump, then it is better to change it immediately - it will be cheaper.
Determining the performance of a part
In a sense, the water pump is a rather tricky part. Without disassembling the timing belt assembly, it is not so easy to find its functionality
But there are some signs of a pump malfunction that call for paying close attention to it:
- At an early stage of wear, bearing noise occurs. Not every auto mechanic can distinguish it, not to mention the average car owner. But if you managed to catch this noise, in other words, a reason to look under the plastic cover of the gas distribution mechanism.
- Wet marks under the timing cover and a belt shiny with water indicate that antifreeze is gradually seeping into the compartment. Naturally, through the pump.
- The belt is not in the center of the camshaft gear, but is shifted to the very edge. This happens when, due to free play in the pump bearing, the gear warps and the belt slides to the side.
- The coolant in the expansion tank of the Lada Kalina gradually decreases, and wet spots are constantly observed under the car directly under the timing mechanism.
Some tips on how to check your pump. If you observe one of the indicated signs, then it is worth taking the time to remove the timing belt from the camshaft gear by releasing the tension roller. Now you can manually check the free play of the bearing and, if such is found, immediately replace the part.
Malfunctions of the water pump are fraught with consequences, right up to half a year of engine repair. A non-functioning unit leads to overheating of the unit, which leads to failure of the piston rings and jamming of the pistons themselves in the liners. Some Kalina owners, in order to improve the performance of the cooling system, practice installing an additional pump. This is a very effective remedy for airing the system.
Typically, the additional pump is a standard water pump from the Gazelle, equipped with its own electric motor. The device fits into a small circle of cooling water circulation, or more precisely, it is placed on the return pipe of the stove. The electric motor is connected through an additional relay and a button inside the cabin so that the pump can be turned on as needed.
This video was processed in YouTube Video Editor ()
https://youtube.com/watch?v=hDpatOnEBQo
Device feature, failure symptoms
This is what the pump for Kalina looks like
The pump works in conjunction with the engine. It ensures uninterrupted operation of the fuel supply and cooling systems. The first one transfers fuel from the tank to the engine. The next reason is the forced pumping of antifreeze, or antifreeze.
The water pump-impeller, located on the shaft, is covered by a housing. The shaft has ball bearings at both ends and rotates due to a rotating moment by means of a belt attached to the engine.
Symptoms of a water pump failure:
the reddish section of the tachometer indicates the overheating temperature of the car engine, this is confirmed by the readings of the device; in the cabin of the Kalina car there is a persistent smell from the evaporation of antifreeze; a sound similar to a whistle can be heard quite clearly - repair or replacement of the pump is needed; there is an option to find drops of water under the car (to identify the problem, leave a sheet of snow-white paper under the car while you sleep).
Restoring the pump to function requires experience and special tools. It is better to entrust the work to 100% specialists, and at the same time replace the pump with the newest one.
Step-by-step work on replacing the timing belt
Before you begin replacing the timing belt, you need to prepare your work area and all the necessary tools. For work we will need:
- New timing belt.
- The key is "10", "17", "19".
- Flathead screwdriver.
- Tensioner pulley key.
Execution order
- Open the hood and remove the plastic engine cover.
- We dismantle the belt protection by unscrewing three bolts to “10”.
- Remove the right wheel and protection.
- This is what the timing belt diagram looks like, according to it we set the marks. The location of all marks is shown schematically.
- We turn the crankshaft clockwise by the bolt until the marks on the pulley and the tendril on the timing cover align. Marks "C and D".
- Make sure that the marks on the camshaft and the protective cover also match. Labels "A and B".
- We remove the plug on the upper part of the clutch housing using a screwdriver and make sure that the marks meet there too. The marks are marked with arrows.
- We fix the “crankshaft” from turning, insert a flat-head screwdriver into the hole between the flywheel teeth. We fix the screwdriver where the arrow points.
- We unscrew the generator pulley bolt while holding the screwdriver, then remove the pulley from its place. Using a “17” wrench, unscrew the fixing bolt.
- The next step will be to loosen the idler pulley nut.
- Loosen the nut so that the belt is as free as possible.
- Remove the belt from its seat. We dismantle the weakened belt.
- If you need to remove the tension roller, unscrew the fastening bolt and remove it from its seat.
Installing a new belt
- We put the belt on the crankshaft pulley.
- We begin to tension the two branches of the belt, first fix it on the pump pulley, then wind it by the tension roller.
- Then it drives it onto the camshaft.
- We tighten the belt using a tension roller, while simultaneously fixing the latter using a special key. (Rotate the roller counterclockwise).
- We make sure that all the teeth lie flat on the gears.
- Tighten the generator pulley mounting bolt and turn the crankshaft clockwise by giving one revolution.
- We make sure that all the marks match and remain in place.
Self-check the condition of the alternator belt
Before replacing an implement belt, drivers should perform a visual inspection to determine if replacement is necessary. To perform this, it must be placed in a stationary state. To prevent the car from rolling during inspection, clamps should be installed under the wheels. The generator belt is located in the engine compartment, and is tensioned on the pulleys of the attachment. The entire product must be checked. Having examined one area, inspect all the others sequentially, turning the belt. You can make a mark at the place where the inspection began.
The following signs indicate the need for replacement:
- cracks and abrasions on the surface, both internal and external;
- frayed, sides;
- peeling of rubber from rubber;
- mechanical damage;
- traces of oil and working fluids are on the surface.
During inspection, you also need to check the belt tension. If it is loosely tensioned, the generator will not work at full capacity. Too much tension causes premature wear of the bearings and strap. To check the tension, press the belt in a place free from equipment. With a force of approximately 10 kg, the deflection should not be more than 7-8 cm.
If the tension is insufficient, then you need to know how to tighten the belt. The tensioner screw acts as a regulator; it is used to perform tension (video author – Remgar).
When replacing a belt, it is advisable to change the tensioner pulley, which should also be inspected. It should be free of scratches, chips, play, and deformation. The roller should rotate freely without delay. You should not neglect regularly checking the condition of the belt drive.
If the belt breaks on the way, further movement is only possible using the battery. But even if it is fully charged, you can move it for no more than one hour. Therefore, it is recommended to have a spare alternator belt in the trunk in case it breaks.
Functions and purpose of a pump in a car
Normal engine operation is impossible without a cooling system that circulates coolant through the pipeline (system components, pipes and hoses). The purpose of the pump (water pump) is to ensure constant movement of antifreeze throughout the entire system while the engine is running. If at some point the pump stops functioning, this will immediately disrupt the thermal conditions of the engine. In this case, the coolant will boil, which can lead to serious engine damage.
Structurally, the pump is a fairly simple structure, consisting of a metal body and a pulley and impeller located on the shaft. The pulley is driven by a belt from the engine crankshaft. An impeller is located on a shaft inside the housing, which moves the coolant with blades from one part of the cooling system to another. This is how the motor is cooled.
Installation procedure
The pump is attached to the gearbox ear. Buy a set of new hoses that connect to the interior heater (stove). Old hoses may have cracks.
- Degrease the hose seats with a special liquid and coat them with a special heat-resistant sealant.
- Put on the hoses. On several hoses, the clamps were installed close to the edge. This is bad because there may be poor sealing. Antifreeze will leak and suck in air, which is of no use to us.
- We install all the pipes and fill with antifreeze. At the end of all work, do not forget to remove air from the system.
How to connect heated seats of Lada Vesta?
How to connect an additional pump on the Lada Kalina
Most modern cars have two water pumps installed at once. This ensures the highest quality engine cooling in any operating conditions. You can also install a second (additional) pump on the Lada Kalina, and this work takes a little time and effort. The most difficult thing is to get to the place where the pump is fixed, since you will have to disassemble many engine compartment parts.
In order to install the second pump on the Kalina, you will need:
hoses of different lengths;
fasteners (depending on where exactly it will be easier and more convenient to screw the pump);
The essence of the work is to organize a small circle of coolant circulation throughout the system.
Doing the work yourself
The first step is to assemble the assembly itself from the materials that are at hand. The pump is connected to two hoses (the short one will provide fluid removal, and the long one will provide supply). The hoses are attached to the two ends of the pump with clamps. Then follow the following procedure:
- The coolant will need to be drained. You can simply empty the expansion tank without draining the entire volume of antifreeze.
- Near the bottom of the car, find two hoses (one leads the antifreeze to the stove, and the other takes it away from it). Disconnect the outlet hose and instead attach the assembled structure with an additional pump.
- After this, attach the pump to the gearbox housing. Depending on the availability of fasteners, you can place the device on brackets or secure the pump with metal clamps.
In this case, the hoses are connected with clamps, and the pump itself is mounted on a metal bracket
At the end of the work, you will need to plug all hoses and plugs and fill in new antifreeze.
Video: second pump - preparation and installation
Thus, on Lada Kalina cars, the owner can independently change the water pump without resorting to the help of service station specialists. This will save money and also allow you to independently control the operation of the pump, taking into account the knowledge about the state of the machine system that was obtained during operation.
It all started when the coolant in the expansion tank began to decrease. I immediately checked all the tubes and connections - everything was dry everywhere. I removed the timing belt protection cover - the whole belt was wet, and so was the pump. When the engine was running, the pump began to make (periodically) grinding sounds - I concluded that it was time to change it.
At the very beginning, all coolant must be drained from the cooling system. You can read how to do this here.
Preparatory activities
Before changing the pump on Kalina, you will have to partially empty the cooling system. Antifreeze should only be drained from the cylinder block ; there is no need to touch the radiator. Unless you notice fluid leaking on the pipes, then you can change the hoses at the same time. The procedure is performed according to the following algorithm:
- Remove the mudguard that protects the engine from below from dirt. It is held on by bolts with 10 mm socket heads.
- Disconnect the positive terminal from the battery and the high-voltage wires from the ignition coil. Unscrew the coil mount with a 5 mm hexagon and move it to the side, freeing access to the drain plug.
- Empty the cylinder block by placing a special container and unscrewing the drain plug with a 13 mm wrench. In this case, it is necessary to open the cap of the expansion tank.
- If you need to empty the radiator, you should move the container under its drain neck and also unscrew the plug.
To carry out work on replacing the pump, no special pullers or devices are required. It is enough to have a set of regular and ring wrenches, a screwdriver and thin pliers. It is also quite possible to do without an inspection ditch by placing the car on a flat area and securing it with anti-roll bars.
Fuel pump: design features
Carburetor cars had mechanical pumps. The drive or shtof pushed the diaphragm, in the process a vacuum was created and fuel entered the carburetor. Currently, virtually all cars have an injection engine and an electronic pump. It delivers hot food at high speed and maintains steady pressure in the system. The electric motor, together with the working rotor, pushes the fuel. The pump is located in the gasoline tank itself. During operation, fuel becomes coolant and lubricant. There are car models that have two pumps: the main one is under the hood, the worker is located in the fuel tank.
- special motor shell;
- heat exchanger with electric fan;
- device for maintaining a constant temperature;
- suction device;
- expansion tank;
- contact tubes.
By looking into the plastic expansion tank, you can visually control the amount of antifreeze and antifreeze. There are special marks for the highest and lowest levels of liquids in the tank. Outside the tank, there is a pipe at the top for connecting to the heat exchanger sleeve, and at the bottom with a filling tube.
Expansion cap with breathers. The device contains inlet and outlet breathers. They are capable of providing systemic impermeability. The intake valve maintains elevated pressure in the hot engine. As the temperature increases, steam leakage decreases. The reduced pressure facilitates the opening of the released breather as the car engine cools evenly. Pump pumping antifreeze, quick discharge blade. The crankshaft wheel drives the pump by means of a toothed belt on the camshaft rod. Its body consists of aluminum. The shaft rotates in a double-row ball bearing, which contains enough fuel oil for the entire warranty period. The outer ring is tightened with a screw. There is a gear pressed in front, an impeller, a retaining ring, and an oil seal in the back. Antifreeze or antifreeze leakage is monitored through a hole in the pump shell. This method will help identify unit malfunctions. If the pump cannot be repaired, it is replaced with a similar assembly device. The coolant corrects the redistribution of antifreeze. System cooling of paired cycles occurs as follows: in a larger circulation circle, the antifreeze seeps through the motor shell to the radiator battery; when moving in a small circle, antifreeze or antifreeze passes only through the cooling shell, without getting into the heat receiver.
This video was processed in YouTube Video Editor ()
https://youtube.com/watch?v=hDpatOnEBQo
Replacement of the water pump, Lada KALINA. Replacing antifreeze (coolant)
The stove in the car does not heat. I changed the thermostat, removed the air locks, but nothing helps. Night car on.
The cooling system consists of a radiator battery and a throttle heating unit. The circulation of antifreeze or antifreeze here occurs continuously, regardless of the location of the coolant valve.
Thermostat. Thermal unit and two breathers are components. There is a redistribution of the flow of antifreeze or antifreeze. When the engine is cold, the node valve redistributes the direction of fluid movement. It begins to circulate over a smaller radius, without entering the radiator. High temperatures of 85°C allow the valves to open and allow fluid to flow into the radiator. At temperatures above 100° C, the main valve is fully open, the spare valve closes. Liquid circulation occurs over a large radius. Antifreeze or antifreeze temperature meter. This device is screwed into the cylinder head for automatic control of coolant. The sensor is connected to the temperature indicator on the instrument panel of the car. This information is sent to the controller. Heating heat sink. Built into the engine cooling system, it heats the vehicle interior by circulating hot coolant. The radiator consists of 2 plastic tanks in a vertical position. One of them has a partition. There are 2 more rows of rounded aluminum tubes, aligned horizontally, that pass through the cooling plates. The pipes are connected to the tanks through a rubber key. Antifreeze enters through the upper pipe and exits through the lower pipe. The inlet pipe is located next to a thin steam exhaust hose. The radiator has a casing with an electric motor. Drain plug at the bottom. The fan maintains the temperature inside the car. As soon as the controller receives the signal, the fan is turned on via a relay.
Fuel filters Kalina
Like many other VAZ cars, the Lada Kalina power system is equipped with two stages of fuel filtration. The coarse cleaning function is assigned to a mesh filter or “mesh”, as it is commonly called. Installed together with the entire fuel module in the gas tank, the mesh protects the electric fuel pump and does not allow large debris to pass through, which can cause a breakdown or clog the fuel line.
For Lada Kalina you need a mesh with a cut. An inexpensive part costing no more than 50–100 rubles. plays an important role. A clogged filter makes it difficult for fuel to flow into the fuel pump, which is forced to operate at higher speeds in order to maintain the required pressure in the power system. This mode can cause premature failure and replacement of the pump at a cost of about 2,500 rubles.
Before entering the injectors, gasoline goes through one more stage - a fine fuel filter or simply a fuel filter, as it is called in official descriptions and manuals. The power system of the Lada Kalina uses a conventional gasoline filter for injection cars with fittings for hoses equipped with clamping clips. Parts with threaded connections are not suitable.
The market is saturated with fuel filters from various manufacturers. Their prices range from 150–500 rubles depending on the brand. Some manufacturers and sellers value their goods even more expensive. While researching the market, experts from the magazine “Behind the Wheel” did not find any significant differences between the products. Among the main parameters of gasoline purification filters are screening fineness and performance at a given pressure.
All filters that attracted the attention of specialists successfully cope with the retention of pollutants larger than 10 microns in size and easily pass 2 liters of fuel through the filter element every minute
Choosing a fuel filter of a certain brand does not have a significant impact on the quality of cleaning. Provided that the filter is replaced in a timely manner, price-conscious motorists do not worsen the operating conditions of the engine. The purchase of expensive products is justified if improved parameters are required: minimal screening fineness and a large area of the filter element.
Photo gallery: fuel filters from various manufacturers
Kalina was the first VAZ model, the interior of which was designed using mathematical models using the latest equipment. This provided the compact car with surprisingly good ergonomics - in terms of space and ease of seating, this car cannot be compared with previous front-wheel drive vehicles, although the base, in fact, remained the same!
Oleg Polazhinets
Wheels