How to connect a car radio in a car with your own hands
How to connect a car radio in a car - when installing the head unit in a car, always remember that the positive voltage power wire must be laid directly to the battery terminal with the obligatory inclusion of a special fuse block in its circuit, be characterized by high quality insulation and have a large cross-sectional area. It is most advantageous to install this fuse block in close proximity to the battery.
There are cases when inexperienced car owners make a serious mistake in the process of connecting the device, namely: - they take the positive power supply voltage of the radio from the cigarette lighter, this installation option is completely unacceptable. Consequently, due to such incorrect connection, the output power of the device is reduced, this is especially noticeable at maximum volume, when the backlight begins to blink. In addition, with a clear drop in power, distortion begins to occur at an earlier stage of melody playback.
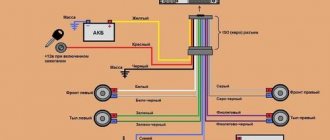
The circuitry of the radio provides a pair of positive voltage wires, one of which is red and is the power wire, and the other yellow is the function of transmitting the control signal. The negative voltage wire is black. It is connected according to the standard scheme - to the car body or directly to the battery terminal with the “-” sign. It is considered preferable to use the second connection option, since it minimizes the likelihood of electrical interference.
The built-in audio power amplifier or active antenna is turned on via a blue “REM” wire.
Dynamic emitters are connected using separate pairs of wires, which have their own colors for each spatially located speaker.
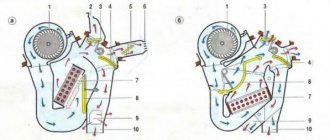
For clarity, the connection diagram is shown below:
This diagram shows that one wire has a clearly defined color, and the other has a duplicate dark stripe; this wire is the conductor of negative voltage, that is, “minus”.
One of the important points during installation is the correct connection of speaker wires. Indeed, if the assembly is incorrect in relation to the color scheme, problems in establishing balance may arise in the future. If the speakers were connected without observing polarity, then the speakers installed at the rear will be out of phase, which will ultimately lead to a lack of low frequencies.
In addition to the usual schemes for connecting a radio to a car, there are several other possible options. For example, they connect directly to the ignition switch terminals. But this method is ineffective, to say the least, the fact is that such a scheme will not work if there is no key in the ignition. There is another option - connect to the alarm connector, but this solution also did not find wide support among car enthusiasts.
Sometimes during the operation of the device there is a need for preventive maintenance, repair or replacement of equipment, so to make this convenient, when installing the car radio, you do not need to shorten the wires, but it will be more effective to use ISO connectors and special adapters.
Here is another solution for connecting the device. The yellow wire goes to the 12v power terminal, and the red wire goes to the parking light connector. The contact point of 12v dimensions is located at some distance from the radio, for this reason it would be advisable to use an electromagnetic relay. Power for the relay can be obtained from the contacts of the ashtray light bulb.
Positive nuances of this scheme:
- The head unit itself starts working the moment the lights are turned on and at the same time retains memory.
- When the side lights are turned off, the head unit stops working. This is a significantly positive moment for those who, out of forgetfulness, do not turn off the light.
- The head unit can work even if the ignition is not turned on.
- If the side light circuit is implemented using LEDs, the electricity consumption is quite insignificant.
The video below shows the process of connecting a car radio in a production VAZ car:
Video:
Music in a car is considered one of the main indicators of driving comfort. Therefore, many car enthusiasts today are interested in the question - how to connect a radio in a car on their own and what is needed for this? In this article we will talk about all the connectors and their markings, as well as the procedure for installing a car radio with your own hands.
Connectors and their markings
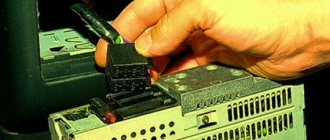
So, in order to correctly connect a car multimedia system to a car battery or ignition switch at home, you first need to understand the connectors. Currently, most car radios are usually equipped with two standard outputs, marked with ISO symbols. Each of them has eight contacts equipped with a special key.
One of them consumes linear current in amperes, that is, a power circuit should be connected to it, which is a brown connecting element, marked as A. The second is intended for connecting music speakers, usually black wires are connected to it, and it is marked with the letter B.
Connecting the radio plug in a car
It should be noted that in some cars, in order to properly connect the power to the network, it is necessary to use non-standard connectors. But such elements are usually labeled the same, so there are several options here. The first is to simply cut off the old connector and connect the wires to it, then wrap them with electrical tape, but this option is less practical. The optimal solution would be to purchase a special adapter, with which you can correctly connect the system directly to the battery or through the ignition switch. Currently, you can purchase such a device without any problems, especially since the domestic market offers customers a huge assortment.
Installing speakers in a car
In addition to the radio itself, you will need to correctly place and connect the audio speakers.
Installation of the rear and front speakers is carried out according to the same scheme. To do this, you will need to cut openings in the door trim, so for ease of installation you need to remove them. The upholstery is removed in the following sequence:
- the door handle is removed;
- The plastic casing under the handle is removed;
- the adjusting handle for raising the glass is removed (only for Lada Granta Standard).
The stock upholstery has 16 cm diameter openings that are specifically designed for speakers. Certain difficulties may arise if you decide to install speakers of other sizes.
For speakers with a diameter of 13 cm, you will need to cut out the central plug in the door trim. The layout diagram is included with the speaker kit. Having understood the intricacies of a particular model, you will have to slightly increase the plane of fastening of the tongues, since standard openings are larger.
Speakers on the rear parcel shelf of a car
Speakers with a diameter of 16 cm are most often easy to install, but sometimes the sizes do not match. In this case, it is necessary to adjust the metal opening allocated for installing the speaker using an electric jigsaw. After each adjustment, be sure to try on the column, as it is very important not to overdo it in this matter.
After successful installation, you will need to connect power and check the functionality of the speaker. Then you can install the door trim back. A protective grille is placed over the column, which must be secured with self-tapping bolts.
Choose speakers with a flat surface. Otherwise, they will interfere with looking into the glove compartment; to do this, you will have to open the front right door every time.
What extensions can there be?
If you plan to connect a professional device via the ignition switch or directly to the network, then in order to do everything correctly, you need to take into account the extensions specific to the 220 radio. Thanks to this functionality, the device is equipped with additional functionality that makes using the radio more comfortable.
For example, these could be extensions:
- ANT. This extension will be useful if the car has a retractable antenna. That is, if you need to activate it, you can simply give a command to the device and the antenna will turn on automatically.
- REMOTE. Thanks to this function, you can connect an amplifier to the system and, accordingly, achieve better sound. If your car is basically small, then this function will not be particularly useful, since in any case you will not be able to achieve the desired sound background.
- ILLUMINATION. Using this extension, you can make sure that the brightness of the device is reduced while driving and does not distract the motorist. When the car stops, the system will automatically increase the brightness of the display.
- MUTE. This extension is enabled only when the car owner needs to talk on a mobile phone. When the phone rings, the system automatically turns on this extension and the speakers are turned off.
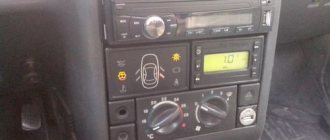
Lada Granta Liftback Norma with air conditioning › Logbook › Installing a radio and speakers
The first thing that was done in Grant after the purchase was installing a radio and speakers. As a radio, I chose a diskless JVC with Bluetooth, a microphone included and playback music in FLAC format.
The microphone (for now) is connected to the instrument cluster. In the future, perhaps I will move it to the ceiling lamp, where there is a place and slots for it. If, of course, I can now peel it off the instrument cluster.
Speakerphone through the radio is very convenient; when there is an incoming call, the music is paused, you answer the call by pressing a button on the radio or on the phone, and then talk without using your hands: through the microphone and speakers in the doors. The only negative is if you are driving in a car with someone and don’t want prying ears in the cabin to hear your telephone conversation. But this happens extremely rarely, and even in this case, on your phone you can turn off the output of the conversation audio to the Bluetooth device, that is, to the radio.
I'm happy with the radio. The only thing I personally don’t like about it is the red backlighting of the buttons; I would like green backlighting to match the backlighting of the instrument cluster in the Grant.
The single din radio is very easy to install. First, we pull out the plug shelf from the torpedo, prying it off from above and below. The ISO and antenna connectors are inserted into this plug from the reverse side. In the space vacated by the plug, we place the metal frame of the radio from its kit. Next, we connect all the connectors, including the microphone, and place the radio itself in the frame. Elementary and does not require any tools at all.
Installing speakers is more difficult. Fortunately, the “Norma” package already has wiring in all doors.
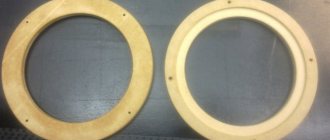
If we want everything to be beautiful, then in addition to the speakers themselves, it is advisable to buy1. Facing (grids) in door cards from the Luxury package. Codes: front 2190-6102096, 2190-6102097; rear 2190-6202094, 2190-6202095. The price is about a hundred rubles per piece.2. The front speakers can be screwed directly to the doors, while the rear ones require standard plastic spacers 2190-7901032, 2190-7901033.
We remove the door trims. To do this, you need to unscrew the lock button, pry the door handle trim from below with a plastic puller, a screwdriver (but the screwdriver can leave marks) or with your fingernails. Unscrew the two screws behind the handle. At the rear doors, remove the window lifter handle. To do this, you need to recess the door trim near the window lifter handle, pressing on the trim, and then move it to the side and remove the fixing clip at the base of the window lifter handle. After which the handle can be pulled out freely. On the front doors, unscrew the screws from the bottom of the trims. Next, pull the door trim towards you with your fingers, starting from the bottom. It is attached around the perimeter with clips. Considerable force must be applied, but over several removal/installation cycles not a single clip broke. In any case, their cost is cheap.
Car radio installation
How to connect a 220 car radio with your own hands through the ignition switch? First, you will need a car radio connection diagram, which should come with the system. You will also receive installation instructions along with the device; you need to study them thoroughly. In addition, first you should check whether the kit includes all the fasteners that will be required during installation.
In general, you can easily connect all the cables for the system with your own hands, no matter how many there are, if you correctly follow the steps noted in the instructions. Installing the device into the instrument panel should not cause problems, but during installation, please note that it is necessary to avoid the formation of large gaps and cracks. Over time, dust will enter the openings, which will settle on the system and can lead to its failure. In addition, these cracks will contribute to the appearance of vibration, and this, in turn, can also affect the operation of the audio system as a whole.
Please note: if your car already had a radio installed, then when dismantling the old device you should also get rid of the frame. Connecting a new system with your own hands into an old frame is impractical, as this may cause incomplete installation of the device. Only those frames that come with the kit are used, otherwise vibrations cannot be avoided.
By observing all the nuances described in this article, you will be able to install any multimedia device. The brand of the car radio is absolutely not important here; you just need to study the diagram and connect all the wires correctly. If you want to do everything yourself, study the video, which describes this process in detail.
Most car enthusiasts cope with this process on their own, but sometimes cases occur when incorrect connection of contacts leads to failure of the media system. To avoid this, you can try using the services of a specialist. Moreover, if you evaluate it objectively, the cost of such a service today is not particularly high, but you can be sure that the radio will be connected correctly.
Removing the standard radio in Grant Lux
The difference between grants of the luxury configuration: the MMS (multimedia system) installed from the factory. This is a 2 din device.
To remove standard acoustic grants :
- take a knife or plastic spatula to dismantle the acoustics and disconnect the decorative trims to the right and left of the radio. It is not necessary to take pictures;
- in the gap between the cover and the panel we find the head unit lock. There are two of them on both sides. Press it out with a screwdriver;
- we take out the GU on ourselves.
Everything is described in detail in the video:
Replacing the standard MMC in Grant
The process - after removing the acoustics, we install a new system.
Difficulties : you may have to finish the fastenings of the new system for VAZ ones. Plus you need the right frame. The factory MMC frame may not fit.
When you buy a new PG for your car, you need to buy a frame for it specifically for Grants. Otherwise there will be holes in the panel.
Have you bought a new 2 din radio, but there is no frame for sale? You can do it yourself .
Example at the link.
How to install a car radio
Installation of a car radio is most often carried out in a standard place on the front panel of the car. Otherwise, installation of the radio is done using a special mount that you can make yourself. Since 1 DIN radios are the most common, the seats have a height suitable for installing these devices. For 2 DIN sizes, additional modifications to the dashboard will be required to install a player in the car.
You should check the package contents of the device before installing the car radio to make sure you have all the necessary parts. Installation of the standard radio is done using a special frame that is included with the device. It is used to fix the radio in the car. First, the box for small items is removed, which is located in the standard place for installation. Then the metal frame is inserted.
Using the supplied special tool, pick up and bend the fixing tabs.
The next stage of installing a car radio with your own hands is securing it to the seat. Some devices have a threaded hole on the back wall. A pin is screwed into it, with which you can further secure the player. To do this, attach a special strip to the back of the dashboard.
To install a non-standard radio, you will need to check which mount is used and whether it fits the seat. If there are threaded holes on the side walls of the device, then installation of the radio on the car is carried out by screwing it to the dashboard with bolts.
Selecting a 2 DIN radio
The Lada Granta can be equipped with a 1 or 2 DIN device. These radios have 2 types of display: standard and touch. When choosing other equipment, you will need to purchase or make a frame to frame the device body. The rule applies to miniature 2 DIN speaker systems. They have a standard frame. She approaches Granta's radio panel. However, the final decision remains with the car owner.
Among AvtoVAZ products there is a device with a touch screen. The advantage of the radio is the same backlighting of the control keys and other buttons. To install a standard device, you need to buy an original panel on the main console. The standard mounting socket is not intended for such devices.
How to properly connect a car radio
Connecting the car radio is done in several ways:
- Using an ISO connector.
- Without using chips by splicing wires.
- By directly connecting the power wires to the battery terminals.
- Via the ignition switch or a separate switch.
- Through a security alarm.
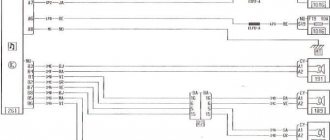
Car radio diagrams, which help with the correct connection, are printed on a label on the top cover of the device. They indicate the color marking of the wires established by the generally accepted standard:
- red - power management;
- yellow - power supply to memory and amplifier;
- black - mass;
- blue with a white stripe - power supply to the antenna with amplifier.
For reliable fixation, the wiring can be secured using cable ties.
Connection with and without chip
The first option for connecting the radio to the car is suitable if you have an ISO connector, which is built into recently released devices. If the tape recorder is equipped with a proprietary connector, then you need to purchase an adapter suitable for it, which may or may not be equipped with an additional feature. In the first case, if there is a mating part in the car wiring, the connectors are inserted into each other.
Possible problems and how to solve them
When using the radio, problems may occur due to connection errors. For example, the device will not turn on due to incorrect connection of the power circuits. If there is a fuse, it will blow if a short circuit occurs due to careless handling or connecting the power wires to the terminals of speakers or service devices.
To solve this problem, you should turn off the radio, remove it, inspect the wiring and check the connection according to the colors of the wires. The incorrectly connected wires are then disconnected and reconnected according to their intended purpose.
If after turning on the device there is no sound, then you should set the volume control to a position other than zero. If the radio suddenly turns off or an error message appears on the display, then there is a leak or short circuit in the speaker wiring. To deal with this problem, the integrity of the insulation and the location of the wires are checked. Damaged cables are replaced and moved away from hot and sharp objects.
Connecting the audio system
It is not difficult for a person with minimal knowledge of electrical engineering to connect a Chinese 2 din radio. You just need to follow the included instructions exactly. In addition to connecting 4 speakers, it is possible to connect an amplifier or subwoofer. The wire marked AMP-CONT is responsible for this. The line has a built-in fuse, and power is supplied with a time delay of 8-10 seconds to reduce noise that occurs when the car player is turned on.
The acoustics are connected to the 2din radio with special multi-core acoustic wires. Their length should be minimal to reduce line resistance. It is not advisable to twist the wires, as this affects the sound quality. It is better to use special connectors.