Installing a Niva generator on a classic
To the list of articles VAZ2101-2107
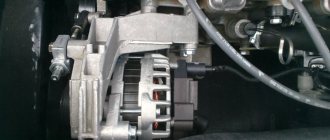
Installing a generator from Niva on a classic (30 Amperes)
We install a generator from an injection field (engine 21214) on a traditional VAZ. The article is naturally already floating around the web, but I think it would be useful to publish it again since the topic of the dilemma discussed in the forums, increasing the current of the on-board network, is a burning issue. The installed generator has slightly different fasteners, and the current it produces is eighty (eighty) amperes.
1. What you need to have for installation.
1.1 Generator mounting bracket 21214-3701650.
1.2 Compensating bushing for mounting the generator two thousand one hundred ten (rubber silent block, I did not find the number in the catalog). complete with counter-shaped washer 2110-3701638 (at least in Kemp it is this that is sold under this number, and not the bushing assembly).
1.3. Generator mounting bolt 2110-3701376 with nut 2110-3701686 (a grower doesn’t seem to be needed, but there’s enough space to put it).
1.4. Additionally, bolt M10×1.25×20 (15970521). My old bracket was fastened with 2 bolts.
1.5. Tension bar 21214-3701635.
1.6. Bolt M8×25 with nut 2110-3701686 (like the lower mount of the generator).
1.7. Instrument and beer :).
2. Step-by-step procedure for replacing the generator.
2.1. Remove the split iron bushing installed in it from the twenty-one thousand two hundred fourteen bracket and install a silent bushing in its place (with the iron side inward).
2.2. Remove the generator.
2.3. Remove the sixty one contact extension (excitation winding) from it under the protection cover. In general, you can do it without the help of others :).
2.4. Unscrew the old bracket from below (head with 17, two or three bolts).
2.5. Unscrew the old bar on top (17 head, one nut).
2.6. Hang the newest bar. but don’t fix it completely, let it dangle.
2.7. Secure the new bracket with the silent insert inserted into it (iron ring inside).
2.8. Hang up generator 214, having previously placed the excitation winding contact extension on it (so as not to do this by touch). Insert the bolt, put on the shaped washer (with the ribs facing inward, obviously) and tighten with the nut (not very well).
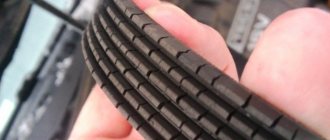
2.9. Put on a belt. By the way, it is noticeably easier than on 213 to insert a bolt into the bar and the upper ear of the generator and tighten it (not all the way, again).
2.10. Completely tighten the fastening of the bar to the engine.
2.11. Pull the belt, fix the ear fastening to the bar, fix the lower fastening.
2.12. Put the wires back on.
2.13. Having drunk a beer earlier, get excited and enjoy the fact that you are alive. z.y. I haven’t installed it myself yet, but what is described is completely realistic. And I have plans to do a replacement.
To the list of articles VAZ2101-2107
Step-by-step procedure for replacing the generator. Option two is not complete
3.1. Remove the old generator, mounting bracket (pictured) and generator tension bar.
3.2. Remove the split iron bushing installed in it from the twenty one thousand two hundred fourteen bracket.
3.3. Install the twenty one thousand two hundred fourteen bracket in place of the old bracket.
3.4. Install the newest tension bar.
3.5. Remove the silent ring with 2 rings from this bolt.
3.6. Install it in a bracket that is already attached to the block.
3.7. Everything else is simple. As usual, we install the generator, tighten the bolt on the bracket from the bottom, put on the belt, tighten it, tighten the generator with a tension bar using an M8x25 bolt with a nut and a groover.
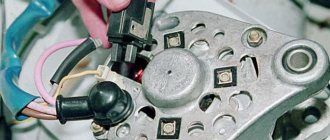
3.8. Now connecting. On the driver's side, under the hood, a voltage regulator is attached to the fender; two wires are connected to it; we disconnect them from the regulator and isolate them.
3.9. On a new generator there are only two places for connection, a bolt and a terminal. Just like on an ancient generator, we place a terminal on the bolt; tighten it with a nut and put the rubber casing on the bolt. As for the other two wires going to the generator, we place the yellowish wire on the remaining terminal of the generator, and we also insulate the grayish one (it was not attached to the brushes of the old generator) and leave it dangling.
READ Which piston is better for VAZ
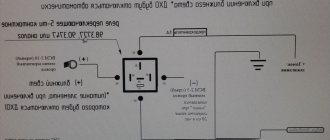
3.10. And one last thing. There is a RS-702 relay under the hood on the passenger side; it must be replaced with the purchased RS-527. We connect in the same way as the old one was connected, i.e. contact eighty five to 85, eighty six to 86, etc.
3.11. It’s probably worth replacing the battery))) and running to start the engine! Everything works for me, it’s one of the few things that works after my hands.
Thanks Tretyakov Oleg “STALKER”, VAZ-2106 Auto Club
More information about connection diagrams The issue of connection is discussed on forums. There are various ideas and advice: from replacing the seven hundred two relay with five hundred twenty seven and connecting three hundred eighty PP wires to soldering in diodes, etc. Therefore, share your experience of which path is correct. And if possible, describe the specific connection step by step, because in diodes, excitation windings, etc. I’m not cutting much yet. Changing one relay is the most common solution. In the tidy, you can solder the light bulb not “-” (as it is there by default), but “from the ignition” with a parallel resistor - then you can connect this wire (which goes from the relay to the light bulb) directly to the generator. You need to connect exactly like this. In principle, you can not use resistors, but then if the light bulb burns out, charging will disappear. Nine - resistors 2W (mlt-2, omlt-2) 100 Ohm
We take the “” wire “15” from the ignition switch (the “” appears when the ignition is turned on) and connect it to one of the contacts of the light bulb. From the other contact of the light bulb we pull a wire to the generator and connect it to terminal 61. EVERYTHING! It will work until the light bulb burns out.
You can connect two 100 Ohm resistors with a power of two W or one 50 Ohm resistor with a power of two W in parallel to the light bulb (actually four W is needed). Then, when the light bulb burns out, charging will not be lost.
Using the method of simple compositions, you can use the original wiring and the original light bulb on the tidy
The mechanism of operation of the two thousand one hundred ten generator is similar to Niv’s. The resistor there is also fifty ohms. You can use any diode for a direct current of 5A.
And here is the connection diagram for the 2110 generator
How to check the generator yourself
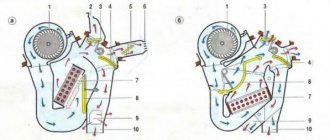
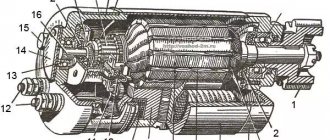
How to check a VAZ generator using the example of model 2109. Generator type 94.3701 alternating current, three-phase, with a built-in rectifier unit and an electronic voltage regulator, right-hand rotation.
Generator connection diagram . The voltage to excite the generator when the ignition is turned on is supplied to terminal “D+” of the regulator (terminal “D” of the generator) through indicator lamp 4 located in the instrument cluster. After starting the engine, the excitation winding is powered by three additional diodes installed on the generator rectifier block. The operation of the generator is controlled by a warning lamp in the instrument cluster. When the ignition is turned on, the lamp should be on, and after starting the engine, it should go out if the generator is working. If the lamp is brightly lit or glows half-lit, it indicates a malfunction.
The “minus” of the battery should always be connected to ground, and the “plus” should always be connected to the “B+” terminal of the generator. Failure to turn the battery back on will immediately cause increased current through the generator valves and damage them.
It is not allowed to operate the generator with the battery disconnected. This will cause short-term overvoltages to occur at the “B+” terminal of the generator, which can damage the generator voltage regulator and electronic devices in the vehicle’s on-board network.
It is prohibited to check the functionality of the generator “for spark” even by briefly connecting the “B+” terminal of the generator to ground. In this case, significant current flows through the valves and they are damaged.
Installation of the VAZ 2107 Generator. Removal and installation of the VAZ 2107 car generator
Removing the generator from a VAZ 2107 car
1. We install the VAZ two thousand one hundred seven car on an inspection hole or overpass (see “Preparation of the VAZ two thousand one hundred seven car for maintenance and repair”).
2. For easy access to the upper nut of the generator, remove the battery (see “Battery for a VAZ two thousand one hundred seven - removal and installation”).
3. Using a seventeen mm socket wrench with a universal joint and an extension (thirteen mm wrench for generator 9412.3701), unscrew the nut securing the generator to the adjusting bar.
4. Remove the mudguard of the engine compartment (see “Mudguard - removal and installation”).
5. Remove the belt from the generator pulley (see “VAZ two thousand one hundred seven generator drive belt - tension adjustment, replacement”).
6. Disconnect the wire block from the generator output.
7. Sliding the protective cap, use a ten mm wrench to unscrew the nut securing the wire tips to the generator terminal connected to the positive terminal of the battery.
8. Using a nineteen mm socket wrench, unscrew the nut securing the generator to the bracket on the cylinder block.
9. Having removed the bolt, remove the generator. Make sure not to lose the buffer sleeve A in the eye of the cover.
Installing a generator on a VAZ 2107 car
1. Installation of the generator on a VAZ two thousand one hundred seven car is carried out in the reverse order.
2. Adjust the tension of the generator belt (see “Alternator drive belt for VAZ two thousand one hundred seven - tension adjustment, replacement”).
Options for replacing a broken unit
The main thing to remember is that to replace a broken generator, it is forbidden to take the first one you come across. Failure to comply with this rule will lead to lengthy and expensive repairs of the VAZ 2107 or other modifications. The most common modification is G-221. To carry out a technically correct replacement, it is necessary to study the following manufacturer’s recommendations:
- Replacing a VAZ generator is possible using a unit from modification 2105. The maximum current level is 55 A, which is suitable for cars with a small number of consumers. Replacement does not imply modifications or modifications.
After the car owner decides on the power, it is necessary to install the device correctly. Car mechanics recommend exercising extreme caution. Poor installation of the generator leads to many problems during subsequent operation.
Source
Installation of a generator from VAZ two thousand one hundred ten on a VAZ 2106
Installing a generator from a VAZ two thousand one hundred ten to a VAZ two thousand one hundred six is not only probable, but expedient. The generator from VAZ two thousand one hundred ten is one hundred percent suitable for these purposes. The advantages of the generator from the “ten” are high power and the absence of the need for external excitation.
When I went to the car market, I bought:
1. Generator mounting bracket from Niva 21214.
2. Bolt for securing the generator 2110.
4. Generator pulley 21214
5. A stud, two nuts and a drill with a diameter of 16mm
6. Generator 2110.
Installation of a generator from VAZ two thousand one hundred ten on a VAZ 2106
1. First, we dismantle the old generator, the mounting bracket (see photo) and the generator tension bar.
2. We take out the split iron bushing installed in it from the twenty one thousand two hundred fourteen bracket.
3. Now we install it in the old place of the bracket.
4. Then remove the silent with 2 rings from this bolt.
5. Install it in a bracket that is already attached to the block.
6. Take a new generator and dismantle the 2110 pulley.
7. Now we need to drill a sixteen hole in the twenty-one thousand two hundred fourteen pulley (which we purchased). Attention:
Before drilling, you must make sure that this operation is necessary.
8. The pulley should fit onto the rotor threads.
9. Fix pulley 21214.
10. Next is the usual installation of the generator on the VAZ 2106. Install the generator and tighten it with a bolt on the bracket from the bottom.
11. Take the tension bar that we removed along with the old generator. We level the plane along which the belt tension was adjusted with a hammer (initially it is semicircular). We put on the belt. Next, take the pin, put one nut on it, then the bar itself and tighten it tightly with the second nut. We put the tension bar in its place so that the end of the pin rests against the generator cover. Now let’s start screwing the tension bar itself with a nut; now this particular nut will be used to regulate the belt tension.
12. Now connected. On the driver's side, under the hood, a voltage regulator is attached to the fender; two wires are connected to it; we disconnect them from the regulator and isolate them; we no longer need the regulator.
13. On a new generator there are only two places for connection, a bolt and a terminal. Just like on an ancient generator, we place a terminal on the bolt; tighten it with a nut and put the rubber casing on the bolt.
14. As for the other two wires going to the generator, we place the yellowish wire on the remaining terminal of the generator, and we also insulate the grayish one (it was attached to the brushes of the old generator) and leave it dangling.
15. On the passenger side under the hood there is a RS-702 relay (we don’t need it now either), it needs to be replaced with the purchased RS-527. We connect in the same way as the old one was connected, i.e. contact eighty five to 85, eighty six to 86, etc.
16. Replace the battery and start the engine.
The installation of a generator from a VAZ two thousand one hundred ten on a VAZ two thousand one hundred six with your own hands was successfully completed. While you are enjoying the result, I will remind you that the previous article on our website was about replacing the front windows of a VAZ two thousand one hundred six with windows of a VAZ 2107.
Generator 2108
This device is often installed on both 2106 and 2107. This is due to its greater efficiency; it produces a charging current of 55 A, which is quite enough for most motorists. But, if your car has significantly more equipment, then it is better to choose something more powerful.
These generators are identical in terms of mounting, so there will be no problems with the installation itself. Of course, if you remember to remove the terminal from the battery. The fun starts when you connect. The whole point is that 4 wires are attached to the original device. There are only 3 for the “eight” one. This is due to the built-in voltage relay. To obtain a normal result, you need to insulate the black wire, and connect the rest as usual. When the generator is running, the light indicating the discharge will be on. This is a normal phenomenon with such a connection. Accordingly, it should go out when there is no charging.
In principle, you can already drive like this, but if you want to do everything as expected, you will have to make some more modifications. We remove the old relay and replace it with a regular power relay. Now the light will light only when the engine starts, and also at low speeds, which is quite acceptable.
READ How to connect an 8 pin motherboard to a 4 pin power supply
When installing on a VAZ 2107, you only need to add a power relay.
Installation of a generator from VAZ two thousand one hundred ten on a VAZ 2106
Installing a generator from a VAZ two thousand one hundred ten to a VAZ two thousand one hundred six is not only probable, but expedient. The generator from VAZ two thousand one hundred ten is quite suitable for these purposes. The advantages of the generator from the “ten” are high power and the absence of the need for external excitation.
When I went to the car market, I bought:
1. Generator mounting bracket from Niva 21214.
2. Bolt for securing the generator 2110.
4. Generator pulley 21214
5. A stud, two nuts and a drill with a diameter of 16mm
6. Generator 2110.
Installation of a generator from VAZ two thousand one hundred ten on a VAZ 2106
1. First, we dismantle the old generator, the mounting bracket (see photo) and the generator tension bar.
2. We take out the split iron bushing installed in it from the twenty one thousand two hundred fourteen bracket.
3. Now we install it in the old place of the bracket.
4. Then remove the silent with 2 rings from this bolt.
5. Install it in a bracket that is already attached to the block.
6. Take a new generator and dismantle the 2110 pulley.
7. Now we need to drill a sixteen hole in the twenty-one thousand two hundred fourteen pulley (which we purchased). Attention:
Before drilling, you must make sure that this operation is necessary.
8. The pulley should fit onto the rotor threads.
9. Fix pulley 21214.
10. Next is the usual installation of the generator on the VAZ 2106. Install the generator and tighten it with a bolt on the bracket from the bottom.
11. Take the tension bar that we removed together with the old generator. We level the plane along which the belt tension was adjusted with a hammer (initially it is semicircular). We put on the belt. Next, take the pin, put one nut on it, then the bar itself and tighten it tightly with the second nut. We put the tension bar in its place so that the end of the pin rests against the generator cover. Now let’s start screwing the tension bar itself with a nut; now this particular nut will be used to regulate the belt tension.
12. Now connected. On the driver's side, under the hood, a voltage regulator is attached to the fender; two wires are connected to it; we disconnect them from the regulator and isolate them; we no longer need the regulator.
13. On a new generator there are only two places for connection, a bolt and a terminal. Just like on an ancient generator, we place a terminal on the bolt; tighten it with a nut and put the rubber casing on the bolt.
14. As for the other two wires going to the generator, we place the yellowish wire on the remaining terminal of the generator, and we also insulate the grayish one (it was attached to the brushes of the old generator) and leave it dangling.
15. On the passenger side under the hood there is a RS-702 relay (we don’t need it now either), it needs to be replaced with the purchased RS-527. We connect in the same way as the old one was connected, i.e. contact eighty five to 85, eighty six to 86, etc.
16. Replace the battery and start the engine.
The installation of a generator from a VAZ two thousand one hundred ten on a VAZ two thousand one hundred six with your own hands was successfully completed. While you are enjoying the result, I will remind you that the previous article on our website was about replacing the front windows of a VAZ two thousand one hundred six with windows of a VAZ 2107.
Sources:
https://tuning-vaz2106.ru/6/vaz-2107-kreplenie-generatora-2107.html https://vazgarage.ru/vaz2106/elektrooborudovanie2106/270-ustanovka-generatora-ot-vaz-2110-na-vaz -2106.html https://vazgarage.ru/vaz2106/elektrooborudovanie2106/270-ustanovka-generatora-ot-vaz-2110-na-vaz-2106.html
Standard option
Which generator is better to install on VAZ 2106 and 2107? The question is quite complicated. It needs to be considered starting with the most common option. After all, any manufacturer will say that it is the standard version that should be installed on the car. Let's look at the features of the standard version G221.
In this type of relay generator, the regulator is installed separately from the brush assembly. This makes it easier to troubleshoot some problems to some extent. The advantage is the ease of installation, there is no need to adjust the wiring for connection, everything is done according to the standard scheme. But such a generator is low-power; it produces a charge of a maximum of 42 A, which is not enough for most modern batteries.
From all this, we can conclude that a standard generator is certainly good. But, if you have additional devices, it is not very profitable to use it. It is best to choose a more powerful option.
This generator is intended for use on Niva cars. It is capable of delivering 50 A of current, which is quite enough for full-fledged electrical work. It differs from a standard “six” generator in the presence of a built-in regulator relay. Here it is assembled into one unit with brushes. Therefore, to install it on a VAZ 2106, you just need to make some minor modifications. This electric machine is installed on 2107 without any special interference or modifications.
There are several ways to refine such a generator. The easiest way would be to install brushes from the G221 generator. They fit perfectly in place of the relay assembled with the brush assembly. No modifications are required, this allows you to install such a generator, even for people without special skills. It is possible to install the G222 with a standard regulator, but to do this, you will have to redo the generator connection diagram. Otherwise, nothing will work out.