How to remove the tank on Niva 2121
We continue the epic of improving the car!
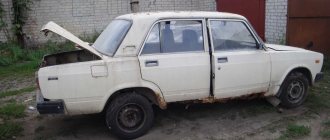
As practice has shown (Grid grids, Trip to the village of Borok and how we treated Niva), something is wrong with the fuel system. The signs of these “not okay” are the following: - the smell of gasoline in the cabin; — you have to refuel by hand and control the pressure so that it is very small; — when filling under the filler neck, fuel drips in the area of the right rear wheel; — on potholes the car tries to stall. All this led to the fact that one fine sunny day I decided to work on the gas tank and the entire fuel system. Before going deep, I tried to study this issue for the presence of certain spare parts in this system, which most often fail, which is why the fragrance of 92 gasoline is possible, and just in case, I went to the store for fuel hoses (according to the catalog number is 2121-1101079-20). In the store they looked at me like I was an idiot and said that they didn’t import this, they don’t import it and it’s unlikely that I will ever import it. I stood, looked at the shelves of various spare parts that I didn’t need at the moment, scratched my little head and decided to buy tubes for the windshield injectors. They pour all sorts of chemicals on the glass, maybe they can withstand gasoline. The job needs to be done, but there are no tubes. I bought 10m for the footage. If it remains, it will be useful in the future. Before removing the tank, I threw a piece of the purchased tube into a bottle of gasoline for testing. I took everything out of the trunk, removed the back seat and put it outside. I removed the right side panel trim and the rubber gas tank pipe. I unhooked the supply and return pipes and pulled the gas tank out into the sunlight. There was not much gasoline in it, I didn’t refuel on purpose, I got there with the lamp on.
Then I prepared a container where I would drain the gasoline from the tank and also prepared a five-liter bottle with the purest 92 m. To make it easier, I removed the fuel level sensor. I looked inside the tank - there was a hole there... Let's start washing. We take the tank in our hands, feet shoulder-width apart, and with circular movements, first clockwise, then counterclockwise, we begin to drive *evenly* around the tank. This is a delicate matter, you have to feel it; when you start to see a funnel, you need to sharply turn the tank upside down into the drain container we have prepared. Wait until everything drains from it, pour in fresh 92 from five and start the fitness procedure again. Calculate the number of repetitions yourself based on the cleanliness of the fuel tank. It turned out that in four approaches I drained everything from the tank.
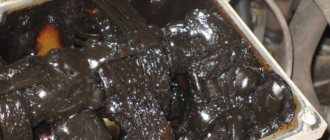
I poured it into another five-piece that I had prepared. In color, what I merged resembled (may...) yellow rubbish with pieces of silicone, some kind of stones and other foreign bodies. Where does the sealant come from?
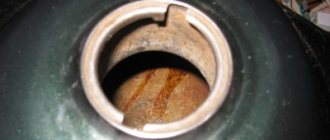
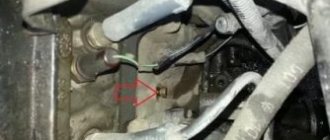
I went to look at the filling pipe. He took it out of the car and began to twirl it in his hands. Mom is dear, the air hole is sealed with sealant. I picked everything out, put it away, cleaned it.
I put it in its place. I tore off the old pipes from the gas tank.
The overflow tubes were made of oak and cut off in the area of the separator. Self-tapping screws are screwed into the cut ends (as if plugged), and the ends are inserted from the right into the area of the rear right fender. When the tank was full, gasoline drained through these tubes and through these plugs and flowed out just in the area of the right wheel.
I removed and inspected the separator. I had it made of plastic and the proboscis on it were cracked. I had to go to the store again for a new separator, a new hose that goes to the filler neck (to the gas tank cap), new clamps and a new fuel level sensor. I bought everything and came back.
I looked at how the tube, lowered into a bottle of gasoline, was doing there. I took it out, twirled it in my hands, it didn’t seem to soften. I decided to install it anyway. I measured the required length, cut it and installed it on the tank. Next I installed a new fuel level sensor. The next step was to install the fuel tank on the car.
Everything is simple here, as usual. The tank was installed, the pipe hose was put in place and the clamps were tightened. First, I put all the hoses on the separator. I did it carefully so as not to damage the proboscis. Then he put the separator in place and screwed it on. We return the trim, seat and all the junk to the car in reverse order. I also replaced the fuel filter with a new one. Next, we fill the remaining clean gasoline from the fiver into the tank and start the car. Beauty - it works)) At this point, washing the tank is completed.
PS Refueling. Kirov-Sovetsk-Borok car behavior on potholes, smell of gasoline (review of flushing the gas tank)
Some time after the work had been done, we again went to Sovetsk. On leaving the city we filled up the tank full. My joy knew no bounds) Having removed all the sealant, I cleared the way for air. Now he has somewhere to go when gasoline enters the tank and begins to displace it from there. Accordingly, now there is no need to control the pressure so that it is very small. You also have to refuel by hand, but only because if you don’t lift the gun, it rests against the grate. Now you can refuel very quickly, as if there was no grate. We filled the tank full and drove off. The smell of gasoline in the cabin no longer haunted us. There was no fuel dripping in the wheel area. So we got to the city of Sovetsk, to the village of Borok. I will also say that the car now runs smoothly over bumps and does not try to stall, which means there is enough fuel for it. That's all, friends!
Removing the fuel tank
There must be a minimum amount of fuel in the tank.
Disconnect the negative cable from the battery. Remove the fuel tank compartment cover (see Removing an electric fuel pump with a fuel level sensor). Remove the right side upholstery (see Removing interior upholstery). We disconnect the electric fuel pump from the wiring harness and pipelines (see Removing the electric fuel pump with a fuel level sensor). Unscrew and remove the fuel tank cap.
Use a Phillips screwdriver to loosen the clamp.
. and remove the plastic tank ventilation hose from the right fitting.
Similarly, disconnect the tank ventilation hose from the left fitting.
Use a Phillips screwdriver to loosen the clamp on the fuel tank hose and filler pipe.
. and remove the hose from the tank fitting.
Using pliers, loosen the clamp of the filler pipe hose.
Remove the filler pipe with hoses and the rubber O-ring.
Using a 13mm socket, unscrew the two rear mounting bolts for the fuel tank.
. and two bolts for the front mounting of the tank to the cross member.
How to remove the gas tank on a VAZ 21213 video
Dear visitors of the Autotrack website! We will be very grateful for your comments on the video clip “How to remove the gas tank on a VAZ 21213 video”; registration is not required for this. We also ask you to let us know if you have any problems playing the video.
This car is not for you. Rust is easy to take care of. The anticorrosive thing you did was nonsense. I have a 99 year old car with rust and chips only with a mileage of 200 thousand. Is it difficult to change the alternator belt? Try doing this in a foreign car. The car fogs up - put the radiator valve in order and ventilate the car for 5 minutes every trip in winter. The transfer case increases engine power. - Wow
05/09/2016 — 05:13 XAREK999
I dressed the jacket in the color of the wallpaper very stylishly. :3
04/09/2016 — 06:00 Mobili S
The new section is good, but please choose better video quality and ask the owners not to shoot vertically. :
04/05/2016 — 23:24 MobilLugansk
By generator. If the generator gives less charge, it’s not the brushes. When the brushes are present, the charge disappears altogether. I had a charger of 13, 2 installed an additional diode, now 14. Any electrician can do this.
03/20/2016 — 21:10 MobilLugansk
On rubber. The dear K 156 will drive everywhere in the forest, unless you look for lakes 0.5 m deep filled with shit. In winter, yes, only winter - there are no thorns in Hancock.
02/28/2016 — 06:41 MobilLugansk
Author Is shooting vertically a director's move? But in general, I love Niva. I have a silver Crocodile 2012.
02/18/2016 — 19:43 Pavel Oleinikov
good review, keep filming, take a test drive, but immediately remove the chips, treat and paint, otherwise we’ll be a complete ass later, take care of it and everything will be fine
Damn, how many times have I offered to take off my nivar? We need to organize a meeting of nivavods in Cheby
01/31/2016 — 06:22 Zhenya Mikhlichenko
01/11/2016 — 17:52 Nikita Davydov
But does the Lada Urban really work at 95 or can you fill it with 92 and what is the consumption in the city?
12/20/2015 — 19:09 Valery 777
MACHINE '11 Aren't you tired of the guys? do repairs? After all the videos about the Niva and breakdowns, I lost the desire to buy. There was a Honda HR-V, it was driving through the door of the snow, it was moving, but the car was repaired in 1999, but in 2 years it required replacing the pads and stabilizer bushings = 2300 rubles. I really want a Niva, but it’s a shame the car is ’11 and falling apart
The principle of installing gas equipment on a VAZ 2131
The installation of gas equipment is complicated, which is also the main disadvantage of the system - it is the need to allocate additional free space for installing the cylinder itself. It acts as a fuel tank. Standard capacity - 90 l. This cylinder is located in the trunk of a car. Naturally, part of it will have to be sacrificed. Another option is to install only 50 liters, which will take up significantly less space. But it will have to be refueled much more often, especially if the car is primarily operated on gas.
You can also place a cylinder in the VAZ 2131 in the muffler area. But it will also have to be partially reworked and an additional beam added. At the same time, of course, the Niva’s ground clearance will decrease, which will negatively affect the SUV’s cross-country ability on a dirt road. Fortunately, there is more than enough space for such a modification in the VAZ 2131. It differs from the regular Niva in that it has an extended wheelbase of 500 mm and the installation of 2 additional doors.
The basis of the HBO kit is:
- gearbox;
- electric gas supply valve;
- electric valve for switching to gasoline;
- mixer (aka mixer).
The most difficult thing is not the installation of gas equipment, but the choice of the location of certain components. This also entails safety and ease of use. For example, it is better to place the gearbox itself on the left side of the hood on a rigid mount. In this case, when hitting various types of bumps, the engine speed will not drop (due to the deflection of the internal diaphragm). A gas valve will be located nearby. For gasoline - on the other side, at the inlet of the carburetor. All that remains is to choose a place for the mixer. It is better to “embed” it in the area of the stove pipes in the VAZ 2131. True, you will still have to buy a tee. But such a system will work flawlessly throughout the entire period of active operation of the Niva.
How to protect fuel from gasoline drainage?
Rising gasoline prices are the only stable process in our changing world.
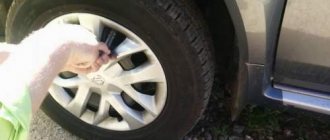
Accordingly, its attractiveness to attackers is growing. For Chevrolet Niva owners this is a particular problem. The car does not have a fuel filler flap lock, which makes fuel theft very easy.
Various methods are used to protect gasoline from thieves:
- Installing a filler cap equipped with a mechanical lock (coded or keyed).
- Installation of an alarm sensor on the tank hatch.
- Installing a mesh cup in the filler neck to prevent the hose from entering.
There are also more complex methods: moving the filler neck to the trunk or laying a cable holding the hatch. However, any protection only complicates criminals’ access to gasoline, but does not provide 100% protection. Therefore, mechanical tank protection is ineffective without modern alarm systems.
Important: even if a thief fails to break open the hatch or lid, he can use brute force: pierce the tank, fender and gas tank with a blow of a screwdriver or knife.
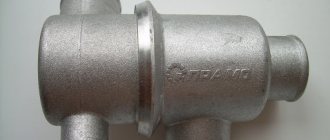
Operating principle
The cooling system of VAZ Niva models does not come into contact with the atmosphere in operating condition, and therefore requires pressure. The coolant is antifreeze with a freezing point of 40 degrees Celsius. The composition of the solution is water and ethylene glycol. The total volume of the cooling circuit is 10.7 liters. Antifreeze can boil after a temperature of +110 degrees Celsius.
The main functional unit in the system is the thermostatic valve, which distributes the coolant flow depending on the engine temperature. The thermostat, controlled by a temperature-sensitive sensor, regulates the direction of movement of antifreeze. A simplified work flow looks like this:
- Before the internal combustion engine warms up to operating temperature (+90 degrees Celsius), the cooler moves along a small circuit (interior heating radiator, thermostat, power plant) using a pump.
- The damper opens towards the large circuit where the radiator is located, at a temperature of + 80 degrees Celsius. Afterwards, virtually the entire cooler moves along a large circuit, mainly cooling through the radiator.
- The small ring is not blocked, but a minimum of antifreeze enters it due to pipes of a smaller diameter.
- In model 2121, the fan is mounted on the axis of the water pump and constantly directs the air flow to the (BC). Cooling fans in Niva 21214 and 2131 are paired with electric drive. They are activated alternately or together using a temperature sensor (switching temperature is about 100 degrees Celsius).
- When heated, excess antifreeze is sent to the expansion tank, increasing the pressure in the system, which reduces the boiling threshold of the coolant.
In summer and during transition periods in models with an injector, the movement of the cooler is limited by a special tap. The Niva Chevrolet model does not have such a blocker, so the heating is turned off by directing the air flow past the heat exchanger.
Capacity displacement and “appetites” of the iron horse
All cars could be equipped with the same tanks, if not for the individual level of consumption, because this indicator cannot be ignored. Based on the characteristics declared by the manufacturer or based on personal experience, you can calculate how far you can travel with a full tank of gas. You have to count on your own less and less often, because modern vehicles are equipped with on-board computers that quickly and easily solve this problem.
The volume of the Niva 2131 tank is 65 liters. How long will this displacement last? Depends on conditions. In the city, this model “eats” approximately 11.1 liters, which means it will be possible to travel approximately 660 kilometers. If your speed is 90 km/h, then a hundred will take no more than 9 liters. This means that with 65 liters you will travel at least 700 km. The largest “appetites” are observed in the Niva at a speed of 120 km/h. In this operating mode, the vehicle consumes 12.1 liters per 100 km. And even with this consumption, you can travel more than 500 kilometers.
Installing LPG on a VAZ 2131 is quite simple. But what will this give? First of all, significant fuel savings. The standard engine installed on this model has a volume of almost 1.6 liters and a power of 87 hp. With. Consumption - up to 12 liters per 100 km in country driving mode. With current fuel prices this will be quite expensive. And gas equipment will help fix this. In addition, it remains possible to freely switch the operating mode from gas to gasoline.
First, you can purchase an LPG kit from Milano and place the cylinder in the muffler area. But it will also have to be partially reworked and an additional beam added. At the same time, of course, the Niva’s ground clearance will decrease, which will negatively affect the SUV’s cross-country ability on a dirt road. Fortunately, there is more than enough space for such a modification in the VAZ 2131. It differs from the regular Niva in that it has an extended wheelbase of 500 mm and the installation of 2 additional doors.
The basis of the HBO kit is: - gearbox; — electric gas supply valve; — electric valve for switching to gasoline; - mixer (aka mixer).
The most difficult thing is not the installation of gas equipment, but the choice of the location of certain components. This also entails safety and ease of use. For example, it is better to place the gearbox itself on the left side of the hood on a rigid mount. In this case, when hitting various types of bumps, the engine speed will not drop (due to the deflection of the internal diaphragm). A gas valve will be located nearby. For gasoline - on the other side, at the inlet of the carburetor. All that remains is to choose a place for the mixer. It is better to “embed” it in the area of the stove pipes in the VAZ 2131. True, you will still have to buy a tee. But such a system will work flawlessly throughout the entire period of active operation of the Niva. Installation of a gas cylinder
Does the tank volume differ depending on the configuration?
During the entire time that the Chevrolet Niva has been on the assembly line, many modifications and versions of the car have been produced. For the first time, the VAZ-2123 Niva model rolled off the assembly line in 2001 . A year later, the rights to the car and the name "Niva" were transferred to a joint venture between General Motors and AvtoVAZ. In the same year, construction began on a workshop intended for assembling and painting cars produced under the Chevrolet brand.
In 2004, the model was slightly updated - all trim levels began to be equipped with audio preparation, as well as electric drives and heated exterior mirrors. In 2009, the model underwent restyling and has been produced in this form for 10 years. At the same time, the update of the car did not affect its design - the modernization mainly affected the appearance and equipment. All this time, the Niva has been produced with a classic VAZ engine with a volume of 1.7 liters and a power of 80 hp. With. In 2021, it was announced the release of a new Niva, which will subsequently change its name from Chevrolet to Lada.
The currently produced modification of the Niva is offered to customers in several configurations:
In the fall of 2021, it was announced the release of the most budget version of the Chevrolet Niva (SL trim level).
The differences between all trim levels mainly lie in the interior trim and equipment . For example, the LC and GLC variants are equipped with air conditioning, which distinguishes them from other modifications. There are no differences in technical equipment between different versions of the car. Therefore, all Chevy Nivas have a standard 58-liter gas tank, regardless of configuration.
In 2006, the FAM-1 modification was released, equipped with a 1.8 liter Opel Z18XE engine with a power of 122 hp. pp., Japanese 5-speed gearbox and transfer case in a single gearbox unit. The FAM-1 also featured a richer set of amenities - the base model was already equipped with air conditioning, two airbags, etc. However, the changes did not affect the basic design of the car, including the fuel system and gas tank. The fuel tank volume of the Chevrolet Niva version FAM-1 was also 58 liters.
This modification had too many imported components, so it turned out to be too expensive and was not popular with buyers. During the 2 years of production of the FAM-1 modification, no more than 1 thousand copies were sold.
Also, in various years, the GM-AvtoVAZ joint venture prepared special versions of the car :
Changes in the special low-volume series compared to the standard model were mainly cosmetic . All special versions have a standard fuel tank capacity of 58 liters.
There is a tuning modification “Trophy”, specially adapted for off-road use . Despite the fact that the “Trophy” version was quite thoroughly redesigned (pairs of main gears were changed, self-locking limited-slip differentials were installed, etc.), the changes did not affect the gas tank. This model variant also has a standard capacity of 58 liters.
Blocking the differential mechanism
All-wheel drive does not always guarantee a vehicle's ability to pass on bad roads. In most cases this is not enough. It is only in situations where locking and four-wheel drive work together that the vehicle becomes close to an all-terrain vehicle.
And at the same time, you should always remember that differential locking is a mode intended exclusively for difficult driving conditions. With the help of the blocking system, you can drive through places where other cars cannot pass. It is not recommended to use this mode unless necessary in the city. Otherwise the machine may break down.
The fuel pump is broken, what should I do?
It is a very unpleasant moment when a fuel pump failure occurs, for example, on a highway or near a traffic light.
The situation becomes most tense at times of heavy traffic. If such a nuisance happens and there is no one to help, then the first thing you should do is roll the car off the roadway and try to “reanimate” the fuel pump.
Symptoms of a problem
In the arsenal of automotive tools of any caring driver there should be, along with the keys, a tester, even if in the form of a simple warning lamp and two wires.
The first sign of a malfunction on an injection engine is that the fuel pump motor is “silent” when the ignition is turned on. Accordingly, all attempts to start the engine in this case will not be successful.
In any unclear situation, remove the terminal. Very useful advice, by the way!
Read more: Daewoo Nexia fuel pump connection diagram
The driver will be very lucky if a very simple method helps, which should be taken first. To do this, remove the terminal from the battery for a while, and then put it back in and secure it. Perhaps the fuel pump will start working again.
Checking the power supply at the fuel pump terminals
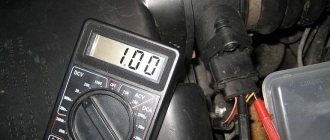
Well, if this does not happen, continue to look for the problem. Here you should tinker and try to get to the pump itself, and use a tester or test lamp to check whether there is power at its terminals.
One end of the tester wire is installed on the car body - this will be “ground”, and the other - on the terminal connector of the fuel pump. If there is voltage, then, unfortunately, it is impossible to avoid replacing the electric motor, and if there is no voltage, the troubleshooting should be continued, already in the electrical circuit of the car.
The fuel pump screen is clogged
Not severe contamination of the filter mesh. It could be worse!
In this case, the engine starts, but does not develop full power.
Troubleshooting in an electrical circuit
The electric motor of the fuel pump rarely fails during normal operation.
Burnt contacts on the fuel pump
The main reason for this malfunction is the inexperience of the driver who does not monitor the fuel level in the gas tank, that is, when the fuel is almost completely gone. Gasoline pumps extremely do not like to work in the absence of fuel.
Fuses and relays
So, having made sure that the electric motor of the fuel pump itself is fully operational, the second thing you need to do is check the fuse and relay responsible for turning on the fuel pump.
Fuel pump fuse and relay location
Unfortunately, getting to them is not so easy: you have to remove the plastic upholstery, which is located under the front panel glove compartment. Having dismantled it, you can find the relay block and the fuse itself in the depths.
You can replace the faulty relay with a neighboring one. It's the same.
You should also take spare relays and fuses with you; they will be very useful on the road.
After checking the fuse, you can bend its legs. Sometimes the contacts in the mounting block can become loose
The relay is checked only by replacing it with a known good one. If this does not help, then you should pay attention to the relay that is part of the alarm system. After all, when the alarm is turned on, it is impossible to start the engine by blocking the fuel pump power supply circuit .
Gas equipment adjustment
There are quite a few ways to debug HBO, but most of them include the following aspects:
- Compliance of LPG with vehicle standard. Gas equipment on cars with EURO-1,2,3 environmental standards can use any control unit. For the Russian automobile market, the production of such vehicles ended in 2011. The only additional condition for reliable operation of the VAZ-2106, 2110, 21213, 21214 brands can be the use of high-quality radio components. And for models with the EURO-4.5 standard (VAZ-2131, 2123, 2121 and Largus after 2011), it must be equipped with a special program that takes into account road conditions and the fuel used.
- Settings options. When entering data, a difficulty arises with the type of fuel injection of a particular car brand.
VAZ-2131 belongs to cars with pairwise parallel fuel injection
Thus, vehicles with sequential fuel injection include VAZ-21213, 21214, 2123, 2110, 2106, 2121, Largus and Chevrolet, and vehicles with pairwise parallel injection include VAZ-2131.
- Connecting a diagnostic scanner for a gasoline unit. The main goal of debugging gas equipment is to bring the parameters of the engine running on gas to the data obtained from running the engine on gasoline. And this information can only be obtained using a gasoline block scanner. So, for brands 21213 and 21214 there is a slight difference in engine power, so the settings will differ. The deviation in the amount of fuel supplied during fuel correction is displayed as a percentage; a shift from 0 occurs when the injection time changes from the reference values. When debugging, enter the correct coefficient into the system and observe how the car reacts to adjustments.
Principle of operation
On VAZ 21213–21214 models, 2 types of fuel level sensors were installed, but both of them were lever type. In the injection modification of the car, an electric pump was simply added to the previously existing mechanism. Therefore, the node is now called the EBN module. But at the same time, the basic design of the FLS has not changed. In both the first and second views of the sensor, the main elements remained, such as:
- Resistor (potentiometer).
- Movable contact (slider).
- Metal lever.
- Float.
- Fuel intake.
How does the mechanism work? When filling the tank with gasoline, the fuel sensor float remains on the surface and rises with the level. The slider integrated into the metal lever also begins to move upward along the resistor. In this case, the resistance parameters decrease (at a maximum there should be 20 Ohms, and at a minimum 250 Ohms), so the voltage increases (Ohm's law U = IR). The higher voltage is sent through the wire to the level gauge in the instrument panel and shows more gasoline. This is how the driver monitors changes in the tank.
Technical characteristics of engines on Niva
Since the domestic car has been so advertised, let's take a look at the technical characteristics of the Niva 2121 internal combustion engine. They are all recorded in the table.
| Parameter | Meaning |
| Power | 87 horses |
| Engine capacity in liters | 1,7 |
| Ecoclass | Different models have different classes. For example, 21214-41 – Euro 3. 21214-30 – Euro 4. |
| Torque | 129 Nm |
| Number of cylinders | 4 |
| Number of valves | 8 |
| Max speed | 142 mph |
| Cylinder diameter in mm | 82 |
| Piston stroke in mm | 80 |
| Nutrition | Distributed |
| BC | Cast iron |
| cylinder head | Aluminum alloy |
| Lifetime of the power unit | 150,000 km |
| Fuel for operation | AI 95 |
| Cylinder operation | 1-3-4-2 |
| Tact | 4 |
Attention! The closer the Niva engine is produced to the year in which it lives, the higher the environmental class.
The Niva's fuel consumption is as low as all small cars. Car owners often change their gasoline engine to a diesel engine for their Niva Chevrolet. Let's take a look at the advantages obtained by installing this engine and the negative aspects that the owner has to face.
Differential lock on Niva (self-block): bringing the car to perfection
Today we will look at products that can qualitatively improve the Niva transmission. There are a huge variety of them on the market. We will try to clearly and intelligibly answer the question - which self-block is better to install on the Niva.
Content
- What are we dealing with?
- Coefficient, preload and other nuances
- Types of locks on Niva Limited slip self-block (LSD)
- Forced blocking
- How to decide what to install?
What are we dealing with?
What is a differential or as it is sometimes abbreviated as “diff”. Why is it needed?! The Latin word “differentia” and the similar English word “different” are translated into Russian almost identically: “difference” or “different”. There is another definition of differential - planetary gear.
The purpose of this element is to transmit the power of the power unit through rotation without losing it on the axle shaft with the wheels attached to them. The differential causes them to rotate at different speeds depending on driving conditions. Inside a turn, the wheel makes much fewer revolutions than one that goes along a long radius. If in place of the “planetary” there was an ordinary solid axle, the probable parasitic circulation of power would guarantee a decrease in control over the car, loss of traction with asphalt, significant wear of the transmission, incredible fuel consumption, etc. The differential “links” the drive of one axle, removes the “parasitic” phenomenon, without loss of power.
An interwheel differential is present in almost all cars. It is usually located on the drive axle. There may be two or more axes to which the planetary gear distributes the incoming power flow.
Coefficient, preload and other nuances
The Niva 2121 is equipped with permanent all-wheel drive, and therefore, in addition to two inter-wheel differentials, it has a third - an inter-axle differential, distributing the moment between the front and rear.
A regular “free” differential is not always enough for a Niva owner. An SUV is bought to drive like a mother-in-law on different terrain and surfaces: dirt, snow, ice, etc. Often a car ends up with two wheels on a grippy surface and the other side on a slippery texture. In such a situation it is easy to “lose” him. Blocking will allow you not to worry about this.
When choosing a block, you need to take into account two important points - blocking coefficient and preload. The first denotes the ratio of torque on the lagging wheel with good grip and on the leading wheel, which has already lost contact with the road. A free differential has a coefficient of 1. For self-locking ones, it is up to five. That is, the lagging wheel will receive 5 times more torque. This parameter is sometimes indicated in %. For worm gears it is determined by the inclination of the teeth, for disk drives it is determined by the configuration of the friction clutches.
And preload is a certain moment of blocking inside the body of the product even before the moment when it may be required. Mostly in modern self-blocks, preload is created by washers. It can be customized to suit almost any driver's requirements. The washers can be replaced as they wear out, and the differential will continue to serve faithfully for many more years. While the teeth of the “worm” and the clutches of the “disc” design wear out sooner or later, the preload decreases.
True, it is important not to “overdo it” here - excessive preload greatly increases the load on the differential itself and increases the wear of all transmission elements.
Types of blocking on Niva
“Native” differentials can be replaced with a self-locking analogue of increased friction or with a device where the “planetary gear” is locked forcibly. For those who want to install a self-block on a Niva themselves, we will try to thoroughly explain the difference between a worm, screw or disk lock. Let’s evaluate each design that works “from the button.”
Limited slip self-block (LSD)
A limited slip differential or limited slip differential is installed on various sports cars. Many companies have been mass-producing such things in Russia for a long time and in large quantities. It initially has limited slip. This thing independently equalizes angular velocities. It essentially serves as a direct transmission, as if the power is transferred to a single “stick” on which two wheels rotate equally. Can also be installed on a Niva 2124 car.
LSDs are distinguished by the response format - from the occurrence of a difference in angular speeds (disc) or when the torque changes (screw).
Disk lock
There are many options for implementing such a lock, but they all have a common principle - the differential here is equipped with two sets of discs. As soon as slipping occurs, the clutches compress and equalize the angular velocities. The discs are similar to automatic transmission clutches. They do not interfere in any way with the civilian operation of the car. The preload here is created by a spring or conical rings.
The SV-PARTS store offers locking for everyday driving on the Niva for axle shafts with 22 or 24 splines:
This makes it possible to use this product even on the good old Niva, produced by AVTOVAZ, or on its “younger” sister – Chevrolet Niva: