What should you do if a yellow exclamation mark lights up on your car's dashboard? This question often worries car owners. It is sometimes difficult to give an unambiguous answer to this, because in cars of different brands the same problems can be displayed on the display using different signs. This means that you will have to carefully understand them so as not to find yourself at some point in a hopeless, or rather, hopeless situation.
How do indicators work differently in cars with and without ABS?
If the car has the named system, then the warning lamp (also called the indicator icon) should normally light up when the ignition is turned on and the parking brake is applied, and go out after starting the engine and when the parking brake is released. This is how the system is tested. And if the light goes out, it means the system is working properly. An indicator signal that glows longer than expected indicates a malfunction in the vehicle's systems. If ABS is not installed, then when the ignition is turned on, the icon appears only if problems arise, which we will discuss in more detail below.
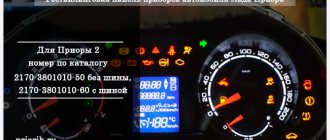
How to enable autotesting on Priora
Self-diagnosis of the VAZ Priora dashboard is necessary to be able to detect hidden problems or defects in on-board systems. To complete the procedure, you will need to perform a certain sequence of actions.
- Get into the car and insert the key into the ignition lock.
- Press and hold the daily mileage reset button.
- At the same time, turn on the car's ignition.
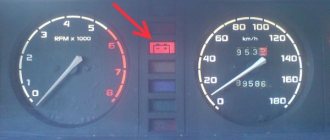
- If everything is done correctly, the instrument arrows will make several full revolutions and return back. All indicators will also flash.
The problem will be identified if any signal does not respond to manipulation.
So what could be causing the exclamation mark?
As we have already said, several exclamation marks can appear on the dashboards of different car brands. For example: in the yellow triangle - a signal of a malfunction in the electronic stabilization system, or in the red - the occurrence of an emergency situation, in brackets - a sign of low tire pressure (we are mostly talking about American-made cars). And if everything is clear enough with the last warning symbol, then an exclamation mark in a circle that appears on your dashboard and does not disappear during the trip may be a signal of several different problems:
- lack of brake fluid;
- violation of the integrity of the indicator circuit;
- leakage of the vacuum brake booster;
- putting the parking brake into working condition.
By the way, when the anti-lock braking system fails, the warning lights for both the brake system and ABS light up!
Don't forget about the information on the scoreboard!
By the way, in any case, the signs appearing on the panel are also a reason to find out the reason for the warning on the information board itself. To better understand the problem, you should open the “Machine Information” section there. To do this, you need to enter the menu and, by switching up or down, confirm your choice. This way you can find out what exactly the illuminated danger sign is telling you. As already mentioned, in some cars the exclamation mark can indicate not only defects in the brake system; in such cases, a description of the malfunction is displayed on the message display in the center of the dashboard.
Basic error codes
Using the built-in controller, the car enthusiast can identify the main Priora error codes on the instrument panel independently. For this purpose, you should first activate the testing option. And then perform a series of sequential actions.
- Turn off the Priora's ignition. Activate the reset kilometer button for the current day.
- Press the button and turn on the ignition again.
- All indicators should light up and the arrows should begin to move towards the maximum values.
- Press the function selection key to select the desired one. And information about the presence or absence of problems appears on the screen.
All information is reset by pressing the mileage reset button for a few seconds.
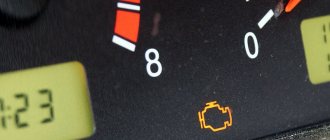
How does the indicator light up when there is a lack of brake fluid?
So, to begin with, let's assume that the indicator reports insufficient brake fluid level. If this problem appears in your car, then an exclamation mark lights up on the display even while driving. Check if everything is in order and add fuel fluid if necessary. However, you should remember that later, when you have to change the pads, it can rise in the reservoir and spill. Be careful, try to suck her off with something. A rubber bulb may also be suitable for this.
Warning
Of course, in this case, it is best to find the nearest service center to check the car's braking system. By the way, on the way to an unscheduled inspection, you need to be prepared for the fact that you will have to press the pedal harder if you need to brake. And also to the fact that the free play of the said pedal will increase, as will the braking distance of your car. By the way, if the icon lights up along with the ABS indicator, then when braking, premature locking of the rear wheels is possible.
Decoding errors
Each code consists of five characters: P 1 4. Let's say right away about the fourth and fifth characters - they indicate the serial number of the error. Now it’s worth taking a closer look at what the codes consist of
The first character may vary depending on the vehicle system:
- P – malfunctions in the operation of the power plant; the symbol also indicates defects in the automatic transmission.
- U – you need to look for a fault in the interaction node between the system units.
- B – defects in the operation of body systems, which include electric lifts, airbags, etc.
- C – chassis sensors have detected a malfunction in the chassis system.
In what other cases does the exclamation mark light up?
If the fuel pressure is at a normal level, and the brake pads do not cause any complaints, but the indicator warning sign is still on on the panel, then what could this mean? In such a case, it is worth assuming that something is happening with the wiring: the system most likely began to open. If any wire leading to the pad sensor breaks, a lamp lights up, signaling their wear. In this case, of course, you can short-circuit the wires yourself, but then you will have to climb under the car every 2000-3000 km to check their condition. So it’s better to go to the service.
What you can do yourself
Try removing the connector from the cap of the reservoir where the brake fluid is located, pull off the rubber boot from it and, if it appears wet from the fluid, blow it out and wipe it clean. Check to see if the exclamation mark has gone out. Put the connector on. If the indicator lights up again, then the level sensor is most likely faulty. It happens that brake fluid gets into the middle part of the cover and closes the contacts. To do this, you need to disassemble the lid, clean and dry it. A similar operation can be done at home.
If your car has a handbrake sensor
If your car is equipped with handbrake sensors, then such a signal may be a warning about its malfunction. Problems with the handbrake cables can have the same effect. After all, it is enough to carelessly slide off the side or, when going out into nature, to “sit” on a nearby cobblestone so that the cable receives a strong load along with internal damage. It will still work for some time, but eventually the damaged area begins to become “shaggy.” And, as a result, even your muscle strength will be enough to jam the brakes using the cable (when you release it, it cannot return to its previous position, and the car goes on the brakes).
Tuning options
The choice of options for tuning is not particularly large:
- Install a device from another car. In this case, you will need the services of a qualified electrician, since the connectors will have to be redone. You can also install a digital version of the tidy - it will be more than original.
- As a tuning option, you can install LED bulbs instead of regular ones. Many car owners choose this option because it is less expensive and the easiest to implement.
- Another tuning method is to install original instrument scales on the speedometer, tachometer and other sensors. Moreover, you can buy such scales either ready-made or make them yourself in accordance with your preferences.
Some tips from a car mechanic
In this case, after the exclamation mark lights up, try to raise the handbrake to the maximum, but do not use much force. If you feel any play (the impression as if the handle is not secured and is simply hanging on the crossbar), then this definitely means problems with the cables. By the way, if the warning light does not come on and the rear wheels overheat when driving, then the parking brake mechanism is most likely faulty.
Hi all! Today I want to raise a rather current topic that, judging by the questions on the forums and the number of requests in search engines, worries a large number of people. I want to talk about a phenomenon where when you press the brake pedal, an exclamation mark on the dashboard lights up.
I will try to give a comprehensive answer to this question and explain why this happens and what kind of damage may be involved. Go!
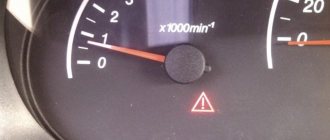
Let me start, perhaps, with the fact that if a lamp (!) lights up on the panel, it means something is wrong with the brake system. As a rule, this indicator signals a low level of brake fluid (BF) in the system. As you can imagine, faulty brakes are no joke and the problem needs to be addressed. I’ll say more, if anyone doesn’t know, OPERATING A CAR WITH A BURNING INDICATOR (!) IS PROHIBITED! Since you don’t know what’s wrong and what caused this error to appear on the dashboard.
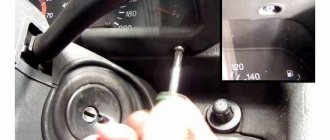
Removal and installation
This is not such a complicated procedure as it might seem. And it even requires very few tools:
- Socket wrench for 8.
- A socket with a knob, or a 13mm socket wrench.
- Figured (phillips) screwdriver.
And nothing more than the ability to use them. This is provided that the steering wheel itself has already been removed, which is a different story.
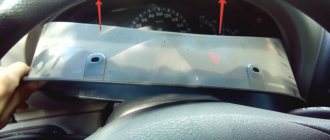
Well, now go ahead. Remove the plastic covers from the steering column by unscrewing 2 screws and unfastening 2 fasteners. Using a screwdriver, unscrew the four bolts and separate the lower part of the lining. Now the lock and the “helicopter” - the turn switches and wipers - are in the way. First of all, pressing the antennae on the connectors, disconnect all the wires. Then, using a size 8 wrench, loosen the clamp that attaches these devices, after which they will freely come off the shaft casing.
Disconnect the two connectors from the ESD ECU. Remove the plastic cover from the special pin.
Do not unscrew the lower nuts completely, but turn them a few turns with a number 13 wrench. But pull out the coupling bolt of the intermediate shaft hinges completely, unscrewing its nut by 13. Well, there you go. Having unscrewed all the fastening nuts, you can remove the faulty Priora EUR. Using a 13 key, release the lower shaft of the device from the splined joint. OK it's all over Now. You can try to fix the malfunctions described above yourself, take it to a workshop, or simply install a new unit on your Priora, proceeding in the reverse order.
Useful video on general repair of Priora electric power steering:
Source: mashintop.ru
What to do if the lamp comes on?
- The first thing you need to do is check the fuel fluid level. This is done simply and without any difficulties. Open the hood and look at the level, it should be between o and “MAX”. The level must be monitored constantly; for those who forget to do this, there is an exclamation mark. It lights up based on a signal from the sensor, which signals when the fuel level is below the permissible level.
By the way! There are often cases when the light comes on when driving over uneven surfaces and goes out as soon as the car drives onto a more or less level road. This happens precisely for the reason that the level of “brake fluid” is close to o and when the car is rocking, the sensor detects a low level and signals this to the instrument panel.
- If everything is in order with the brake fluid level, you need to check the fuel injection system, which is located in the brake fluid tank. I'll tell you how to do this now.
2.1. Turn on the ignition and make sure that the exclamation mark lamp comes on, that is, the indicator of insufficient fuel level. It should light up and go out if the level is normal and the sensor is working.
2.2. We turn off the power from the sensor and look at the lamp; if it goes out, most likely there is a problem with the sensor. Check the sensor, sometimes the problem is that the float fails and sinks to the bottom even though the fuel fluid level is fine.
2.3. If, after turning off the power from the sensor, the exclamation mark on the panel continues to light, most likely the problem is in the wiring, and the sensor itself is working. Perhaps the reason is a short circuit in the wiring, or something else, but one way or another the problem will be associated with a faulty wiring and a violation of its integrity.
If everything is fine with your fuel oil level sensor, but you want to check its operation, this is done quite simply
2.4. We press the rubber seal on the tank lid, so you lower the sensor float to the bottom, and in working sensors an exclamation mark on the panel lights up.
2.5. If the indicator does not light up, take a small piece of copper wire and turn off the power from the brake fluid level sensor. The prepared wire must be used to close the power contacts of the sensor, that is, the contacts on the wiring that is supplied to the sensor, and not the contacts of the sensor itself. With such a short circuit, a corresponding signal about low brake fluid level should appear on the panel. If this does not happen, most likely the sensor is working, and the problem is faulty wiring.
If the brake fluid level sensor is faulty, replace it; if the problem is in the float of this sensor, you can try to repair it; if the wiring is faulty, replace it or seek help from an experienced auto electrician.
Drivers are notified of the presence of malfunctions in various vehicle systems using icons on the instrument panel. It is not always possible to decipher the meaning of such burning icons intuitively, since not all car enthusiasts are well versed in cars. In addition, on different cars, the graphic designation of the same icon may differ. It is worth noting that not every light on the panel only indicates a critical malfunction. The indication of light bulbs under the icons is divided into 3 groups by color:
- Red icons indicate danger, and if any symbol lights up in this color, you should pay attention to the signal from the on-board computer in order to take measures to quickly resolve the malfunction. Sometimes they are not so critical, and it is possible to continue driving the car when such an icon on the panel is on, but sometimes it is not worth it.
- Yellow indicators warn of a malfunction or the need to take some action to drive the car or service it.
- The green lamps of the symbols inform about the vehicle’s service functions and their activity.
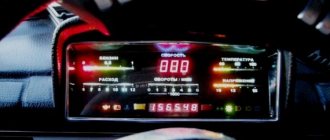
Main elements of the VAZ 2114 panel
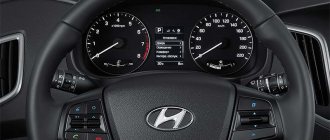
To better understand the operating principle of the VAZ 2114, you should understand the instrument panel. It is a key source of information about the car. Thanks to it, the car enthusiast will be able to obtain any information about the functioning of all components of the car and its technical condition. The instrument panel also reflects the operation of sensors and all other elements.
Location
The instrument panel of the VAZ 2114 is located in such a way that the driver can see all the icons, as well as the lights. To use the panel as efficiently as possible, you should study it, as well as the location of all indicators and buttons.
The key elements on the dashboard are:
- Speedometer. It allows you to know about the current speed. The sensor that records the speed is located directly in the gearbox. The speedometer error is 5 km/h.
- Tachometer. The main function of this device is to transmit speed readings in real time. The tachometer receives information from the on-board computer.
- Coolant temperature indicator. Coolant is a cooling liquid. If the temperature becomes too high, you must stop driving and then turn off the engine. It needs to cool down, otherwise the power unit will require expensive repairs.
- A display with information about the level of fuel filled in the gas tank. If the driver sees the number 0, this means that the tank is empty. If it is 1, it means that the tank is filled to capacity with fuel.
At the very top there is a gas station symbol. The purpose of this icon is to warn the driver that the tank is full. If the orange icon lights up in the lower corner (right), then there are less than 6 liters of fuel in the tank.
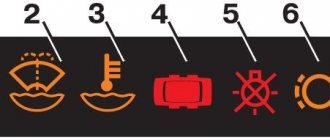
The “canister with a drop” icon indicates that the oil level has dropped.
“Windshield wipers and fountain” - not enough washer fluid.
“Thermometer” - low coolant.
“Car with open doors” - some door is open.
“Sign with a crossed out light bulb”—problems with the brake lights.
“Circle and lines on the side” - wear of the pads.
"Check Engine" engine problems.
Letter P - handbrake is off.
Warning icons on the panel
The steering wheel icon can light up in two colors. If the yellow steering wheel is on, then adaptation is required, and when a red image of the steering wheel with an exclamation mark appears, you should already be concerned about the failure of the power steering or power steering system. When the red steering wheel lights up, your steering wheel will probably become very difficult to turn.
The immobilizer icon usually blinks if the car is locked; in this case, the indicator of a red car with a white key signals the operation of the anti-theft system. But there are 3 main reasons if the immo light is constantly on: the immobilizer is not activated, if the tag on the key is not read or the anti-theft system is faulty.
The handbrake icon lights up not only when the handbrake lever is activated (raised), but also in cases where the brake pads are worn out or the brake fluid needs to be topped up/replaced. On a car with an electronic handbrake, the parking brake light may come on due to a glitch in the limit switch or sensor.
The coolant icon has several options and depending on which one is lit, draw conclusions about the problem accordingly. One red lamp with a thermometer scale indicates an increased temperature in the engine cooling system, but a yellow expansion tank with waves indicates a low coolant level in the system. But it is worth considering that the coolant lamp does not always light up at a low level; perhaps there is simply a glitch in the sensor or float in the expansion tank.
The washer icon indicates a low fluid level in the windshield washer reservoir. Such an indicator lights up not only when the level actually decreases, but also if the level sensor is clogged (the sensor contacts become coated due to poor-quality liquid), giving a false signal. On some vehicles, the level sensor is triggered when the washer fluid does not meet specifications.
The ASR icon is an Anti-Spin Regulation indicator. The electronic unit of this system works in tandem with ABS sensors. When such a light is constantly on, it means the ASR is not working. On different cars, such an icon may look different, but often in the form of an exclamation mark in a triangle with an arrow around it or the inscription itself, or in the form of a car on a slippery road.
The catalyst icon often lights up when the catalytic element overheats and is quite often accompanied by a sharp drop in engine power. Such overheating can occur not only due to poor cell throughput, but also if problems arise in the ignition system. When the catalyst fails, high fuel consumption will be added to the burning light.
The exhaust gases icon , according to information from the manual, indicates a malfunction in the exhaust gas purification system, but, as a rule, such a light starts to light after poor refueling or the presence of an error in the lambda probe sensor. The system registers misfires of the mixture, as a result of which the content of harmful substances in the exhaust gases increases and, as a result, the “exhaust gases” light comes on on the dashboard. The problem is not critical, but diagnostics are worth doing to find out the cause.
Diagnostic methods
There are two proven methods for finding problems on this modification of the car. Each has its own advantages and disadvantages.
Self-diagnosis using on-board computer
This method does not require the user to have additional equipment. All the necessary systems are already installed inside the machine. The processing sequence looks like this:
- Find the odometer reset key on the daily mileage;
- While holding the button, turn the ignition key.
If everything is done correctly, all the lamps on the dashboard will light up, the arrow indicators will make a full revolution and drop to the “0” position. In this way, the functionality of all vehicle systems is checked. If there is no response from any indicator, you need to check the circuit following the indicator. To more accurately determine the source of the problem, you can, in the same mode, press the mode scroll key to the “error codes” position, which in 90% of cases provokes the appearance of one of these indicators:
- 2 – short circuit or high voltage flow on the BS;
- 3 – the fuel level sensor in the gas tank is covered;
- 4 – antifreeze temperature sensor has burned out;
- 5 – error of the sea thermometer;
- 6 – severe overheating of the internal combustion engine;
- 7 – you need to check the oil level – the pressure has dropped;
- 8 – failure or jamming of the calipers, the pressure inside the line has dropped;
- 9 – battery “died”;
- E – failure or violation of the integrity of the EEPROM data packet.
To exit the menu, you must leave the on-board computer alone for 30 seconds. The main disadvantage of the method is its mediocre accuracy. The light only shows a broad problem in the design of the entrusted part of the machine. Thus, to more specifically identify the problem, you will need to resort to the following technology.
Checking via connected unit
Modern computers connect to the car's network via a diagnostic connector. The block is located inside the cabin, under the dashboard on the front passenger side. To work you will need a laptop or PC with the necessary software. After establishing a stable connection, an error code will appear on the unit’s display, explaining why the machine is acting up.
Standard codings were developed due to the sale of cars for export. It is inconvenient for the manufacturer to program each ECU for a different language. The standard cipher consists of 5 characters, each of which is responsible for a narrow range of information. One of these elements always comes first:
- P – malfunction of the power plant electronics;
- C – chassis electronics failure;
- B – problem inside the cabin;
- U – synchronization of two or more circuits is disrupted.
Next comes the first digit:
- 0 – OBD 2;
- 1/2 – enterprise code;
- 3- reserve
The data indicates a malfunction. The following indicates the serial number of the circuit containing the breakdown:
- 0 – exhaust gas system;
- 1/2 – fuel/air supply;
- 3 – ignition distribution system;
- 4 – additional control;
- 5 – violation of idle speed;
- 7/8 – gearboxes, differentials and drive axles.
The last two indices indicate the serial number of the breakdown.
Fault indicators
The battery icon lights up if the voltage in the on-board network drops; often this problem is associated with a lack of battery charge from the generator, so it can also be called the “alternator icon”. On vehicles with a hybrid engine, this indicator is supplemented by the inscription “MAIN” at the bottom.
The oil icon , also known as a red oil can, indicates a drop in the oil level in the car engine. This icon lights up when you start the engine, and does not go out after a few seconds or may light up while driving. This fact indicates problems in the lubrication system or a drop in oil level or pressure. The oil icon on the panel may have a droplet or waves at the bottom; on some cars the indicator is supplemented with the inscription min, senso, oil level (yellow inscriptions) or simply the letters L and H (characterizing low and high oil levels).