Installation of good budget acoustics (speakers, radio) in VAZ 2107, 2106, 2101
Car audio, installation of good budget car acoustics - speakers (speakers), head (radio) in the classic VAZ 2106.
Without a good acoustic system - tuning a VAZ 2106 is like a sandwich without butter. The first thing I advise you to do is soundproofing (soundproofing). Even a non-professional one significantly reduces the noise inside the car, therefore the quality of car sound improves. At the same time, spray all creaking joints of parts with liquid silicone. I did this right away - the squeaks and various rattles are very annoying...
Next, but equally important: think carefully about whether you can do everything yourself - your hands should grow at least two to three centimeters from your butt (not closer!) Budget option - 4 columns: 2 in the front doors (plus 2 beepers on top - included or not) and 2 ovals in the rear parcel shelf. In the front doors: 10 cm (4 inches), 13 cm (5.25 inches), 16 cm (6.5 inches) Rear shelf - ovals 15 * 23 cm (6 * 9 inches) In principle, you can choose it yourself - the seller will advise depending on your wallet, but there are two rules:
- Sound quality is only as good as the weakest link. Therefore, it is worth buying a head unit (radio tape recorder), speakers (speakers), etc. same price range. There is no point in buying an expensive head unit (radio tape recorder) and cheap speakers.
- It is better to take all devices from one manufacturer. They are usually played well and suit each other best.
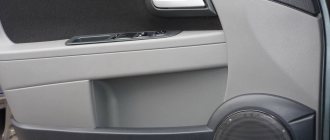
I won’t recommend a specific brand - no one pays me for advertising radio tape recorders. Buy in a store - there is no ice on the market... A normal system can be found for 6-8 kilo rubles. Installation location of the front speakers in the VAZ 2106. Remove the door trim, having previously purchased fasteners (some will break). There are three places where it is easiest to install the speakers:
1 2 3
1. I haven’t tried it, although it is possible.
2. by 10, 13 cm. Any one can stand up without any problems, I set it to 16cm - it’s difficult to stand up, it’s a tight fit. I had to saw off a little bit from the bottom rim of the speaker. That is, you must first try on the diameter of the magnet and the height of the speaker. You can bend the iron of the door a little, then it will definitely fit.
In terms of sound quality, the stage is very low, there is no bass at all, when getting out of the car we hit the speaker with our foot.
3. (with glass 07.05 it will not work) After installing the ESP, a problem arose - during installation the speaker (2) rested against the ESP rail. I had to look for another place. After much testing, I found an unexpected place - under the door handle (3). 10 cm, 13 cm will fit without problems, 16 cm fits tightly (in the picture without protection). In order for the hand to fit into the handle, the speaker protection must be flatter, so I removed the ring (in the picture below right), leaving only the left grille with the plastic.
The auto audio has become much better (the stage has risen). Why bother, the sound has become cooler. Bass appeared, and if you lowered your head, it was a complete blast. Before cutting a hole, we carefully try it on, placing the speaker on the door where the hole should be (if you’re not sure, you haven’t drunk, measure seven times and cut once, bad luck). Included with the speakers is a round piece with its dimensions (speakers), which we cut out of a piece of paper, apply to the fiberboard door (trimming) and cut a hole. I knocked out the perimeter with a chisel and hammer.
Included with the speakers are iron figurines. So, we screw the speaker not to the plywood, but to them. We put four around the perimeter, attach the speaker and screw it on (as in the picture) so that the self-tapping screw fits into the hole on the back of the thing.
Tweeters (tweeters)
Install it as high as possible (photos coming soon).
I bought the back shelf at the store. The material of the rear shelf is plywood, preferably not narrower than 8 mm (otherwise it will rattle).
Heavy. The rear speakers should preferably be turned towards the interior (the sound is much better). It’s not difficult to do it yourself, I just didn’t have time. FAQ is available on the Internet. The most budget option is to cut 8-10 mm plywood to the size of the old shelf, cut holes, fit it like a VAZ 2106 door, and you're done.
speakers facing the interior
So, to remove the rear parcel shelf on a VAZ 2106 you need to remove the back of the rear sofa. The arrow shows an iron petal, bending which the rear backrest is removed (there are two of them, on the right and on the left). You need to stick your hand in there and bend them back.
We remove the rear shelf and find out (I don’t know about everyone), but in the place where the speakers should be there is an iron partition (. Here you can’t do without an angle grinder... Cover everything with rags (so as not to spoil it with scale) and cut out the partition so that the speakers can stand up There is no other way(.
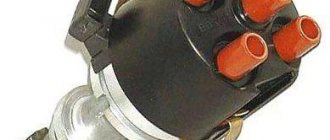
Wiring and connection
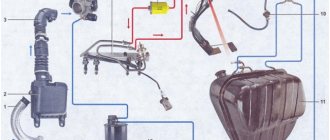
The connection diagram is clearly described in all instructions. Power is supplied to the car radio via two wires: a plus (+) yellow and red wire, one to the generator, the other to the battery, and a minus (-). I took and wound the red and yellow together and connected it to the positive side of the fuse box (the hazard warning light, I think). Cm.
drawing. That is, the radio will always work, even with the key removed. You can also connect it to the positive of the cigarette lighter (the red wire is not the yellow one!). Minus - to the minus of the cigarette lighter (black wire). The rest is according to the instructions.
Insulate everything carefully, (it is better to use heat shrink) use heat shrink. It took me 2 rolls of electrical tape. We hide all the wiring under the casing. We do the wiring to the door speakers like this: we either push it through the existing channel, or we drill a new one, the edges of which are primed and painted (as a last resort, coat it with lithol).
The auto audio turned out to be quite good, at the budget level.
DIY acoustic podium VAZ 2107
Acoustic podium Alamar for VAZ 2107
As you know, an acoustic podium in a car is always beautiful. Many people have probably seen these very decorative elements designed for installing large speakers, but not everyone knows how to select them correctly or make them themselves. Today we will learn how to make an acoustic podium for the VAZ 2107 yourself, using only available materials and tools. The acoustic podium of the VAZ 2107 will completely transform the appearance of the car's interior. In addition, the article contains general information about the types and types of various podiums.
What is the product
Translated from English, the word podium means elevation. In a sound system, this device is the location for the speakers in the car. These devices are divided into two types: external and internal.
The VAZ 2107 car does not have a standard place for installing speakers in the front doors from the factory. The speakers can only be installed using podiums, which can be purchased ready-made or made independently. This device also allows you to install speakers of any size into the car, which is not always possible to do with standard trims, thereby obtaining more directional and high-quality sound in the car. It is known that the most voluminous and high-quality sound can be obtained from speakers with a diameter of 16-20 cm.
From the factory, VAZ 2107 cars were not equipped with speakers in the front doors. Let's consider what the technology for manufacturing acoustic devices for these doors for the VAZ 2107 car is.
Making podiums for the front speakers
True connoisseurs of high-quality sound take on the task of independently manufacturing acoustic elements for both rear and front speakers. Although factory-made products are popular, they have one drawback: they are designed more to preserve the design, and do not always fulfill their intended purpose of securely fastening the acoustic effect speaker. Let's look at how to make acoustic podiums for a VAZ 2107 with your own hands.
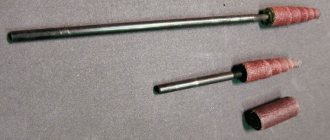
To make products for the front doors, you will need to use plywood, the thickness of which is at least 6 mm. In addition to plywood, manufacturing will require polyurethane foam, self-tapping screws, a jigsaw, drill and other auxiliary devices. Initially, a sketch of the future structure is made on plywood. After this, you need to use a jigsaw to cut out the structure with holes for installing the speakers. Additionally, it is necessary to cut two rings with an internal diameter corresponding to the size of the speaker. These rings are attached to the main workpiece at the desired angle using spacer bars and self-tapping screws (or glue).
At the next stage, you should use polyurethane foam to fill the space under and around the spacer. After the foam has dried, which takes up to one day, it is necessary to trim off its protruding parts. The surface of the resulting product is covered with wood putty, and then with fiberglass and epoxy, which will increase the strength and wear resistance of the device. Having sanded the structure, you can begin sheathing the product with decorative elements or painting it. As a result, we get products of the following type, as shown in the photo below.
This amazing design called the podium
Acoustic podium for VAZ 2107
The word "Podium", as you know, is English, and it means "elevation". In acoustics, a podium is a special place for speakers, and they can be both external and internal.
Purpose of podiums
- If in a car such as a VAZ 2107 the factory does not provide a regular place for a speaker, only installing a podium will allow you to install an acoustic speaker.
- The podium can be mounted in a car to install a speaker of any size, even much larger than what is provided by the manufacturer.
- The podium will provide an opportunity to correctly direct the sound of the speaker, which often disappears or weakens due to many factors.
- The podium gives the entire structure on which the column is attached rigidity and strength.
Acoustic podium in VAZ 2107
In most cases, car radio speakers need to be installed in places where, according to the designers, they should not be. For example, these may not be the speakers themselves, but tweeters or midrange speakers. As for our domestic designers, they did not provide any special standard places for speakers at all, being content with doors or a panel. And there you can only insert small-sized coaxial speakers.
Note. When installing component acoustics in a VAZ 2107, the owner will have to either buy a podium or sculpt it himself. In this case, the speakers will fit as they should and everything will look much nicer, fitting into the overall interior design.
- In the doors of the VAZ 2107, the manufacturer either does not provide a standard place for speakers at all, or it includes a speaker measuring 13 cm, but no larger. This size, as connoisseurs of good sound know, will not provide volume, but 16 cm or 20 cm is just what you need.
- For 16 cm speakers, it will be possible to fashion both an external and an internal podium.
Note. If everything is clear with the outer podium, then the inner one is a ring made of thick plywood or chipboard, rigidly attached to the door frame. The internal podium is placed in such a way that the factory trim fits into place without problems.
- Any speaker has uneven radiation, that is, you can listen to it directly in front of the speaker and then there will be a certain sound quality, and listen to it when turning the speaker to the side, which will give a completely different sound. It is impossible to say unambiguously how to position the speakers most correctly until the sound itself acquires the desired character, and only after that the podium is completed (at least that’s what the professionals advise).
- The design of the speaker is a piston. A diffuser moves in it and thus compresses the air in front of it, creating sound waves. If everything is clear with this, then you should also know that the speaker is also a reactive system, which is subject to Newton’s third law. This means that if the speaker mounting is insufficient, the speaker will wobble on its support and the sound will come out sluggish and unpleasant.
Note. Installing a podium solves this problem, as it increases the rigidity of the entire structure where the speaker is attached. The “seven” door itself is made of very soft metal that bends easily. Putting a speaker here without a podium is a real crime.
On sale today you can find different podiums for acoustics, but more often they are made of thin plywood, to which orientation rings made of the same material are tightly screwed.
All the voids on the factory podiums are filled with polyurethane foam, but on such podiums, even the coolest acoustics will not play very well. This is due to the fact that sufficient rigidity is not provided. Polyurethane foam is not the point. It will, of course, give the product the desired shape, but only when the rigid body is ready. Therefore, only homemade podiums can be considered as the most valuable option.
Shelf installation
In principle, the process of installing a shelf and interior is not complicated. But we present it too, just in case. We do the following:
- We try to ensure the tightest possible fixation, avoiding a loose fit;
- We tighten the shelf with self-tapping screws;
- We close all the cracks with sealant;
- We install the speakers during the process of making the shelf, although in a particular case it is possible to put them in after installation;
- It is better to line the inner surface of the trunk with some sound-absorbing material. This will give the best results. Ordinary foam rubber is also suitable as a material, although today many special materials that provide sound and vibration-absorbing effects are sold at quite affordable prices.
Trunk soundproofing material
Note. Working with soundproofing materials is very simple - all you need to do is cut a piece of the desired shape and size, peel off the protective film of the trunk wall, apply the adhesive part of the material and press.
An acoustic shelf made on your own, its competent and durable installation, sound insulation of the trunk - all this together will give excellent results. During the work process, it is highly advisable to watch a thematic video review, high-quality photos - materials, diagrams and drawings.
How to make a podium yourself
Acoustics in the VAZ 2107 imply the presence of a podium and, as mentioned above, it should preferably be made independently. Let's find out how to make it? Ordinary plywood is the most suitable material for making a podium. The process begins with cutting out ovals or circles from plywood with a jigsaw. Shaping the podium can be done using:
- Foam, but as we learned, it will not provide adequate rigidity.
- Epoxy resin.
- Compoplast.