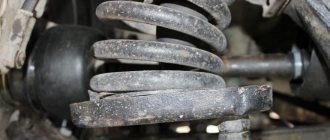
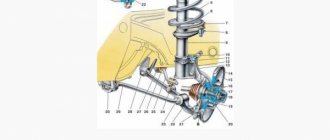
The rear suspension in the Chevrolet Niva is designed to provide a more comfortable ride, both in city conditions and off-road. Its structure is dependent. The main components are two coil springs and hydraulic shock absorbers.
Two rods are attached below to prevent longitudinal movement of the bridge. The top two ensure static stability under load during braking. A crossbar between the wheels prevents lateral movement.
Fastening of these elements is provided by hinges on a rubber-metal base. If the condition of the eyes after using the car is satisfactory, then you can replace the hinges separately.
The shock absorber is mounted on a Chevrolet Niva car in the lower part to a specially welded bracket. At the top, the shock absorber is connected to an eye located in the arch. Rubber or steel bushings are used for fastening.
It is important to remember that when replacing shock absorbers or a rod, it is necessary to tighten the bolts only by placing the car on the wheels and releasing the jack.
Retaining cups are used to secure the suspension spring.
To support the upper end of the spring, a special thrust cup is welded to the body. A special compression buffer is additionally attached to it. It is needed in order to limit the full travel of the suspension. When replacing rear suspension components, be sure they are of the same stiffness class.
Signs of trouble
While driving, many drivers are able to detect driving faults by ear. If the ball joints are worn out or the shock absorbers are faulty, you can hear the broken rod knocking or other components of the suspension creaking.
To avoid unpleasant surprises, you should prepare your car in advance for driving on bad roads and be attentive to the following characteristic deviations.
- Rocking and bouncing when crossing uneven roads.
- Pull the car to the left or right side of the drive.
- The braking distance becomes longer.
- Constant loss of control.
- Accelerated or uneven tire wear.
To detect deficiencies in a timely manner and reduce costs, we recommend that you frequently check the support angles of the suspension wheels.
Otherwise, the control of the car will decrease, at the same time wearing out the tires. To check wheel alignment, choose a mileage interval of 11-16 thousand km, or after serious impacts on the roads.
Installing a lift kit on Niva 2121
Hello, dear friends! Today I propose to talk to you about the elevator kit for the Niva. This could be a Chevrolet Niva, that is, series 2123, or the more “our” Niva Urban, 2131 or 4x4, and representatives of the 2121 series, that is, 21213, 21214. It all depends on what kind of car you have at your disposal.
Russia, Ukraine, Belarus and a number of other countries are the greatest admirers of Niva cars. They are affordable and provide many benefits.
Some people prefer to do everything themselves. I can’t say that modifying the front and rear suspension of a Niv car will be an easy job in a minute. No, you will have to spend a lot of effort, time and patience on this.
You can find out how much such a service costs at a service station. The price for a professional lift is steep, so not every owner of a not-so-expensive crossover like the Niva is willing to spend that kind of money, having the opportunity to do everything themselves. And if you put a power bumper and an expeditionary trunk on top, it will turn out great. At least now on a round-the-world trip on Niva.
Increasing the ground clearance of the VAZ 2121 (lifting) allows you to increase the vehicle's off-road capability. Thanks to simple manipulations, the ground clearance increases significantly by changing the suspension height (the Niva lift kit will help you here, which makes the work very easy to do even with your own hands without the help of a service center) and installing slightly larger diameter wheels.
Lifting - increasing the vehicle's ground clearance by upgrading the suspension. Performed in order to increase cross-country ability.
Also interesting: Transfer case synchronizer Niva and Chevrolet Niva (Val Racing)
We propose to consider this issue in more detail.
As a rule, a lift kit for Niva 2121 includes:
- Rear and front springs.
- A set of spacers for the upper ball joint.
- Front oil shock absorber.
- Adjustable Panhard rod.
The need for self-repair
Carrying out any repair requires experience, plumbing skills and a suitable set of tools. Most repairs cannot be done without an inspection hole.
Replacing ball joints and silent blocks is also impossible without pullers, and special stands are needed to check and adjust the locking angles of the front wheels.
Only if you have the above conditions and experience in carrying out repairs, is it possible to independently repair the car suspension. The most common cases are when owners prefer to go to a service station instead of purchasing tools for one-time work.
You need to prepare thoroughly for suspension repairs, because safety on the road depends on it. If you feel that you can handle it on your own or do not have the necessary tools, it would be right to play it safe and use the services of professionals.
Replacement of suspension elements.
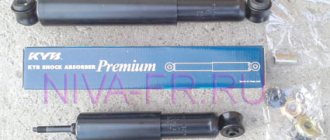
One of the components that most often suffers during operation is the shock absorber of the rear suspension of the Niva Chevrolet. Replacing it requires a few simple steps:
- Using a folding wrench, the shock absorber mounting element is removed.
- the wheel is hung, for this the car must be raised with a jack and secured to special spacers
- pull out the fastener and then remove the shock absorber
- The bracket is secured with three nuts to the rear axle beam. To remove it, you need to unscrew them.
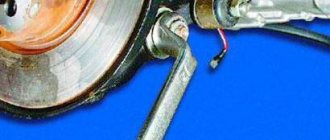
- If during operation the bolts move inside the brake mechanism and turn during operation, it is necessary to remove the drum and hold the unscrewed elements using a spanner.
Replacing the lower longitudinal rod will require placing the vehicle on an inspection platform. The most convenient way would be to use a special lift. The replacement work is carried out in several stages:
- the nut that holds the bolt securing the rod is unscrewed to disconnect the structure from the rear axle beam. the bolt is held in place using a wrench of the same size.
- Using a special tool you need to knock it out of its seat.
- the tip of the rod is removed from the eye
- so that when removing the bolt at the point of attachment to the body bracket it does not rotate, you must also hold it with a key
- Once removed, the rod can be completely pulled out.
- the front end of the rod is secured with four nuts, by removing which you can completely pull out the bracket
With your own hands
An external engine air intake, which will save the car from water hammer and help overcome water obstacles - the snorkel on the Chevrolet Niva is a reliable companion during long journeys on dusty and road-like surfaces (in off-road conditions). The elegant device is installed on the left pillar, enlivens the design and is completely invisible from the interior. The highlight of the manufacturers is the relatively simple installation of the snorkel according to the instructions with minimal requirements for the skills of the performer. Hunting and fishing with unexpected weather conditions will not result in troubles on the way home after installing a useful device on the hood of the Niva. You can even risk driving a Chevy Niva along the coast if you get bored with the monotonous road surface after picturesque views of nature, a campfire and a delicious barbecue with friends. For those who doubt it, here is a list of arguments in favor of installing an air intake on the Chevrolet Niva and the advantages of the device:
the air intake point moves from a vulnerable and relatively low position to a safe and high place;
the snorkel on the Chevrolet Niva constantly provides an influx of clean, cool air;
the risk of engine damage when crossing fords from water ingress is reduced;
ensures efficient operation of the “heart” of the Chevy Niva when driving in a column in unfavorable conditions (dust, dirt from cars in front).
Since the air intake on the Chevrolet Niva is not an innovation and is successfully imitated by the Kulibins, before inventing your own device, it is worth assessing the difference between the finished product and the results of applied art in terms of efficiency, aesthetics and quality.
Snorkel-original - a high-quality alternative to homemade products
A homemade external air intake with your own hands is a flight of fancy for the car owner using various improvised means. Such a device can look different, it all depends on the materials and skill of the author of the masterpiece. Some models look very extravagant and can amaze the delicate taste of a connoisseur of beauty with their aggressive appearance and surreal design.
Materials for a do-it-yourself snorkel for a Chevrolet Niva are fiberglass, fiberglass, epoxy resin, chrome pipe, corrugation, fastener clips, plastic joints, O-rings and even original round ventilation grilles. The entire range of available products from the plumbing department of any supermarket must be adapted to the car using glue, an industrial hair dryer, a hacksaw, a drill and welding. Some manage to achieve the state of “modestly and tastefully”, otherwise the shniva risks striking the sophisticated public with an awkward pile on the hood.
The original looks elegant and predictable, harmoniously complements the contours of the body and does not interfere with visibility. For fans of tuning and aerography, the air intake for the Chevrolet Niva can be supplemented with a stylish image or give the car a strict and presentable look. The standard kit includes an adapter, O-rings, hardware, connecting pipes, snorkel and installation instructions.
Snorkel for Chevrolet Niva - overview of the range
A popular device from F-Dising will cost a car enthusiast from 6,000 rubles, and for the lazy half of humanity they offer a service - installation for 1,000 rubles. Supporters of high-quality and reliable products are invited to install an air intake on the hood made of LLDPE - linear polyethylene. Advantages of reinforced products:
high physical and mechanical properties
excellent performance properties
crack resistance
shiny surface (a la Australian Safari snorkel).
The cost of the reinforced product will be 3,800 rubles, the kit includes fastening materials, clamps, a pattern, and an air intake. A fiberglass product will cost 4,000 – 4,600 rubles, depending on the aesthetics: painted, unpainted.
Installing a snorkel on a Chevrolet Niva
When choosing finished products, all manufacturers offer installation instructions (one of them can be downloaded at the end of the article). All products are installed along the left pillar; the contractor will need to make a hole in the mudguard, spar, mounting holes on the roof, wing and a figured cutout in the wing. For installation you will need a set of tools and materials:
ruler;
jigsaw (cricket scissors), riveting gun;
drill, drill bit (4 and 10 mm);
ratchet wrench;
polyurethane sealant, masking tape, anti-corrosion primer;
water based marker.
Installation is carried out according to the instructions of the selected manufacturer. As a rule, it is recommended to jack up a Chevrolet Niva, remove the fender protection, wheel, air filter tank, pipes, clean the body and tape the surface with tape. The outline on the left wing is marked according to the template, then cut out, the pipe is inserted and the snorkel is installed.
The next step is to mark the fastening points, holding the snorkel, remove the product, drill holes and remove the tape. The last step is to install threaded rivets, glue them and apply sealant evenly to the surface. Then install the air intake for the Chevrolet Niva and secure with bolts. Excess sealant is removed with a rag.
Tuning
There are ready-made suspension modification kits available in stores. Three types of tuning are popular:
- Lifting - increasing ground clearance by installing spacers under the springs and installing shock absorbers with increased travel.
- Reinforcement - replacement of reaction rods and other parts with more durable ones.
- Installation of air suspension, which allows you to adjust the ground clearance and stiffness in accordance with the road condition
The last option is the most complex and expensive. But it allows you to quickly adjust the behavior in accordance with operating conditions.
Read news about the new Niva
- The modernized Lada Niva Legend (4x4) 2021 was shown on the Internet
- Lada 4×4 Bronto - sales stopped, new details » Lada.Online - all the most interesting and useful about LADA cars
- Description of the instrument panel Lada 4×4 (VAZ 2121, 2131) » Lada.Online - all the most interesting and useful about LADA cars
- Chevrolet Niva gasoline consumption per 100 km
- Buy LADA (VAZ) 2131 (4×4) 2021 in Rostov-on-Don, low price for Lada 2131 (4×4) 2021 on the Avto.ru website
- Fuses Niva 21214 injector «
- The new large Lada 4×4 Niva “Bigster” 2021-2022 based on the Dacia Bigster was shown for the first time. The SUV has changed beyond recognition
- New Niva Chevrolet Lux 2021 - review of GLC equipment
Now you can go to the forest! Do-it-yourself Chevrolet Niva lifting
When a person buys a Chevrolet Niva, he rarely thinks about an extreme trip. Most often, a car is bought for a picnic with the whole family. That is, the car moves from one point to another.
Although the Chevrolet Niva is an SUV, it is noticeably inferior to its European and Asian competitors in cross-country ability in hard-to-reach places. It is because of this problem that fans of hunting, fishing and simply extreme driving choose to lift their car instead of watching videos while sitting at home.
Lifting is a type of tuning that increases the vehicle's ground clearance. They often do it with their own hands, in garages.
Chevrolet Niva
Proper modification will turn the Niva into a fairly solid car that will show excellent results off-road and in difficult terrain. We mentioned the word “lifting”, but did not say what it is.
Lifting is a set of changes made to the design of the car. They allow you to install larger diameter wheels on your car. Most often, cars with all-wheel drive are chosen to create such projects.
An all-wheel drive jeep is much more suitable for this task than a simple passenger car.
Useful video about checking the Shniva suspension after 38 thousand mileage
We will tell you how to properly perform tuning modifications in this material.
Do-it-yourself elevator - drawings, diagrams, sizes, types of kits. Lifting varies in the degree of intervention in the standard structure. For some, it is enough to raise the SUV by a few centimeters, and for others by as much as 20.
Extreme tuning – maximizing cross-country ability for traveling on severe off-road conditions.
- Regular jack
- Hijack jack
- Spring puller
- Balloon wrench
- Ratchet socket set
- Set of open-end wrenches
- Mount
- Wooden deck (stump)
It is advisable to perform such work with a partner. First of all, it's safer. Secondly, some lifting work is performed with four hands. Let's take the front suspension as an example.
Raise the front end. You can safely cling to the standard bumper, only the jack is installed under the pipe securing it. By removing the wheel, we get full access to the lever and spring. The front suspension 21214 is made using a double wishbone design, which simplifies the task.
The lever travel is limited by the shock absorber. Unscrew its fastening and move it to the side. Next you need to free the suspension from the anti-roll bar. The mounting bolts may become stuck due to corrosion, so we will use a penetrating liquid (such as WD-40). The stabilizer silent block clamp can be pryed off with a pry bar.
Then disconnect the hub from the lower arm. To do this, you need to jack up the suspension and fix the steering knuckle of the wheel. You can tie it with wire. Then unscrew the 3 mounting bolts and release the ball joint.
We fix the spring with ties and lower the jack. We remove the old elastic element. In some cases, it is enough to simply lower the lever with your foot, and the spring will come out without the use of ties.
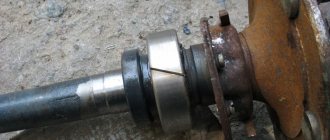
Remove the upper support rings from the old springs. With their help, the elastic element is centered in the cups.
They come together easily with a hammer and screwdriver. We install the rings on new, longer springs. We put the elastic elements in their regular places and jack up the lower arm until it is completely aligned with the lower cup. At the same time, an assistant centers the shock absorber eye and moves the steering knuckle to the mounting location of the lower ball joint. We tighten the ball “triangle” and attach the shock absorber mounting axis.
By manipulating the jack, we “catch” the mounting holes for the stabilizer bar clamp. With its bolts it should get into the normal place without distortion. After such modernization, the clearance increases by 30-50 mm. This is enough to install wheels of larger diameter, and the bottom will still rise above the ground.
The rear axle of the Niva can be lifted by installing spacer supports of increased height. When using a size of up to 50 mm (according to changes in front end height), no modifications to the rear axle are required. By lifting the rear axle, maintenance can be carried out on the axle and brake system.
Also interesting: How to remove a wheel bearing in a field. Replacing and adjusting the front wheel bearing Niva.
The handbrake cable may need to be replaced. It is lengthened by a couple of centimeters. Otherwise, the Niva lift will lead to increased wear of the brake pads in the rear drums. Disconnect the lower shock absorber mounts and lower them until the springs stretch.
We take out the elastic elements and knock off the support rings from them. We clean the upper cup and carry out anticorrosive treatment. We install new supports of increased size and seat the springs using a jack. We fasten the shock absorbers, assemble the axle, and mount the wheels.
Such a lift will not arouse suspicion among traffic police inspectors, and the cross-country ability of your NIVA 2121 will improve. No drawings, much less homemade parts, are required. You buy new springs and about the rates, the rest is a matter of technology. Labor costs for an elevator of one NIVA are two people/one day off.
Making a Niva-2121 elevator with your own hands, the drawings, the dimensions of which are freely available, will not be difficult. Thanks to such a trick, you can make your car more stable on the road and overcome a lot of obstacles with it. Of course, to bring a truly high-quality Niva elevator to life with your own hands, you will have to work hard.
The process will take time and require effort, because even the easiest elevator requires a significant immersion in the technical aspects of the issue. However, the end result will live up to all expectations, allowing the modest Niva to show its exceptional side.
For lovers of hunting, fishing and country travel, as well as those eager to try themselves and their own “Niva” in driving a vehicle in difficult-to-pass places, we have the opportunity to offer an increase in ground clearance, which increases the cross-country ability of your car.
Niva tuning – suspension lifting.
At the moment, there are at least 6 types of suspension lifting for Niva and Sh/Niva, each is interesting in its own right and is negotiated during the preparation of the car for “off-road” at the request of the visitor, taking into account the distinctive features of the operation of his car and the sizes of wheels and tires he uses wants to put it on his car.
We often use a kit from the Russian club 'Korovka' as a base. This lift kit was made at the factory and was tested at competitions in Russia. The ground clearance increases by 5 centimeters, which actually makes it possible to install R15 235/75 or R16 235/70 tires (on the right wheels). In addition, this will provide a rise of another 4 centimeters.
In total, the increase in ground clearance will be 9-10 cm! In this version, “NIVA”, without loss of comfortable qualities, has the ability to be used both on paved highways and off-road, being in no way inferior to foreign-made SUVs.
Consequently, at the lower point of the RZM the clearance is 25 cm, and at the cut of the threshold - 44.5 cm.
Front suspension lift.
The lift is performed by installing targeted washers under the lower spring pad (they create a sufficient angle for the front spring). Under the upper arm (between it and the ball) another spacer washer is placed (i.e., we unload the arm).
The levers of the steering knuckles are swapped and the tips of the control rods already go from top to bottom (since subsequently the work done before, when the rod is fully turned, they will rest against the stabilizer, although at the request of the visitor it is possible to leave it as it was by changing the fastening of the stabilizer).
During lifting work, it is often necessary to change shock absorbers, springs, and resins on request. spacers, internal CV joint boots on tuning suspensions modified for this type of lift and create adjustments. spring bumpers.
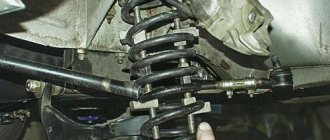
Lifting the Niva suspension at the rear.
The lift is carried out by installing new rear spring cups, which are bolted on top of the standard ones, and brackets for moving the mounting points of the rear shock absorbers up 5 centimeters (bolted).
The short upper rods of the rear axle are lengthened or made adjustable (for easy rotation of the shank, so as not to bite the crosspiece), the reaction rods of the rear axle are either reinforced with an angle or installed double; at the request of the visitor, a rear axle stabilizer “Tehnomaster” (Tolyatti) is added, although it will be needed adjust to the elevator machine, digest.
Similarly, it is preferable, on lifted cars, to use a rear CV joint. Those who begin to lift old or worn-out cars need to remember about the internal CV joints (the balls leave their place) and will need to prepare for their replacement. The solution to this difficulty is quite possible by reducing the drive angle by untying the front axle.
The outer CV joints are too little susceptible to this, it will be worse for them if the wheel becomes larger in offset, width and weight, and then they can “crunch”. Although even then the hub bearing has a hard time, especially if it had play before.
Although we have avoided this problem, since we install steering knuckles with 2 ball bearings (from the rear axle shaft), they do not need to be adjusted; they are tightened all the way, although it is much better with a torque wrench. The unit comes out maintenance-free, the hub is unloaded, rolling is easier and the dynamics of the car are much better. Steering knuckles are naturally of domestic production and with a guarantee.
Also interesting: Engine from Mercedes to Niva – AutoTop
When installing wide wheels after a lift, you will need to keep in mind the ball ones (when the weak ones “fly”), the pendulum will also be able to fly, and the installation of the latest gas shock absorbers results in a stiffening of the upper bracket of the lane. shock absorber (otherwise it tears, especially when the front end is heavier), the mounting of the rear shock absorbers can also be strengthened. It is preferable when lifting, replace the suspension with p/urethane instead of rubber.
Economical Niva suspension lift of 1.5-2 centimeters. In such a situation, we resort to replacing the rubber spacers for the springs with tuning ones (of greater thickness), installing washers, spacers for the upper ball joints and adjusting the spring bumpers (at the visitor’s request). In this implementation, the Niva gets wheels (correct) in size R15 215/75.