December 23, 2015 Lada.Online 169 239 8
When using the car for a long time, you may notice that the body has sagged a few centimeters. This is a characteristic feature of wear on the suspension springs. Controllability and comfort depend on their rigidity. And if they are selected or installed incorrectly, then this is already a security threat.
Purpose
Chevrolet Niva comes from the factory with springs, both front and rear. The main purpose of these devices is to absorb all the shocks of the suspension that occur when the wheels hit potholes and bumps. They are located in the gap between the wheel and the frame of the car, due to which shocks from the road are smoothed out.
For their manufacture, special high-strength steel is used. The number of turns of the device affects not only the quality of shock absorption, but also the distance of the body from the suspension.
Many Chevrolet Niva owners upgrade the rear springs by installing spacers or reinforced parts.
Reinforced rods
The appearance of cracks between the rod base and the lugs will shorten the service life of the parts. This problem can even cause an accident - the car suddenly pulls to the side when the traction breaks.
To avoid unpleasant surprises, special reinforced parts are installed in the rear suspension. They are made of alloy or cold-rolled steel and differ from conventional ones in the diamond-shaped section of the base and powerful welding seams that hold the lugs.
Also interesting: Chevrolet Niva suspension diagnostics in Vladimir: addresses and phone numbers of car services, ratings and reviews, questions and answers
Reinforced rods differ from standard ones in the following characteristics:
- Reduced weight of parts.
- Improved paint coating that prevents corrosion of elements.
- High strength welded seams.
- Increased resistance to torsion, compression and tension.
Installation of reinforced rods is recommended for full use of the Chevrolet Niva off-road. They don't offer much benefit for city or highway driving. Under gentle operating conditions, the strength of standard rods is quite sufficient, so there is no point in overpaying for reinforced parts.
Classification
The suspension elements under consideration are divided into two types according to their rigidity:
- Standard hard ones are designated by the letter “A”. They have high stability and load capacity.
- Soft “B” is their main advantage in providing increased comfort, but at the same time they quickly become unusable - they “sag”.
Reference! From the factory, Shniva is equipped with class “A” parts, that is, rigid ones.
Rules for receiving online orders
Upon receipt of the goods you must:
- Check the appearance of the order packaging (integrity)
- Open the package and check the presence of all ordered items
- Check the appearance of the order (it must not be broken or wrinkled)
- Check the completeness of the order (delivery set, accompanying documents)
Attention! If you find any defects or damage, you must, in the presence of employees of the transport company or courier, draw up a report (claim) indicating the corresponding defect.
We ask you to also take a photograph of the detected defect. Photos along with a document signed by the transport company employees or the courier must be sent to our email address within 3 days from the date of receipt of the order.
Please note: if you have not checked your order in the presence of the courier or transport company employee and have not drawn up the appropriate report, claims regarding appearance and configuration will NOT be ACCEPTED!
There are several payment methods in our store:
Types of springs for Chevy Niva
The time comes when the springs on a Chevrolet Niva need to be replaced. First you need to figure out which suspension elements are best to install so that they provide the expected properties.
Front
You can replace the front suspension elements with devices from manufacturers such as Izh-Techno, Kilen, Lesjofors, Reid or Techno Ressor.
It is necessary to mark only devices of the Reid brand, the cost of which is 4,000 rubles per set. This price is due to the high quality of the kit.
Rear
Unlike the front end, it is recommended to install reinforced elements on the rear part. This is necessary so that the SUV can be loaded, and at the same time the car still absorbs shock from the road well.
Spacers
During operation, the elastic elements of a car's suspension sags and require replacement, however, there is a more budget-friendly option that many car enthusiasts use - installing spacers.
In this case, one main condition must be met - the absence of signs of deformation .
Spacers help restore the functionality of the shock-absorbing elements of the suspension, thereby the owner can save money.
Compatibility of springs from Niva and Shniva
The springs on the Chevrolet Niva from the regular Niva VAZ-2123 are not suitable. The reason for this is the differences in length. Let's consider the main technical parameters of these elements.
| Parameter name | VAZ-2121 Niva | VAZ-2123 Chevrolet Niva |
| Front | ||
| Bar diameter | 15.2 mm | 15.7 mm |
| Length | 278 mm | 313 mm |
| Rigidity | 74.42 kg/cm | 75 kg/cm |
| Load | 815 kg | 815 kg |
| Rear | ||
| Bar diameter | 13 mm | 13.9 mm |
| Length | 434 mm | 410 mm |
| Rigidity | 22.44 kg/cm | 30 kg/cm |
| Load | 483 kg | 483 kg |
From the comparison table it is clear that the free length of the parts in question does not correspond, which is the reason for the impossibility of installation, since the springs from the Niva are shorter.
DIY replacement
Replacement of rear and front springs is carried out not only when they sag, but also when chips, cracks, and other defects are detected. At the initial stage of work, the necessary tools and materials are prepared.
Tools and materials
To carry out the replacement work, you will need the following tools and materials:
- Set of wrenches.
- Jacks and stops.
- New set of springs.
Important! It is recommended to replace them as a set or in pairs for the front and rear wheels. You cannot install parts from different manufacturers or different stiffness classes on the machine.
Work progress
Replacement of the front elements should be carried out in this order:
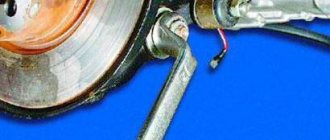
1. Jack up the SUV and remove the wheel. Set the stop. 2. Unscrew the nut securing the lower arm axle using an open-end wrench.
3. Unscrew the shock absorber mounting bolt, having first unscrewed the nut. 4. The stabilizer cushion bracket is dismantled after unscrewing the two fastening nuts. 5. Place the jack under the suspension and lift until the compression limiter moves freely. 6. Unscrew the three nuts securing the ball joint. The bolts securing the support are removed. 7. Slowly unloading the suspension, remove the springs. 8. The spacers are also dismantled, and then new parts are installed in the reverse order of removal.
Suspension lifting Niva VAZ 2121 21213 21214 2131
We will tell you how to properly perform tuning modifications in this material.
Do-it-yourself elevator - drawings, diagrams, sizes, types of kits. Lifting varies in the degree of intervention in the standard structure. For some, it is enough to raise the SUV by a few centimeters, and for others by as much as 20.
Extreme tuning – maximizing cross-country ability for traveling on severe off-road conditions.
- Regular jack
- Hijack jack
- Spring puller
- Balloon wrench
- Ratchet socket set
- Set of open-end wrenches
- Mount
- Wooden deck (stump)
It is advisable to perform such work with a partner. First of all, it's safer. Secondly, some lifting work is performed with four hands. Let's take the front suspension as an example.
Raise the front end. You can safely cling to the standard bumper, only the jack is installed under the pipe securing it. By removing the wheel, we get full access to the lever and spring. The front suspension 21214 is made using a double wishbone design, which simplifies the task.
The lever travel is limited by the shock absorber. Unscrew its fastening and move it to the side. Next you need to free the suspension from the anti-roll bar. The mounting bolts may become stuck due to corrosion, so we will use a penetrating liquid (such as WD-40). The stabilizer silent block clamp can be pryed off with a pry bar.
Then disconnect the hub from the lower arm. To do this, you need to jack up the suspension and fix the steering knuckle of the wheel. You can tie it with wire. Then unscrew the 3 mounting bolts and release the ball joint.
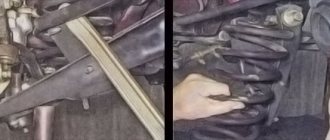
We fix the spring with ties and lower the jack. We remove the old elastic element. In some cases, it is enough to simply lower the lever with your foot, and the spring will come out without the use of ties.
Remove the upper support rings from the old springs. With their help, the elastic element is centered in the cups.
They come together easily with a hammer and screwdriver. We install the rings on new, longer springs. We put the elastic elements in their regular places and jack up the lower arm until it is completely aligned with the lower cup. At the same time, an assistant centers the shock absorber eye and moves the steering knuckle to the mounting location of the lower ball joint. We tighten the ball “triangle” and attach the shock absorber mounting axis.
By manipulating the jack, we “catch” the mounting holes for the stabilizer bar clamp. With its bolts it should get into the normal place without distortion. After such modernization, the clearance increases by 30-50 mm. This is enough to install wheels of larger diameter, and the bottom will still rise above the ground.
The rear axle of the Niva can be lifted by installing spacer supports of increased height. When using a size of up to 50 mm (according to changes in front end height), no modifications to the rear axle are required. By lifting the rear axle, maintenance can be carried out on the axle and brake system.
The handbrake cable may need to be replaced. It is lengthened by a couple of centimeters. Otherwise, the Niva lift will lead to increased wear of the brake pads in the rear drums. Disconnect the lower shock absorber mounts and lower them until the springs stretch.
We take out the elastic elements and knock off the support rings from them. We clean the upper cup and carry out anticorrosive treatment. We install new supports of increased size and seat the springs using a jack. We fasten the shock absorbers, assemble the axle, and mount the wheels.
Such a lift will not arouse suspicion among traffic police inspectors, and the cross-country ability of your NIVA 2121 will improve. No drawings, much less homemade parts, are required. You buy new springs and about the rates, the rest is a matter of technology. Labor costs for an elevator of one NIVA are two people/one day off.
For lovers of hunting, fishing and country travel, as well as those eager to try themselves and their own “Niva” in driving a vehicle in difficult-to-pass places, we have the opportunity to offer an increase in ground clearance, which increases the cross-country ability of your car.
Niva tuning – suspension lifting.
At the moment, there are at least 6 types of suspension lifting for Niva and Sh/Niva, each is interesting in its own right and is negotiated during the preparation of the car for “off-road” at the request of the visitor, taking into account the distinctive features of the operation of his car and the sizes of wheels and tires he uses wants to put it on his car.
Also interesting: Chassis, front suspension, device, Design, operation, description, device, car repair Niva VAZ 2121, engine, assembly, disassembly, transmissions, gearboxes
We often use a kit from the Russian club 'Korovka' as a base. This lift kit was made at the factory and was tested at competitions in Russia. The ground clearance increases by 5 centimeters, which actually makes it possible to install R15 235/75 or R16 235/70 tires (on the right wheels). In addition, this will provide a rise of another 4 centimeters.
In total, the increase in ground clearance will be 9-10 cm! In this version, “NIVA”, without loss of comfortable qualities, has the ability to be used both on paved highways and off-road, being in no way inferior to foreign-made SUVs.
Consequently, at the lower point of the RZM the clearance is 25 cm, and at the cut of the threshold - 44.5 cm.
Front suspension lift.
The lift is performed by installing targeted washers under the lower spring pad (they create a sufficient angle for the front spring). Under the upper arm (between it and the ball) another spacer washer is placed (i.e., we unload the arm).
The levers of the steering knuckles are swapped and the tips of the control rods already go from top to bottom (since subsequently the work done before, when the rod is fully turned, they will rest against the stabilizer, although at the request of the visitor it is possible to leave it as it was by changing the fastening of the stabilizer).
During lifting work, it is often necessary to change shock absorbers, springs, and resins on request. spacers, internal CV joint boots on tuning suspensions modified for this type of lift and create adjustments. spring bumpers.
Lifting the Niva suspension at the rear.
The lift is carried out by installing new rear spring cups, which are bolted on top of the standard ones, and brackets for moving the mounting points of the rear shock absorbers up 5 centimeters (bolted).
The short upper rods of the rear axle are lengthened or made adjustable (for easy rotation of the shank, so as not to bite the crosspiece), the reaction rods of the rear axle are either reinforced with an angle or installed double; at the request of the visitor, a rear axle stabilizer “Tehnomaster” (Tolyatti) is added, although it will be needed adjust to the elevator machine, digest.
Similarly, it is preferable, on lifted cars, to use a rear CV joint. Those who begin to lift old or worn-out cars need to remember about the internal CV joints (the balls leave their place) and will need to prepare for their replacement. The solution to this difficulty is quite possible by reducing the drive angle by untying the front axle.
The outer CV joints are too little susceptible to this, it will be worse for them if the wheel becomes larger in offset, width and weight, and then they can “crunch”. Although even then the hub bearing has a hard time, especially if it had play before.
Although we have avoided this problem, since we install steering knuckles with 2 ball bearings (from the rear axle shaft), they do not need to be adjusted; they are tightened all the way, although it is much better with a torque wrench. The unit comes out maintenance-free, the hub is unloaded, rolling is easier and the dynamics of the car are much better. Steering knuckles are naturally of domestic production and with a guarantee.
When installing wide wheels after a lift, you will need to keep in mind the ball ones (when the weak ones “fly”), the pendulum will also be able to fly, and the installation of the latest gas shock absorbers results in a stiffening of the upper bracket of the lane. shock absorber (otherwise it tears, especially when the front end is heavier), the mounting of the rear shock absorbers can also be strengthened. It is preferable when lifting, replace the suspension with p/urethane instead of rubber.
Economical Niva suspension lift of 1.5-2 centimeters. In such a situation, we resort to replacing the rubber spacers for the springs with tuning ones (of greater thickness), installing washers, spacers for the upper ball joints and adjusting the spring bumpers (at the visitor’s request). In this implementation, the Niva gets wheels (correct) in size R15 215/75.
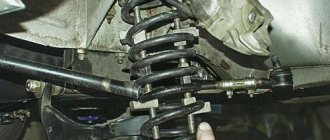
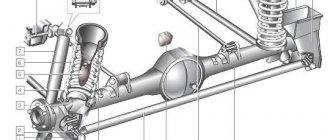
The Chevy Niva bridge is held in place using five parts. To prevent longitudinal and transverse displacement, four longitudinal rods (two each: front and rear) and one transverse rod are used. At the ends of the products there are eyes into which silent blocks are inserted to prevent knocking in the suspension. One end of the rod is attached to the bridge, the other to the car body.
The parts have the same diameter and differ only in length. The longest is the transverse thrust. The length of the elements ensures vertical mobility of the rear axle. Thanks to this, the silent blocks do not twist, even if the suspension moves by the full stroke of the shock absorber.
Video
We recommend watching detailed video instructions, this can save you time and effort when carrying out repairs on your own
In the previous entry I noted my observations about the subsidence of the front springs (the distance to the compression bumper was about 5 mm).
Measurements at 14,000 mileage showed the following: Distance from the center of the hub to the fender: Front Left 42.5 cm - Front Right 42.5 cm Rear Left 43 cm - Rear Right 42.5 cm Clearance under protection 19 cm.
One solution is to install reinforced Kilen/Lesjöfors springs, this allows you to return the suspension to stock condition and preserve it for a long time. I didn't want to lift the suspension with springs. I followed this path.
Because Kilen and Lesjöfors are made at the same factory, so the choice fell on those that came out cheaper: Front spring CHEVROLET H/D Lesjöfors (PN 4014219) 2 pcs Rear spring CHEVROLET H/D Lesjöfors (PN 4214212) 2 pcs I knew in advance, that the rear springs are shorter than the standard ones, so I took additional spacers from Sobol: Reinforced front spring spacer GAZ-Sobol (PN 22172902720) 2 pcs
In general, I decided to post my report about the Shniva elevator on the drive. So:
Source material: 2006 shoe. with sagging soft (blue markings on the springs) springs front and rear, wheels - 2057515. In front, the distance from the top of the wheel bearing cap to the arch is 36 cm, at the rear - 42 cm, the levers in the center look down, the bumpers in the front springs practically lie on the cups . In winter, when driving in the snow behind a fresh car, behind which there was only a track and an untouched middle, I cut everything off with my protection. Accordingly, on a hard surface I was constantly clinging to the protection and fighting with the levers. After the extreme competition, the rear left ammo leaked (Delfi). The target model is to install tires in size 2357515 for not very sporty rides. Those. The main purpose of operation is not city driving and quiet driving on dirt roads to the village or to the country, but driving every weekend over rough terrain in search of ambushes and ways to overcome them. It was decided because sagging springs - replace the springs, because Frequent off-road, near-sport driving was expected - install stiffer springs and ammas, make a lift for installing 235x wheels. The lift option chosen was one with rubber spacers, and not, like Rybachok’s, a cup lift. This was due to the lack of a sane turner, the hassle of cutting off the stabilizer mount, and then digesting it, cutting out openings in the cup, touching the steering rods against the stabilizer mount, etc. Those. This lift is NOT by lifting the cup, but by RUBBER SPACERS. As a result of the lift, the result was immediately 45 cm from the top of the wheel bearing cap to the arch in front and 50 cm in the rear. Under the beam - 30 cm. After several iterations (reinforced spacers were removed from the rear springs) and two weeks of riding, incl. active along gullies - in front - 45 cm, behind - 45 cm, under the beam - 28 cm. The CV joints do not crunch, does not catch on the anthers, does not cling to the steering rods with the wheels hanging and turned out to the maximum, does not cling to the inner surfaces of the springs, not at all it doesn’t knock out the front or rear, up or down, and doesn’t break the brake hoses on the lift. I didn’t cut the bumper, although I had previously cut off the skirt on the front bumper. Further operation will show what will happen next) This option is not an axiom, as was noted here on the forum - each car is individual, the described option was customized for my car, summarizing materials from the forum and the Internet. Some pictures are not mine, because... Either I didn’t take a photo of my own or it turned out crooked, all copyrights belong to their authors (and thanks for the ideas!), I’m attaching them here only for clarity. Thanks to Rybachok, Fangorn and others who posted here for ideas and visual solutions.
When to change?
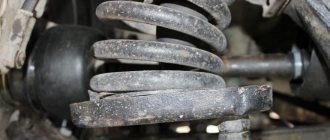
Let me refer to quotes from the forums: look at how your lower control arm is relative to the ground, measure the distance from the edge of the wheel to the arch, and the like. Of course, there is some truth in all this, BUT these are all consequences. We need to look at the reason, that is, at the spring itself. The next legitimate question is: where to look? The photo shows springs from the same car, one side before replacing the springs, the other after.
when to change springs?
For some reason I remembered the magazine “Murzilka” with pictures on the topic, find 10 differences)). Red circles indicate where to look. Why do springs in this condition need to be changed and why is this criminal? Different alloys have different physical characteristics. In particular, spring steels do not withstand shock loads at all. When the coils of the springs close to full contact, an impact occurs. Stress tends to accumulate, and at some point the spring bursts. If this happens at low speed, the face of the car will simply fall down. The fuse will be the shock absorber, which will bend, and if the swing was stronger, then the body will lie on the wheel. It is much worse if this happens at speed or somewhere on the descent from a hill. I saw a short video from the Ladoga Trophy, when a short Niva drives down a hill, bounces a little and turns over. What can be seen in the slow motion replay: when flying up, the suspension dissolves. Then, the face of the car goes down, the spring bursts, the body falls on the wheel... and the car does a somersault through this wheel, since the kinetic energy has not gone away.