Replacing the front springs of a VAZ 2107
If traces of mechanical deformation in the form of cracks were detected on the front springs, they should be replaced with new ones.
Springs can also change as a result of their shrinkage. “Classic” cars are equipped with two types of springs, differing in length. The springs must be changed on both sides at once. To dismantle you will need a tension puller. It is highly not recommended to use improvised means for the tie, as the spring is very compressed and can fly out, causing serious injury.
Removing the front springs
- First, remove the shock absorber and disconnect one end of the anti-roll bar from the lower control arm. The rubber bushing will also need to be removed.
- Slightly loosen the pin nut from the ball joint. Then press the pin out of the steering knuckle so that the pin is fixed only on the nut. Do this using a puller.
- Lightly load the suspension by first placing a jack under the lower control arm. Now completely unscrew the ball joint pin nut.
- The entire spring load should go to the jack and lower arm. Gradually lower the jack, thereby weakening the spring force and unloading the suspended part. At the moment when the suspension is completely unloaded, use a mounting blade to pry the spring at its lower end and remove it.
- Next, remove the rubber gasket from its seat.
Installing a new spring
Before installing a new spring in place of the old one, be sure to place a rubber gasket on its upper end. The gasket must be oriented so that the very first spring coil fits exactly into the duplicate groove of the gasket. Secure the rubber spacer with electrical tape. After this, secure the tension bolts and tighten the spring so that its length is no more than 28 cm. Now you will need to reinstall the spring to its original point. As you lift the jack, gradually begin to apply load to the hanging part. At the same time, insert the ball joint pin into the steering knuckle and tighten the nut tightly. Then secure the anti-roll bar as well. Now that all the elements and the spring itself are installed, remove the coupling bolts and remove them through the technological hole located in the lower arm.
When it's time to replace
There are several signs by which you can determine that it is time to replace the springs. These signs are:
- Detection of damage and defects in the product design. This malfunction can be determined by visual inspection, but first you need to put the VAZ 2107 car on an overpass.
- Their significant subsidence. If the vehicle's ground clearance decreases significantly, this indicates sagging of the devices in question. Springs quickly sag in such cases when the car is used to transport heavy loads every day. Also, those cars that are used as taxis also require frequent replacement of the devices in question.
If you find a problem with the springs on a VAZ 2107, then you should replace them without delay. This will extend the life of other suspension elements and save money. It is recommended to replace devices in pairs, since replacing only one element will cause the body to skew, which will negatively affect driving. In some cases, spacers help when the springs have sagged but are not deformed. Experts believe that you should not get carried away with spacers, since the physical properties of a car with spacers are many times worse. As a result of such modifications, the suspension does not function correctly, which affects many factors: from control to comfort. Therefore, if necessary, it is better to replace the springs, both rear and front. We will learn how this is done on a VAZ 2107 from this material.
Replacing the front springs of a VAZ 2107
Replacing the front suspension elements on the “seven” is carried out according to the following scheme:
- First, you need to install the car on an inspection hole or overpass, and then begin to remove the wheels, having first jacked them up.
- The front shock absorber needs to be removed.
- The nuts that secure the lower arm to the axle are loosened.
- Using a second jack, you need to place it under this lever, thus adding the suspension load. This is done to make it easier to disconnect the stabilizer.
- At this moment, you can use special spring ties (if available) to secure the springs in a compressed state. This will make further removal actions much easier.
The front springs of the VAZ 2107 need to be changed in pairs, just like the rear ones.
Changing the rear springs on a VAZ 2107
Replacing the rear springs of a VAZ 2107 is carried out according to the following principle:
- Install the jack and remove the wheel.
- The pressure regulator rod in the brake system is unscrewed.
- The rear pipe tee bracket is unscrewed.
- The shock absorber fastener at the bottom is unscrewed.
- Jack up the car and thereby release the shock absorber and spring fasteners.
- Now you can remove the spring, which also has a rubber spacer. If the spacers are deformed, they should be replaced.
- Replace the removed springs with new ones, installing all the removed parts in the reverse order of removal. When installing products, it is important to purchase special ties, as shown in the photo below.
Replacing the rear springs is much easier and faster, so it will take half a day to replace all four products.
What springs to install
It remains to figure out the question of what springs to put on the VAZ 2107? Instead of standard products, you can install reinforced devices. The replacement principle is similar, but the result will be significant. The suspension with reinforced devices will become stiffer, but it is important to know that at the same time you will need to install new shock absorbers (more powerful).
Many car owners are wondering what springs are best to install on a VAZ 2107? The best option for a rear-wheel drive sedan is products marked 2101. They are quickly and easily installed in standard places and do not require modifications. When choosing products, you need to pay attention to their manufacturer. There are many manufacturers, both domestic and imported, but it is important to pay attention to the cost. When choosing, pay attention to the stiffness class of the springs, the number of turns and their thickness. There are two types of hardness:
- Type A, whose length exceeds 273 cm. They are red in color and are the toughest.
- Type B. Their length is up to 273 cm and their color is green. Such products have reduced rigidity.
In conclusion, it should be noted that the higher quality the product, the longer it will last. Therefore, when choosing, it is important to analyze for what purpose you need a car: to transport cargo or simply carry passengers.
- While the car is “on wheels”, tear off the wheel mounting bolts with a “balloon”.
- Jack up the car with a screw jack on the side where you are going to change the suspension spring.
- Next, you need to hang the wheel and completely remove it from the car.
After this, remove the shock absorber, this is done as follows:
- To do this, use the key at "6, 13, 17 and 19".
- The rod must be kept from turning with a key.
- Next, loosen the nut and remove it.
- Also remove the cushion washer, spring washer and upper shock absorber mounting pad.
8. Unscrew the two fastening nuts of the bracket to the lever and remove the spring washers.
9. Remove the shock absorber from the bottom using the mounting hole in the arm.
10. Loosen the mounting nuts that secure the lower arm to the axle, but do not rush to remove them.
Now it’s the turn of the second jack (hydraulic)
11. Place it under the lower control arm, then raise it slightly to load the suspension and level the lower control arm.
12. Remove the stabilizer bar.
13. Unscrew the nuts of the stabilizer bracket and remove the bracket with the rubber cushion.
14. Unscrew the nut that holds the pin in the ear of the steering knuckle, but now you can remove the lower ball joint.
15. Lower the jack and knock out the support pin with a hammer; to do this, hit the lower ear of the steering knuckle several times.
16. With the lower ball joint removed, reinstall the jack under the lower control arm, but there is now no need to load the suspension.
17. After this, you can unscrew the ball joint pin nut completely, slowly, and carefully lower the lower arm down. Help yourself with a mounting spatula by moving the stabilizer to the side so that it does not catch the bracket mounting studs.
18. Now completely unload the suspension and move the jack to the side.
19. Prepare a strong rope or wire, with its help you need to pull the upper arm as high as possible in order to provide yourself with access to the front suspension spring.
20. Take a pry bar and use it to pry the lower end of the spring, then carefully remove it from the lower arm support cup.
21. Remove the suspension spring, remove the spring gasket from the upper support cup.
Now that nothing is in the way, the front suspension spring can be replaced.
To replace the front spring, do the following:
1. Take a new spring, attach a gasket to it (use regular electrical tape for this) and install it in place.
2. Install the mounting blade into the hole for the shock absorber and, holding the spring with it, fix the lower coil. By looking at the surface of the lower arm, you can see a helical surface indicating the correct position of the spring. Helping yourself with mounting, you need to adjust the correct position of the spring in relation to the screw surface.
3. Having set the correct position of the lower coil, install the jack under the lever and create a load on the spring, then use a mounting blade to finally seat the spring on the screw surface.
4. Increase the load on the spring and, using a mounting tool, install the stabilizer bar into a position between the two mounting studs of the stabilizer bracket.
Assembly is carried out in reverse order.
Now we can say that the replacement of the front suspension springs of the VAZ 2106 has been completed.
Instructions for replacing the front suspension springs of a VAZ 2107
Welcome, friends, to the DIY car repair website. When driving on our roads, the car’s suspension experiences enormous loads and the front springs are no exception, and they will be discussed today.
Replacing the front suspension springs of a VAZ 2107
Irregularities on the road and careless driving inevitably affect the condition of this element. But the importance of springs is difficult to overestimate - in combination with other suspension elements they provide comfort and smoothness.
In the event of a malfunction of this unit, replacement of the front springs of the VAZ 2107 is mandatory. But how to diagnose a breakdown? Is it possible to do the work yourself?
Signs and malfunctions of the front springs of the VAZ 2107
To avoid unpleasant consequences, it is important to identify the problem in time. This is not difficult to do. During operation, you will notice that the car has “squatted” in height and the ground clearance has decreased.
If one of the springs fails, a slight roll may occur. If both springs are damaged, the car will visually “nod off”, that is, the front part will be significantly lower than the rear.
In addition, the malfunction can be identified by inspection - damage will be visible on the spring (cracks, traces of impacts against each other, and so on).
Many car enthusiasts install spacers under the springs and solve the problem this way. It is not right. In most cases, such products are ineffective.
In the best case, you can raise the ground clearance, but if there is a malfunction or defect, then the best solution is to replace the VAZ 2107 front suspension spring.
Algorithm for replacing the front springs of a VAZ 2107
Prepare the simplest tool for the job; every car owner who at least sometimes repairs his iron horse should have it.
You will need:
- A set of keys (you should have it in your trunk);
- jack;
- a brush with metal bristles;
- wheel wrench;
- hammer;
- wire hook;
- mount;
- insulating tape.
The sequence for replacing the front springs is as follows:
1. Remove the shock absorber from the desired side and remove the wheel.
2. Next, you need to slightly unscrew the nuts securing the lower arm.
Attention! When performing work under a vehicle, do not forget about safety precautions; place wheel chocks under the wheels and supports under the car body.
Place a lifting device under the lower arm and lighten the suspension (this is necessary to simplify the task of removing the stabilizer).
3. Unscrew the pair of nuts that hold the fixing bracket on the stabilizer pad.
4. Now remove the retaining bracket from its place, and then the cushion (stabilizer bushing).
5. Slightly loosen the ball nut that secures the steering knuckle and the lower hinge pin. Be careful. The nut must be unscrewed until it coincides with the end of the pin. Once this happens, lower the jack that is located under the lower control arm slightly.
6. Take a hammer and make several strong (and most importantly, sharp) blows to the outer part of the fist. Thanks to this action, you will achieve the release of the pin from the rotary cam.
7. Pay attention to the lower arm. At the moment when the pin is knocked out, it will be on only one nut, you need to slightly raise the jack under the lower part of the lever. But there is no need to heavily load the suspension.
Replacement of front and rear springs of VAZ 2107
Have the springs burst on your VAZ 2107? If you feel that when the interior or trunk is lightly loaded, the clearance has decreased significantly, then it is time to replace the rear springs.
Replacing the rear springs of a VAZ 2107:
1. You need to buy the springs themselves and rubber spacers with metal clips. Nowadays there is a large assortment of spacers in stores; you can buy standard, medium or high.
2. To replace the springs of a VAZ 2107 you will need two jacks, a screwdriver, 19mm wrenches and a wheel wrench. It is better to do the work on a pit or a lift.
3. Loosen the wheel bolts and unscrew the lower bolt of the rear shock absorber, then you need to unscrew the short torque rod bolt.
4. Next, you need to lift the car body with a jack, and install the second jack under the rear axle stocking and lift the wheel.
5. Remove the wheel and slowly lower the rear axle, the spring should come out of its seat.
6. Remove the spring and take out the spacers.
7. Install the spring, the lower end goes into the recess of the cup on the rear axle.
8. When the spring is installed, lift the edge of the rear axle with a jack and install the wheel.
9. Lower the car and secure the rear shock absorber and short torque rod.
This completes the replacement of the rear springs of the VAZ 2107.
Replacing the front springs of a VAZ 2107:
1. Remove the front wheel and unscrew the stabilizer from the front lower arm and the shock absorber.
In order to remove the front springs on a VAZ 2107, use a puller consisting of two jaws; it must be installed between the coils of the spring.
3. Now you need to press the lower ball joint pin out of the steering knuckle and move the hub mounted on the upper ball joint to the side.
4. Loosen the nuts of the lower arm using a 22mm wrench.
5. Push down the lower arm and pull out the spring along with the puller from the lower arm.
6. Replace the insulating gasket.
7. Install the new front springs of the VAZ 2107 in the reverse order, remember that they must be tightened with a puller.
8. Before tightening the lower arm axle nuts, place the machine on its wheels.
At this point, the replacement of the front springs of the VAZ 2107 is completed and your car is ready for use again.
Removing and replacing front springs on VAZ 2101, 2102, 2103, 2104, 2105, 2106, 2107
Hello, in this article you will learn how to replace the front springs on a VAZ 2101, 2102, 2103, 2104, 2105, 2106, 2107. Front springs are usually replaced when they sag significantly. Front springs usually sag for a long time, but if you often drive a loaded car, this will happen much sooner. As the springs sag on bumps, the suspension begins to “break through” more often, which makes the ride not entirely comfortable, and in some places not safe. The cost of new springs on the automotive market ranges around 800 rubles. To replace the front springs you will need: spring ties, heads or wrenches for 13, 22 and two jacks (one of them is better hydraulic). First of all, jack up the car, remove the wheel and shock absorber. Next, use a 22mm wrench to loosen the fastenings of the front suspension arm.
Important points when replacing suspension springs
When repairing the front suspension, you need to take into account the specifics of replacing the front springs: if you do not follow some rules, complications may arise in the future, for example, you will have to re-do the work or make another purchase. Characteristic specifics of this repair:
- The front springs should be replaced in pairs and try to match them according to stiffness and height. Almost all parts are marked with a paint mark; it is necessary that the paint color of both springs matches;
- The service life of the spring largely depends on the performance of the bump stop and shock absorber, so the condition of these parts also needs to be monitored. If the bump stop is missing or is in poor condition, it will not be able to soften the impact, for example, if a wheel falls into a hole, the spring may break;
- When purchasing spare parts, you should not buy the cheapest parts; defects often come across here. It's better to spend a little more money, but you won't have to redo the work in the future. The most ideal option is to purchase original spare parts, or if you buy non-original ones, then from a well-known manufacturer with a good reputation;
- When removing and installing a spring, it is necessary to use ties; all traditional methods of tightening spring coils often lead to injury.
Ties must also be purchased of high quality, and it is better to try not to use Chinese tools at all. With Chinese ties, the threads quickly pull out, and the metal is of such poor quality that the special device may simply not be able to withstand compression of the coils, and the spring will fly off to the side. What the consequences may be is clear without further ado; you should take care of your health and take care of your safety.
Source: avtobrands.ru
Logbook VAZ 21074 (2006)
Do-it-yourself: Front suspension: 5. Replacement of VAZ-2107 springs
So, we continue to rebuild the suspension. Today we’ll look at how to change the front springs, since the factory ones have already reached 220 thousand and are pretty tired, although the ground clearance is normal. To do this, I purchased similar springs from VAZ JSC with new spacers and a front spring remover.
Before replacing, to compare the effect, we will measure the distance from the floor to the wheel arch of the front wings before and after replacement with new springs, silent blocks and shock absorbers.
As we can see, the car has a skew of 1 cm on the right side, which is not critical.
Out of curiosity, let's measure the thickness of the new spring rod - if you subtract the painting, it is approximately 13 mm.
And the free length is 37.2 cm.
For work we will need:
- Keys and heads for 13, 22
- Central spring puller and ball joint remover (preferably)
- Crowbar or large screwdriver, hammer, wire brush
- WD-shka or other “liquid key”
We hang the car, remove the wheel, remove the shock absorber, loosen the nuts of the silent blocks of the levers, remove the stabilizer bracket and cushion - we will also replace it with a new one.
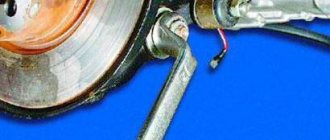
Now loosen the nut securing the lower ball joint pin to the steering knuckle and tear off the pin. We have already discussed how to do this earlier.
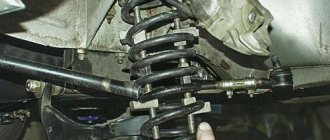
We place the puller plates under the maximum lower and upper coil of the spring and tighten until the lower end moves away from the cup and the tension between the levers is relieved.
It is worth keeping in mind that the puller is weak, the bearing under the lower plate fell apart when replacing the second spring, although it works well without it if you lubricate the washers. Production, it seems, is Kostroma.
Now we fix the upper lever with the hub assembly, remove the ball joint pin from the steering knuckle and lower the lever down, carefully remove the spring with the spacer.
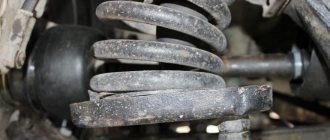
Inspect the spring for damage. As we can see, there are traces of corrosion and interturn wear.
Let's measure the remaining length in the free state - compared to the new spring, there has been a shrinkage of about 1 cm.
Now, using a puller, we tighten the new spring, placing the cups approximately under the second turn from above and below.
We put a new rubber spacer on the spring and fix it with tape or tape so that the end of the rod rests against the recess on the spacer. We carefully place the spring between the levers, orient the lower end of the rod so that it rests against the recess on the metal cup of the lever.
Using a jack, insert the ball joint pin into the steering knuckle and tighten it.
Now we remove the puller and install the new shock absorber back.
Also, we put on a new stabilizer pad and fix it.
We tighten the silent blocks under load and put on the wheel.
Now let's re-measure the distance from the floor to the wing.
As we can see, the front suspension has risen by 3.5 cm, which shows us how much the old springs were already weakened - taking into account the length in the unloaded state, they lost about 2.5 cm in elasticity. Yes, and visually the lower arm has slightly changed its angle.
It remains to check the wheel alignment, since the angles of the levers have changed.
Instructions for installing new springs, struts, support bearings and the supports themselves
First of all, we put the bump stop and boot on the new rack:
Then we tighten the new springs to the required moment and put them on the rack. It is important that the lowestmost coil falls exactly into the recess on the rack, so to speak, in its home place:
When the spring is sufficiently compressed, we proceed to the supports and bearings. We take the new support, turn it over and insert the support bearing. Typically, the bearing is marked “TOP”, meaning that this side should be inserted into the support:
We put a cup on top of the support bearing, as shown in the picture:
And on top of this pancake we put an elastic band:
Now we carefully place this entire structure onto the stand rod and tighten the nut, keeping the rod from turning. It is important that the upper turn, upon final installation, lies exactly along the circle of the elastic so that there are no distortions. As a result, the entire SS20 front suspension module looks like this:
Then we remove the coupler, also checking that the spring is evenly seated at the bottom and top, and you can start replacing. If you are installing spacers, then on them, as well as on the supports, there is an arrow that should be directed in the direction of travel of the car. We put it on the support studs and install the module on the car:
We also insert the stand back to the top of the glass and immediately tighten the nuts. Well, then you will have to sweat a little to get the steering knuckle into the place where the rack is attached. To do this, I pressed the brake disc with my foot with great force, pointing it down, and tried to combine the whole thing with my hand. It didn’t work out right away, but after 10 minutes of effort everything worked out and the rack was installed on the car.
With the second side we perform the same operations and with it everything turns out much faster, since our hands are already full!
So far, no word about impressions of the new suspension, I will write a more detailed article about this tomorrow.
Do-it-yourself replacement of VAZ-2107 springs
When replacing springs on domestic sevens and other models of the “classic” series, it is important to comply with the basic requirements. It is advisable to inspect all suspension elements in detail and assess their condition. Compared to front-wheel drive cars, on a “classic” car the work with the suspension is much easier due to the fact that the springs and shock absorbers work together, but they have different fastenings. You can, for example, remove and replace the shock absorber without any problems. In this case, dismantling the spring is not required.
Design Features
When replacing VAZ springs, some motorists try to choose long or short copies. The degree of development is different for everyone, so some individuals, without going into details, simply cut the springs, shortening them by several turns. Of course, this is wrong - the operation of the entire suspension is immediately disrupted. This affects the functioning of the shock absorber, even the ease of control.
The service life of suspension elements is significantly reduced. But installing extended springs will not give the car any advantages. It is reasonable to do this only in cases where the car is operated in extreme conditions and its suspension is constantly loaded. During operation, even steel springs sag, which affects the ease of control. Therefore, sometimes it is necessary to diagnose the suspension and replace worn parts.