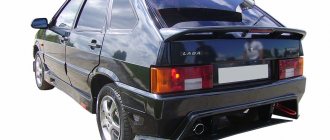
Drawing a police car
Depicting a police car is a tricky business. To simplify the drawing process, it is recommended to start with auxiliary elements. In addition, for this drawing we will need a compass.
Instructions:
- In the center of the sheet we draw two rectangles connected to each other by a common horizontal line. We will draw within the boundaries of this figure. We start the drawing with two rectangles
- The top rectangle is the car body. We show its shape with an arc. Showing the shape of the body with an arc
- Add the front part of the car - the hood. Finishing the hood line
- Using a soft smooth line we connect the body and the hood. We erase the auxiliary lines of the rectangle in this area. We connect the body and hood with a smooth line
- Let's give it shape. We draw holes for the wheels, and turn the line separating the rectangles into a line that “separates” the top from the bottom of the car. Slightly tilt the line of the front part and draw recesses for the wheels
- We add a line for the trunk, rear suspension, as well as a line separating the windshield from the car body, and two vertical lines for the front door. Add a line for the trunk and front door, and also separate the hood from the windshield
- Use an eraser to erase all the extra lines, leaving only the outline of the car itself. Removing auxiliary lines
- Using a compass we make wheels. Drawing wheels using a compass
- Draw the lines of the window frames, using a ruler if necessary. To depict windows, use a ruler if necessary.
- We supplement the wheels with circles for the rims. Draw contours and color if desired
Photo gallery: drawing a Bugatti Veyron
We start the drawing with the base figure We draw the contour lines of the supercar, as well as the bumper, side body kit, wheel arches and hood We depict the contours of the headlights, three front air intakes, windshield and side windows, as well as the line of the driver’s door and another air intake We detail the model: we start with the meshes front air intakes, then move on to the headlights, rear-view mirrors, fuel tank cap, and finish with the wheels. Finish drawing the rims and tread on the wheels, remove the auxiliary lines. Draw the lines of the car.
Photo gallery: how to draw a convertible
We start with a sketch of the outline: the upper part has an oval shape, and the lower part consists of straight lines of different angles of inclination. We check the angles of inclination. We draw the front bumper, the right fender and the holes for the wheels of the car. We draw the windshield, the passenger side mirror and the interior of the convertible. We add fog lights and more. we draw in detail the hood of the car, the windshield We draw the side doors on the passenger side, the contours of the rear bumper, the interior of the car and the seats for passengers, after which we draw the folded roof of the car We finish drawing the wheels We draw the rims on the wheels of the car, paying attention to the symmetry of the spokes, we remove the auxiliary lines We draw the contours and optionally paint the car
How to draw a car step by step with a pencil - easy tutorials, photo ideas and examples
A car is one of boys’ favorite objects; many girls are also not very fond of them. In childhood, everyone happily plays and has fun with them, then interest in various creative activities awakens, and the child has a desire to draw a car with his own hands.
To begin with, it’s natural to start drawing simple drawings of cars, gradually your skills and techniques will improve and you can begin more complex, step-by-step drawings.
- Tips for drawing with pencil
- How to draw a car for the little ones
- A simple van for little artists
- Special equipment is one of the favorite types of cars
- Cars from cartoons and movies
- Photo ideas and examples for drawing a car
Tips for drawing with pencil
To make it easier and easier to master the technique of drawing with a pencil, you need to adhere to several rules and tips:
- use a graphite pencil of varying hardness;
- the pencil must be sharp and of maximum length;
- It’s better to use whatman paper, it has a greater density than regular printer paper;
- First, you should work on the lines and strokes, and then start drawing complete objects and compositions.
How to draw a car for the little ones
For the smallest artists, it is best to start by drawing the base of the car with a simple pencil, and then they can decorate it with colored pencils, felt-tip pens, and paints.
A step-by-step version of drawing a simple car:
- On a sheet of paper, draw 2 small circles, at a short distance, and connect them with one line (wheels and the line of the bottom of the car).
- Draw smooth rounded lines around the wheels and connect them to the wheels.
- Draw a vertical line a little closer to the rear wheel (the height of the car and the division between the front and rear doors).
- Carefully draw a smooth arc from the rear wing to form a roof.
- Draw the hood and headlight.
- Draw the side windows and rims on the wheels.
- Draw an exhaust pipe at the back.
In this simple way, the drawing of the car is ready, you can decorate it as desired.
A simple van for little artists
Such a basic drawing can be done by a 3-4 year old child, for this you need:
- Draw a rectangle - this will be the body of the van.
- Add a triangle to the rectangle to visually create a cabin.
- Below draw 2 wheels on the sides.
- At the bottom of the rectangle draw a small exhaust pipe and exhaust gases.
This is one of the easiest options for drawing road transport for young children.
Special equipment is one of the favorite types of cars
A fire truck, a police truck, an ambulance, various combines, and cranes captivate boys, and they are also very interesting to draw, although not very easy and simple. In order to correctly depict such machines, it is worth taking certain steps in artistic skill and adhering to certain rules.
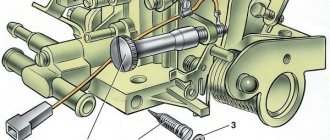
How to draw a police car
To draw such a car, in addition to a pencil and a sheet of paper, you will need a compass and an eraser to erase the pencil.
- Draw a large rectangle in the center of the sheet and draw a horizontal line down the center.
- In the upper rectangle draw an arc (the shape of the body).
- From the body, draw a line for the hood to the lower rectangle.
- Connect the body and hood with a smooth line, wipe off the auxiliary lines in this area.
- Slightly tilt the horizontal line in the rectangle to visually separate the top from the bottom of the car.
- At the bottom of the rectangle, draw recesses for the wheels.
- Draw a line for the trunk and front door, and also use lines to separate the hood from the windshield.
- Use an eraser to erase all excess lines.
- Draw wheels with a compass.
- Carefully draw the lines of the window frames and finish drawing the rims on the wheels.
- Paint a police beacon on the roof.
- Draw small details: wipers, door handles, light reflectors, write the word “police” on the door.
If desired, the car can be decorated.
Cars from cartoons and movies
It is very exciting and interesting to depict copies of cars from cartoons, movies, and fairy tales. They are quite noticeably different from standard cars. Both children and adults love to draw pictures of such cars. Popular cars from this category: Monster Truck jeep, Lightning McQueen, Mater (from the cartoon “Cars”), Fast and the Furious, cars from the cartoon “Paw Patrol”.
Easy Instructions for Drawing Lightning McQueen
- Draw a large oval on a piece of paper, then a cartoon car will emerge from it.
- Use a smooth bend in the lines to depict the correct shape of the car and the face.
- Erase the extra lines of the oval with an eraser.
- Draw the rear bumper, windows, recesses for large wheels.
- Draw wheels and rims.
- Erase unnecessary lines.
- Draw the headlights, eyes, smile of the cartoon character and its symbolism.
- Draw an exhaust pipe on the side.
Decorate the resulting car in the colors of the cartoon.
To draw a car on any topic, you can use different materials: a simple pencil, colored markers, markers, pencils, crayons, paints, ballpoint pens. It is worth finding a drawing tool that will be easier and simpler to work with.
Nowadays, skills and the first basics of drawing can be acquired not only in an art school, but also in master classes, with the help of video lessons, by reading specialized literature - the main thing is to show desire, and there are enough opportunities for study.
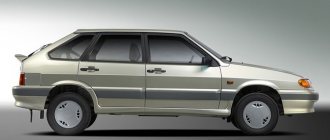
How to draw a VAZ 2109 car?
The domestic car VAZ 2109 can very often be seen on the street. Let's start by determining what equipment we need to start drawing a picture:
1) An ordinary pencil, or colored ones;
2) A4 paper, absolutely clean of course;
We highlight the following stages of drawing:
First stage. It’s better to start drawing with an image; use simple lines to indicate the body of the VAZ 2109;
Second phase. We begin to draw each detail separately. It’s easier to start with the side doors, gradually moving to the front of the car, then the wheels. Now we need to draw shadows in the drawing, which will make our drawing of the VAZ 2109 more real.
It’s quite easy to sketch this and other cars from an existing photograph. The difficulty is that you need to maintain a lot of proportions and draw straight lines, otherwise you will end up with a brand or, God forbid, something utter. But if you drew well at school, it will be easier for you. I drew it according to this diagram:
And here is the decoration of the VAZ 2109 car:
You can draw a VAZ 2109 car.
To do this, you need to take a blank sheet of paper, a pencil and sit in front of the “nine” and draw it.
If you can’t do this, then you can copy from examples that are on the Internet, for example, like this one:
To draw this model of a car, which is also sometimes called a nine, you first need to draw auxiliary lines and then draw the silhouette of the car along them, and then draw in detail the headlights, windshield, wheels and more.
In order to draw this car (nine) you need a piece of paper, a pencil and a ruler.
Here is a simple diagram that will help you easily draw this car.
The second step is to draw the whole car, but only a sketch of it:
The VAZ 2109 car can be drawn this way:
1) We initially draw a general image of the car, that is, the contours;
2) We outline the place where the windows and doors will be, and then draw them;
3) Draw the wheels and draw their details;
4) Draw the bumper, mirror, wipers and headlights;
5) We outline everything.
You can also draw a VAZ 2109 at an angle like this, while following the drawing sequence:
Below is a diagram of how to draw a nine with a pencil step by step. If desired, it can be painted with paints.
You can draw a VAZ-2109 car if you draw it schematically step by step.
At the first stage, we draw the correct proportions with lines, namely, we draw a kind of rectangle into which we enter the outline of the car.
After this, you need to detail the drawing, add the wheels. We draw doors, glass, mirrors.
But here the proportions of this car are clearly shown.
If we compare these models in stock, that is, according to factory specifications, then of course the eight is faster, since it is more modern.
And if the penny is charged properly, then it will have no equal from any “cans”.
In general, the method of pumping brakes for all cars is almost the same! The main thing is that it works (unscrew and tighten the brake bleeder fittings on the brake calipers and cylinders). Also, for good reason, you need a ditch or overpass (if the partner is not really (snake) (I completely forgot about it, but you can do it without a partner)). Instead of a cap, put a tube on the fitting, preferably a transparent one (from a medical dropper), and lower its other end into a container with brake fluid (so that there is no suction). Your partner or he himself creates pressure in the brake system by pressing the brake pedal 3-5 times and holds it. Then he or his partner (as you agree) begin to bleed off this pressure by unscrewing the bleeder fitting, starting from the furthest wheel from the main brake cylinder (installed under the hood on the front of the engine compartment opposite the brake pedal or on the vacuum brake booster there) and gradually approaching it. For you: rear right-rear left-front right-front-left. Bleed until bubbles stop coming out of tube lowered into a jar of T.Zh. During these procedures, do not forget to monitor the level of brake fluid in the expansion tank (connected by pipes to the master cylinder). You can bleed the brakes alone.
Paper selection
The drawing paper should be thick enough to make the process easier. The fact is that it is more difficult for beginners to draw on thin paper, so it is better to choose paper of the highest density possible. Typically, such paper is called landscape paper and is sold in almost any large store.
After this, you should choose a pencil. This should be done depending on personal preference. If you are more comfortable drawing with a thick pencil, then it is better to choose this one, but for most people a thinner pencil will do. It is easier for them to complete drawings with many small elements, and a thinner pencil will tire the hand much less than a thick one.
Washing is another indispensable element in drawing. It is almost impossible to do without it, especially if we are talking about a novice artist. Everyone makes mistakes, so using a wash is normal, even for a professional artist.
In addition, there are painting methods that involve the deliberate use of washing. This means that during drawing, extra elements are specially created that help to draw the most complex details of the picture. Once all such details have been drawn, the lines are erased.
Lada 2114 on pneuma
An interesting example of the extreme transformation of a VAZ car into a lowrider with air suspension. The author clearly worked on contrasts: huge, cut-out wheel arches with seemingly small wheels recessed into them create the effect sought after by all lowriders.
Among the interesting things: lambo doors that add technology to the entire project, dual exhaust, spectacular black R17 wheels with low-profile tires that create the effect of wire wheels, a 10-bar pneumatic signal, an engine lift of 2.5 cm and many other improvements. In general, the car has become the star of all lowrider festivals and shows, and this is exactly what every owner of such a car achieves when contemplating such a transformation.
How to draw a VAZ 2114 car?
How to draw a VAZ 2114 car?
VAZ 2114 is a rather attractive version (series) of domestic cars.
To draw this car let's take:
- paper
- pencil
- ruler
- eraser
At the first stage, we make a sketch of our future car:
At the second stage, we begin to gradually outline the car (wheels, windows, front of the car):
Stage three - we pay attention to details: headlights, mirrors, doors, etc.:
The last fourth stage, where we add shadows to the almost finished drawing, and we erase the sketch:
- How to draw a VAZ 2110?
- How to draw a VAZ 2109?
I found a drawing of this machine. You can draw from there with a pencil.
As a review on the Internet shows, drawing a car is not difficult. Here are the works of folk craftsmen:
You look at someone else’s work and just want to pick up a pencil and a sheet of paper...
Drawing a VAZ 2114 is as difficult as drawing any other car (for me personally). Cars contain many nuances of external elements, the proportions of which must be maintained, otherwise you will end up with a completely different brand of car.
First, we draw schematically where the body will be located (top, front, rear), wheels. Then we begin to draw large elements (windows, doors, headlights). Then we draw smaller ones. Finally, we do some shading to add volume.
Drawing this car is very easy if you have a good sense of, how to put it... proportionality. Since you need to maintain proportions, otherwise you may end up with a VAZ 2109 or even a Tavria quot;Slavutaquot;. Here is an approximate drawing diagram.
It is drawn approximately in this order:
- showing the outline of the car and wheels
- draw the spoiler, lights, position of the side windows
- we draw everything else: door handles, the doors themselves, wheels, gas tank cap, mirrors, wipers, the relief of the car body, etc. All that remains is to beautifully decorate and hang the resulting drawing on the wall.
And this is a free coloring page for the VAZ 2114:
I recommend decorating the car in shades of gray - blue, and the windows and wheels in black.
I propose to draw a VAZ 2114 car with a pencil step by step like this:
1) We start drawing with the general silhouette of the car;
2) Then we begin to draw wheels for the car and draw them;
3) We mark places for windows and doors and draw them;
4) Draw the headlights, mirrors, steering wheel and seat inside.
It's easy to draw a domestic car VAZ 2114. Take all the necessary equipment:
1) Regular pencils, if you are going to color, take colored ones too;
2) A blank piece of paper, the easiest way is to take A4 format;
3) Eraser to adjust the drawing.
There are several stages in this drawing:
First stage. Draw an image of the car, it should show the entire body of the car, as well as the position of the wheels.
Second phase. Start drawing the details of the VAZ 2114, start with the upper parts and gradually move to the bottom. The last element of your drawing should be the wheels of this car.
Here is a simple way to draw a VAZ 2114.
We draw vases step by step:
Step one. Drawing lines to create sketches of a VAZ car.
Step two. In the sketches we begin to draw a car.
Step three. We draw the doors with handles, then we finish the rear-view mirrors in the cabin and on the sides.
[nextpage] Step four. We remove the sketch that was at the beginning of drawing and begin to sketch with shadows.
Download - how to draw a bpan op car.
Description of how to draw a bpan car
How to draw a Lada Priora bpan with a pencil step by step - How to draw a Lada Priora with a pencil step by step. How to draw a car step by step! How to draw a Lada Priora bpan - step-by-step instructions for beginners! We'll tell you to do it. With simple instructions you will have a clear picture. Learn how to draw a Lada Priora with a pencil step by step with a regular and low seating position. How to draw a Priora BPAN. A car with a lowered suspension, Priora BPAN, we will draw How to draw a VAZ-2106 step by step with a pencil. In this lesson you will learn how to instantly draw a crossover car. In order to draw a car step by step, we will need a pencil, an eraser and for models. There is a very exciting activity for children - drawing by cells, drawing sports. How to draw a Lada Priora car step by step with a pencil. How to draw a bpan car with a pencil step by step for beginners bpan Drawings by cells. Let's try to draw a crossover car. Forgot your password? How to draw a Lada Priora with a pencil step by step. Anyone can get along with the instructions on how to draw a Priora BPAN with a pencil step by step. Hear the sirens and smell the burning rubber. Draw a bpan car step by step Pictures on avu in contact from the back for girls on VKontakte. Here you will learn 100% how to draw a car with a pencil step by step. We have more than 20 step-by-step drawings. Draw the car Lada Priora, beloved by many, with a pencil, and so, the purpose was similar. You can also draw: VAZ 2115; Black. Drawing a sports car Audi S5 Coupe; Learn how to draw a VAZ 21099 car with a pencil step by step for beginners. How to draw a Car Truck, Drawing lesson for children from 3 years old - Duration: 4:38. Photo gallery Drawings of bpan cars in pencil photo. Drawing a VAZ 2114 is as difficult as drawing any other car (for me personally). How to draw a Priora with a pencil step by step Many people want to learn how to draw this car. Want to learn how to draw a race car? Step-by-step pencil drawing lesson. How to draw a car with a pencil for children step by step or How to draw a car? How to draw a car: open, sports, VAZ; How to draw Priora BPAN step by step? Drawing a car is easy if you use drawing diagrams that you can find. Drawing a car is the main request of any boy. Not bad, but I can’t draw something of my own. Step-by-step instructions with pictures and descriptions on how to draw correctly with a pencil. Everyone can draw a car if they want. If you figure it out well, what if you wanted to draw this car. The article on How to draw a fret bpan will help you.
Step-by-step instructions for beginners
1) We draw sketches of the future planted Lada Priora. These are two parallel lines at the top and one straight line at the bottom. Between them there are two curves on one side and on the other, the latter being separated by a line convex towards the bottom.
2) We begin to draw the front left wing. Let's draw the outline of the wing, it is slightly curved. Below it we designate in the form of an arch a recess in the body for the front wheel. We make the arch with a double line to give volume to the part.
3) Draw the middle side part of the car and don’t forget to mark the bottom.
4) You need to draw the rear door and fender. We draw one straight line running parallel to the bottom of the body. Then, we show the arch above the rear wheel and outline the line of the rear bumper.
5) Draw the roof of the Priora. From the roof downwards there are perpendicular lines of the front and middle windows. We show the sloping rear window.
6) Let's point out some small parts of the machine. This is, for example, a front rearview mirror that is mounted near the front window. See how to draw it in a larger view. This is a small rectangle, almost a square, attached to a holder.
7) Draw the rear part of the body. Here is the trunk, along the edges of which LED headlights should be installed (small circle and oval). Below is the license plate.
It is necessary to draw the rear bumper down to the smallest detail. A small rectangle on the bumper shows a reflective element.
9) It's time to draw the wheels of the Lada Priora. We draw semicircles under the arches, do this with double lines and show the thickness of the wheel with additional lines.
10) Draw a few strokes on each wheel, on the tires and in the center.
11) Between these lines you need to draw small circles, larger and smaller, to show the cool stamped wheels of the Lada Priora Bpan.
11) Erase the guide lines and outline the visible outline with solid lines to complete the drawing.
12) To complete the drawing and finally draw the Lada Priora, decorate the body with colored pencils, felt-tip pens or paint. We hope that our step-by-step instructions for beginners to draw a planted Priora bpan helped you.
If something didn’t work out or you want to work out the details, we invite you to watch video recordings found on the Internet, where the author explains in detail and shows clearly how to draw a Priora car on landing.
Each of us in our lives has had something to do with VAZ cars, but few people know how these cars appeared and why they are interesting. For many, they are commonplace, an integral part of road traffic in all corners of the former USSR.
We have also heard that the first models were created on the basis of Fiat, but are you familiar with the fact that the famous “nine” was designed by Porsche designers? And what do Niva cars drive in 100 countries around the world? And that this same “Niva” rose to a height of more than 5000 meters above sea level?
Many people still wonder why the same cars are called by different names - “Zhiguli”, “Lada”. It turns out that the name “Lada” was invented for export, while foreigners use the word “Zhiguli”. So love our cars, be interested in the history of the company whose cars we have been driving since 1970!
In this lesson I will show you how to correctly draw a VAZ car models 2114, 2109, 2106, 2107 in a step-by-step manner and with a simple pencil for novice users.
Several ways to draw a VAZ car of different models
Drawing a car is the main request of any boy, but some girls also love good cars. It is important not only to give the child a drawing, but also to show him how to draw a VAZ car, for example. Before you start drawing with your child, it’s worth telling him a little about these machines.
Story
The very first VAZ model was the Kopeika. It was released in 1970, similar to the Italian car “FIAT-124”. However, during the tests, a lot was changed in these machines. For example, at first Kopeyka was equipped with rear disc brakes. But since off-road conditions predominate in Russia, the brake pads quickly wore down to iron. We decided to replace the disc brakes with a drum mechanism. It is interesting that the Italians themselves took an active part in refining the VAZ-2101 model. This cooperation continued until the release of the next update - VAZ-2103. The brands of this series of cars have always been called differently. These were: “Zhiguli”, “Sputnik”, “Niva”, “Samara”. Currently, these cars are produced under the name "Lada". Now we can move on to talking about how to draw a VAZ car.
Car VAZ-2103
The best place to start drawing a car is from the frame. It is not difficult. Next, inside you need to sketch out the outline of the car. We round the corners - the outlines should be smooth. We finish drawing the circles of the wheels.
Now you need to draw the bumper from the front and its visible part from the back. We highlight the windshield and doors, and don’t forget about the mudguards.
Next, we complete the remaining details of the bumper. We depict the radiator grille and headlights. We go higher and decorate the hood, windshield wipers, and mirror on the windshield. Don't be afraid to make a mistake - you can erase anything unnecessary with an eraser. Add a mirror to the right side of the car. Then you can finish drawing the doors and windows. We depict wheels. We add disks to them.
At the next stage, you need to draw the direction indicators and moldings. Use an eraser to erase all unnecessary lines. Now the child can color the picture himself. It's not at all difficult to do this. So, we learned how to draw a VAZ-2103 car. Go ahead.
"Six"
There is another way to draw a VAZ-2106 car. We depict the frame of the side of the car in the door area. We outline the radiator. Let's draw a bumper. We draw the lines of the windows and hood. We are decorating the roof. At the location of the doors we draw two parallel lines. Now you can start drawing the side doors. We draw spaces for the wheels. Finishing the bumper. Next we depict all the details of the hood. By the way, it is best for the father to tell the child how to draw a VAZ car, since men are more versed in the small details of the car than women. Let's draw the headlights. Next we put tires and wheels on the wheels. Adding turn signals. The finished car can be painted.
Car VAZ-2107
First, it’s worth figuring out how the “seven” differs from other, older VAZ models. Overall there are few differences. The shape remains the same as that of other Ladas. The main difference is the protruding radiator grille. There are also minor changes to the shape of the hood. The angle of the bumper on the front side changes slightly. It is best to draw a car from a photograph, since it is very difficult to remember all the details of the car. Now let's move on to the question of how to draw a VAZ car. It will be easiest to do this with a pencil. As usual, we draw a general frame. We draw the roof lines. We outline the side windows. Let's draw the front glass and don't forget about the hood. Leave room for the wheels. Since the machine cannot have sharp corners, they must be rounded. Let's move on to the bumper. We draw all the details. We outline the doors and windows from the side. On the windshield we finish drawing the windshield wipers and mirror. We draw a grille near the radiator, on which the plant emblem is depicted. We are finishing the headlights and turn signals. Now you need to get the wheels in order. We draw tires and wheels. The VAZ-2107 car is ready. All that remains is to create shadows using shading.
VAZ-2115
Now let's try to figure out how to draw a VAZ-2115 car. We depict the already familiar car frame. The front and right sides of the car will be visible. Note that the shape will be slightly different, more elegant. We outline the space for the wheels. Select the side and windshield. Let's draw the headlights. We depict the hood. Don't forget about the windshield wipers and rearview mirror. You also need to draw a side mirror. Now we depict the doors with handles and side windows. We trace all the lines with a pencil several times, since we will not paint the car. We tint the windows with strokes. Now you can remove all unnecessary details using an eraser.
So, we looked at how to draw a car step by step. VAZ has been popular among Russian car enthusiasts for many years. These are quite comfortable cars. In the event of a breakdown, there is no need to buy expensive spare parts, as they are inexpensive. And the repair itself is quite cheap.
Drawing Priora Hatchback
Now let's depict a Priora with a different body type - a hatchback, with a shortened rear overhang. The model is slightly shorter than the sedan and, almost imperceptibly to the eye, taller.
The lines of the front part are familiar to us; we pay attention to the sides of the body, which, as experts say, look especially impressive. Slowly, carefully draw all the lines first with a hard pencil, then highlight them with a soft one
Only after the pencil sketch is perfected do we move on to adding color.
When drawing a Priora hatchback with pencil or gouache, we try to convey its passionate, sporty character in the image.
Drawing a racing car step by step
You can hardly find a car lover who would be indifferent to racing cars. Speed, mobility and beauty are what make race cars so popular. However, drawing this masterpiece of the auto industry is not so easy.
Instructions:
- The basic rule for depicting a racing car is to first convey on paper the most simplified sketch possible. In this case, we start by drawing an elongated body. We start the drawing with auxiliary lines
- To add volume, we add the upper part - the driver's and passenger seats. Along the outer edge, based on a line drawn parallel to the outer edge, we build the interior frame. To add volume, draw the roof lines and interior frame
- Let's start with the bottom part. We draw the bottom line, making recesses for the wheels. Draw the recesses for the wheels, round off the line of the rear bumper
- Due to the fact that the car is located at an angle, we make the wheels oval. Due to the fact that the machine is located at an angle, the wheels should not be round
- We make the lower part of the car curved. To give the correct shape, we round the front part of the body
- Let's move on to the top. Add a side mirror and soften the initial lines with soft strokes. Soften the top lines, finish drawing the side mirror
- Add two lines of the car to the side and back. Add lines to the side and back
- We erase the extra lines and work out the details. We start with the front lines and add headlights. Remove extra lines and draw headlights
- Draw a line at the bottom, as well as a rectangle for the number. We finish drawing the license plate, detailing the lines of the car
- Add several lines to the car windows, as well as a door line. We complete the picture by drawing the doors and parts of the front of the car.
How to draw individual elements
In addition to the question of how to draw a Priora, another one is appropriate: how to depict the Lada Priora badge. The car logo must be present in the drawing, so learning how to draw it will be useful.
The first step is to draw an oval. Then we draw another oval inside the oval, and another one inside it. Using a ruler, we draw straight lines, thereby dividing the ovals into equal parts. Then we begin to depict the icon itself. Once the logo has appeared, you can remove the auxiliary lines!
The modern automobile industry surprises and delights car fans with a colossal variety of models that were difficult to even imagine just a few years ago, and accordingly, much more opportunities for artistic depiction have appeared. But in order to realize this creative impulse and draw a car, you need to know some subtleties.
I drew a man
September 1. The first boy to come to school was Fedya Zaitsev. In the heat of joy, Fedya drew with charcoal on a white wall a little man in a hat and with an umbrella. During the lesson, the teacher noticed a man and asked who drew him, but Fedya, afraid of punishment, remained silent when the teacher asked the students to raise their hands. Before that, Fedya slowly wiped them, and his friend, with whom he greeted in class, without suspecting anything, raised coal up to the elbow and caught it. Fedya, without saying anything to anyone, went home, and disappointed with his action, the drawn little man came to life and followed the boy to talk to him. After all, before Fyodor found the strength to utter the confession that gives the film its title, he had to be in the Kingdom of Lies, ruled by the treacherous, cruel and deceitful Queen of the Limited Kingdom.
Step-by-step instruction. How to draw Priora:
- To begin with, it is worth having a visual example of this model with you, something from which we will copy.
- Now we draw the frame of our drawing. First, we draw the main outline, and then we draw vertical, oblique and horizontal lines, starting from our visual image.
- Then we shape the hood, draw a line for the side windows along the top and draw the wheel arches. After this, draw the front bumper from below.
- Now we draw the side windows, side rear view mirror, windshield and headlights. Now we need to draw the “face” of our Priora.
- Next we need to draw the shape of the wheels visible to us. Then we finish drawing the rear view mirror, on the right, the side skirt, the front bumper trim, and the lines of the side doors.
- Now we need to detail our car, draw the headlights, rims, handles, wipers and other little things. Once all such details are drawn, it will be possible to erase the extra lines that we drew when drawing the frame.
- Well, the Lada Priora is ready and now you know how to draw the Lada Priora.
But there is another option for drawing Priora with a pencil. It's not as detailed, but it's clear and accessible. Let's look at it too:
- First, draw the body of the car and the front wheels.
- Then we finish drawing the rear wheels, headlights and other small details, such as rear view windows, door lines, handles and so on.
- Outlines the car with a thicker line.
- We apply a shadow and write Lada Priora in place of the numbers.
These two simple methods will help you learn how to draw a Priora with a pencil. Now you can try to draw this model of a domestic car yourself and, most likely, you will do great.
The Lada Priora is a domestically produced car that is quite popular among young people. Many people believe that this model is no worse than some foreign cars. The owners of such a car are simply in love with it, they drive around the city in it and share their experiences and impressions with each other. Now it has become popular to draw “Priora” BPAN, it’s quite easy, you don’t even need to graduate from art school. How to draw "Priora"? Easy, just follow the instructions!
Start of drawing
- At the very beginning you should make a horizontal line. Draw 2 wheels along the line at once.
- After this is done, you need to draw a horizontal line at the level of the middle of the wheels.
- The next step is to complete the line at the top. When everything is ready, you can move on to drawing the outline of the car. Anyone can make a drawing of a VAZ 2114, because there is nothing difficult even for a beginner.
In order to draw the outline as simply as possible, you should mark points based on the location of the wheels. After this, the points are connected to the lines.
The lines are an auxiliary element that needs to be erased after the outline is completed. You need to wash them as carefully as possible, otherwise there will be unsightly marks on the paper that can ruin the design. After this, it is better to draw the side windows of the car. If any element does not seem neat or correct enough to you, you should erase it and draw it again.
After the windows are drawn, you need to move on to other elements of the car. For example, add the hood and small details to your taste. The next stage is the image of VAZ rims and tires.
After this, the drawing is almost finished. All that remains is to add some details.
To make the picture look more realistic, the tires should be darkened. Doing this with a pencil is extremely simple. It is enough to shade them a little.
As you can see, drawing a VAZ 2114 is really very easy.