- Replacement or welding
- Preparatory work
- Installation process
The problem of a spar failure on a VAZ 2108/2109 is an unpleasant situation, but this does not mean that it cannot be corrected. There are many ways to fix the problem: replacement or welding, do-it-yourself repair or in a workshop. You will learn further how to make the right choice.
Weak spots
What weak points does the body of the domestic nine have? Let's try to find out.
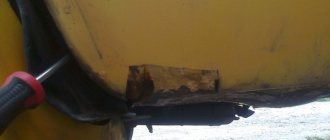
If rotten or deformed elements of the car body are detected, they must be removed and appropriate measures taken to restore the integrity of these areas.
The most vulnerable areas of the VAZ 2109 body include:
- Front floor, reinforced sills, doors, fenders and rear underbody;
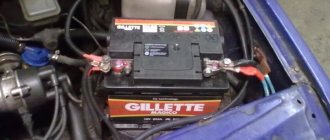
- The hood has relative endurance, but over time it begins to lose its former properties. The area above the battery is especially affected. This is where Nine owners most often notice the formation of rust;
- A noticeable problem that many drivers face is the fuel tank floor;
- Optics reflectors and a muffler also cannot boast of a long life without the appearance of signs of rust.
Corrosion is obvious
Dealing with problems in general terms
To get rid of the problem of rust formation on the body, you need to do some work. On your own or with the help of specialists, decide for yourself.
- Disassemble the engine compartment, drain the coolant and remove the radiator.
- Remove all doors.
- If there is an amplifier (TV) in front, then it will also have to be disassembled.
- Using a grinder, all damaged areas are cut off;
- If the wings or panels are rusty, they will have to be cut off.
- If holes or holes have formed due to corrosion, they can be welded or patches can be used.
- It is recommended to additionally cover areas that are not highly resistant to corrosion with metal inserts.
- Experts advise strengthening mudguards with additional inserts and then securing them with spot welding.
- New body parts that are installed in place of rusted ones must be adjusted in accordance with the standards.
- After processing, the wings and sills are secured with screws, bolts and welding.
- Restoring the geometry of the body is a mandatory activity, on which most of the time is spent. To do this, you will need a bench machine on which the machine is fixed and adjusted in accordance with the norms of the control points.
- The next stage is welding a new floor, if required as a result of assessing the condition of the body. When restoring the floor, patches, connectors and amplifiers are used. At the final stage, the floor is covered with anti-corrosion compounds.
- It is easier to purchase new arches than to try to restore old ones. They can be coated with resin and waste oil mixed together. This mixture is excellent at resisting rust. Just do not use this composition to treat the bottom under any circumstances.
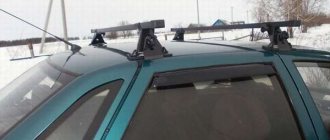
During body repairs, it is often necessary to jack up the car. If the jacking areas are rusty, use a support beam to lift the car.
Holes, rust
Often, the body is repaired independently if small areas are damaged, dents or holes are formed due to the effects of rust. In addition to correcting the geometry, painting and polishing are performed.
More serious deformations and damage caused by collisions and road accidents necessarily require contacting specialized workshops. Here, focusing on control points and using professional equipment, you can restore the body as correctly as possible without disturbing its geometry, maintaining rigidity and other factory parameters. Sometimes they can even be improved.
Bumpers on the “nine”: repair and replacement
Often the rear and front bumpers on the “nine” are removed to repair them or to restore other parts of the body. You will still have to learn how to remove them correctly and without problems, no matter how you look at them, if the owner intends to carry out body repairs on his own.
Dismantling
So, in order to remove the rear bumper:
- On the side we find the nuts that secure the bumper to the body and unscrew them (as a rule, there are 2 fasteners on each side);
- We find the front nuts and now unscrew them (it is recommended to hold the bumper so that it does not fall).
The front bumper is removed in the same way, only here you also need to remove the plastic fender liners.
Painting
The preferred color of bumpers on the “nine” is an eternal topic of discussion among fans of this car model. Many are on the side of the classic black color, although there are also those who believe that the color of the bumper should be in harmony with the color of the car.
Be that as it may, painting and decorative repairs are not difficult. The bumpers will need to be dismantled and thoroughly inspected for any deformations. If there are any, then you will have to straighten the elements and clean the remaining parts from old paint and rust.
Attention. If the bumper is plastic, then its defects can be repaired with putty.
Plastic bumpers can be easily removed from rust and paint using 200-400 grit sandpaper. If there are holes in the bumper, they can be closed with pieces of plastic removed from old bumpers or other plastic elements. As you know, plastic can be glued together well with a soldering iron with a power of 40-60 W.
In general, parts of a damaged plastic bumper can be fastened in 4 ways.
- By melting the plastic of the bumper itself or additional linings. In this case, the width of the soldered seam can be left at 1.5 cm, and as for the depth of the solder, it should depend on the thickness of the bumper.
- By connecting with parallel seams. In this case, ordinary wire, nails with the heads removed, and other improvised means will help. You just need to solder these peculiar fasteners on the back side of the bumper.
- A more complex option involves the use of flexible wire, preferably copper. It is already soldered in the same way as method 3, only with a zigzag, a snake from the inside. If it is not possible to carry out this method on the back side of the bumper, you can also make a snake from the front side.
- The grille will connect the bumper pieces together more firmly than anyone else. To do this, you need to arm yourself with a net (a decorative piece will do).
If you cannot find similar pieces of plastic, you can use other materials:
- The same grille, bent to the shape of the bumper. After the mesh is soldered into the bumper, you need to take some plastic similar in elasticity to the bumper material, and melt it, apply it to the mesh. The boundaries of the standard plastic must be carefully aligned with the edges of the applied material. After the plastic has hardened, everything must be smoothed and sanded;
- You can build up the missing part of the plastic with putty. Only it will need to be mixed with epoxy. It is necessary to carry out grinding at the final stage;
- The putty is also mixed with fiberglass.
Device manufacturing process
Such an agricultural device as a walk-behind tractor has been used by summer residents as a working machine for many years. Thanks to him, a person’s labor in carrying out land work has become noticeably easier. When installed on an adapter with a seat, it will turn into a mini tractor. Picture 1.
With the help of a small tractor it is very convenient to cultivate the soil, mow the grass and prepare the ground for planting a new crop. In addition to working in the fields, a mini-tractor will be useful when transporting seedlings, fertilizers for plants or heavier objects.
Figure 1. Preparing the walk-behind tractor.
In this matter, an important role is played by the trailer (trolley), which is connected to the walk-behind tractor. Its main function is to transport heavy loads, construction materials and other agricultural items.
Technical condition assessment
Before repairing the body of a VAZ 21099, it is necessary to assess its technical condition and decide what body work needs to be done and whether it is advisable to carry it out from an economic point of view.
To do this, visually inspect the surface of the body for:
- dents;
- chips;
- scratches;
- peeling of the paint layer;
- presence of rust (pay special attention to the sills, wheel arches and bottom).
The problem with any Tolyatti-assembled car, including the VAZ 21099, is the poor quality of the metal, the low, insufficient level of anti-corrosion treatment of the main elements of the body structure.
If the car has been in an accident, the geometry of the body is checked. It is impossible to do this with your own hands; you need a special stand, which is available only at specialized service stations, after which the factory geometry of the load-bearing elements is restored.
Then we decide on a budget. Body repairs can be major or local, partial. For VAZ 21099, when rust appears and the paint layer peels off, a major body repair is recommended, because local repair is a temporary solution, a deferment of the sentence. It’s better to invest once and do everything yourself, including with your own hands, than to restore it gradually, which leads to a decrease in the performance characteristics of the car, the appearance of hidden defects and more significant financial costs in the end. After all, the build quality of domestic cars is extremely low, and the attempt to create a sedan based on a station wagon was a very dubious design decision, which is confirmed by the practice of operating the VAZ 21099.
Preparatory work and elimination of minor damage
Where to start repairing the VAZ 21099 body? In any case, it must begin with an assessment of the technical condition of the car and determining the scope of body work, its feasibility and cost. To do this, you need to inspect the car and identify:
- dents and other deep damage;
- possible chips;
- scratches;
- peeling of paintwork;
- presence of rust.
It is possible to eliminate minor damage yourself if you have special tools and devices that every car owner has. The car's structure allows you to perform simple manipulations after dismantling some body elements. First of all, you need to remove the following parts:
- doors;
- trunk top;
- hood;
- radiator grille;
- bumpers.
Wings of the "nine"
The fixation of the front wings on the “nine” was done quite well, if we mean ease of removal. Just a few bolts hold them in place. Therefore, no welding is required to dismantle them; you just need to arm yourself with a pair of good shaped screwdrivers and an 8-size socket with an extension.
- Remove the fender liners, which are held on by self-tapping screws;
- The fender bolt holding the body element from below at the threshold is unscrewed;
- Two more bolts hold the wing on the inside;
- You will have to completely dismantle the bumper or unscrew its side fastenings, and then move it to the side to gain access to another bolt securing the wing;
- Finally, it remains to remove a few bolts securing the wing from above.
It is also not customary to tinker with a wing if it is deformed. You can easily replace it with a new one, especially since it is inexpensive - 1200 rubles. If you use auto-disassembly, you can buy the part even at half the price.
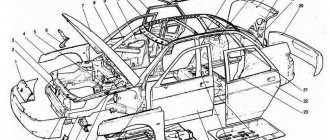
What do body geometry control points mean?
Control measures are needed to correctly measure the geometry. Most of them are technological holes. They are located in certain parts of the body. Often this role is played by basic structural elements: radiator frame, aprons, mudguards, bottom, license plate frame. The main thing is that they must be in a horizontal or vertical plane.
Typically, when checking geometry, the centers of control points are taken as a basis. However, this only applies to small, medium-sized holes. If their diameter is too large, the outer parts are used as a measure. In some cases, the distance between the apexes of fastening the suspension elements, which affect the wheel alignment indicators, is measured. To obtain a more accurate result, it is also possible to fix the wheel position angles.
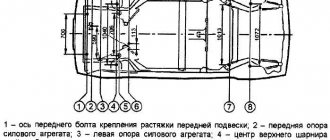
Scheme of control points and angles of the car body geometry
If the car body is severely deformed after an accident, undamaged parts of the car are used as points. Starting from a flat plane, specialists quickly identify inconsistencies and deviations. The length is measured between the marks located on the diametrical zones of the machine.
Lighting system
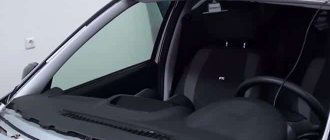
The factory lighting system of the VAZ 2109 is quite good, but does not have a very attractive appearance. The problem with the headlights offered for replacement is their low quality, so you need to make your choice carefully. By purchasing and installing low-quality but beautiful headlights, you will significantly worsen the lighting, and this will negatively affect traffic safety. The lighting system can be modified as follows:
- replacing the headlight unit;
The plastic on taillights often becomes cloudy, which impairs its appearance and quality of lighting. To fix the problem, you can buy new plastic, but sometimes it is enough to polish the one you have. This will improve the appearance of the lights and the brightness of the lighting, making the car more visible at night and in fog.
Video: tuning rear lights
Possible consequences
The correct geometric parameters of the car are the safety of the driver and passengers. Relative to the position of the power elements of the body, the angle of each of the wheels of the car is set. If the geometry is violated, the wheel alignment measuring system will never meet the standard. If the body moves relatively little, the technician will adjust the position of the wheels, but not for long.
Changes in geometry lead to the fact that the bottom is gradually deformed, folds appear in long body elements in the intervals between welding points, and the safety characteristics of the structure are noticeably reduced.
In a head-on collision, the engine should collapse underneath. If the dimensions of the body are violated, the engine will fly into the cabin, the risk of death for the driver and passenger increases by 50%.
Technical condition assessment
Before repairing the body of a VAZ 21099, it is necessary to assess its technical condition and decide what body work needs to be done and whether it is advisable to carry it out from an economic point of view.
To do this, visually inspect the surface of the body for:
- dents;
- chips;
- scratches;
- peeling of the paint layer;
- presence of rust (pay special attention to the sills, wheel arches and bottom).
The problem with any Tolyatti-assembled car, including the VAZ 21099, is the poor quality of the metal, the low, insufficient level of anti-corrosion treatment of the main elements of the body structure.
If the car has been in an accident, the geometry of the body is checked. It is impossible to do this with your own hands; you need a special stand, which is available only at specialized service stations, after which the factory geometry of the load-bearing elements is restored.
Then we decide on a budget. Body repairs can be major or local, partial. For VAZ 21099, when rust appears and the paint layer peels off, a major body repair is recommended, because local repair is a temporary solution, a deferment of the sentence. It’s better to invest once and do everything yourself, including with your own hands, than to restore it gradually, which leads to a decrease in the performance characteristics of the car, the appearance of hidden defects and more significant financial costs in the end. After all, the build quality of domestic cars is extremely low, and the attempt to create a sedan based on a station wagon was a very dubious design decision, which is confirmed by the practice of operating the VAZ 21099.
The geometry of a car body is understood as a certain set of distances between special control points. The latter make it possible to determine how accurately the body elements, components and mechanisms of the vehicle are located in relation to each other. The location of control points is indicated in the technical passport of the manufacturer. When determining the correct geometry of the car body, first of all, you need to pay attention to:
- front and rear track width;
- distance between front and rear axle (wheelbase);
- the distance between the side members, as well as their length;
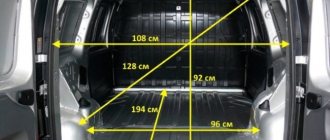
- trunk and engine compartment dimensions;
- dimensions of door and window openings.
Bumpers
It is sometimes necessary to remove the front and rear bumpers to replace them or repair other body elements. Dismantling does not require special skills, so even a beginner can cope with this task
The only difference when removing the front bumper compared to the rear one is that the plastic fender liners will need to be additionally removed in front.
Otherwise, the dismantling and repair procedure is performed as follows:
- There are nuts on the side that hold the bumper to the body. They need to be unscrewed. Mostly on most VAZ 2109 there are 2 of these fasteners on each side;
- Now find the front bumper mounting nuts and remove them;
- When unscrewing the front fasteners, be sure to hold the bumper, otherwise it may fall and be damaged;
- If you remove the front bumper, then remove the fender liners. All removal work is completed;
Dismantling process
- Carefully examine the condition of the bumpers visually. If there are deformations or damage, these areas can be straightened;
- Old peeling paint and traces of rust can be easily cleaned using 200-400 grit sandpaper;
- If the bumper is made of plastic, all damage is repaired using special putty;
- The holes on the plastic bumper are covered with plastic elements from old bumpers or other elements that have suitable dimensions, thickness, and strength;
- Using a soldering iron with a power of 40-60 W, you can weld plastic elements.
Failure to maintain clearances
Connection of bumper elements
To fasten the elements of a damaged plastic bumper, you can use four methods.
- Melt the plastic of the bumper and additional inserts. The seam width should be about 15 millimeters. And the depth of the soldering depends on the thickness of the body element.
- Parallel seams. Wire or nails without heads can help here. These fasteners are soldered on the reverse side. A fairly reliable connection option.
- Flexible copper wire. A more complex, but also more effective method. The connection is made according to the principle of the second method, then the wire is soldered from the inside with a snake or zigzag. Some people also solder it from the front side.
- Lattice. The most reliable and durable option. Using a mesh or a piece of decorative radiator grille, the elements of the plastic body are fastened together.
Body repair is a rather complex and sometimes labor-intensive process. Based on video lessons and instructions, you can complete a number of tasks. But for complex damage, it is better to turn to professionals.
Control points of the body geometry of the VAZ 2109
MegaDED 07 Oct 2009, 16:59
Help me find Body Floor Control Points 21099
Re: body geometry, 21099
8ter 07 Oct 2009, 22:36
if anyone needs 08-09:
Re: body geometry, 21099
Fray 07 Oct 2009, 22:55
Re: Check points for VAZ 2108-099 bodies
Monaxms 06 Nov 2009, 05:00
Everything in life is relative BUT for some reason they always hit you from behind (((
Re: Check points for VAZ 2108-099 bodies
Fray 06 Nov 2009, 12:12
Re: Check points for VAZ 2108-099 bodies
Fray 03 Dec 2009, 21:45
Re: Check points for VAZ 2108-099 bodies
Fray 05 May 2011, 22:40
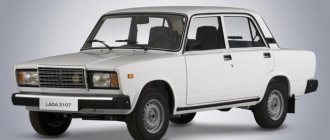
Dimensions Lada 2109 restyling 1991, hatchback 5 doors, 1st generation
| Options | Dimensions | Weight, kg |
| 1.1MT 21091 | 4006 x 1650 x 1402 | 915 |
| 1.3MT 21090 | 4006 x 1650 x 1402 | 915 |
| 1.5i MT 21093-20 Standard | 4006 x 1650 x 1402 | 920 |
| 1.5i MT 21093-21 Normal | 4006 x 1650 x 1402 | 920 |
| 1.5i MT 21093-22 Lux | 4006 x 1650 x 1402 | 920 |
| 1.5 MT 21093-00 Standard | 4006 x 1650 x 1402 | 945 |
| 1.5i MT 21093-20 Standard | 4006 x 1650 x 1402 | 945 |
| 1.5i MT 21093-21 Normal | 4006 x 1650 x 1402 | 945 |
| 1.5i MT 21093-22 Lux | 4006 x 1650 x 1402 | 945 |
| 1.5 MT 21093-01 Norm | 4006 x 1650 x 1402 | 945 |
| 1.5 MT 21093-02 Lux | 4006 x 1650 x 1402 | 945 |
| 1.5 MT 21093-20 Standard | 4006 x 1650 x 1402 | 945 |
| 1.5 MT 21093-21 Norm | 4006 x 1650 x 1402 | 945 |
| 1.5 MT 21093-22 Lux | 4006 x 1650 x 1402 | 945 |