VAZ 2114 body geometry
The geometry of the VAZ 2114 body is the most important indicator of its condition. Today, cars from the native automobile industry are no less popular than foreign cars. It is recommended that when buying a used car, you first pay attention to the condition of the body. So knowledge of its geometric dimensions helps in this case.
Body inspection using 3D measurement
This method consists of comparing the height, length and width of the main structural elements with reference options. This can only be done using special three-dimensional systems. Such a system itself establishes the planes from which the counting is made.
Width measurements are taken from the central plane. The central plane (line) is a line that conditionally divides the car along the center into equal halves. On some models, the manufacturer already places such marks in the lower or upper part of the body. Both parts of the car must be completely identical and symmetrical.
The height of the machine is measured from the main plane. This plane runs parallel to the car bottom.
From the zero plane placed in front of the car, its length is measured.
Geometry check: factory dimensions
Geometry is the exact dimensions of the VAZ 2108 body. And when checking, the most important of them come forward. As a rule, one of the main parameters of the body is the size of the side member, wheelbase, distance between the wheels on one axle, etc.
Note. When changing the dimensions of the VAZ 2108, it is imperative to observe the weight of the body and its curb weight.
No less important is the distance between the points of the door and window openings, the location of the internal combustion engine compartment, the dimensions of the trunk, and so on.
Note. Wheelbase and track width are one of the most important indicators of correct body geometry. The first coefficient is measured by measuring the distance between the front and rear axles of the car (for the “eight” it is 2460 mm), the second - by measuring the distance between the right and left wheels on the same axle (for the “eight”: 1400 mm in the front - 1300 mm in the rear).
The table below shows the original, factory dimensions of the V8 body, which will make it possible to check the metal frame for deformation and find out how much the VAZ 2108 body weighs, which is also important
Be more careful
First, remember: a car body’s geometry is in its best state only when it leaves the production “table.” And after the sale, this indicator will change while driving. Even if you do not notice any distortions, this does not mean that the car is in perfect condition. You just need to be more attentive to the operation of the car. Maybe the tires wear out too quickly? Or does the steering wheel not respond to your orders as quickly as before? All such problems can be associated with incorrect geometry. Then you should check this parameter of your car as soon as possible.
Trunk volume of VAZ-2114 dimensions and exact parameters
VAZ-2114 is a car that replaced the discontinued “Nine”, and immediately gained popularity and became in demand. Compared to its predecessor, this car model has several differences. The differences affected not only the external parts of the body, but also the interior. In particular, the VAZ-2114 has a large trunk volume. Door sill trims, moldings along the sides, a spoiler with a brake light - all this gives the car a modern appearance.
External changes affected the performance characteristics of the machine. In particular, this model has excellent aerodynamic qualities. It is stable on the road, even when driving at high speed. The combination of body colors and attached parts gives this car the appearance of a foreign car.
Thanks to its appearance, this car has aroused increased interest among people who are involved in tuning. At relatively low financial costs, such a car can easily be made into an original car that stands out from the crowd, thereby emphasizing the individuality and sense of style of its owner.
Trunk
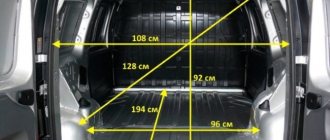
Due to the ability to fold the rear seat, this car can easily be transformed into a utility vehicle. For this car model, the trunk volume is:
- 330 dm3 with seats folded down;
- 600 dm3 with rear seats folded.
The volume in liters is the same as in cubes (cubic decimeters).
This capacity of the machine allows it to transport even large cargo, which is especially important for those who often face the need to deliver any goods or cargo for other purposes to the unloading point. With the seats folded down, the trunk volume almost doubles.
In addition, if you need to transport a large amount of cargo, or, for example, you are going on a trip with the whole family, you do not have to be limited to 330 liters of space for storing things. Various fastenings and installations are available for sale for this car model, which allow you to transport much more things than will fit in the luggage compartment.
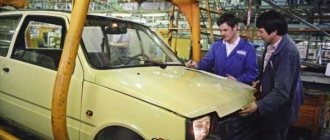
For example, you can install a roof rack. Various options for such mounts are available for sale:
- Autoboxes.
- Fastenings for sports equipment.
- Baskets.
- Expeditionary roof racks.
Thus, you will be able to make your car even more spacious and free up space for passengers.
Button control
It is very convenient when control (trunk opening) is carried out from a button
Every car owner knows that it is very important to ensure that the trunk, like the car doors, closes securely. Reliable operation of trunk locks is just as important as the reliability of the lock on a garage or apartment door.
All modern car models are equipped with a trunk opening mechanism using a control panel or a special button. Installing a mechanism with a button not only makes control more convenient, but also solves a number of problems. In particular, this solves the problem of icing of the lock, which is opened with a key.
The installation of such a mechanism can be entrusted to a specialist. But some car owners prefer to do this work themselves. To do this, you will need a steel cable, a roller, a connection button, a trunk drive solenoid and wires. The roller is installed on the wiper gear housing. If the roller is open, you can use braided cable. The easiest way to connect is to the cigarette lighter. Other options require appropriate knowledge of electrical circuits.
Control points of car body geometry
Most control points are holes in structural elements of the body. In general, any stationary points on the structural elements of the body can act as control points. You can measure, for example, between symmetrical angles.
Control points are located in vertical or horizontal planes. Their locations vary depending on the car model. Repair manuals indicate the location of specific points and the distances between them.
Measurements are made between the centers of the control holes or between their edges.
Usually the distances are measured from center to center of these holes located on opposite sides of the car. Test point holes typically have a larger diameter than the ends of the ruler. In this case, you need to measure from edge to edge of the holes.
If necessary, the attachment points of the suspension elements are measured, as they affect the wheel alignment. You can also measure the position of the wheels.
In case of emergency deformation, control points can be used to determine the central plane of the machine, based on its undamaged part. Next, the central plane will help to find out the degree of deviation of the damaged part or the correctness of the repair.
When using a measuring ruler, it is advisable to have information about the factory parameters of the distances between control points. When checking these parameters, you need to take into account what distances are indicated (from center to center or from edge to edge). If there is no information about the factory geometric parameters of the body, then you can use an undamaged car of the same model to compare distances. A comparative measurement of the opposite, undamaged part is also used.
What causes damage to the body of the “nine”
There is an opinion that Soviet cars are equipped with an “indestructible” body. It is impossible to say this one hundred percent, but it is also wrong to refute such a statement. Indeed, the diagram of which is presented in the article is made to perfection, but over time, any quality will come to an end.
VAZ 2109 body geometry
Almost all car bodies older than 5-7 years need repair. And there is nothing surprising about this. The living conditions of recent years, the huge amount of harmful substances, the general deterioration of the environment - all this cannot have a positive effect. Difficult, almost extreme, modern operating conditions also cause a lot of harm.
As a result, the state of the metal surface becomes deplorable, the internal combustion engine and parts are sent for disassembly, and instead of a worn-out but close-to-the-heart car, a new car takes its place. All this can be avoided if you know the features of the body layout, understand the intricacies and carry out preventive maintenance in a timely manner.
Body repair Lada Largus. Geometric dimensions of the Lada Largus body
| Openings | front side doors | ||
| Symbol | Name | 0 holes, mm | |
| ,Ah, a | Joint between A-pillar and roof panel | ||
| in,b | Joint between A-pillar and hood panel | ||
| With, with | Front side door hinge nut | 8 | |
| D, d | Front side door hinge nut | 8 | |
| Her | Assembly mark of the front pillar, | ||
| F, f | A-pillar assembly mark | ||
| G, g | Door threshold assembly mark | ||
| H, h | Door threshold assembly mark | ||
| L i | Roof panel assembly mark | ||
| ■J. j | B-pillar assembly mark | ||
| K, k | B-pillar assembly mark | ||
| UI | Rear side door hinge mounting hole | 13 | |
| M,m | Rear side door hinge mounting hole | 13 | |
| Symbols | Distance, mm | Symbol | Distance, im |
| Ee | 1,172 | E-f or e-F | 1,487 |
| Ff | 1,406 | E - h or e - N | 1,555 |
| Gg | -1,444 | E-j or e-J | 1,337 |
| Hh | 1,444 | Fj^nf-J | 1,740 |
| 1-i | 1,062; | F-kilig-K | 1,648 |
| JJ | 1,266 | H-i or h -1 | 1,594 |
| Kk | 1,426 | —J-knnnj-K" | 1,442 |
xn--44-6kchdmw3bgiawoo4b.xn--p1ai
Reasons for repairing body parts
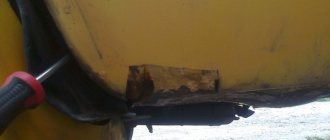
The most commonly damaged parts are the hood, bumpers and fenders of a car. The listed parts are protection for the engine, as well as for the driver and passengers in the car, so they take the entire impact in the event of a traffic accident. Therefore, these body elements must always be in good condition. Body repair is required if:
- rust appeared on metal elements;
- with minor damage to the hood and plastic parts;
- when body elements are destroyed due to a serious impact.
If rust begins to appear on body parts, and the vehicle was damaged as a result of a traffic accident, the car needs to be repaired. If traces of corrosion of body parts are detected, as well as minor damage to plastic parts of the car body, chips and scratches, it is necessary to eliminate these consequences in a timely manner, since rust can destroy other body parts.
This will lead to additional financial costs, and plastic parts may simply fall apart during operation. Often the hood of the 2114 is made of metal, but some drivers tune their car and install a plastic hood. A metal hood has a number of disadvantages compared to a plastic one: it is susceptible to corrosion, and repairs are more expensive.
Removal of damaged body elements, replacement and repair of body parts
The deformations encountered during the repair of damaged vehicles are so varied that it is almost impossible to find bodies with the same degree of damage. Many salvage bodies during restoration require mechanical action, i.e., cutting off certain parts that prevent one or another unit or component from being removed from the car (for example, front suspension, radiator, engine, fuel tank, spare wheel and many other parts in depending on the location and magnitude of the damage). In these cases, at the stage of disassembling the car, it is necessary to separate the deformed part of the body or entire panels that are part of the entire body of the welded structure. To perform these operations, a mechanized tool or a hand hacksaw, chisel, etc. is used.
The sequence of operations when disassembling and removing individual damaged body elements must be such that the repaired unit does not receive additional deformations that cause distortion of geometric parameters due to weakening of the repair site. During repairs, it is recommended to use conductors and spacers that are installed in body openings and hold in a normal position a unit that has lost support as a result of removing a deformed body element (for example, when replacing side panels and central pillars).
The technology for removing corroded or severely deformed body panels that are unsuitable for restoration depends on the method of their attachment to the body. The greatest difficulty is caused by the removal of panels that are part of a welded body, usually connected to each other by welding (contact, electric arc or gas).
Panels, which are elements of all-metal bodies of welded construction, are cut down with a hand chisel or pneumatic chisel (Fig. 20), cut with saws, scissors or gas cutters. Electric and pneumatic cutting machines with abrasive cutting discs are often used for these purposes (Fig. 21). Before performing work to remove damaged body elements, the boundaries of the area to be removed are marked.
Rice. 20. Cutting out a defect with a pneumatic chisel
Rice. 21. Use of hand-held grinding machines: a – smoothing the weld; b – cutting along the spot welding line; c – location of the grinding wheel (1 – grinding wheel; 2 – protective casing; 3 – tilt angle of about 15)
The main method of body assembly in the production process of a modern car is resistance welding, and to remove the panel it is necessary to remove the points of the welded areas (Fig. 22). Welding points are removed with a finger cutter or a specially sharpened drill using a drill by drilling through the thickness of the sheet of the panel being removed, after which the panels are separated using a chisel and hammer blows (Fig. 23).
Rice. 22. Replacement of the rear wing: a – removal (dashed lines indicate the places where the wing is cut down); b – welding of the repair part
Rice. 23. Process of removing a welded panel
To separate parts at the place of seam welding, part or all of the welded joint area is ground off on one of the parts, as shown in Fig. 21. When tool access is possible from the side of the part being removed with minimal impact on the remaining part, only part of the welded joint area is ground down. The operation is performed with a carbide cutter with a diameter of 4...6 mm using a high-speed grinder or drill with a specially sharpened drill. If access to the welding points from the side of the part being removed is not possible, then use a regular drill, drilling the welding points through from a convenient side, having previously marked the centers with a core.
To separate parts at the point of spot welding, the following technique is often used: the area to be removed is first cut off so that only a strip 15...20 mm wide with spot welding remains, which is then separated with pliers or wire cutters.
Parts removed from the body - panels, and sometimes power elements (struts, side members) - are obviously more convenient to edit separately from the assembled body. The feasibility of removing body elements is determined by the condition of ensuring the necessary strength of the body after repair and the overall labor intensity of the repair work performed.
957
Varieties
Depending on the purpose, the car body can be:
On VAZ 2114 cars the first option is installed.
According to the design features, such a spare part can be:
VAZ 2114 cars are equipped with a frame type.
The product can also be:
There are body designs:
- Painted.
- Unpainted.
- With anti-corrosion coating.
- Without anti-corrosion coating.
The body is sold in different places. It can be purchased:
- At the car market.
- In a store that sells spare parts for AvtoVAZ cars.
- In the online store.
Body of Lada Largus / Lada Largus
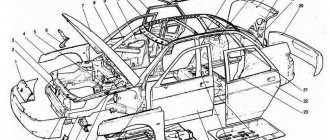
Body parts: 1 – left luggage compartment door; 2 – right luggage compartment door; 3 – rear bumper; 4 – right side window of the rear compartment; 5 – right rear door; 6 – front door right; 7 – hood; 8 – outside rear view mirror; 9 – right front wing; 10 – front bumper
The Lada Largus body is a one-piece welded structure. It is welded on a robotic line. All body parts that are prone to corrosion are galvanized. The main method of connecting body parts to each other is resistance welding, and electric welding is used in hard-to-reach places. All welds and joints of parts are coated with mastic. When making a body, after connecting its main parts, it is immersed in a special bath with an anti-corrosion compound. Then the primer and paint coating are applied. Hidden cavities are treated with a wax auto-preservative, and the bottom is covered with anti-corrosion mastic.
The volume of anti-corrosion mastic applied to the bottom has been increased by one and a half times compared to Renault Logan.
The body is designed taking into account the most advanced requirements for passive vehicle safety. One of the most important elements of passive safety is the front subframe, which has the property of redistributing impact energy. Car bumpers are made of impact-resistant material that absorbs impact energy. The car doors have metal stamped reinforcements in case of a side impact.
Due to the fact that the body has a very rigid structure, and the plastic interior parts have a gap between each other and are secured with special fasteners, there is virtually no vibration noise in the cabin (the so-called “crickets”).
The LADA Largus windshield is three-layer, it is glued into the body frame and is part of its load-bearing structure. All other car windows are tempered. The side door windows are sliding and, depending on the configuration, have either a manual or electric drive.
The side windows of the rear compartment can be opened slightly (7-seater version).
The luggage compartment doors can be opened completely, or up to two fixed positions provided for this, which is very convenient if the car is in a cramped loading/unloading space.
A modification of the car called LADA Largus Cross has unpainted black front and rear bumpers, as well as protective covers on the wheel arches and sills made of black plastic.
About choosing paint to match the body color
Theoretically, the paint can be selected according to the code that is indicated on the nameplate on the car or is stamped by the VIN code. However, very often the resulting color differs significantly from the body color. This is due to two factors: production features and the abundance of color matching systems (programs). The problem is that there is no uniform production of paint of certain shades. At automobile factories, the desired tone is obtained according to a certain recipe: a package of pigments is added to a barrel with the main color. For each batch of machines a new batch is made. And just as parts can differ from each other by a tolerance, so paints also vary slightly in shade.
At a car plant, you won’t find two barrels with a 100% color match—even cars from neighboring batches have different colors. Factory-prepared paint is not supplied to the secondary market, and during body repairs at any service center you have to select the tone. There are color matching systems for this.
largus-mcv.ru
Relays and fuses VAZ 2114
- F1 for 10 Amps (A) rear fog lights and rear fog light warning lamp.
- F2 for 10 A turn signal lamps, turn signal relay, hazard lights, hazard warning lights.
- F3 7.5 A lamps for interior lighting (both) and trunk, ignition lighting, powertrain control system control lamp, brake lamps, computer, if available.
- F4 20 A carrier, relay and rear window heating element.
- F5 20 A horn and its relay, cooling fan.
- F6 30 A power windows and their relays
- F7 30 A motor for heater, headlight cleaner, windshield washer, cigarette lighter, glove compartment light bulb, rear window heating relay coil.
- F8 7.5 A right fog lamp.
- F9 7.5 A left fog light.
- F10 at 7.5 A left side marker, lamp signaling the inclusion of the side light, lamps for illuminating the sign, engine compartment, illumination of switches and instruments, instrument lighting switch.
- F11 at 7.5 A right side.
- F12 at 7.5 A right low beam.
- F13 at 7.5 A left low beam.
- F14 for 7.5 A left high beam and a light indicating that the high beam headlights are on.
- F15 at 7.5 A right far.
- F16 30 A - a light indicating insufficient oil pressure, brake fluid level, engagement of the parking brake, low battery, instrument cluster, relay for monitoring the health of lamps, indication of control systems, reversing lamps, turn indicators and their relays, as well as an alarm if turning mode is turned on, computer, generator excitation winding is turned on at the moment the engine starts.
Location of relays and fuses of the new model
- K1 - relay for turning on headlight cleaners;
- K2 - relay-interrupter for direction indicators and hazard warning lights;
- K3 - windshield wiper relay;
- K4 - lamp health monitoring relay;
- K5 - power window relay;
- K6 - relay for turning on sound signals;
- K7 — relay for turning on the heated rear window;
- K8 - headlight high beam relay;
- K9 - relay for low beam headlights;
- F1-F20 - fuses.
Connection diagram of the new type mounting block
- K1 - relay for turning on headlight cleaners;
- K2 - relay-interrupter for direction indicators and hazard warning lights;
- K3 - windshield wiper relay;
- K4 - lamp health monitoring relay;
- K5 - power window relay;
- K6 - relay for turning on sound signals;
- K7 — relay for turning on the heated rear window;
- K8 - headlight high beam relay;
- K9 - relay for low beam headlights;
- F1-F20 - fuses.
Location of old-style relays and fuses
- 1 — relay for turning on the headlight cleaner (K6);
- 2 — rear window washer time relay (K1);
- 3 — relay breaker for direction indicators and hazard warning lights (K2);
- 4 — windshield wiper relay (K3);
- 5 — contact jumpers in place of the relay for monitoring the health of the lamps;
- 6 — relay for turning on the heated rear window (K10);
- 7 - spare fuse;
- 8 — relay for turning on the high beam headlights (K5);
- 9 — relay for turning on low beam headlights (K11);
- 10 - fuse;
- 11 — relay for turning on the electric motor of the engine cooling system fan (K9);
- 12 - relay for turning on the sound signal (K8).
Old-style mounting block connection diagram
- K1 — rear window washer time relay;
- K2 - relay-interrupter for direction indicators and hazard warning lights;
- K3 - windshield wiper relay;
- K4 - lamp health monitoring relay (contact jumpers are shown inside, which are installed instead of the relay);
- K5 - headlight high beam relay;
- K6 - relay for turning on headlight wipers;
- K7 — power window relay;
- K8 - relay for turning on the sound signal;
- K9 - relay for switching on the electric motor of the engine cooling system fan;
- K10 — relay for turning on the heated rear window;
- K11 - low beam headlight relay.
Body geometry and ways to check it
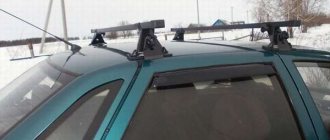
Due to the winter, constant snowfalls, 5% tint, and even the fact that the mirrors already have built-in heating, I decided to connect it
It warms perfectly, melts the ice once or twice, droplets of rain (or melted snow) soon disappear completely, so it’s a great thing! Now I don’t understand how you can drive in bad weather without heated mirrors
Need to buy: 3m. wires (it took me that much), a regular 4-pin relay + a wire block for it, a 7.5A fuse (10A is also possible), a button for heating the rear window of a VAZ 2114 + a wire block for it. FOR THE POLARITY OF THE MIRRORS WIRES, I don’t care. We remove the on-board computer, connect everything stupidly according to the diagram wiring, I also wrapped the relay with anti-squeak so it wouldn’t rattle
I downloaded the diagram somewhere, then showed it to the electrician, he approved it, made his own small changes (I changed them), so enjoy it)
Diagnostics at the technical center
In large populated areas you will definitely find a specialized technical center where they can carry out a complete diagnosis of the body geometry. Here we usually have the computer equipment we need, connected to a special stand. Diagnostics can be carried out using mechanical systems, special systems with fasteners, laser systems and computer diagnostics. The vehicle is first slightly disassembled and installed on a stand. After a kind of “scanning,” the data is sent to a computer, where a three-dimensional model of the car is created. The computer then conducts a comparative analysis of the machine data and the original model data.
The main advantage of such a check is maximum accuracy. But this method requires time and, of course, money, approximately you will have to spend several thousand rubles on this.
Basic Concepts
Body geometry refers to the exact dimensions of the vehicle established by the designers of the manufacturing plant. The main parameters of paramount importance are:
- width – both front and rear tracks;
- length of the wheelbase;
- the distance between the side members and their length.
As practice shows, a violation of one or several of the above-mentioned parameters leads to a noticeable deterioration in terms of vehicle controllability.
The secondary dimensions are as follows:
- door openings;
- windows;
- engine compartment volume;
- trunk capacity;
- car interior size.
If these standards are violated, this only leads to a deterioration in the appearance of the vehicle.
A track is the distance between coaxial wheels. Moreover, this distance is measured from point to point, which are located in the center of the tread.
In turn, the wheelbase is the distance between the axles of the car. The control points here are the middle of the hubs.
Angle of longitudinal inclination of the axis of rotation
Caster angle is a parameter that is unique to front suspensions. He is responsible for the car's handling during sharp turns.
Essentially, this is the angle that characterizes the tilt of the steering axis of the wheel back and forth.
Caster angle can be positive, negative or zero.
On sports cars, the caster angle can reach seven degrees. The main reason for the deviation is the failure (deformation) of the lower wishbone.
Thanks to the caster angle, the steering wheel returns to its original position (if the parameter is correctly adjusted).
On conventional cars, the pitch angle is positive (for example, in the Mitsubishi Outlander XL this parameter is 2.35 degrees).
Replace control points VAZ 2109
1 – installation frame; 2 – car body; 3 – front suspension cross member mounting bracket; 4 – anti-roll bar mounting bracket; 5 – straightening device with arrow and hydraulic device
A significant part of body repair work occurs on damaged vehicles, which, in most cases, require checking the geometry of the attachment points of components and assemblies of the vehicle chassis.
To control the geometry of the mounting points of the chassis units shown in Fig. Basic dimensions for checking the attachment points of units, as well as for performing complex body repairs with simultaneous control, a body repair and control unit is used, in combination with straightening devices.
Basic dimensions for checking the attachment points of units
0 – baseline; 1 – upper radiator mount; 2 – fastening the steering gear housing and the pendulum lever; 3 – axis of the brake and clutch pedals; 4 – center of the steering mechanism; 5 – center of the rear wheel; 6 – mounting of rear suspension shock absorbers; 7 – rear muffler mount; 8 – front muffler mount; 9 – fastening of the transverse rod of the rear suspension; 10 – rear wheel axle; 11 – fastening of the upper longitudinal rods of the rear suspension; 12 – fastening of the lower longitudinal rods of the rear suspension; 13 – center of the front wheel; 14 – attachment points for the front suspension cross member; 15 – mounting of the anti-roll bar; 16 – lower radiator mount; 17 – car axle; 18 – upper radiator mount; 19 – rear mount of the power unit; 20 – hand brake mount; 21 – fastening of the cardan shaft support; 22 – mounting of rear suspension shock absorbers
Body floor check points
1 – intersection of the axes of the front anti-roll bar mounting bolts with the surfaces of the side members; 2 – center of the axes of the lower bolts securing the steering gear housing and the pendulum arm bracket; 3 – intersection of the centers of the front technological holes of the front floor side members with the surfaces of the side members; 4 – intersection of the rear technological holes of the front floor side members with the surfaces of the side members; 5 – center of the axes of the bolts for fastening the lower longitudinal rods; 6 – center of the axes of the bolts for fastening the upper longitudinal rods; 7 – intersection of the axis of the crossbar mounting bolt with the body bracket; 8 – intersection of the center of the rear technological hole of the central reinforcement of the rear floor with the surface of the amplifier; 9 – center of the axles of the front anti-roll bar mounting bolts; 10 – intersection of the centers of the axes of the lower mounting bolts of the steering gear housing and the pendulum arm bracket with the surfaces of the side member mudguards; 11 – center of the front technological holes of the front floor side members; 12 – center of the rear technological holes of the front floor side members; 13 – intersection of the axes of the bolts for fastening the lower longitudinal rods with the outer surfaces of the body brackets; 14 – intersection of the axes of the bolts for fastening the upper longitudinal rods with the outer surfaces of the middle side members; 15 – intersection of the axis of the bolt securing the transverse rod with the body bracket; 16 – center of the rear technological hole of the rear floor amplifier; 17 – longitudinal axis of the car; 0 – reference line
Using the control points of the body floor, you can, without dismantling the chassis components and assemblies, check the position of the floor elements during installation.
Properties of acrylic paint
- viscous liquid of medium fluidity, which dissolves well in water.
- has a specific, but not pungent odor;
- dries quite quickly, after which a durable film is formed that protects the treated surface.
- due to its elasticity, acrylic paint lends itself perfectly to mechanical loads without cracking and maintaining a smooth surface;
- the paint does not lose color when exposed to direct sunlight;
- after drying, it is soluble in water, which allows it to be used outdoors and not need to be covered with an additional layer of varnish;
- if the working surface has been thoroughly cleaned and degreased, acrylic paint adheres well to the surface;
- acrylic paint dries very quickly;
- goes well with other types of water-soluble paints.
Body repair of the VAZ 2108 can be divided into two conventional types
Elimination of corrosion
In this case, using a welding machine, having previously cut out and cleaned the rotten areas, we weld patches of “fresh” metal.
The same effect is achieved without welding using compositions based on epoxy resins and fiberglass. These methods are used on small areas of corrosion.
Restoration of plastic body elements
Fiberglass and epoxy resin are also useful here, with the help of which cracks are glued from the inside and broken parts of the cladding are restored. Also, for reliability, cracks are additionally soldered with a soldering iron.
Restoration and replacement of aluminum parts
In this case, you cannot do without argon welding.
Although the skill and imagination of domestic craftsmen did not show such tricks.
Repairing scratches and chips with your own hands
With the help of modern technologies, there are a great variety of options for restoring paintwork.
Serious damage to the paintwork will have to be repaired using primer, putty and an aerosol can.
When is wheel geometry adjustment necessary?
A wheel is a unit that is made using different materials, each of which has individual chemical and physical properties (weight, center of gravity, density, etc.).
If there are no deviations in the adjustment parameter, then the car has:
- Excellent handling;
- Slight tire wear;
- Sufficient maneuverability;
- Good stability;
- Minimum fuel consumption;
- No additional braking when coasting;
- Low tendency to skid during turns.
Wheel geometry adjustment will be required in the following cases:
- After repairing the chassis, namely replacing suspension arms, ball joints, steering rods, pendulum arms and steering ends. It is also recommended to do a wheel alignment after installing new shock absorbers or struts, springs or silent blocks. In the latter cases, re-checking the wheel alignment is recommended after two to three thousand kilometers.
- After completing work related to adjusting the ground clearance - installing spacers, replacing shock absorbers or springs with shorter or longer ones.
- After “re-shoeing” the car. Checking the wheel alignment is especially important if the tires were stored improperly (lying on their side).
- Every 18-20 thousand mileage or annually (here it all depends on what comes first).
- After hitting an obstacle or after an accident.
- After completion of the break-in or in case of purchasing a used car.
Where and what body should I buy?
If the owner of a VAZ 2114 car has a need to purchase a new body, then you need to decide where to purchase such a spare part. In total, the motorist has three options:
- Visit a market where auto parts are traded.
- Go to a store that specializes in selling auto parts.
- Visit the online auto parts store.
Each of these options has its positive and negative aspects. For example, the advantages of buying at the car market are a large selection and reasonable cost. But here they can sell used spare parts or low-quality Chinese counterfeits. The body performs a protective function, so it must be strong and reliable, able to withstand the impact of a collision with another car.
The advantages of a specialized store are the availability of original designs, the ability to choose, and obtaining a warranty card. The downside is the high cost of the products.
If you have enough money, then it is better to make a purchase in a specialized store, and if finances are in short supply, then it is worth considering the assortment of the car market.
Checking control points
This type of diagnostics is performed on a slipway or lift using a computer and appropriate software, as well as using special rulers and gauges. Measurement of body control points is carried out in accordance with the standards established by the manufacturer of a particular car brand. The obtained data is compared with factory values. This diagnostic operation is performed in a certain order, and it starts from the center of the bottom. The correctness of the overall geometry of the body is determined by the location of the control points relative to the central point of the bottom.
To check the compliance of some points, partial dismantling of certain suspension units is required.
If discrepancies between control points and standard indicators are detected, the geometry of the car body is restored. If this procedure is not carried out on time, then deformation processes will progress, negatively affecting all vehicle systems.
Lada 2115, 2114
VAZ 2110 control points: VAZ 2110 body control points
A selection of body dimensions, data on the body geometry of the VAZ 2115 and control points of the VAZ 2115, VAZ - 2114 from the factory documentation. A significant part of the repair work on cars, especially those received after road accidents, falls on body repairs. In most cases, repairs require checking the geometry of the attachment points of components and assemblies of the vehicle chassis.
VAZ 2115 body dimensions: 0 – base lines; 1 – axes of the front bolts for fastening the front suspension braces; 2 – center of support of the front suspension of the power unit; 3 – center of the support of the left suspension of the power unit; 4 – centers of the upper hinges of the front telescopic struts of the front suspension; 5 – centers of the hinges of the front suspension arms; 6 – points of intersection of the axes of the welded bolts for fastening the steering mechanism with the surfaces of the brackets; 7 – attachment points for the rear suspension support of the power unit; 8 – points of intersection of the axes of the rear welded bolts for fastening the rear suspension arms with the surfaces of the rear side members; 9 – centers of the upper supports of the rear suspension shock absorbers
Damage to car body can be very different. Therefore, the repair rules in each individual case must be different, most suitable for these damages, and it is necessary to make maximum use of the possibilities of straightening damaged panels. If possible, it is necessary to avoid thermal effects on the metal so as not to disrupt the factory welding and anti-corrosion protection of the body. Remove the front body panels only in extreme cases, to determine the location of damage, straighten or align the body. In cases of significant body damage, it is recommended to remove all interior trim to facilitate measurement, inspection and installation of hydraulic and screw jacks to correct distortion and damage to the body.
By editing it is necessary to restore the original linear dimensions and locations of the power units, the dimensions of the openings of the wind window, hood, and doors. Protrusion of the front surfaces and removable parts relative to adjacent panels is eliminated by fitting and adjusting them.
Control body dimensions, data on Lada 2115 geometry and VAZ 2115 control points from various repair bases.
Cost of downloading the file: 10.00 usd The link will be available within 16 hours after payment. After payment, a link to download the file will be sent to the specified email, or you can click the 'Buy' button again and the file download will start automatically.
Signs of violation of factory geometry
- Vibrations appear, accompanied by atypical extraneous noise.
- The overall controllability of the car decreases: when moving, it is “pulled” to the side, making maneuvers difficult.
- The car loses stability when driving, especially at high speeds.
- The suspension, as well as the entire chassis of the car, often begin to fail.
- Tires wear out quickly and unevenly.
- Fuel consumption increases.
- It is impossible to adjust the wheel alignment correctly.
The presence of such symptoms indicates that urgent restoration of the geometry of the car body is necessary.
Modernization
Whatever one may say, after several years of operation, even the most elegant car wants to be modernized. Automakers have long understood this, periodically introducing restylings and tuners making changes on their own.
Regarding the 15th model, many attempts at modernization were carried out at the amateur level. Some images of such tuned cars have every right to be called masterpieces, others, to put it mildly, are not impressive.
When the car's mileage reaches 50 thousand km, it's time to think about the suspension. Tuners recommend upgrading it first, as one of the weakest areas.
Over time, the reaction is no longer the same as before, when even on the icy road 2115 confidently passed through flat sections and turns. Now the rear of the car begins to toss from side to side, and the acceleration dynamics and handling are no longer the same.
The second, no less important note relates to the comfort of the car. Over time, the already frail sound insulation completely wears out. Everything starts to creak, including the rear parcel shelf.
Modernization also concerns the introduction of various options. To be honest, almost all VAZ car models reach the end user as “semi-finished products”. There is no competent anti-corrosion treatment of the body, there are no required comfort and safety parameters.
Here are the activities that are usually carried out, such as tuning and modernization on the 15th model:
- Installation of lockers and protection of the power unit crankcase;
- Replacement of sedan door and trunk locks with new, silent ones;
- Replacement of covers;
- Modernization of disks by installing new cast ones;
- Noise insulation and anti-creak treatment of various parts of the body, necessarily the roof and doors;
- Body painting and anti-corrosion treatment of the floor and other components most susceptible to corrosion;
- Installation of body reinforcement (struts);
- Replacing bumpers;
- Replacement of wing and spoilers;
- Remodeling doors and much more.
Painting
Painting has a longer history than the car itself. At least if you mean a paint gun. Modern tools are made at the highest level and make it easy and quick to paint a part or the entire body in the appropriate color.
Note that small scratches on the paintwork of the 15th model can be easier to remove by polishing. But if they are too deep and reach the ground or metal, you have to paint them.
As you know, painting can be carried out in 2 ways: partially, when the parts are painted with a transition, or completely.
Transition painting is applicable only in cases where one or another body section is being restored. This method has both advantages and disadvantages.
Note. In particular, with this method, body parts will not need to be dismantled, and therefore the structure will not be damaged. On the other hand, partial painting cannot guarantee the long-lasting effect of paintwork as much as complete painting.
It was written above about the pistol, but you can paint the 15th model in your garage using a spray can. But this method has many disadvantages:
- The spray can has an uneven spray, which significantly complicates painting (an overly saturated jet causes smudges);
- It is difficult to choose the appropriate color of paint sold in cans;
- Spray paint fades faster over time (such paint protects the surface less well).
Advice. If, however, you chose the spray can painting method, it is recommended to apply thin layers, keeping the spray can as far as possible from the body part.
Example of painting a rusty part
Let's say that this is the wing of the 15th VAZ model:
- Wash the car completely;
- Get rid of rust by sanding the part with coarse sandpaper and applying a degreaser;
- Restore the geometric dimensions of the part by applying layers of putty.
Attention. If the body part is subject to frequent vibrations, then ordinary putty will not work. You need to choose one with aluminum particles.
Regarding the application of putty:
- It must first be properly diluted with the hardener, doing this in small portions (the mixture dries quickly);
- You need to apply it directly to the surface, remembering that the putty dries for about a quarter of an hour if the room temperature is at least 20 degrees.
Body geometry VAZ 2112 slip dimensions
To independently solve the problem of restoring parts of a VAZ 2112 car, you need to have the geometric dimensions of its body. In professional workshops, these parameters must be taken into account, and they are individual for each machine model. Violation of body geometry must be eliminated, since it significantly reduces the safety of driving such a car. From this article you can learn important information about the indicators on which high-quality repair of the VAZ 2112 body depends.
The influence of body geometry on handling
During the operation of a VAZ 2112 car, sooner or later deformation of body parts occurs. Safety on the road and ease of operation depend on the level of their wear.
VAZ 2112 has been produced since 1999. The car body of this model is similar to the 2110 modification, the difference is that the first is slightly shorter than the second.
The steering wheel makes turns easier and faster.
Model 2112 is characterized by a sporty character. It combines the winning parts of the 10 with the estate rear seat from the 2111, making the car much roomier and more maneuverable. The ability to transform the rear seat allows, if necessary, to significantly increase the volume of the interior. Improved handling characteristics have simplified the process of entering a turn, which has significantly increased the level of safety for road users.
The VAZ 2112 has several modifications, for example, model 21123 is characterized by an original design of the hood and bumper, which allowed the car body to become popular among many car enthusiasts. After some time, the VAZ 2112 had a new grille model, and the hood took on a standard look.
Geometric dimensions of the “two-piece”
VAZ 2112 is one of the most popular models among the cars produced by the domestic automotive industry. It is relatively inexpensive, has a good design and different body styles.
The main geometric dimensions of the body of this car are as follows (in mm):
- length – 4170;
- width without mirrors – 1680;
- height – 1435;
- width with mirrors – 1875;
- rear door opening diagonal – 1320;
- short diagonal of the rear side window frame – 230;
- the distance between the center of the upper beam of the rear door opening to the middle of its lower beam is 1050;
- the long diagonal of the rear side window frame is 710.
The rarest body type of the 2112 is a coupe, or three-door hatchback. This is a sports model, it stands out from others, which are monotonous in terms of the geometric dimensions of the body. It was the design features of the VAZ 2112 coupe that allowed the model to become in demand at one time. However, after ten thousand examples of the 2112 coupe were produced, production ceased, so it is considered a rare model.
Several modifications of the VAZ 2112 were equipped with hatches, which greatly increased the comfort of the driver and passengers on the road. The geometric dimensions of 2112 made it possible to equip the car with many additional functional capabilities.
Body parts most susceptible to deformation
Sharp braking or untimely start provoke, first of all, damage to the bumper. If it is insignificant, then during repairs it is possible to achieve the performance of standard geometry. In the presence of complex deformations, this cannot be done, so it is easier to replace the damaged body part with a new one.
If the owner of the car does not take enough care of the condition of the body, then those parts that have close contact with the road surface are quickly eaten away by corrosion. And repairing the hood, doors and hidden body parts instead of timely prevention is already more difficult and expensive.
The question arose about replacing the TV (s/o) with a VAZ-2110, as there was great sadness. Like everyone else, in order to save money, as well as gain experience, it was decided to do it yourself. The question arose about the geometric dimensions of the engine compartment. I found a couple of diagrams on the Internet
Comments 18
I also need sizes to check, so which ones to use!
I made it approximately according to my measurements
You probably haven’t been here for a long time) I’ve already done and sold the car! I won’t edit the blog anyway!
Yes, I already made mine too. But this recording will still be useful to someone
Wow, I should try to measure it)
Didn't take any measurements? Otherwise, in just a week I’ll go on vacation, and I’ll start doing shamanism a little
Not yet, I won’t get around to it, but I’ll definitely write back if I intend to)
I would be very grateful
Technical characteristics of VAZ-2115
| Total information | VAZ-2115 | |
| Dimensions, mm: length, mm width, mm height, mm | 4330 1650 1420 | |
| Base, mm | 2460 | |
| Front track, mm | 1400 | |
| Rear track, mm | 1370 | |
| Ground clearance, mm | 165 | |
| Turning radius, m | 5,2 | |
| Curb weight, kg | 985 | |
| Total weight, kg | 1410 | |
| Load capacity, kg | 425 | |
| Acceleration time 0–100 km/h, sec. | 14,2 | |
| Maximum speed, km/h | 158 | |
| Fuel | AI-95 | |
| Fuel capacity, l | 43 | |
| Fuel consumption (EU 99/100), l/100 km: at a speed of 90 km/h at a speed of 120 km/h urban cycle | 5,7 7,8 8,9 | |
| Body | ||
| Body type | sedan | |
| Number of doors | 4 | |
| Number of seats | 5 | |
| Trunk volume (VDA), l | 430 | |
| Engine | ||
| Location | front transverse | |
| Configuration | P4 | |
| Number of valves | 8 | |
| Working volume, cubic cm | 1499 | |
| Supply system | distributed injection | |
| Neutralizer | There is | |
| Toxicity standards | Euro 2 | |
| Compression ratio | 9,8 | |
| Power, kW/hp at rpm | 56,4/76,7 5400 | |
| Torque, N*m at rpm | 115,7 3000 | |
| Transmission | ||
| Type | front-wheel drive | |
| Transmission | M5 | |
| Chassis | ||
| Front suspension | McPherson type | |
| Rear half-link | elastic beam | |
| Steering | rack and pinion | |
| Front brakes | disk | |
| Rear brakes | drums | |
| Tire size | 165/70R13, 175/70R13 | |
| Equipment | Standard | Lux |
| Rear window defroster | There is | There is |
| Power windows for front doors | There is | There is |
| Heated front seats | No | There is |
| Immobilizer | There is | There is |
| On-board computer | No | There is |
| Fog lights | There is | There is |
| Exterior mirrors | with anti-glare effect | with anti-dazzle effect and electric drive |
| Seat upholstery | tweed | velvet |
| Vegetable padding on the front seat backs | There is | There is |
| Trunk spoiler with brake light | There is | There is |
| Tinted windows | No | There is |
Ruler for measuring the geometry of a car body
The folding ruler is the most commonly used measuring device for measuring body geometry.
p, blockquote 14,0,0,0,0 —>
p, blockquote 15,0,0,0,0 —>
A measuring ruler is capable of measuring the distance between two points. Each distance must be cross-checked with two additional control points.
p, blockquote 16,0,0,0,0 —>
A modern ruler for measuring body geometry is a telescopic measuring device with height-adjustable pointers. Even when unfolded to its full length, it does not cause measurement errors. Depending on the type of ruler used, additional measurement may be required between the pointers. Additional accessories in the line include attachments and extensions for tight placement in inspection holes.
p, blockquote 17,0,0,0,0 —>
The ruler allows you to take measurements when there are obstacles between the measured points.
p, blockquote 18,0,0,0,0 —>
All cars are symmetrical about an imaginary central plane located along the center of the car. However, there are a few points on some cars that, for various reasons, are not symmetrical, but they do not make the entire car asymmetrical. Without symmetry, a car would be very difficult to make and even to sell.
p, blockquote 19,0,0,0,0 —>
It is important that the indicators are firmly inserted into the inspection holes.
p, blockquote 20,0,0,0,0 —>
As mentioned earlier, if the pointers were set to different heights, then the value on the ruler scale may differ from the actual distance between the points being measured. For the correct value, you need to additionally measure the distance between the indicators with a tape measure.
p, blockquote 21,0,0,0,0 —>
The ruler and pointers must be straight. The indicators should be positioned 90 degrees relative to the ruler and have no play.
p, blockquote 22,1,0,0,0 —>
It is important that when measuring, the length of the indicators is set at the same distance.
p, blockquote 23,0,0,0,0 —>
p, blockquote 24,0,0,0,0 —>
If you do not need to obtain exact values when measuring, but compare one side to the other, then the ruler does not have to be parallel to the plane of the machine. You can compare distances with the opposite side, as well as with similar points on the same whole vehicle (comparative measurement).
The body of the fourteenth model and its features
ATTENTION! A completely simple way to reduce fuel consumption has been found! Don't believe me? An auto mechanic with 15 years of experience also didn’t believe it until he tried it. And now he saves 35,000 rubles a year on gasoline! Read more"
We are talking about a car assembled on a standard VAZ platform. The car is a 5-door, front-wheel drive, hatchback body type. In front, and in general, the shape of the car frame is distinguished by good AED* characteristics and a modern, practical design.
Thanks to the numerous options included by the manufacturer, driving the machine is quite comfortable. We can say that there is no unnecessary function or detail on the fourteenth model, and the body is made in a unique style. A new design of front optics, a different radiator lining, a different hood and moldings - all this was fully introduced into the domestic auto industry with the release of the VAZ 2114.
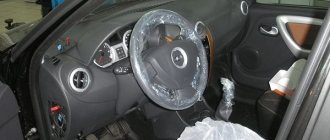
As for the interior, there is also a lot of innovation here. The steering column is adjustable, although the design of the “steering wheel” as a whole does not differ from the appearance of its analogues (installed with “tens”). The heater and front STPD* received a new design.
Initially, the fourteenth model moves into the category of cars of a new class, as close as possible to foreign cars. On the other hand, 2114 still remains a people's car, corresponding to the individual needs of the owner. If it occurs to a motorist to carry out tuning, then the VAZ 2114 turns into a real sports car, distinguished by an expressive body kit and sweeping body lines.
Note. Already in 2007, the Lada began to be equipped with a 1.6 liter power unit. Its peculiarity was that it fully met Euro-3 standards, which at the time the car was released was the only criterion in the world for environmental compliance with standards.
As for the main standard size, the body length of the VAZ 2114 is 4006 mm. Despite the fact that this is a hatchback, the luggage compartment is quite large - 330 liters. If you fold the rear seats, the trunk will be twice as large.
3D car body measurement
Three-dimensional measurement includes measuring the length, width and height of structural elements of the body. This is carried out using three-dimensional measuring systems.
The principle is that with the help of a measuring system, the distance from the imaginary main planes of the body is obtained: central, main and zero (see illustration).
These planes are imaginary. Such planes are installed and used by a three-dimensional measuring system.
The width is measured from the central plane of the car, the length from the zero plane, and the height from the main plane (located parallel to the bottom).
Central plane
The center plane or center line divides the car into two equal halves lengthwise. On some cars there are marks that show the center of the car. Such marks are stamped on the metal of the body in both the upper and lower parts. This can be used when measuring with a simple measuring ruler or tape measure. They help save time when taking measurements. The distance from the center to a specific point on the right will be the same as the distance from the center line to the same point on the left. Most cars are made symmetrical except for some points. One part of the body should be mirrored to the opposite side.
VAZ 2113 body characteristics table
| Length, mm | 4122 |
| Width, mm | 1650 |
| Height, mm | 1402 |
| Body type | 3-door hatchback |
| Trunk volume, l | 330 |
| Number of seats | 5 |
| Ground clearance, mm | 160 |
| Wheelbase, mm | 2460 |
| Availability of replacement bodies | VAZ 21083, 21093, 21099, 2115, 2114, 2113 |
As can be seen from the table, when replacing the frame of the thirteenth model, it is not possible to convert it to a VAZ station wagon body, since it simply does not exist in the Samar family.
Photos and video materials will allow you to learn more about the VAZ 2113 car and its body. Step-by-step repair instructions presented in our publications will make it possible to carry out repairs yourself. We hope that this article was valuable and useful.
Ways to adjust wheel geometry
Wheel alignment adjustment has long ceased to be a problem for car enthusiasts. Almost every service station has equipment installed that performs the required amount of work to adjust wheel geometry.
Modern stands at which work is carried out come in several types:
- Laser;
- Computer;
- Optical.
The equipment provides quick and accurate adjustment of wheel geometry with the delivery of results to the car enthusiast (what happened before the repair and what happened after). In this case, the total setup time takes no more than a few minutes.
The main thing is to find a service station that employs experienced specialists who know how to handle specialized equipment.
Often, car service owners purchase equipment to install wheel alignment, but there are no competent technicians to service it.
Many car enthusiasts adjust wheel geometry with their own hands.
One of the following methods can be used here:
- Using a laser pointer;
- Using a telescopic ruler.
The most common option is using a telescopic ruler and plumb line.
To complete the work, you also need a regular ruler, chalk and a set of wrenches.
First, the wheel camber is adjusted, and then the toe-in.
All operations are carried out in a garage, which saves money and nerves. The disadvantage is the high measurement error - 1 mm in one direction or the other.
Read more on this topic here https://autotopik.ru/remont/513-razval-shozhdenie-koles-svoimi-rukami.html.
On VAZ 2101, 2103 cars, these works are performed as follows.
Body repair of VAZ 2109 according to the control points of car body parts
Today, do-it-yourself body repairs of the VAZ 2109 are carried out by many owners of this car. And in general, a considerable part of fans of the domestic automobile industry are faced with body problems. The price of repairing the body of a VAZ 2109 in car services leaves much to be desired, so you have to do some types of work yourself.
In reality, there is nothing complicated about replacing individual elements of the Nine’s body. If you have the necessary tools at hand, it will not be particularly difficult to replace, for example, a rotten arch or the bottom of a car, a threshold or a bumper. From the article you will learn how to do this without wasting a lot of time and effort.
Tools
Before moving on to the direct instructions for repairing the VAZ 2109 body, I would like to dwell on choosing the right tools. Every professional, master of his craft will confirm that a good tool is half the successful completion of any repair operation.
So, the list of necessary tools for body repair of the “nine” is quite wide, since the work is by no means simple and will require a considerable number of specific instruments:
- Special hammers are required, at least 3 types of them with different sizes for straightening work;
- A grinder with mounted circles (you need different discs that perfectly remove paintwork and rust);
- It is advisable that the garage have a carbon dioxide cylinder (about 10 cubic meters);
- Without welding during body work, it’s like having no hands (it’s better to choose a device with a maximum current of 150 A);
- Good chisels with hardened tips and several similar metal drills;
- Lift (it is better to have 2 jacks);
- A good metal brush (you will need it to clean rusty areas of the body);
- A standard set of motorist tools (keys, screwdrivers, etc.).
Algorithm for carrying out body work on the “nine” in general terms
Let's get acquainted with the work process so far in general terms:
- First of all, it will be necessary to remove those areas of the body that are rotten or deformed;
- On the “nine”, over time, the front floor with sills and reinforcements, the bottom in the rear, doors and fenders rot most quickly.
Note. It may even be impossible to install a jack, since the area provided by the manufacturer for it (the jack) becomes unusable. To work in this place, the car can be raised using an engine support beam instead of a support.
- The hood of the “nine” also cannot “boast” of endurance. In the place where the battery is located, it becomes covered with rust;
- The floor of the fuel tank is also considered a noticeable problem on the “nine”;
- The same fate befalls optics reflectors, muffler and other parts over time.
In general, corrosion is the number one problem for domestic cars. It seems that the level of anti-corrosion protection on them is good, but rust eats through everything over time, and there is no escape from it.
- The engine compartment is disassembled and the coolant and radiator are drained;
- Doors are removed;
- If a TV (amplifier) is installed in front, then it must be disassembled;
- Rotten areas will have to be cut off with a grinder;
- You will also have to cut off rusty panels and fenders;
- Holes can simply be welded or patched;
- It is recommended to place additional metal pieces on problem areas;
- Mud flaps must be reinforced with new elements, and then secured with spot welding;
- It is also necessary to fit new parts to the body so that no problems arise;
- It is advisable to fasten the wings and sills with self-tapping screws and bolts, followed by welding of the parts.
Note. The body is also required, which takes a lot of time. You will need a slipway machine on which you will have to fix the car. The slipway has special clamps that ensure reliable fixation of the machine. You can read more about the “nine” checkpoints below.
- After this, you can begin welding the new floor. At this stage of work, patches, amplifiers and connectors are widely used. Be sure to cover all areas with anticorrosive at the end;
- It’s better to install new arches, too, and not bother with their repair.
It is advisable to cover the arches with resin mixed with waste oil. This is an excellent remedy against rye, but you can’t apply it to the bottom for well-known reasons.
Restoring the original condition of the body and parts with your own hands usually involves simple painting and removing dents. It cannot be done without polishing, which protects the surface well from corrosion.
As for the complete restoration of a body involved in an accident, the services of professionals will be required. Only in a car service can you properly restore the body, according to basic control points. Here there is appropriate equipment, and the specific technology for carrying out it is well known to the masters.
In any case, before carrying out repair work, it is necessary to check the condition of the body. The most well-known verification method involves measuring the distances between control points and then comparing them with the passport values.
Specifically, the body is checked as follows:
- The dimensions are checked diagonally;
- The condition of the vehicle struts is studied;
- The roof is subjected to a visual inspection, the dimensions of the diagonals of the door frame and the roof itself are measured;
- Particular attention is paid to measuring the front and rear window frames;
- Finally, a detailed visual inspection of the car from all angles is required. Maybe where there is a bulge, there is a larger gap, and so on.
The main passport dimensions between the control points of the VAZ 2109 body
| Diagonal of the front doorway from the extreme point of the lower threshold to the middle of the roof | 1345 mm (plus/minus 5 mm) |
| Diagonal of the front door opening from the lowest point of the windshield to the middle of the lower threshold | 1000 mm (plus/minus 5 mm) |
| Distance between the front door hinge area and the pillar in a straight line | 963 mm (plus/minus 5 mm) |
| Diagonal of the rear door opening from the point where the lower sill meets the door center pillar to the roof | 1112 mm (plus/minus 5 mm) |
| Diagonal of the rear door opening from the top of the B-pillar to the lower sill | 860 mm (plus/minus 5 mm) |
| Long diagonal rear side window frame | 706 mm (plus/minus 3 mm) |
| Short diagonal rear side window frame | 383 mm (plus/minus 3 mm) |
| Hood diagonal | 1610 mm (plus/minus 5 mm) |
| Distance from the middle of the hood to the middle of the windshield | 712 mm (plus/minus 5 mm) |
Components of the body and their dimensions for the VAZ-2115
The body of the VAZ-2115 car is the supporting element of the entire structure. By type, this model is considered a 5-door sedan, driven by a one and a half liter power plant.
The car body frame consists of the following elements:
- roof;
- sidewalls;
- base;
- non-separable parts;
- hanging units;
- parts of the interior.
Mounted ones include:
- hood;
- doors;
- wings;
- bumpers;
- radiator decorative grille;
- trunk lid.
The dimensions are as follows:
- the length of the car in millimeters is 4330;
- from the middle of the front wheel to the front end – 860;
- from the center of the front to the middle of the rear wheels – 2460;
- to the rear from the last mentioned point - 1010;
- total height of the vehicle – 1420;
- distance between side mirrors – 1979;
- the distance between the wheels located at the front is 1400;
- rear bumper size – 1650;
- the rear wheels are spaced 1370 millimeters apart.
Reasons for repairing body parts
The most commonly damaged parts are the hood, bumpers and fenders of a car. The listed parts are protection for the engine, as well as for the driver and passengers in the car, so they take the entire impact in the event of a traffic accident. Therefore, these body elements must always be in good condition. Body repair is required if:
- rust appeared on metal elements;
- with minor damage to the hood and plastic parts;
- when body elements are destroyed due to a serious impact.
If rust begins to appear on body parts, and the vehicle was damaged as a result of a traffic accident, the car needs to be repaired. If traces of corrosion of body parts are detected, as well as minor damage to plastic parts of the car body, chips and scratches, it is necessary to eliminate these consequences in a timely manner, since rust can destroy other body parts.
This will lead to additional financial costs, and plastic parts may simply fall apart during operation. Often the hood of the 2114 is made of metal, but some drivers tune their car and install a plastic hood. A metal hood has a number of disadvantages compared to a plastic one: it is susceptible to corrosion, and repairs are more expensive.
Editing a damaged body
A very large percentage of work on repairing VAZ 2114 cars after an accident falls on body work. During repairs, it is imperative to monitor the geometry of the body using control points.
Since car damage can be completely different, there are no uniform rules for restoration
In each case, you will need your own approach, but it is important to make the most of the opportunities offered by straightening damaged surfaces. At the same time, the thermal effect on the metal should be minimized, maintaining the integrity of the factory welding and protecting the body from corrosion
Regarding the front panels: they should only be removed as a last resort.
The main tasks that are solved are:
- Identification of damage sites.
- Body straightening.
- Body alignment.
If the car body is significantly damaged, then all upholstery parts inside should be removed. This measure will significantly simplify measurements and control, as well as facilitate the installation of screw and hydraulic jacks (to eliminate damage and distortions existing on the body).
For a complete analysis of body geometry violations, service stations use modern stands. The machine is mounted on them in a semi-disassembled state, and further diagnostics are carried out using high-precision electronic sensors. These sensors provide the head computer with a complete picture of the condition of the body.
Of course, you can independently check the compliance of the car body with the standards provided by the manufacturer. To do this, an experienced driver just needs to measure the diagonals using a regular tape measure. However, such measurements will not be accurate. It is much more advisable to contact a specialized service station.
You should not neglect the systematic procedure for monitoring the geometry of the VAZ 2114 body, since even the presence of small deviations can lead to serious consequences over time, and their elimination can lead to large expenses.
Components of the body and their dimensions for the VAZ-2115
The car body frame consists of the following elements:
- roof;
- sidewalls;
- base;
- non-separable parts;
- hanging units;
- parts of the interior.
Mounted ones include:
- hood;
- doors;
- wings;
- bumpers;
- radiator decorative grille;
- trunk lid.
- the length of the car in millimeters is 4330;
- from the middle of the front wheel to the front end – 860;
- from the center of the front to the middle of the rear wheels – 2460;
- to the rear from the last mentioned point - 1010;
- total height of the vehicle – 1420;
- distance between side mirrors – 1979;
- the distance between the wheels located at the front is 1400;
- rear bumper size – 1650;
- the rear wheels are spaced 1370 millimeters apart.