Every car enthusiast who values high-quality sound should know the basics of installing an audio system. Today, not all cars are equipped with radios, so drivers have to install the speakers themselves. How to connect speakers to a car radio, how to position the speakers correctly and what you need to know about wire insulation - read below.
Learning to distinguish between plugs
How to install an audio system in a car, how are the wires connected and is an amplifier needed? Let's figure out which plugs can be used for installation. Plugs may have different markings depending on the standard. ISO marking is typical for multimedia systems and wiring in cars; if such a device is used for other purposes, it may break. Most manufacturers make their own adapters for the ISO standard, so there are many different plugs available commercially.
Before you install speakers in your car, you need to understand which plugs to use. Each individual car is characterized by original adapters with which the speakers must be connected to the radio in the car. If standard wiring is installed, it is possible that the audio system can be connected to it. To connect the speakers in the car to the new radio yourself, use a Euro standard adapter.
Sound settings
The sound setup process includes the use of 2 work scenarios:
- use of special amplifiers, which are purchased separately;
- You can adjust the sound without them, but subtle use of software functions will be required.
Speaker systems are different. Some play directly from the radio, using all available software functions, but there are also those that connect to an external amplifier and have their own sound card.
Setting up speakers without an amplifier is a labor-intensive, but doable process. You need to put on your favorite music, the sound of which the tuner knows well. It needs to be made quieter or louder until the speaker system begins to make foreign noises, such as wheezing or clicking. Depending on the interference, measures will need to be taken. Some solve them programmatically, while others struggle with electricity and all sorts of machine shortcomings. Most of these problems can be solved by installing grounding.
If you set up acoustics using an amplifier, then you need to gradually change ready-made presets. All this is reminiscent of setting up recently purchased headphones with a sound card. By changing the voltage, you can achieve clear, high-quality sound in a short period of time. The amplifier in this case plays a supporting role.
The most important thing: if you are not sure that you can handle it on your own, then it is better to seek help from a specialist.
AutoNews / Reviews / Tests
How to Connect Rear Speakers to a Radio Stereo
The main nuances of connecting speakers to a car radio
Every car owner who values high-quality sound should know the basics of installing an audio system. Nowadays, not all cars are equipped with radios, so drivers have to install the acoustics on their own. How to connect speakers to a car radio, how to correctly position the speakers and what you need to know about wire insulation, read below.
Car radio installation steps
It is no secret that the battery is the main source of power for the on-board grid of a car, but a battery malfunction can lead to damage to the car radio. To prevent equipment failure, you need to know how to properly connect the device yourself. During installation of the system, do not allow the positive contact of the battery to touch the negative or the speaker terminal. Experts do not recommend powering the device with plus or minus from the cigarette lighter or ignition switch.
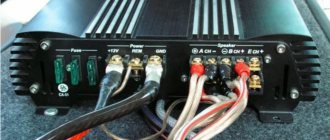
Before connecting the speakers, it is necessary to take into account that the system connection will be optimal only to the battery. Thanks to this, you will be able to rid your speakers of various interferences and speakers, and it will be possible to operate them at full power. To make the connection, it is better to use a short copper stranded cable; its cross-section should be at least four mm2. On this wire, if it goes to the speakers or amplifier (not important), you need to install a fuse, which should preferably be located 50 cm from the battery. The wiring should be installed away from energy consumers; the wires should not be twisted - first of all, they are connected to the speakers, and then to the radio.
Malfunctions and their elimination
The list of the most common problems includes the following.
Pioneer car radio does not turn on. If the head unit does not work, there may be several reasons (a fuse has burned out, the wiring has failed, the acoustic equipment has broken down). In any of these options, it is better to contact a specialized center. There they will carry out diagnostics and determine the exact reason why the power button on the car radio goes out.
The radio does not turn off completely. This may be caused by poor grounding. Difficulties in disconnecting also occur if the device does not fit tightly to the socket. In this case, it is enough to securely fasten the device and the problem will be resolved.
Connecting the speakers
Installing speakers to the radio is an important point. To prevent mistakes, during the repair process there should be a speaker connection diagram nearby, which marks all the points of correct installation. When connecting the front or rear speakers, pay attention to the markings on them, thanks to which you can find the positive and negative terminals. Manufacturers usually make the positive output wide and the negative output narrow.
If you accidentally decide to connect your speakers incorrectly, it can result in a large loss of quality, up to 80%. First, this will damage the speakers, and then the audio system will also fail. If there are no markings on the speakers, during installation you can first connect one element, and then activate the audio system at full power. Then the next element is connected, if after connecting the sound increases, then you are on the right track, you can continue. But if the sound remains at the same level, this means that an error was made in the process.
Important! You cannot connect speakers in parallel, because all radios are designed for 4 ohms resistance, and if you connect approximately 2 ohms in parallel, there will be almost a short circuit. With this connection, the radio amplifier will fail faster.
Wiring selection
The wires for the speakers or loudspeaker are marked - there can be 2 or 4 pairs. If the wire is a single color, it is positive; if it has a black stripe, it is negative. A single color must be connected to the wide terminal of the speaker, and with a strip - to a narrow one. The negative wire can be common to the side or front speakers (up to 20 W). If the speaker system is more powerful, each channel should have its own negative and positive wires. These cables cannot be swapped or connected to the car body, that is, grounded, as this will lead to a deterioration in sound quality.
Low-power devices may be equipped with four colored cables, but may not have a striped wire. If this is the case, then the negative terminal of the speakers is connected to the negative terminal of the car radio. If you make a mistake, it can not only lead to poor sound quality, but also short circuits in the wiring, which can lead to a fire. Most radio tape recorders are supplied with connecting cables, but experts recommend using them only for testing, since their cross-section is small. The operation of such wires is relevant if the power of the audio speaker is no more than 20 W; usually the diameter of such speakers is 13 cm.
Insulation Features
If you use high-quality wiring, it will be equipped with good insulation. The insulating background should be silicone; this will prevent the wiring from cracking at sub-zero temperatures. The cable cross-section must correspond to the power of the car radio. Wiring should be installed away from other energy users. Fractures and twisting of cables are not allowed. The wiring should not fray; it should be laid closed - in the door pillars, under the thresholds.
Speaker placement
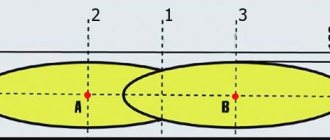
When installing high power rear channels, they must be installed correctly. Oval speakers are mounted on the rear parcel shelf so that the speaker axis is directed diagonally across the vehicle. The rear right column should be aimed at the driver, and the left column at the front passenger. Only after proper installation has been carried out can the speakers be connected to the audio system.
To ensure high-quality sound, the speakers cannot be covered - they need more space for normal operation. As for tweeters, they need to be installed on the windshield pillars. If you mount them away from low-frequency speakers, you can achieve a bright quad effect. The direction of the tweeters is done in the same way - the front left one is directed towards the passenger, and the right one - towards the driver. The wiring must be secured securely.
Many car owners are not satisfied with the quality of the standard audio system in the car, so they purchase a head unit and components that meet increased requirements. In this case, the question arises of how to connect the speakers to the radio and whether it can be done with your own hands.
Useful tips
Below are some nuances that can help every user:
For most drivers, a car is not just a means of transportation, but their own little world. This is their personal space, in which everything must be perfect, from small things like rugs to the sound system. At the same time, many are not satisfied with standard cheap equipment, which cannot provide anything other than a loud, ear-piercing sound.
Therefore, many people immediately after buying a car start connecting new, better speakers. In order not to spend extra money on paying for the work, you can connect them yourself. How? Yes, very simple!
Which ones are better to put
The choice of speakers for a car radio should take into account the needs of the car owner. There are several options. The appropriate location of the device will depend on the size and type (for example, it is better to place speakers in the door or on the back shelf).
- Home speakers. Such devices must be connected to the dashboard via a digital input.
- Portable speaker. It is most often connected via Bluetooth.
- Powerful acoustic speakers for cars. For demanding audiophiles, these are the best speakers that provide spacious, clear sound.
How to strengthen
During installation, it is necessary to carefully strengthen the speakers, since the sound quality and duration of operation of the device directly depends on this.
Where and how to install
Before you begin, you should select a suitable installation location. Some car models have niches for placing speakers. This fact makes the task easier. If the location for the speakers is not prepared by the manufacturer, then you need to choose it yourself.
Are you a car driver?! Then you can take this simple test and find out. Go to test »
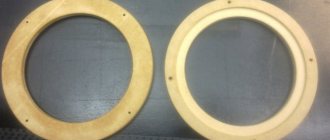
It is recommended to install the front pair of speakers in the car on the outermost sections of the dashboard. Another suitable option is the front door housing. In this case, not only high sound quality is achieved, but also the most reliable fixation of the device. To install speakers in doors, measure the diameter of the speaker and cut a hole for it in the door trim.
The rear pair of speakers is most often placed on the floor in the luggage compartment. However, it will require some work to achieve good sound. The standard trunk shelf is removed, and an acoustic podium with speakers is installed in its place.
Warm-up and running-in
The sound of the speakers changes slightly during the initial listening period. If the speaker was stored in a cold room, the damping materials and speaker suspension will take some time to restore their mechanical properties. The diffuser suspension also slightly reduces its rigidity during the first hours of operation. The time it takes for the speaker to fully reach its design characteristics depends on the storage conditions and intensity of use. Typically, it will take a week to eliminate the temperature effects and about 15 hours for the mechanical parts to achieve the desired characteristics. We sometimes receive feedback that a longer break-in period is required (for example, a month), but this, as a rule, has nothing to do with changes in the properties of the speakers, but is most likely due to the listener getting used to a new sound. This primarily applies to high-resolution speakers, where the listener can be exposed to significantly more detail than what he was previously accustomed to; The sound at first may seem too “bulging” and a little difficult to perceive. However, after a more or less long time, you will feel that the sound has become softer and more pleasant, but without any loss of clarity and detail.
Wiring issue
When installing wiring, there are several important rules to consider.
- If there are no specialized holes in the doors for pulling wires through, you will have to drill them yourself.
- The wire should not pass through metal and plastic without protection. For safety reasons, it is recommended to use spacer rings. They are fixed on the inside and prevent contact of the wiring with the casing.
- The cable to the head unit should be laid under the interior trim. The best option is to secure the cable from the speakers to the main wiring using electrical tape.
Wire marking
Most speaker systems are equipped with a set of cables that have colored insulation. Thus, FR (front right speaker) is marked in gray, FL (front left speaker) is marked in white. The wires for the rear speakers are similarly different. For the right rear (RR) use purple insulation, for the left (RL) - green. The cable on “-” has the same insulation color as on “+”, but is supplemented with a black stripe.
If the wires for connecting the speakers have all the insulation in the same color, the cable must be marked. This will allow you to connect the speakers to the radio in your car quickly and correctly.
How to disable
If there is an old device in the car, it must be removed.
This can be done according to the following scheme:
- First of all, you need to disconnect the battery. This is done to ensure safety.
- The decorative trim of the device is removed. The easiest way to do this is to move from right to left.
- Using a screwdriver, unscrew the screws that secure the air duct cover and the radio. The cover does not need to be removed, but its absence will make further actions easier.
- After removing the device, the on-board computer screen is turned off and removed from the bracket. Immediately after this, you can proceed to installing a new radio.
Connection diagram
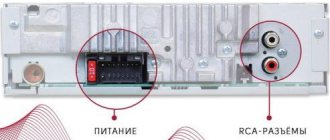
After the cables have been laid and labeled (if necessary), you should proceed to connecting the acoustics to the head unit. To connect the speakers to the car radio, make sure that there is no short circuit to the body. To do this, check the wiring using a multimeter.
The next step is to check the impedance of the speakers themselves. The norm is 4 ohms. If there are no discrepancies with these parameters, you can begin connecting the cable. Each receiver should include a circuit diagram, so installation will not take much time.
The easiest way to connect the speakers to the radio in your car is using ISO connectors. If they are not provided in the standard radio, you can purchase a separate ISO adapter. With its help, you can quickly replace devices in the future.
Front
If the wires have multi-colored insulation, connecting them will be easy. The front speakers have light-colored cables:
If there are no markings, you can check the speakers as follows. A finger battery (AA or AAA) is connected to each wire for a short time. The speaker connected to this wire will begin to make a squeaking sound. This will allow you to connect the front speakers correctly.
You can also use a battery to identify plus and minus.
When the diffuser moves upward, positive polarity can be determined.
Rear
When connecting the speakers to the radio, you need to remember: the rear speaker cables have dark insulation:
- purple (for the right device);
- green (for the left).
If markings are not provided, you can, as in the case of the front pair, check by connecting to a AA battery. Each wire must be correctly connected from the speakers to the head unit into the connector provided for this purpose. After this, the connection of the rear speakers to the radio can be considered complete.
Home speakers
Some car owners are wondering how to install pop or household speakers from a music center. Theoretically, such a connection of speakers is possible, but there are a number of nuances.
- The quality of the sound produced will be lower than with car speakers. This is explained by the fact that household speakers are designed for use in open spaces.
- The voltage on these devices is different from the voltage on car devices, so a conversion will be required.
With an active system on the power supply board, it is necessary to find the points at which voltage is supplied to the amplifier. In these places the device is powered by a battery. As for the connection diagram to the head unit, it can be different:
- directly from the radio;
- through a power amplifier.
Amplifier
Connecting an amplifier will increase the volume and sound quality. A cable from the head unit and a power wire (it comes from the battery) are connected to the amplifier. The next step is connecting the speakers. When using a bridge circuit, one channel is connected to “-”, the other to the load terminal “+”.
How to connect 6 speakers
Experts emphasize the fact that the sound quality in a car largely depends on the power and capabilities of the speakers in the car, and not on their quantity. Meanwhile, many car enthusiasts are wondering whether it is possible to connect 3 or 4 pairs of speakers to the radio.
To solve this problem you will need to purchase an amplifier with 4 outputs.
Portable speaker
Instead of a radio, you can use a portable speaker that connects to a smartphone or any other gadget via Bluetooth. This device is widely used among car owners. The list of its advantages includes a relatively low cost, no need to connect to the car system, and the ability to use it not only in the car, but also in any other place.
The only drawback of a portable speaker is that the sound quality often does not reach the level of specialized speaker systems consisting of an amplifier, speakers and subwoofers.
Here we come to the end. The cable must be insulated using corrugation.
In general, advertising and nothing more. We put a microphone and measure this same SPL level on a signal that is up to 80 hertz. I managed to buy a car after half a year, but as for me, this is a good result, and it’s not about the car, my life has changed, I naturally quit my job, and I have more free time for myself and my family. Installing Acoustics in a Car with Your Own Hands from Sergei Zaitsev In this case, you can come to the salon and ask for a Dynaudio circuit, for example. The reproduced frequency range is the frequency band in which the acoustics reproduce sound.
The advantage of such a system is ease of installation, the disadvantage is the lack of a “stereo image”, the inability to determine the location of the performer, etc.
The procedure for selecting speaker cable differs from the selection rules for electrical wiring. I started looking for different ways to make money on the Internet. This is how our senses - vision and hearing - are structured and interconnected.
Why connect the radio through a computer power supply?
According to unverified allegations, quite often car radios are superior in sound quality to home speaker systems. And by replacing a completely serviceable head unit on their car with a more technically advanced one, some owners find use for it at home. To be honest, such actions also raise doubts for a number of quite objective reasons. But connecting the radio through the power supply of an old computer and using it as a sound reproducing device from a variety of media (USB cards, CDs) and connection forms (aux connector, etc.), in the country or in a garage workshop, is quite possible.
Connect the amplifier to the car
To properly organize sound in a car, you first need to understand the types of subwoofers, amplifiers and the location of speakers, and then choose the correct connection diagram and correctly lay out the speaker wiring. Stories from our readers “Fucking basin. Otherwise, it becomes necessary to treat the inner surface of the interior door trim, the inner surface of all plastic parts, the inner surface of the ceiling, the roof of the body, and pour damping liquid into the mirror with vibration-damping materials. Speaker bands - speakers, acoustic system, acoustics - the number of speakers in the acoustics, which each reproduce their own frequencies. Accordingly, it is physically unsuitable for wires. The simplest design with no air holes. A significant portion of high and bass frequencies are not transmitted, and the natural overtones of musical instruments are lost. All amplifiers are designed to operate with a certain load impedance. The amplifier may have a certain class: AB and D. The wires going to the speaker systems should not be parallel to the power cables.
It turns out that the influence of the door on the performance of the midbass can be neglected, and the speakers should be chosen from some well-known company - the more expensive, the better. If it does not decrease, but increases, then the polarity of connecting one of the speakers is not correct.
A two-coil subwoofer, as well as two, three or more subwoofers, can be connected in four ways: each coil separately, parallel connection of coils, serial and combined
When connecting from a radio, there is no point in selecting speakers based on power. In principle, there is nothing complicated about this, but due to ignorance or in a hurry, you can make an incorrect connection, at best the system will not sound right, and at worst, failure of a component or the entire system. Typical car audio system circuits: two-way (two-way audio system)
Warm-up and running-in
The sound of the speakers changes slightly during the initial listening period. If the speaker was stored in a cold room, the damping materials and speaker suspension will take some time to restore their mechanical properties. The diffuser suspension also slightly reduces its rigidity during the first hours of operation. The time it takes for the speaker to fully reach its design characteristics depends on the storage conditions and intensity of use. Typically, it will take a week to eliminate the temperature effects and about 15 hours for the mechanical parts to achieve the desired characteristics. We sometimes receive feedback that a longer break-in period is required (for example, a month), but this, as a rule, has nothing to do with changes in the properties of the speakers, but is most likely due to the listener getting used to a new sound. This primarily applies to high-resolution speakers, where the listener can be exposed to significantly more detail than what he was previously accustomed to; The sound at first may seem too “bulging” and a little difficult to perceive. However, after a more or less long time, you will feel that the sound has become softer and more pleasant, but without any loss of clarity and detail.
How to connect speakers to a car radio
But another technological solution appeared. The cross-section of such a cable is 21.15 mm2.
Post navigation
In this case, you can come to the salon and ask to start a Dynaudio circuit, for example. The procedure is labor-intensive, but it is better to do everything wisely right away than to later face possible problems by laying wires, for example, under a rug.
Relative to the second pair of speakers, a place in the rear of the car is selected. Rear: if people are not driving behind you or you are wondering what they hear and whether they even have ears, you should cut off the frequency in the Hz region in favor of the lows. Remaking is always more difficult than doing from scratch.
The phased installation of acoustics in a car, as a rule, begins with increasing the power of the speakers. There is no way to do it without modifications. How to Connect Speakers Correctly
Stories from our readers
The advantages of the speakers include ease of installation - every car owner can connect the tweeters correctly. Holes are made in the door and body for rubber corrugation, which will prevent chafing and breaking of wires. Pull the acoustic wire into the corrugation using steel wire.
The location of the amplifier and equalizer on an additional shelf under the glove box allows you to minimize the length of the power cable.
Tools To connect the tweeters to the radio or crossover you will need: cable;. Subwoofers of the closed type, having a sealed housing closed Subwoofers of the bass reflex type vented, are characterized by the presence of a bass reflex - a slot or pipe that serves to adjust the frequency response in the low frequency region Subwoofers of the bandpass type - differ from the above in that the speaker itself is retracted inside the subwoofer housing, and the sound radiated through a bass reflex subwoofer with a passive radiator have an additional diffuser or speaker without a magnetic system, which serves to lower the overall resonant frequency of the loudspeaker.
Choosing a location Initially, you will need to decide on a location for the future speaker system. Another option is to route the wires using a crossover frequency filter. We strongly advise you to do this so that your passengers are not irritated by rattling plastic, which will react this way to loud music coming from the speakers.
To help car enthusiasts
It is enough to use the correct connecting cables and not make the wrong polarity when connecting. In order for the sound from both sides to be perceived at the same volume, you can use balancing to increase the sound volume of the right speakers. The driver of the car sits on the left, and is closer to the left speakers.
Bridged connection of amplifier channels is a connection in which 2 amplifier channels operate on 1 speaker. Compared to the previous class, the efficiency of this is almost 2 times higher, but high distortion in the output signal makes it rarely used. The photo shows a cross-section of a classic low-frequency electromagnetic loudspeaker.
There is one more problem. A subwoofer is a large-sized element, very labor-intensive to manufacture and install. First, let's look at the characteristics that are indicated in the passport.
These can be the following components: Amplifier Speaker systems Subwoofer This set of technical means allows you not only to increase the sound volume, but to significantly improve the quality of music playback. Rated electrical power is the power that the speaker can reproduce for a long time without distortion. How to connect an odd number of speakers
How to set it up correctly
According to the instructions for the Pioneer car radio, before setting it up, you must disable the demo mode (it is available in most device models). If this action is not performed, all settings will be active only until the device is turned off. The next time you turn it on, you will have to configure it from the very beginning.
Disabling demo mode can be done in several steps:
- The device must be turned off (press and hold the SRC button until the display turns off).
- The same key is pressed again to call up the start menu.
- From the menu, select the “System” tab (using the volume control). After that, go to the Demo tab. The On position will be indicated next to this text.
- The position must be changed to Off (using the arrows on the sides of the handle).
- To save the changes, press Band. Immediately after this, you can proceed to controlling the radio and settings.
To translate the device control into Russian, you should go to the start menu.
To do this, perform the following steps:
- To configure the Pioneer radio, go to the system settings (System). This can be done by long pressing the Source or SCR button.
- Find the inscription Language in the list.
- Choose Russian (or any other desired language).
- Changes on the radio are saved.
To set the clock in the radio, repeat the first step from the previous description.
After that:
- rotate the knob to select the clock settings tab;
- go to settings using the right arrow;
- The time is adjusted by rotating the “Volume”;
- Confirm the settings by pressing once;
- You can exit the settings using the left arrow.
After the device is fully connected, you can proceed to setting up the radio and speakers. To do this, it is recommended to set the volume to no higher than 30 units:
- Go to the main settings menu, find the “Audio” tab.
- When you press the handle, you go to a new list of functions, where you need to find the Fader tab and select it.
- In the factory settings, this indicator is 0; when configuring, you need to specify 15 units.
- When this parameter is configured, return to the “Audio” menu (swing the knob to the left).
- The next step is to adjust the high frequencies HPF (High pass Filter).
- This indicator is also 0 in most cases. It should be set to 50.
- After setting, you need to swing the handle to the left and exit the menu.
You should definitely check how well the acoustics play. Additional configuration may be required.
There are several ways to configure the radio in your car to receive radio signals. The simplest one is suitable for automatic search.
When the receiver is turned on, you can switch to it by pressing Band once:
- In receiver mode, press the right button. It must be held for about 1 second.
- After this, the device will begin automatically searching for a radio station.
- Immediately after finding the first radio wave, the signal begins to play.
- If the user is satisfied with the radio wave, he can save it by pressing the buttons located below the display.
- To search for further stations, repeat steps 1 to 4.
To reset the settings, the instructions for the Pioneer car radio recommend completely turning off the power to the device.