Replacing the oil pan and its gasket on a VAZ 2101-VAZ 2107
Welcome! Today, many people already know such a thing as an oil pan, but not everyone knows what it really is, when it needs to be changed and how to properly replace it on cars of the “classic” family - we will look at these questions today.
Note! To replace the pan and its gasket, you will need to prepare a few things in advance: First, be sure to stock up on wrenches, or you can use an extension, universal joints and sockets instead!
Summary:
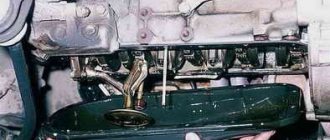
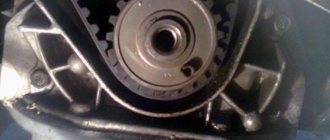
Where is the oil pan and its gasket located? The pan is located at the very bottom of the car engine; unfortunately, in order to fully see the pan it is necessary to remove the crankcase protection, which is done in the figure below:
Note! The blue arrow indicates the gasket that is located between the cylinder block and the crankcase pan!
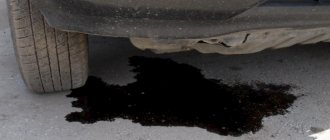
When do you need to replace the oil pan and its gasket? The pan must be replaced if it is deformed, due to which the engine oil that was located in it begins to flow out of the pan itself.
The pan gasket must be replaced if it is strongly compressed and if it is torn, how do you understand this, you ask? Usually, when the gasket is deformed, engine oil begins to flow through it, but the leak can also be treated by simply tightening the bolts that secure the oil pan, but if tightening the bolts does not produce any results and the leak does not stop, then replace the gasket with a new one.
Question? Which of these two parts are you replacing, the pan or the gasket? (Write your answer in the comments)
How to replace the oil pan and its gasket on a VAZ 2101-VAZ 2107?
Note! This method is not always suitable for people to remove the pan from a car, because not everyone has items that facilitate this, so at the very end of the article there is a video that shows the procedure for removing and replacing the pan and gasket without the use of special tools!
Removal: 1) Before starting work, drive your car into the inspection hole.
2) Then remove the crankcase protection from the vehicle. (How to remove the protection, see the article: “Replacing the crankcase protection”)
3) Then completely drain the engine oil from the car engine. (How to drain the oil, see the article: “Changing engine oil”)
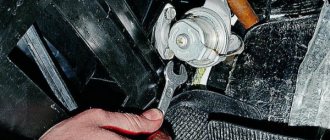
4) Next, unscrew the two nuts on both extreme sides that secure the right and left engine mount to the cross member.
5) Next, install the “Travece” on top of the engine compartment, it is indicated by the number “1” in the photo, and then begin to tighten the nut under the number “2” and thereby lift the engine from the car.
Note! You need to lift the engine until the ends of both studs, numbered “1”, coincide with the flat part of the engine mount brackets, which are indicated under the number “2”!
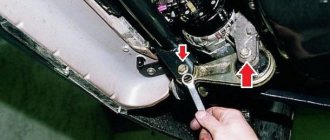
6) Now, using a wrench or an extension with a hinge and cap, unscrew the “19” bolts that secure the pan to the engine.
Note! There are washers under each bolt, so be careful not to lose them!
7) And finally, use a screwdriver to carefully separate the oil pan from the cylinder block and, as a result, remove it along with the gasket.
Note! If the gasket is stuck to the block, then use a sharp object to remove it and clean the entire plane of the block from pieces of the gasket!
Installation: 1) First, use a clean cloth to wipe the mating surface of the block, and then the oil pan.
Note! There is no need to degrease the surfaces of the block and tray using products such as White Spirit, etc. Because in the future, this will make it easy to disassemble the connection!
2) Next, lubricate both sides of the gasket with a thin layer of silicone sealant to ensure that engine oil does not leak through the gasket in the future.
3) Finally, install all the removed parts in their place, in the reverse order of removal.
Note! Replace all deformed parts with new ones, and tighten the “19” bolts that secure the oil pan during installation crosswise. When tightening the bolts, do not use much force because this may damage the crankcase flange and the gasket may be deformed!
Additional video: For more detailed instructions on removing and replacing the gasket and pan, see the video below:
How to replace the oil pan gasket
Deformation, extrusion
Spontaneous deformation of the gasket often occurs. You need to understand that this sealing element is subject to high loads, pressure and temperature changes. And if on the street side the air temperature can be +15 degrees, then inside the pan the oil is heated to 110 degrees Celsius.
Also, the pan gasket is subject to deformation due to high pressure in the oil system. What could cause this phenomenon? Often, oil seals and gaskets are squeezed out due to dirty The element must allow a mixture of oil vapors and condensate to pass into the inlet pipe. If the valve does not work, the high pressure in the engine squeezes out all the sealing elements. This does not happen right away. However, replacing these parts will cost a pretty penny. Moreover, not only the parts themselves are expensive, but also the work to replace them (for example, the rear crankshaft oil seal). To prevent this from happening, periodically check the crankcase ventilation system.
Step by step replacement
1. We drive onto the overpass.
2. Unscrew the four bolts securing the crankcase protection.
3. Unscrew and remove the engine splash guard. It is secured with several bolts.
4. Unscrew the drain bolt. Prepare containers for used oil in advance.
Before unscrewing the plugs, the engine needs to be warmed up.
5. Unscrew the nineteen bolts securing the crankcase cover.
6. After unscrewing the fastening bolts, the crankcase cover cannot be easily reached. The beam is in the way.
7. In order to remove the cover, you need to unscrew two engine mounts. The first airbag unscrews from under the hood on the left side. The other one is from under the car, through the hole in the beam.
Next, we raise the car 10-12 centimeters, go to the pit and place a wooden block under the gearbox. We lower the car and it turns out that the body will lower, and the engine and gearbox will stand on a block. Please note that you do not need to lift the car higher than 10 centimeters; if you lift it higher, you can bend the fuel pipes when you lower it.
8. Remove the crankcase cover and the old gasket, usually it sticks to the block.
9. Install a new gasket on the base of the pallet, seat the gasket on the sealant.
10. Coat the upper part of the gasket with sealant and install the crankcase cover in place.
11. Secure the crankcase cover with nineteen bolts.
12. Remove the stand from under the gearbox and screw on two engine mounts.
13. Tighten the drain plug in the crankcase cover and fill in new oil to the level.
14. Install and secure the mudguard, as well as the crankcase cover protection.
If you do not understand any point in the work, write your questions in the comments. I will help and advise.
Video lesson
How to tighten the head on a VAZ 2106 - Do-it-yourself car repair
The cylinder head (or cylinder head for short) is one of the most important components of the entire engine system of your car. The process of tightening it itself is quite simple, as is flushing the engine cooling system. To do the job well, you only need a special set of tools and the cylinder head bolts themselves.
1 In what cases is it necessary to tighten the cylinder head?2 What does the tightening torque of the bolts depend on?3 Basic recommendations when tightening cylinder head bolts4 What is tightening the cylinder head bolts used for?
5 cylinder head tightening
The need to periodically tighten the cylinder head is typical only for car brands that were produced up to 2010 inclusive. All other models of modern cars have a completely different engine structure, as a result of which this stage of work is not carried out. However, for those who own the same VAZ-2106 or 2107, this problem is primarily relevant during the car’s annual maintenance.
Advice: when repairing the ignition switch on a VAZ-2107, be sure to check the further operation of the engine. Replacing any element related to the operation of the engine greatly affects the condition and operation of the cylinder heads.
The need to tighten the cylinder block arises as a result of the gradual accumulation of water in the place where the bolts come into contact with the cylinders in the block. In this case, the main reason lies in correcting problems with lubricant leakage. After all, if oil begins to leak a little from the engine housing, then within a couple of months you will encounter problems with the operation of the engine cylinders.
How to remove the oil pan of a VAZ 2107
Before you begin removing and replacing the pan on a VAZ 2107, you need to understand its purpose, location and damage that entails the need to change the crankcase.
The pan is located at the bottom of the car, and in order to see it and gain access, you will need to remove the protection. Structurally, the device consists of a steel base that resembles a lid. This container contains engine oil, so to ensure tightness, there is a gasket between the crankcase and the cylinder block.
Removing the VAZ 2107 oil pan must be performed when deformations occur, which leads to engine oil leaking out of the engine. There is a lowest point on the cover body where the engine oil drain plug is located. Before removing the oil sump, you must first drain the engine oil.
An oil leak can occur not only when the crankcase is deformed, but also when the integrity of the gasket is damaged. To eliminate the leak, you need to tighten the fastening bolts, and if this does not help solve the problem, then you will need to resort to changing the gasket.
Now, when the need arises to replace the pallet on the seven, we must resort to such manipulations. It is worth noting that the gasket needs to be changed more often, and crankcase defects occur only if there is no protection on the car. Removing the engine oil pan on a VAZ 2107 should be done in the following sequence:
- To begin with, the car should be placed on an inspection hole or overpass. Carrying out work under the bottom without placing the car on a pit or overpass is simply very inconvenient.
- The next step is to begin dismantling the protection, which is secured with 4 bolts.
- After removing the protection, you need to unscrew the oil drain plug. If you plan to change the oil after completing the procedures, it is recommended to warm up the engine to 40-60 degrees before removing the plug. Before unscrewing the plug, you need to place a container into which the oil will drain. You can use an old plastic oil can for this.
- Next, you need to loosen the nuts securing the two engine mounts from under the hood. The nuts need to be loosened, but not completely unscrewed, to avoid the possibility of the engine moving. After loosening the nuts, you need to lift the engine to remove the cover. Without lifting it, it will not be possible to remove the crankcase on the seven.
- There are different ways to raise the engine. The first method is to use a traverse in the form of a wooden block, which is laid parallel to the radiator. A pin, pre-attached to the motor, is passed through the traverse. Screwing the nut onto the stud causes the engine to slowly rise. The second method involves using a winch. The third method is the simplest and most accessible - using a diamond-shaped jack, which is located under the box and, by acting on it, the engine is raised. When the engine rests against the nuts of the mounting brackets, you can continue further manipulations to replace the bottom cover.
- Along the perimeter it is necessary to unscrew all the crankcase mounting bolts, of which there are 19 in total. These bolts are screwed together with the nuts, so when unscrewing them, it is important not to lose them. Some bolts are difficult to reach, so it is recommended to use special hinged wrenches with socket or socket heads.
- After this, you can begin to dismantle the cover, as well as its subsequent replacement. The new crankcase should have a similar design. After the change, the assembly process is performed in the reverse order of dismantling.
Replacing the oil pump
To replace the VAZ 2106/07 oil pump, the car should be placed on a lift, inspection hole or overpass. In extreme cases, you can use a jack.
Necessary tools and equipment
To replace the oil pump you will need:
- set of socket wrenches;
- knife;
- jack;
- durable wooden block;
- wooden spacer;
- container for draining oil;
- new oil pump gasket;
- new pan gasket;
- new oil pump.
Oil pump removal procedure
The oil pump is replaced as follows:
- Clean the bottom of the engine from dirt. After unscrewing the protection fastening, remove it.
When replacing the oil pump, it is necessary to remove the crankcase protection
The oil drain plug is unscrewed with a hex wrench
To disconnect the engine from the body, you need to unscrew the nuts securing the lower supports
The engine is lifted using a jack and a wooden spacer
To dismantle the pallet you will need to unscrew the mounting bolts
The oil pump is removed along with the gasket
Oil pump installation procedure
Installation of a new or repaired pump is carried out as follows:
- Install a new pump with a new gasket.
- Tighten the pump fastenings.
- Reinstall the pan cover along with a new sealing element. Tighten all mounting bolts evenly.
- Lower the engine and install the supports in place. Tighten the fastening nuts.
- Install and secure the crankcase protection.
- Fill with new engine oil.
Video: replacing the oil pump on classic VAZ models
Replacing the oil pan and its gasket on a VAZ 2101-VAZ 2107
Today, many people already know such a thing as an oil pan, but not everyone knows what it really is, when it needs to be changed and how to properly replace it on cars of the “classic” family - we will look at these questions today.
To replace the pan and its gasket, you will need to prepare a few things in advance: First, be sure to stock up on wrenches, or you can use an extension, universal joints and sockets instead!
Where is the oil pan and its gasket located?
The pan is located at the very bottom of the car engine; unfortunately, in order to fully see the pan it is necessary to remove the crankcase protection, which is done in the figure below:
The blue arrow indicates the gasket that is located between the cylinder block and the crankcase pan!
When do you need to replace the oil pan and its gasket?
The pan must be replaced if it is deformed, due to which the engine oil that was located in it begins to flow out of the pan itself.
The pan gasket must be replaced if it is strongly compressed and if it is torn, how do you understand this, you ask? Usually, when the gasket is deformed, engine oil begins to flow through it, but the leak can also be treated by simply tightening the bolts that secure the oil pan, but if tightening the bolts does not produce any results and the leak does not stop, then replace the gasket with a new one.
How to replace the oil pan and its gasket on a VAZ 2101-VAZ 2107?
This method is not always suitable for people to remove the pan from a car, because not everyone has items that facilitate this, so at the very end of the article there is a video that shows the procedure for removing and replacing the pan and gasket without the use of special tools!
- Before you start work, drive your car into the inspection pit.
- Then remove the crankcase protection from the vehicle. (How to remove the protection, see the article: “Replacing the crankcase protection”)
- Then completely drain the engine oil from the car engine. (How to drain the oil, see the article: “Changing engine oil”)
- Next, unscrew the two nuts on both extreme sides that secure the right and left engine mount to the cross member.
- Next, install the “Travece” on top of the engine compartment, it is indicated by the number “1” in the photo, and then begin to tighten the nut under the number “2” and thereby raise the engine from the car.
Removing the VAZ 2107 engine sump
In principle, removing the VAZ 21010-2107 engine sump with your own hands is not difficult and, if there is an inspection hole, it will take no more than an hour (including oil changes). How to remove the pallet on the Classic, watch the video clip.
And so you will need: install the car on a pit or overpass, crawl under the car to loosen all the crankcase mounting nuts in a circle. Then use a socket wrench set to “17” to release the engine mounts. And we install a jack under the gearbox housing and lift it. After which you can remove the pan for further manipulations with the engine.
Subscribe
to our channel in
Index.Zen
Even more useful tips in a convenient format
On a warm engine, the oil pressure on the VAZ is on
The engine sump is the part located at the bottom of the car. A crankcase with a pallet is one and the same thing, so it is not at all necessary to use this phrase in everyday life. We will look at the material in detail about what this part is, why it is needed, and also how to remove the pan on a VAZ 2107.
Types of engine protection
Depending on the material used to make the protection, there are several types of engine sump protection.
- Structural steel . It is the most excellent option for any car, which is achieved by the presence of stiffeners. In addition, the steel from which such protection is made has good elasticity, which allows it to return to its original shape after deformation.
- Aluminum . Unlike steel, aluminum protection does not have stiffening ribs stamped on it, but this does not prevent it from being a worthy competitor to steel, the weight of which is much higher than that of aluminum. Aluminum protection is quite expensive.
- Plastic . Usually, it is made of carbon, Kevlar, carbon fiber, etc. It has a fairly low weight, but is significantly inferior in strength, since it usually crumbles upon impact.
How to remove the oil pan of a VAZ 2107
Before you begin removing and replacing the pan on a VAZ 2107, you need to understand its purpose, location and damage that entails the need to change the crankcase.
The pan is located at the bottom of the car, and in order to see it and gain access, you will need to remove the protection. Structurally, the device consists of a steel base that resembles a lid. This container contains engine oil, so to ensure tightness, there is a gasket between the crankcase and the cylinder block.
Removing the VAZ 2107 oil pan must be performed when deformations occur, which leads to engine oil leaking out of the engine. There is a lowest point on the cover body where the engine oil drain plug is located. Before removing the oil sump, you must first drain the engine oil.
An oil leak can occur not only when the crankcase is deformed, but also when the integrity of the gasket is damaged. To eliminate the leak, you need to tighten the fastening bolts, and if this does not help solve the problem, then you will need to resort to changing the gasket.
Now, when the need arises to replace the pallet on the seven, we must resort to such manipulations. It is worth noting that the gasket needs to be changed more often, and crankcase defects occur only if there is no protection on the car. Removing the engine oil pan on a VAZ 2107 should be done in the following sequence:
- To begin with, the car should be placed on an inspection hole or overpass. Carrying out work under the bottom without placing the car on a pit or overpass is simply very inconvenient.
- The next step is to begin dismantling the protection, which is secured with 4 bolts.
- After removing the protection, you need to unscrew the oil drain plug. If you plan to change the oil after completing the procedures, it is recommended to warm up the engine to 40-60 degrees before removing the plug. Before unscrewing the plug, you need to place a container into which the oil will drain. You can use an old plastic oil can for this.
- Next, you need to loosen the nuts securing the two engine mounts from under the hood. The nuts need to be loosened, but not completely unscrewed, to avoid the possibility of the engine moving. After loosening the nuts, you need to lift the engine to remove the cover. Without lifting it, it will not be possible to remove the crankcase on the seven.
- There are different ways to raise the engine. The first method is to use a traverse in the form of a wooden block, which is laid parallel to the radiator. A pin, pre-attached to the motor, is passed through the traverse. Screwing the nut onto the stud causes the engine to slowly rise. The second method involves using a winch. The third method is the simplest and most accessible - using a diamond-shaped jack, which is located under the box and, by acting on it, the engine is raised. When the engine rests against the nuts of the mounting brackets, you can continue further manipulations to replace the bottom cover.
- Along the perimeter it is necessary to unscrew all the crankcase mounting bolts, of which there are 19 in total. These bolts are screwed together with the nuts, so when unscrewing them, it is important not to lose them. Some bolts are difficult to reach, so it is recommended to use special hinged wrenches with socket or socket heads.
- After this, you can begin to dismantle the cover, as well as its subsequent replacement. The new crankcase should have a similar design. After the change, the assembly process is performed in the reverse order of dismantling.