A common breakdown in a VAZ generator is wear and failure of the front or rear ball bearing. The first signs of a malfunction that will require replacing the bearings of the VAZ 2114 generator:
| Malfunction | Cause |
| Crunch when turning | bearings of the VAZ 2114 generator have fallen apart, destruction or wear of the raceways, lack of lubrication |
| Whistle, noise | bearing jammed, rotation on seating surfaces, armature wear |
| Battery charging is unstable | |
| Overheating of the housing, rotor |
Watch the video to see how an electric generator with faulty bearings makes noise.
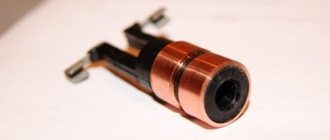
Noise from the front bearing of the VAZ generator
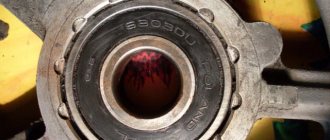
VAZ generator bearing wear
The article provides detailed instructions with photos and videos on how to make diagnostics, correctly disassemble the electric generator, replace the bearings with your own hands and put the unit back together. Additionally, information on the choice of bearings is provided (numbers for the injector, sizes, article numbers, prices, which ones to buy, markings), you will also find repair tips, diagrams describing the design of the unit.
How many bearings are in the VAZ 2114 generator? We study the design of the unit
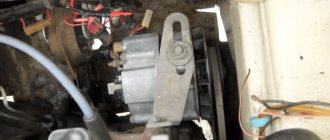
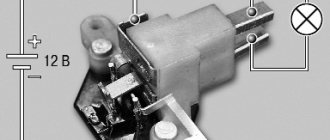
To find out how many bearings are in the VAZ 2114 generator, study the diagram below; the photo shows the model 94.3701 unit disassembled, the positions of the parts are marked with numbers. The electric generator of Lada 2114 and 2115 has two rolling elements, rear and front (16, 15).
To replace, prepare the following tools:
- Socket wrenches or sockets (8, 10, 13, 17, 24);
- Adjustable wrench;
- Hammer, vice;
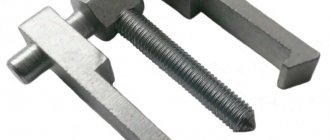
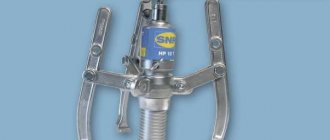
- Two-point puller (if possible);
- Screwdrivers;
- Extended head 27 (for pressing).
How to change the bearing on the Eltra generator in Lada 2114 - removing and disassembling the unit
- The first step is to remove the negative terminal of the battery;
- Unscrew the bolt at the lower fastening (3);
- Now remove the terminal protection from the mechanism (2), then unscrew the nut at the contact.
- Find and unscrew the upper mounting bolt (1).
- Remove the belt (4) from the pulley (5) and remove the unit from under the hood.
- We clean off the dirt, and then clamp the generator in a vice, using an adjustable wrench with a 24mm socket, unscrew the pulley nut, and first apply WD-40.
- Next, remove the plastic cover using a screwdriver.
- We unscrew the bolts holding the rectifier block using head 8 (10). Next, unscrew the contact bolt.
- We remove the block. Now unscrew the housing coupling nuts. Let's disassemble the body.
- There are problems with removing the cover, since there is a ball bearing located there, which is mounted on the armature shaft. Disassembly of the case is shown below.
How to press out and remove a bearing without a puller?
After disassembling the electric generator, the front p/sh is pressed off the housing, and the rear one from the rotor armature shaft. Follow the step-by-step instructions.
- Clamp the structure in a vice or place it on a hard surface.
- Using a hammer, through a mandrel selected to the size of the inner ring, carefully knock out the old spare part.
- We dismantle the rear rolling element using a method without a puller (see photo). We use two open-end wrenches 17 or use a puller if available.
How to replace bearings in a VAZ 2114 generator with new ones? Installation and reassembly of the unit
- Lubricate the seating surfaces (in the housing and the rotor armature shaft) with Lithol.
- The front rolling element is pressed in until it stops using a hammer through the head. For reliability, roll the end with a center punch.
- The rear part is pressed onto the rotor shaft using a 27 mm elongated type head or select a piece of steel pipe with an internal diameter of 20 mm and an external diameter of 24-26 mm.
- After installing new spare parts, we assemble the unit using reverse technology according to the diagram. The replacement is completed, we mount the electric generator back.
What bearings are on the VAZ 2114 generator - how much, what numbers and sizes
When choosing spare parts, motorists have the following typical questions:
- What are the generator bearing numbers?
- Answer : Markings (numbers):
- according to GOST: 6-180303 C17, 6-180203 C17;
- according to ISO: 6303.2RS, 6203.2RS.
- What bearings are on the VAZ 2114 generator?
- Answer : In the VAZ 2114 generator (injector), the manufacturer provided closed single-row radial balls with lubricant.
- How much does a generator bearing cost?
- Answer : The cost of a set of two Russian-made ball bearings will be 300-350 rubles.
- Generator bearing dimensions?
- Answer : For detailed information on the dimensions of the parts, read the article “Replacing the bearings of a VAZ 2110 generator”
egoST
I drive a Ford Focus ST in Moscow
The engineers did a great job - 15 devices in 1 case.
An entire car on-board computer with FULL HD footage. We are pleased with the clear rear view camera and GPS navigator with 32 satellites.
I've been using it for 6 months and already forgot about the fines
.
I am sharing a link to the official website of this miracle recorder: MORE
Table of recommended bearing manufacturers
| No. | Factory | Catalog number (article) | Price 2021, rub. | ||
| Front | Rear | Front | Rear | ||
| 1 | VBF Russia | 6303.2RS | 6203.2RS | 160 | 120 |
| 2 | SPZ Russia | 6-180303 C17 | 6-180203 C17 | 170 | 130 |
| 3 | SKF Sweden | 6303.2RS | 6203.2RS | 370 | 330 |
| 4 | FAG Germany | 6303-2RSR | 6203-2RSR | 320 | 310 |
Additional recommendations for replacing rotor ball bearings
- Reasons for ball bearing failure (for subsequent replacement):
- Wear of parts to failure (service life from 100,000 km);
- Ingress of dirt, abrasive particles, moisture;
- Damage to sealing protective washers, separator;
- Drying of the lubricant, insufficient quantity;
- Development of landing surfaces;
- Corrosion on rings;
- Low-quality steel (non-metallic inclusions, inconsistency in hardening, hardness);
- Inconsistency in the processing accuracy of rings, micro-geometry of raceways, balls;
- Before reassembling, check the condition of the internal elements of the mechanism (brushes, contacts); they should be changed at the same time;
- Additionally, it is recommended to check the condition of the clutch release ball bearing and the hub bearings on the VAZ.
- If, when unscrewing the pulley nut, it turns, insert a screwdriver into the groove of the cover, thereby stopping the rotor.
- When tightening bolts, lubricate them with graphite lubricant.
- Be sure to watch useful videos on how to correctly change bearings on a Lada model fourteen, as well as how to improve and strengthen the generator.
Improving the VAZ generator
Replacing generator bearings 2114
Ilya Vasiliev
I drive a Ford Focus ST in Moscow
This email address is being protected from spambots. You must have JavaScript enabled to view it.
see also
Battery charging lamp is on
- 6 0 22k
Strut support bearing
- 81 1 100k
Repair of VAZ 2115 generator
- 3 0 7k
Generator malfunctions - signs, diagnostics, causes, testing
- 797 13 648k
Replacing the front wheel bearing of a VAZ 2114
- 4 0 11k
Current to power conversion calculator
Convert how many amperes a kW has online. Calculator for converting current amperes to power watts
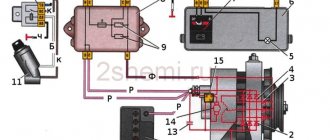
In a modern car, the generator provides current to the entire power supply system: powering the engine, lighting devices, and recharging the battery. On VAZ 2113/2114/2115 cars, generators of type 5102.3771 and 94.3701 are installed. Both generators are a three-phase AC electric motor with electromagnetic excitation, with a built-in rectifier unit and voltage regulator. The generator on cars of the Samara and Samara-2 family is traditionally located in the same way as on the “Classic”, on the right side of the engine compartment - near the headlight on the passenger side.
Tips for replacing the VAZ 2114 generator bearing
Before disassembling the generator, it is necessary to purchase the necessary spare parts that are out of order or rusty. You can only understand which bearing has failed by disassembling the unit. Therefore, when replacing a bearing, it is better to purchase a pair of bearings at once; fortunately, they are not expensive; a large bearing from the VAZ manufacturer with article number 180303 is about 150 rubles and a small bearing with article number 24940220 is about 60 rubles. You can also purchase a set of analog bearings from PILENGA, article number PWP0201, costing 110 rubles.
The price is indicated for spring 2021 in Moscow and the region.
Care should be taken when reassembling the generator. It is important not to miss a single detail and to connect the electrical contacts correctly. In addition to the correct installation of bearings, it is also necessary to correctly install the brushes and check the belt tension.
Of course, every car owner has the right to choose the method of troubleshooting, for example, replacing the bearing with your own hands or contacting a specialized workshop. If you decide to repair the generator yourself, you will need the following tools:
- hammer;
- flat and Phillips screwdriver;
- chisel;
- WD 40 lubricant;
- a set of new bearings for the VAZ 2114 generator;
- keys to “8”, “13”;
- special puller;
- ratchet with a set of attachments “13”, “14”, “15”, “32”.
Open the hood. Loosen the tightening of the coupling bolt nut. Remove the negative cable from the battery.
In addition to the fact that a car is a means of transportation, it is also a source of a wide variety of sounds. Sounds can tell a lot to an experienced owner. Many can easily make a diagnosis without even opening the hood or looking under the bottom. It is enough, as an experienced doctor, to listen to the nature of the noise, and the malfunction is clear in the palm of your hand. Some nodes cannot be diagnosed any other way. This is especially true for bearings. Today we will be interested in the generator bearing.
Content:
Symptoms of generator bearing failure
Problems with the generator cannot be ignored. After all, they significantly affect the ability to use the car. The following symptoms usually indicate that the bearings have failed:
- Crunching noise when the engine is running. It often indicates wear on the generator ball bearings, but can also be caused by other reasons. When such a sound appears, you need to make sure that it comes from this node;
- Whistle, noise when the engine is running. These sounds also often indicate failure of these parts, but they can also occur due to other malfunctions. It is important to check that the generator is whistling;
- Unstable battery charging. The battery can either work normally, or quickly discharge, literally overnight. Often there is a drop in voltage in the on-board network and the inability to start the car due to a dead battery. These signs often indicate a broken ball bearing, but can also be caused by a malfunction of other parts of the generating device. There may also be a problem with the battery, terminals or wiring;
- The generator housing is hot. This can be noticed by touching it when the power unit is running or has just been turned off.
Generator bearing and belt diagnostics
While the generator is running, with or without noise, it is rarely noticed. But as soon as it stops producing current, its absence is immediately noticed. The battery charging light comes on and the search for a fault begins. But it was enough to just listen to the sounds that the generator makes, and the trouble could have been avoided.
Replacing the VAZ 2114 generator bearing may be required as early as 60-80 thousand km. It all depends on how much the owner pays attention to such little things as the tension of the generator drive belt. First of all, this is what affects the resource of the generator. For prevention, let's check the degree of belt tension.
An ordinary eight-cylinder engine, which costs 2114, does not require special maintenance skills. On the tenth family, the belt is tensioned through a tension roller, but in 2114 there is none of this, and the belt itself no longer drives any mechanisms or assemblies. There is no power steering or air conditioning compressor. It's simple, the main thing is to buy the right belt. Its index is 21082-3701720, and it is better to take Gates or Bosch. Such a belt costs the same as two domestic ones, but its service life is longer. A German belt will cost 530 rubles.
REPLACEMENT
If there is a whistle coming from under the hood, and it turns out that the generator is the cause of the whistle, then it’s time to change the bearing on the VAZ 2114 generator. It is better to change them in pairs, because the second one may soon whistle too.
At a car service center, they will charge approximately 600-700 rubles for the replacement work, plus removal and installation of the generator - approximately the same amount of money. But you can change the bearing on the generator yourself; you only need minimal plumbing skills, tools and care when disassembling and reassembling. Alternatively, you can buy a new assembled generator, but replacing the VAZ 2114 generator bearings will cost much less.
So, let's look at how to change the bearing on a VAZ 2114 generator. To replace it, you will need the following tools:
- Set of combination keys;
- Screwdrivers – slotted and Phillips;
- Puller for pressing out the rear bearing;
- Hammer;
- Vise;
- A drill bit with a diameter of approximately 4 mm and a drill (not needed if the entire front cover is being replaced).
Replacing the generator bearing yourself is done as follows:
- We turn off the engine, remove the battery terminals;
- Loosen the belt tensioner nuts and remove the tension belt;
- We completely dismantle the belt tension bar, disconnect the wires, unscrew the mount and remove the entire device itself.
Then you should disassemble the housing and replace the bearings:
- First, remove the back plastic cover; it snaps into place with three clips;
- We dismantle the brush assembly together with the relay regulator;
- We remove the diode bridge; it is held on by three screws and a pin on the supply terminal. Therefore, in addition to the screws, you also need to unscrew the nut by 10;
- There are three screws on the aluminum back cover. We unscrew them and dismantle the back cover, at the same time the stator winding;
- Next, we proceed to disassemble the front part of the generator. We carefully clamp the rotor in a vice, then unscrew the nut securing the pulley, the pulley can be removed very easily;
- Gently tapping with a hammer, remove the front cover along with the bearing;
- That's it, the main assembly has already been disassembled, all that remains is to compress and press in the bearings.
The rear bearing is pressed from the armature (rotor) with a special puller, but first it is better to move it on the shaft using two screwdrivers so that the puller can engage. The new bearing is hammered into place through a mandrel (you can use a 15mm socket).
According to factory technology, the front cover must be replaced as an assembly, and it is difficult to knock out the bearing from it (it is cored in the housing) without damaging the cover. But you can still remove it; for this you need an electric drill and a 4 mm drill. Using a drill, we drill out the metal at the core points and knock out the bearing. We press the new part into the lid and seal it. We perform the entire assembly in reverse order.
That's all, we figured out how to change bearings on a generator.
Alternator belt tension VAZ 2114
The tension of the generator belt is checked on a long branch, and the force should be about 10 kgf. To more or less accurately determine the force, you can use a simple household steelyard. If the belt deviates by no more than 10 mm at this force, the tension is fine. If it is less, the belt will be overtightened and this may end badly for the generator bearing, to which we are already returning.
But even if the alternator belt has always been in perfect condition, has not slipped or been overtightened, there is a possibility that the bearing may sing. Moreover, setting the sound source is quite simple. If a suspicious hum appears, it is enough to make sure that it is a bearing, since there are plenty of singers in that area. This includes the timing belt, the front cover bearing, the pump, and the timing belt tension roller. To accurately determine the malfunction, it is enough to remove the belt from the pulley and start the engine for a short time. If the noise disappears, it is our bearing that is making noise.
VAZ 2114 generator bearing numbers
Once we were convinced that bearing replacement was inevitable, all that was left was to simply select the bearing and replace it. In general, everything is simple, but with the huge number of fakes that flood the market, it would not hurt to know the dimensions of the bearing so as not to get into trouble. Since there are only two ways to find out the dimensions of the bearing - remove the generator and measure it with a caliper, or ask knowledgeable people. Knowledgeable people say that: the front bearing of the generator has an internal diameter of 17 mm and an external one of 47 mm; the rear bearing has an inner race with a diameter of 15 mm, and its seat is 35 mm; The width of the bearing race of the VAZ 2114 generator is 11 mm at the rear and 14 mm at the front.
The front bearing should be marked 6302, and the rear bearing - 6202. The price of a generator bearing for a VAZ 2114 should not be higher than 220 rubles. Although, depending on your luck. And also, if you are too lazy to play with pressing the bearing out of the cover, as an alternative, you can buy a cover assembled with a bearing. It will cost no more than 400 rubles, and the replacement will be much more pleasant.
Bearing VAZ 2101-07, VAZ 2108-099 front generator 302
Dear customers, in order to avoid errors when sending the VAZ 2101-07 bearing for the front 302 generator, in the “Comment” line indicate whether the rotor shaft on the pulley side has an internal hexagon or not, the model of your car, the year of manufacture.
The generator is designed to charge the battery. If it is faulty, then it is possible to drive the car, but the battery will drain all electronics, which will ultimately lead to the battery becoming unusable. The result of a generator failure will be disastrous, since you will have to shell out a considerable amount of money to buy a battery.
If you hear extraneous noise in the form of a metallic ringing, then most likely the bearings need to be replaced. It can only be detected after removing the generator.
To check the front bearing, you need to rotate the front cover of the generator. In this case, it is necessary to hold the pulley with your hand. If there is noise that does not correspond to the normal operation of the mechanism, there is play or “sticking”, the bearing must be replaced.
1 - pulley; 2 — segmental key; 3 — front cover of the generator; 4 — outer bearing mounting washer; 5 — front bearing of the rotor generator; 6 - rotor; 7 — coupling bolt; 8 - stator; 9 — rear bearing of the rotor generator; 10 — buffer sleeve; 11 — back cover of the generator; 12 — insulating bushings; 13 - bolt; 14 - voltage regulator; 15 — generator rectifier block; 16 - capacitor; 17 — contact bolt; 18 - bolt; 19 - bolt; 20 — inner bearing mounting washer; 21 — fan impeller.
The front bearings on generators for injection VAZs are different, except for 6302s; more often there are generators with a 6303rd front bearing.
The main distinguishing feature of generators is the rotor shaft.
If the rotor shaft on the pulley side has an internal hexagon, then the diameter of the shaft and the hole in the pulley is 15mm and the bearing there is No. 6302 with dimensions 15x42x13mm. If the shaft is without a hexagon, then the diameter of the shaft for the pulley is 17 mm, respectively, and the pulley has the same, increased size. In such generators, the front bearing is already No. 6303 with dimensions 17x47x14mm.
Bearing replacement, instructions
Now for the procedure. There should not be any particular difficulties in dismantling the generator. Now that we have the generator in our hands, we can start disassembling it, but we will have to disassemble it completely. To do this, it is advisable to have a vice, and the process itself schematically looks like this:
- Remove the back cover.
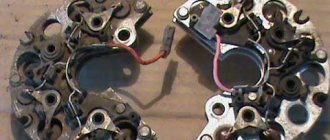
- Remove the diode bridge.
- Remove the brushes.
- Unscrew the pulley nut, holding it in a vice through an elastic spacer so as not to damage it.
- Attention! Be sure to mark the covers with a marker so as not to disturb the alignment.
- Use brake fluid or magic WD40 to treat the tightening bolts and the cover mounting areas.
- Unscrew the tightening bolts and remove the covers.
- Use a wooden punch to knock out the anchor from the cage on both sides.
- Use old bearings instead of mandrels to press in new ones.
It is done. The bearings are pressed in, now all that remains is to put everything back together so that the rotor does not touch the stator. After installing the generator and a new belt, we check the voltage at the battery terminals, if as a result the generator runs quietly, the voltage is at least 14 V, we can consider the mission completed. Good luck to everyone!
From the moment of purchase, the owner of the car must understand that now a significant part of his time and effort will be spent on taking care of this vehicle. Especially when your favorite “wheels” become not only a means of comfortable transportation, but also the main source of income. Constant trips are always fraught with wear and tear on the car, while a significant part of the repairs can be done yourself. Replacing the bearings of a VAZ-2114 generator is not as simple as, for example, replacing a flat tire. But a real driver should be able to repair this breakdown himself.
AvtoVAZ is the largest automobile manufacturer in the CIS and other Eastern European countries. It has reached the point that some spare parts and assemblies for foreign companies (such as Nissan and Renault) are produced by this company. The high popularity of the car, alas, does not insure it against accidents, breakdowns, and, as a result, the need for repairs. But the large number of sales of VAZ cars guarantees that many young drivers need advice and recommendations for repairs.
A number of such standard breakdowns as a flat tire and a cracked windshield were discussed more than once. But how to replace the bearings of a VAZ-2114 generator is a question that is often ignored, although the problem is still not uncommon.
BEARINGS
The generator on a VAZ 2114 car consists of the following main parts:
- A housing consisting of two aluminum covers (front and back);
- Stator (winding located inside the housing);
- A rotor rotating inside the stator;
- Diode bridge;
- Voltage regulator.
The armature (rotor) rotates in two bearings, which are installed: one in the front cover and one pressed onto the rotor. Both bearings are press-fit and therefore are not that easy to replace.
There are usually two main problems with a generator:
- Charging disappears;
- Noise occurs: whistling, grinding or humming.
If there is a whistling noise under the hood, a worn alternator bearing is often to blame. Due to such a malfunction, charging is not lost, but you still shouldn’t drive with noise, since as a result the generator will jam because the rotor will stop rotating.
Before changing or starting repairs, you need to buy the necessary spare parts. And before purchasing, you need to find out what bearings are on the VAZ 2114 generator. A bearing of brand 180202 (a foreign analogue of 6202-2RS) is installed on the rear of the rotor, and 180302 (an analogue of 6302-2RS) is installed on the front cover. The cost of Russian parts is low - in the range of 50-80 rubles per piece, imported spare parts are noticeably more expensive - from 200-250 rubles. Bearings are often sold as a set, that is, in pairs. Imported analogues are of much higher quality, so when choosing parts it is better to buy brand 6202-2RS and 6302-2RS.
"Symptoms" of a breakdown
There can be a lot of breakdowns, including burnt-out diodes and complete discharge of the generator. But these are all separate topics, but when the bearings start to act up, it cannot be confused with anything. When the car is running, there is a loud noise, and often a squeaking sound. The reason for this is (usually) the grease in the bearings has worn off. As long as it is there, everything will work fine. But if there is no longer enough lubrication, there won’t be enough work for a long time. As soon as the first symptoms appear, repairs must be made immediately.
If the bearing housing itself is intact, then lubricating it will not be a problem.
But you need to get to them first. The VAZ assembly uses generators from the Eltra series of models, which, of course, is a plus. But for home disassembly it promises a little more work and attention. To get to the ill-fated bearings, you need to highlight a number of unpleasant points:
- special tools are needed, and without a puller it will be difficult to check;
- problems with checking the bearing in the front cover (in the article a little later).
This process is very difficult. First of all, in these generators, as a rule, the bearing is sealed. Therefore, in order to get it without the above-mentioned devices, it must be knocked out, having first selected the desired nozzle. But since it is cored, before doing this you should remove part of the metal that holds it there. If not operated correctly, the generator cover can easily be damaged, in which case you will have to purchase a new one. For reference, it should be noted that the service cost of replacing bearings (as a rule) also includes the cost of a new cover.
In order for everything to be correct, you should follow simple instructions. You need to take a drill and a drill bit with a diameter of 4 mm. We set the drill at 45 degrees so that the drill is in the cored hole. We drill 2-3 mm in each hole. This way, both the bearing and the residual metal will have somewhere to go.
Other work tips can be found below. The described tips will be a good recommendation on how to correctly replace the bearings of a VAZ-2114 generator with your own hands. Video instructions will become an even better advisor, since in auto repair theory alone is not enough.
An example of disassembly is shown on a newer generator model, which differs from its predecessor only in a number of indicators and characteristics.
Repair
So, you have decided to purchase new bearings and follow a difficult but fairly economical path. For cars like the VAZ 2114, self-repair is a common thing. Such work, even in the absence of impressive experience and knowledge, is not difficult to do. Simple follow the instructions.
- Disconnect the generator from the battery to deprive it of power.
- Remove the timing belt.
- Using wrenches of the appropriate size, remove the fastening nuts.
- The film is removed, after which the sleeve is removed.
- The generator itself is carefully removed from its seat.
Subsequent work is more subtle and complex. After all, you have to disassemble the generator in order to get to the bearings. The task is not an easy one, but you can handle it yourself.
- There are nuts on the generator housing that need to be unscrewed;
- Remove the cover and remove the regulator from under it. This element is responsible for brushes and tension;
- Disconnect the stator from the cover. This operation should be done as carefully as possible so as not to damage the copper winding;
- Sometimes the housing can become rusty, making the stator difficult or even impossible to remove. In such a situation, arm yourself with a hammer and an impact screwdriver. With the help of these tools it is necessary to deliver the most accurate blows. This way you will be able to divide the element into blocks;
- Separating the generator from the stator, you will see both bearings - front and rear;
- Remove the damaged component and install a new alternator bearing in its place. Don't forget that there are two of them. For prevention, you can replace both at once, even if one of them is in completely good condition;
- Assembly is performed strictly in reverse order.
Do-it-yourself repair versus service repair
Of course, contacting the service is always safer, and the driver will be more confident that everything will go right. But it is precisely for this confidence that you often have to overpay, and by very substantial amounts. As already written, even some of the parts that do not need to be replaced, like the top cover of the generator, often also become a reason for extra payment (especially in non-professional service stations).
Of course, doing a DIY repair is not an easy task, especially when you get to parts like a generator. But sometimes everything is done for the first time. And the significant amounts of money to pay for the robotic service can be spent on more pleasant things. In addition to economic indicators, a clear advantage will be the fact that the car owner will be able to feel like a real professional, realizing that he is the one who is able to repair his own car.