Print this article Font size 16
Some novice motorists are sure that the source of energy in a car is exclusively the battery. But this is not so. The battery's job is to supply the necessary current to start the engine and provide power to the starter so that it turns the crankshaft.
The engine starts, and at this moment the electrical equipment begins to be powered by the generator. The quality of operation of electrically dependent equipment and timely recharging of the battery depend on the generator. If the generator breaks down, the entire load goes to the battery. Once it runs out of power, the entire car will be left without power.
In almost 90% of cases, generator failure is associated with its bearings. That’s why we’ll talk about them in more detail today.
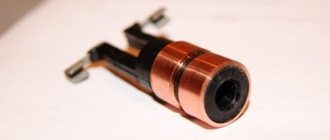
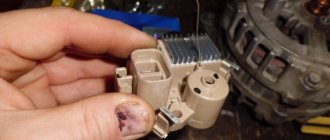
Element appearance
Reasons for failure
There are many reasons for bearing failure, but there are several main reasons, which are discussed below.
Wear
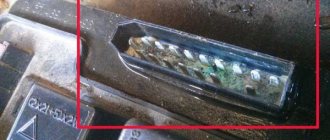
On the left are old bearings, on the right are new bearings.
Wear is a typical cause of bearing failure, since the number of revolutions of the generator rotor is huge over the Nth period of time. Consequently, the lubricant in bearings under the influence of high temperatures loses its properties and the bearing ceases to receive the required slip coefficient, which causes heating and increased clearances in the ball part of the bearing.
Belt tension
Excessive tension on the alternator belt greatly affects the life of its bearings. It is necessary to tension the belt correctly, observing all norms. The generator belt should bend under the influence of 10 kg. by 5-7 mm.
Signs of bearing failure and diagnosis
You can understand that the bearing in the generator has failed by the following characteristic signs:
- when the engine is running, a hum, whistle or grinding noise is heard from under the hood;
- the generator is hot to the touch when the engine is running or immediately after stopping it;
- the device pulley rotates.
In addition, some other symptoms may indicate this problem. And the ones mentioned above do not always indicate a bearing malfunction.
Comparison of worn bearings (left) with new ones (right)
The bearings in the generator can wear out due to time, lack of lubrication or poor quality, and also due to too much belt tension. The latter is usually typical for front bearings.
In order to accurately verify the failure of this element, you need to carry out simple diagnostics. Simply remove the alternator belt and start the engine.
If the extraneous sounds disappear, it means that the bearing is faulty. With the engine off, you can slightly shake the generator up and down by grabbing its pulley. In this case, no backlash should be felt. You can find out which bearing should be replaced after disassembling and inspecting all the elements. It's often better to buy a kit right away just in case.
Diagnostics
If noises and hums appear in the operation of the engine, it is necessary to check and find the culprit of the noise. Most often it is the generator, but in order to exclude other culprits it is necessary to diagnose it.
It is not difficult to independently check the condition of the bearings; this only requires compliance with the points described below.
- Remove the generator belt from the crankshaft and generator pulleys
- We start the engine and listen
- If the noises, whistles, vibrations have disappeared and the internal combustion engine is working properly and smoothly, then the culprit is definitely the generator bearings.
- You can also grab the generator pulley and shake it up and down; there should be no play. Turn the rotor manually, there should be no whistles or squeaks, the rotor should rotate smoothly and softly.
How to change bearings on a generator in a VAZ 2110 (Video)
- When replacement is required
- What to use
- Replacement
Some novice motorists are sure that the source of energy in a car is exclusively the battery.
But this is not so. The battery's job is to supply the necessary current to start the engine and provide power to the starter so that it turns the crankshaft. The engine starts, and at this moment the electrical equipment begins to be powered by the generator. The quality of operation of electrically dependent equipment and timely recharging of the battery depend on the generator. If the generator breaks down, the entire load goes to the battery. Once it runs out of power, the entire car will be left without power.
In almost 90% of cases, generator failure is associated with its bearings. That’s why we’ll talk about them in more detail today.
Element appearance
Size and catalog numbers
These parameters of the ball bearing are necessary for purchase, since without these numbers it is very difficult to buy the right part suitable for your car.
The dimensions of the bearings varied depending on the year of manufacture of the car, so the selection of a bearing can be carried out based on the year of manufacture. auto.
Cars manufactured before 2001 with carburetor engines they have bearings of type 6302 front and 6202 rear.
Cars produced after 2001 with injection engines, have bearings type 6303 front and 6203 rear.
Catalog numbers (articles) and external dimensions
| Bearing, no. | vendor code | Dimensions, mm |
| 6303 | 180302 | 17*47*14 |
| 6203 | 80203 | 17*40*12 |
| 6302 | 180303 | 15*42*13 |
| 6202 | 80202 | 15*35*11 |
When replacement is required
If you hear creaking and howling while the generator is running, then you have discovered the main sign of bearing failure. The only correct solution is replacement.
Creaking and howling occur due to the fact that the bearing separators lose lubrication, they wear out, and are destroyed as a result of prolonged use under heavy loads.
Sometimes a thin creaking sound can be heard from the generator, which is often confused with bearing failure. In fact, it could be the timing belt pulley or the water pump. Because to make sure, just remove the belt. If the sound remains, then the culprit is the bearing.
What to use
Before you start replacing the bearings on the generator, you need to determine what elements are on your car, as well as what they can be replaced with.
| Bearing | Number | |
| Old generators | New generators | |
| Front | 6302 | 6303 |
| Rear | 6202 | 6203 |
When choosing bearings, pay attention to the hub manufacturers. For VAZ 2110, bearing hubs are produced in the city of Samara and are marked SPZ-4. But there are also Vologda and Saratov hubs marked 23 GPZ and 3 GPZ, respectively. It is not recommended to purchase bearings with unmarked hubs, much less use Chinese generator elements.
Dimensions
It will not be superfluous to know what dimensions the standard front and rear generator bearings for your “ten” should have in order to make sure that the spare parts are selected correctly.
The rear bearings of the new type, marked 6203, have the following dimensions:
- Inner diameter - 17 millimeters
- External diameter - 40 millimeters
- Width - 12 millimeters.
We recommend: What to do if the air conditioner in your car does not turn on?
The front bearings marked 6303 have the following dimensions:
- Inner diameter - 17 millimeters
- External diameter - 47 millimeters
- Width - 14 millimeters.
Based on the dimensions, you can understand why rear and front bearings are often called small and large, respectively. It’s easy to visually distinguish them from each other, so you definitely won’t confuse the elements when replacing them.
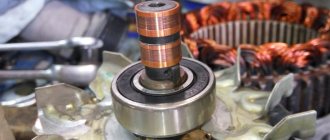
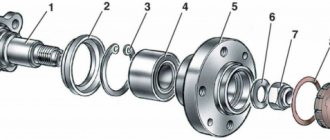
Disassembled device
Replacement
To replace it, you will need to remove the generator from the car and some plumbing tools. It would also be a good idea to have a generator bearing puller. Having all the necessary tools, you can handle the job with basic mechanical knowledge.
Puller
The puller greatly facilitates bearing replacement work, saving time, effort and nerves. This device is a faithful assistant not only when working with a generator, but also with other car parts.
It consists of claws and a thrust bolt. There are a large number of different pullers, they are: two-jaw and three-jaw. In our case, when working with a VAZ 2110 generator, it is best to use a two-jaw one; it is the most compact and convenient to dismantle the bearing.
Its cost varies from 200 to 1000 rubles, depending on the quality of the part.
Necessary tool
The tools you will need to complete the work are presented below:
- Ratchet;
- 13mm, 10mm key;
- 21mm head;
- 8 mm hexagon;
- Gas key;
- Powerful screwdriver “+”;
- Hammer;
- Puller;
- Punch;
- WD-40 (lubricant)
- Rags;
- Marker;
Stages of work
1. Disconnect the negative terminal from the battery. We unscrew the wires on the generator with a 10mm wrench and remove the generator excitation chip.
2. We remove the generator from the car. To do this, unscrew the generator belt tension bolt and remove the belt, unscrew the generator from the mounts and remove it from the car. Be careful not to lose the rubber bushing and washers when removing the lower mounting bolt.
3. Let's start disassembling. Remove the plastic cover of the diode bridge by bending the three latches. Unscrew the two screws securing the brushes to the body and disconnect the connector from the brushes. We mark the alignment of the covers with a marker so that in the future we can assemble everything correctly.
4. Using a screwdriver, unscrew the screws of the ends of the generator winding from the diode bridge and bend them. Unscrew the screw securing the capacitor and separate the diode bridge from the generator.
5. We unscrew the generator pulley with a 21 mm socket, holding it with a gas wrench and holding the rotor shaft with an 8 mm hexagon. We take out the generator pulley and thrust washer.
6. Unscrew the 4 bolts of the cover and remove it along with the stator winding.
7. We take out the back cover by pressing the manifold with our fingers and pull the cover towards ourselves, remove the plastic bearing bushing.
8. Remove the bearings using a puller.
We assemble the generator in the reverse order.
Is replacement required? Diagnostics and testing of generator bearings on a VAZ 2110
Signs that indicate that the VAZ 2110 generator bearings are faulty:
- Whistle, hum when the rotor rotates in the generator;
- Instability of battery charging due to problems with shaft rotation;
- The pulley turns;
- Intense heating due to friction of worn parts;
- See the generator noise in the video.
Noise from the front bearing of the VAZ 2110 generator
If the listed symptoms appear and you suspect that the bearing is faulty, then carry out a simple diagnosis:
- Remove the belt from the pulley;
- Start the car;
- If the whistle, hum, and other signs disappear, this means that a new generator bearing needs to be installed.
- Next, we move on to repairing the VAZ generator.
- Watch how to check the node yourself in the video.
How to check the bearings of a VAZ generator
Reasons why a bearing fails:
- Wear of rolling parts (raceways, rolling bodies, cage, seals).
- Insufficient quantity or leakage of lubricant.
- Rotation of the outer race in the housing or the inner race on the rotor shaft (due to low accuracy of the product or when parts are worn).
- If abrasive particles get inside the element, a squeak appears.
- Expiration of service life before failure.
- Pulley imbalance, belt fault.
- Rotating the pulley.
Replacing bearings yourself
If the generator is repaired on its own, the main problems become:
- how to remove the front bearing of a generator - it is often rolled into the front cover housing, pressing in a new product becomes more difficult, since part of the housing is destroyed during dismantling;
- Removing the rear bearing - you need a puller with suitable dimensions.
However, if the generator starts to hum, you need to act quickly before the rotor completely jams.
Dismantling the generator
On some cars, the generator can be removed through the hood, on others, for example, VAZ 2112, you will need an overpass, pit or lift. The dismantling sequence is as follows:
- disconnecting the “–” terminal from the battery;
- loosening the tensioner nut;
- dismantling the alternator belt;
- disconnecting the terminals of the on-board system from the dismantled unit;
- removing engine protection;
- unscrewing the two mounting bolts from below;
- removing the generator from below.
After this, the repair continues on a table or in a vice. At this stage, the dimensions of the front and rear bearings of the auto generator are still unknown to the user if there is no manual.
Complete disassembly
Since the generator bearing can be checked for runout only after complete disassembly, it is necessary to follow the following sequence of actions:
- marking - using a marker, paint or colored nail polish to mark the relative positions of the casing, front cover and body;
- dismantling the pulley - the rotor is carefully blocked with a screwdriver from turning, the pulley is turned away with a key;
- removing the casing - it is usually fixed with latches that need to be unscrewed with a screwdriver to remove the specified part;
- dismantling the front cover - use a screwdriver to unscrew the screws.
Under the casing there is a voltage regulator, a diode bridge, brush clamps, and a capacitor. Before replacing the bearing, you should check the wear of the brushes, the performance of the diode bridge and the voltage relay in order to increase the next overhaul period.
Attention: The armature (rotor) is removed from the stator winding with the rear bearing mounted on the shaft, while the front one remains inside the corresponding cover.
Before replacing standard consumables, it is necessary to check the bearings:
- rear - use your fingers to turn the outer race, which should not emit any extraneous sounds when rotating and have no play;
- front - here, on the contrary, the inner race is rotated and the play is controlled when the bearing is rocked inside the seat with your fingers.
Manufacturers unanimously recommend replacing the front cover along with the bearing, especially if it is rolled inside the seat. In practice, to reduce the repair budget, the cover is left for further use, since it costs 150–300 rubles.
Front bearing
If the results of the previous test require replacement of the alternator front bearing, the old standard product is removed from the front cover:
- the bearing can be knocked out inside by placing the cover on the bricks with the outer side up;
- or secure the lid in a vice;
- or use a special puller.
In the presence of rolling, this fixing element is broken irrevocably.
After the owner has removed the worn-out consumable, a new bearing is mounted inside the front cover:
- the lid is turned over with the inside facing up;
- the seating surface is treated with sealant;
- a sleeve of suitable diameter is installed on the outer race;
- With light blows, drive the bearing into the seat until it stops;
- lubricate the balls between the races or fill the grease into special holes.
The bearing has been checked for runout and is ready for use; assembly is carried out in the reverse order.
Rear bearing
The rear generator bearing is replaced as follows:
- dismantling with your own hands - the jaws of the puller grip the outer race, and by rotating the central screw the bearing is pulled out of its seat;
- installation - the standard product is mounted on the shaft, a sleeve of a suitable diameter is installed on the inner race, after which its surface is tapped with a hammer.
Then all that remains is to lubricate the bearing and check the runout and rotation of the outer race. The bearing is a closed type or with rubber seals and is already lubricated at the factory, which reduces repair time and its budget.
Disassembly, replacement
Having prepared everything you need, you can begin work. The sequence of actions is as follows:
We put the VAZ-2110 in the garage or on the site. Disconnect the negative terminal from the battery. Disconnect all wiring from the generator. We unscrew the fixing nut and the adjusting screw, push the generator completely towards the motor and remove its belt. Unscrew the bolts securing the adjusting bar and remove it. We climb under the car. We remove the front part of the crankcase protection from the car, unscrew the nut of the lower mounting of the generator, remove the bolt and pull out the generator. All subsequent work is performed on the removed generator. Unscrew the pulley mounting nut. There are several ways to do this. The first of them is if a hole for a hexagon is made in the rotor shaft. Use a hexagon to hold the shaft, and use a spanner to unscrew the nut. If this method fails to loosen the pulley fastening, we use the second method. It comes down to fixing the rotor with a screwdriver. We install it in the slots made in the rotor through the ventilation holes. Having fixed the rotor, unscrew the nut with a wrench. If we couldn’t unscrew it this way, we’ll give up trying for now and move on to further work. Removes the protective cover mounted on the rear of the generator. To do this, pull back the three latches and carefully remove the case. In order not to damage the generator elements installed in the rear part (brushes, regulator, diode bridge, capacitor) during further work, it is better to remove them by unscrewing their mounting bolts. Remove the back cover. It is attached to the front with 4 bolts. In some models, the bolt heads are made for an 8 socket wrench, in others - for a Phillips screwdriver. First fill these bolts with WD-40, since they often turn sour. We also mark the position of the back cover to the front with a marker. You can do this in advance. After unscrewing the bolts with a screwdriver, carefully press the back cover and remove it. In this case, the rear bearing should remain on the shaft. If it was not possible to remove the pulley before, after dismantling the back cover, this can be done by holding the rotor in a vice. If the pulley was removed earlier, knock out the rotor from the front cover. To do this, screw a nut onto the shaft thread, holding the front cover of the generator, hit the shaft with the nut on a wooden stand - the rotor should come out of the front bearing. Unscrew the nut and completely remove the rotor. We knock out the bearing from the front cover. To do this, we use a suitable piece of pipe or a 27 socket from a set of keys. Or using a pipe with a suitable diameter. If you immediately purchased a cap with a bearing, it will be much easier. We lubricate the new bearing and drive it into the seat using the old one. The old bearing is used as a guide and is struck with a hammer until the new element is completely seated. After this, we flare the edges of the cover to fix the bearing in it. Remove the rear bearing from the shaft. To do this we use a puller. If this is not the case, you can use a regular large open-end wrench. We place one jaw of the wrench under the bearing, the rotor will play the role of a stop. We use the key as a lever, striking it lightly with a hammer. The key must be moved in a circle so that when removed it does not become distorted. Having removed or knocked down the rear bearing, we install a new one in its place. We fill it to its location using a pipe attachment or a socket wrench
It is important that when landing, the diameter of the tube or key is equal to the diameter of the inner race of the bearing. Before assembly, we once again thoroughly lubricate the new bearings.
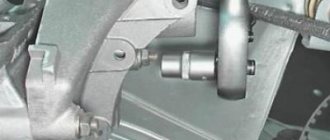
Support bearing VAZ 2112
The front support struts, as well as the support bearings, are constantly subject to severe loads, especially when the vehicle is driven on uneven roads or rough terrain. Timely replacement of support bearings helps prevent complete failure of the entire chassis and the need for its overhaul.
Replacement
1. First of all, you need to remove the hub cap, then loosen the CV joint nut.
2. If you have an assistant, ask him to press the brake, your task is to use a wrench or socket to rip off the CV joint nut.
3. Now jack up the car and remove the wheel.
4. Unsplit the tie rod nut, then press out the pin using a tie rod puller or a hammer and a pry bar.
5. Unscrew the two mounting bolts and disconnect the ball joint.
6. Remove the brake hose from the strut clamp.
7. Using a screwdriver, you need to touch the petals of the washer and unscrew the two caliper bolts. Move the caliper to the side, hanging it on a clamp or wire, this will simplify your task. The most important thing is that it does not hang on the brake hose. It is not necessary to remove the brake hoses themselves.
8. Also, to make it more convenient to work with the removed stand, loosen the stand nut without completely unscrewing it, then unscrew the three support nuts.
9. Unscrew the CV joint nut, try to remove the strut while simultaneously pulling the CV joint from the splines.
10. Using spring ties, retract the spring. This is done as follows: secure the tie to the coils, then use a wrench to gradually tighten each nut. After the spring is compressed, unscrew the support bearing.
11. Replacing the support bearing of the front strut of a VAZ 2110 - remove the old support bearing and put a new “support” in its place.
We perform assembly in reverse order.
Now you know how to replace the support bearing of a VAZ 2112, and I hope that if such a need arises, you can easily do this work with your own hands. It is advisable to have some experience in car repair and a few free hours of time.
Maintenance frequency of car generator bearings
When servicing the unit, you need to know which bearings are on the generator, and which race of each of them is pressed into place. To extend the time between overhauls, bearings are lubricated at the time of installation at the factory or when replaced by the user. It is believed that this amount is sufficient for the entire life of the rolling elements.
The frequency of bearing replacement is determined by ear:
- if the generator is noisy, it means the clip has worn out;
- Before jamming, the generator bearing hums for quite a long time, so the owner usually has enough time not to let this happen.
Attention: It is usually difficult to determine by ear which of the two bearings has become unusable, so the rolling elements are replaced as a set - front and rear.
Replacing generator bearings features, many photos and 1 video.
As practice shows, replacing generator bearings is recommended at 150 thousand kilometers, or earlier. Remember that noise has absolutely no effect on operating efficiency, but it is a harbinger of an imminent replacement of the part. After all, a generator bearing can fail at the most inopportune moment.
Bearings stop performing their functions soon after noise appears from the generator. A hum, strange vibrations, or even sounds that are extraordinary for this element are the first sign of bearing wear.
It is worth paying attention to the fact that the rotor or pulley has no play in any direction, and that there is no beating when the pulley rotates.
How to make sure that the problem is in the bearing?
You can more accurately determine what is making noise - the air conditioning compressor, the tension or idler pulley, or the autogenerator - by using a special stethoscope.
Let's look at the procedure for replacing generator bearings using a Bosch generator as an example.
Here is a video where you can watch all the actions.
The power of the generator and the model of the car do not matter, since similar Bosch generators are structurally the same.
- Remove the back plastic cover by unscrewing two 13 or 15 nuts, as well as 1 screw.
We see a diode bridge, a generator voltage regulator relay, and a plastic bushing for the rear bearing.
- Unscrew the 3 screws securing the regulator relay, remove the relay, moving it to the side. At the same time, we inspect the voltage relay for brush wear and contact corrosion.
Three voltage relay screws
- We unscrew the 4 studs that tighten the front and rear covers of the generator housing.
Unscrew the four studs
4. Next. Attentively! By gently hitting the generator fastening protrusions of the front cover with a hammer, we begin to halve the generator. We do not hit the back cover , since the stator leads (windings) may break at the point of attachment to the diode bridge of the generator.
As soon as there is a sufficient gap between the front cover and the stator winding, we continue to separate the generator parts using two powerful slotted screwdrivers on opposite sides. If it doesn’t work with the help of screwdrivers, we continue to use hammer blows evenly from different sides of the generator.
Unclamping the generator housing
As a result, the generator must be divided into 2 parts: a rotor with bearings and a pulley, a front cover, a rear cover, a stator winding and a diode bridge.
generator bearing replacement
- Unscrew the generator pulley. Method one. If it is possible to use a pneumatic or electric impact wrench, the operation will take 10 seconds. Holding the rotor or pulley with a gloved hand, unscrew the 24 nut with a socket.
Unscrew the pulley with a wrench
Method two. We clamp the rotor in a vice and also unscrew the nut using a regular wrench or ratchet and a 24mm socket.
Unscrew the pulley with a crank
Methods for removing the pulley from the Internet like “lock the rotor with a screwdriver by the impeller” or “clamp the pulley in a vice or with an adjustable wrench” will not work or will lead to damage to the parts.
- We remove the rear bearing with a conventional two-legged puller.
Removing the rear bearing
7. Knock the rotor out of the front bearing. To do this, place the front cover on the stops (a large vice will do).
We knock the rotor shaft out of the front bearing
Next, unscrew the 4 screws securing the front bearing pressure plate and knock out the bearing itself.
Unscrew the front bearing screws
If the rotor shaft is very soured, unscrew the 4 screws securing the front bearing pressure plate and knock out the rotor along with the bearing. If the front bearing still does not want to come off the rotor shaft, you can disassemble it by removing the oil seal, separator and moving all the balls together. Next, remove the balls and outer ring.
Disassembling the generator bearing
We remove the inner part of the bearing from the rotor with a special puller, or, in extreme cases, cut it off with a grinder.
8. Installation of new generator bearings. We press the front one with a mandrel or an old bearing.
Pressing in the front bearing
Don't forget to secure it with a clamping plate and 4 screws. Next, be sure to clean the rotor shaft from rust. We insert the rotor shaft into the front bearing with a cover, put the washer under the pulley, pulley and tighten the nut.
We hammer in the rear bearing or press it with a long head of 17.
Pressing in the rear bearing
If the plastic bushing of the rear bearing is cracked or has play, replace it with a new one.
Generator rear bearing bushing
Along the way, we inspect the wear of the collector rings of the generator rotor (where the brushes go), if the wear is large, we replace it with a new collector.
Next, we assemble everything in the reverse order, after which it is advisable to check the generator on the stand.
For generators from different companies such as Valeo, Mitsubishi, Denso, Hitachi, Delco, the procedure for replacing bearings and the tools used may be different. If you don’t know all the nuances, you can easily ruin any part of the generator. Or do the work in such a way that then, after a short period of time, you will have to redo it.
Replacing generator bearings is a complex type of work; not all car repair shops undertake to carry it out. It would be more accurate to entrust it to people who have done this hundreds of times and know all the nuances.
You have a choice - to repair the generator or completely replace it. A complete replacement will cost more, so in most cases it is better to buy alternator bearings to make the replacement.
Which generator bearings should I choose? The dimensions of the generator bearings depend on the specific model of the unit and can be determined.
Typical sizes of generator bearings for Bosch: front 6303- 17*47*14, 140263- 17*52*17, 6203-17*40*12, rear 6203- 17*40*12, 140273- 15*35*11, 6202 - 15*35*11. For Valeo, front 6303- 17*47*14, rear 6202- 15*35*11. For Mitsubishi front 6303- 17*47*14, 6203-17*40*12, 140754- 17*52*18, rear 140419 8*23*14.
Pay attention to imported products from such manufacturers as NSK and KOYO. The price for a complete replacement is from 1,500 rubles. But this is the price of high quality and prompt replacement, because repair work requires no more than 1 hour with a guarantee.
You will also be offered free diagnostics of the unit or the opportunity to purchase tested bearings for replacement yourself. The range includes all numbers of generator bearings that will return the unit to normal operation.
The most common problem with foreign car generators is failure of brushes or bearings. It is enough to replace 1 element, rather than spending money on purchasing a whole unit. In this case, repair will be a more profitable solution.
It is advisable to entrust the work to specialists who are ready to both install a new unit and remove it to carry out repairs.
Call tel. or and order repairs or parts, taking into account the size of the generator bearing required in your case.