Part 1: Removing the air filter
Without this you won't be able to get to the exhaust manifold.
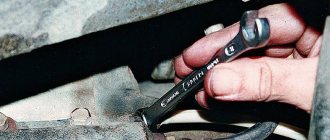
The good news is that the removal process itself is not too difficult or troublesome. If the engine is a carburetor, 3 holders on the filter cover snap off, the screw located in the center is unscrewed, and the cover is removed. The air filter itself is removed and set aside. 4 nuts are unscrewed from the body, it is raised - and you get access to further work. On an injection engine we proceed differently: unscrew the screws (4 pieces), remove the cover. If she is stubborn and doesn’t want to leave, you will have to disconnect the mass air flow sensor connector
. The filter is pulled out, the fasteners are unscrewed from the housing, it is removed - move on to the next step.
Welding exhaust manifolds with your own hands: features and recommendations
We figured out the essence of the problem and its possible causes. Now let's solve the issue of repairing the exhaust manifold. The only solution to the problem is welding. The design of the part itself does not provide for the occurrence of other problems other than through holes or cracks due to high temperatures and the influence of aggressive substances. The second solution is to replace the collector with a new one yourself or at a service station.
Welding aluminum using an electrode
1) How to remove/install the exhaust manifold in a car?
Depending on the degree of complexity of the repair, it may be necessary to purchase a new manifold, because welding will cost the same price, and sometimes even more. For most owners, it will be easier to contact a service station, but there is also a category of motorists who prefer to carry out minor repairs with their own hands.
A set of tools for replacing an old collector with a new one:
- a container into which you can drain the cooling liquid;
- manual/hydraulic/pneumatic or any other jack;
- a set of open-end, box and socket keys;
- ratchet wrench + set of attachments + extension;
- flat head screwdriver and cross head.
When buying a new manifold, you immediately need to change 2 types of gaskets in the kit - in the combination of the manifold/cylinder head and the manifold/receiver pipe of the exhaust system. The marking of the old one will tell you which collector to buy + consult the seller - this is sacred.
Algorithm for replacing the exhaust manifold:
- We first study safety precautions when repairing the propulsion system of vehicles.
- Turn off the battery.
- Drain the cooling liquid. To do this, you will need rubber gloves, wrenches, clean water and a container for draining (a regular basin will do).
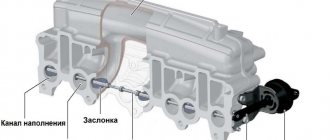
- Depending on the presence of a carburetor, it may be necessary to remove the injector receiver. The second part to dismantle is the air filter.
- We take a suitable wrench and unscrew the nuts/bolts at the points where the manifold is attached to the cylinder heads. If we are talking about eight valve engines, you will have to first remove the intake manifold, then only the exhaust, because in such systems the fastenings apply to both types of parts.
- We are cleaning the plane of the cylinder heads from the remnants of the previous gasket. In case of significant blockages, you can use sandpaper or a file.
- Sometimes you have to restore the threads or install new studs that will secure the manifold.
- We install new gaskets.
- We are installing a new intake manifold. If this is an eight-valve engine, then in parallel we install the intake manifold, which was removed before.
- We tighten the bolts and nuts on the cylinder head.
- We connect the manifold to the exhaust system pipes and install a new gasket. We do not tighten the nuts and bolts completely.
- We check the correct installation of parts and accompanying gaskets and tighten the bolts and nuts.
- We filter the radiator and fill it with new cooling fluid.
- We connect the battery.
Only 14 steps. The entire process can take from 1 to 3 hours. Of course, if a person is okay with straightness of hands. If you are not confident in your abilities, it is better to contact a service center. More expensive, but better quality.
2) How are cast iron exhaust manifolds welded?
Before starting work, you need to decide what material the exhaust manifold is made of. There are 2 options here - cast iron or by welding pipes made of steel alloys with impurities to prevent corrosive processes. Cast iron parts are more common within the Russian Federation, so the bulk of further explanations will be about them. Welding methods when working with cast iron:
- Hot technology. When the workpiece is heated to a peak temperature of 600 to 660 degrees;
- Semi-hot technology. The welding process takes place at temperature conditions of 300-350 degrees Celsius;
- Cold technology. Welding is carried out under standard conditions, without any heating.
The last option differs in the method of laying seams - short sections on which repeated layers are applied. This approach avoids warping of the exhaust manifold material.
Classification of welding types
| Type | Peculiarities | Popularity (out of 5 ★) |
| Gas | The technique shows some of the best results when working with cast iron. Large carbon burnout is prevented without loss of quality in the seams. | ★★★★ |
| Semi-automatic | One of the conditions for success is high-quality preparation of the part for welding. It is important to remember the order of actions during the process. The additive will be specialized variations of the wire. | ★★★ |
| TIG welding | Manual welding using a non-consumable tungsten-based electrode, where argon is used as a shielding gas. The technique is quite acceptable for processing cast iron. | ★★★★ |
| Inverter | A type of manual welding with a large amount of preliminary work associated with cleaning the surface of the exhaust manifold welding site, degreasing and deepening the crack to a cone-shaped joint. The process itself occurs in layers with support as steel pins. | ★★★★★ |
If we are talking about working at home, then the only acceptable option is cold welding with an inverter. Due to the fragility of cast iron, laymen will not be able to properly repair even a small crack.
What is MIG and MAG welding
Which electrodes to use:
- OZCH 2 or 6. Electrodes based on a copper rod coated with iron powder;
- iron + nickel. Good electrode bundle for cast iron. Suitable for DC welding;
- iron + nickel + copper. The resulting seams can resist corrosive attacks and can come into contact with aggressive environments + hot gases without consequences.
If a crack is detected in the exhaust manifold, it is not advisable to wait until it leads to pipe failure. It is advised to remove the part from the engine as soon as possible and repair it. For cast iron collectors, welding requires an increase in carbon - from 3% to 7%.
If hot welding is used, the part must be preheated. The temperature is maintained at the same level (plus/minus 10%) throughout the entire welding process. Consider the physical properties of cast iron - the metal cools very quickly.
Due to the increased fluidity of cast iron, you can either drill holes along the crack or use graphite spacers, placing them under the welding site and also along the future seam. Pore formation during carbon burnout can distort the final result of the work, among other things, and therefore, be extremely careful during the work process.
3) Features of welding the stainless steel exhaust manifold
It already has its own characteristics. Depending on the alloy used in the assembly process of the exhaust manifold, the methods of welding the part may also change. Most elements contain an admixture of nickel, chromium and other non-ferrous metals, which complicates the process of sealing cracks and burnouts.
Please note: in order to avoid burnout of additives in stainless steel alloys, it is strongly recommended to weld parts exclusively in a shielding gas environment.
The secondary consequence is the deformation of the part due to the welding temperature. If the technology is fully followed, the flange will not need to be processed. Otherwise, we get seams with reduced anti-corrosion properties. The reason is overcoming the 500 degree mark. When the peak point is reached, the process of intercrystalline corrosion begins due to the redistribution of metal molecules inside the alloy.
Popular types of welding for stainless steel:
- general type inverter (TIG, AC) + inert medium + tungsten electrodes;
- manual type of welding using electrodes with a specialized type of coating;
- stainless steel wire + inert gas environment + semi-automatic welding.
If we are talking about a garage repair of a stainless steel exhaust manifold, the optimal solution would be to apply welding seams with MMA-coated electrodes. You can choose a titanium-based electrode with a rutile coating.
Less attractive options, but also working, are again titanium dioxide electrodes coated with calcium/magnesium carbonate. The thickness of the electrode is in accordance with GOST 10052.
Welding cast iron products with argon
One of the variations of welding a cast iron manifold with a welding machine:
4) Is it possible to cold weld the exhaust manifold?
Although cold welding is not directly related to metal welding of seams, some craftsmen still use it on a temporary basis. It is recommended to use the method only for those individuals who are familiar with the technology of execution.
When is it rational to use cold welding:
- if, when welding using the traditional method, the part is deformed;
- the geometry of your collector has a complex appearance, and the crack has appeared in the most inconvenient place where an electrode cannot be reached;
- the seam is located at the border of different metals.
To weld a stainless steel manifold, cold welding in the form of glue can still be used, but if the part is made of cast iron, you will only waste time. How long will a seam last? 500 kilometers at most, but in 80% of cases the welding flies off after 50-100 thousand meters, since, by the way, the seam does not work at all for shear and torsion.
To summarize, we note that the most rational welding of exhaust manifolds is an inverter with specialized electrodes for cast iron, and MMA welding with electrodes for stainless steel. Without experience in welding, be prepared for a lot of jambs and seam failures. If you want to save your nerves, it is better to contact a service station or replace the manifold altogether. Good luck on the roads!
How to remove the exhaust manifold? do it in 3 steps
Welding exhaust manifolds: classification of exhaust system problems + algorithm for replacing a cracked manifold with a new one + 3 methods of welding a cast iron manifold + 3 optimal variations of electrodes for welding + the best option for welding stainless steel exhaust manifolds + analysis of whether the manifold can be welded by cold welding.
Questions about debt collectors on the Internet are quite common, and they concern cars. If we are talking about transport, then there are 2 options for manifolds - inlet and outlet. It is the first one that is subject to heavy loads. High temperatures + residual fuel literally “burn through” the part, rendering it inoperable in the vehicle. How exactly exhaust manifolds are welded + whether it makes sense to do it at all, we will look at in today’s article. Let's get started.
Part 2: carburetor removal
Those who have an injector can immediately proceed to the last stage. Owners of carburetor engines, after removing the air filter, plug the holes with a dry rag - to prevent foreign objects from falling into them (in particular, loose nuts and other small things - then there will be no trouble if something falls there). The wire from the EKXX valve is disconnected, the clamps are unscrewed and both fuel hoses are removed. The suction cable is loosened and removed. The end of the spring is removed from the throttle control rod, after which it is completely removed.
Afterwards, the throttle valve itself is disconnected, the power plugs and the screw sensor are disconnected, and the carburetor heating hoses and vacuum tube are removed. Next, the crankcase ventilation hose is dismantled, the fastening nuts (connecting the carburetor to the intake manifold) are unscrewed, and the carburetor is smoothly and accurately, without jerking, pulled up from the studs.
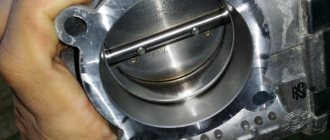
Since we've removed the throttle valve, it wouldn't hurt to clean it.
How to remove the manifold on a VAZ 2114
How to remove the exhaust manifold
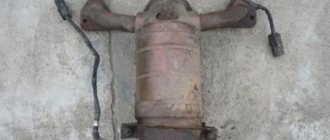
Many VAZ car owners repair and maintain their cars without outside help. One of the most common problems when a car operates in slow mode is the combustion of the gasket between the exhaust manifold and the cylinder head, blocking of the catalyst, and deposition of combustion products on the walls of the exhaust system. All these obstacles negatively affect the removal of exhaust gases from the combustion chamber. Removing gases from the combustion chamber is the main point; their return to the chamber reduces the quality of the fuel-air consistency, which means a decrease in vehicle power will occur. In addition, burning the gaskets releases flammable gases into the engine compartment, which can cause a fire in the engine compartment. The sound during such work will be quite loud and annoying to others.
Elimination of all of the above defects will be associated with an analysis of the exhaust system. How to remove the exhaust manifold and whether this can be done in a garage without contacting a service department is of interest to many VAZ Priora owners who have not encountered such work.
Replacing the exhaust manifold With your own hands, it will require removing additional parts, after which you can get to the fasteners of the exhaust system. If the repair work does not involve the burner gaskets, they should still be replaced.
To work you will need the following tool:
- wrench 8, 10, 13
- deepest head at 13 years old.
- gimbal and head extension.
- ratchet.
- slotted screwdriver.
- liquid WD.
Types of exhaust manifolds
The following types of exhaust system components are distinguished:
- Whole. It is a single ramp with pipes connected to the exhaust channels of the cylinders. The operating efficiency is low, but the collector is compact and inexpensive to manufacture.
- Tubular. Each gas exhaust channel has its own complex-shaped pipe to synchronize the exhaust speed. It works very effectively, but is expensive to develop and manufacture.
While the engine is running, the unit becomes very hot. This accelerates wear and tear, and sooner or later you will need to replace the exhaust manifold. This procedure will be carried out efficiently by GSAvto service station technicians.
The main signs and causes of failure of the VAZ 2114 intake manifold
- The main symptom of a failed intake manifold is a sudden loss of car engine power.
- at the same time, there is an increase in fuel consumption , with a deterioration in traction and a drop in engine performance.
- Often a problem is indicated by a missing stud in one of the manifold flanges. It simply comes off when the collector goes “screw”, that is, due to temperature changes, for example in winter, or over time (average service life is 7 years), the collector begins to bend along the plane, and the pin simply “spits out”, pulls out .
- Due to the fact that the manifold has “leaded”, a crack may form and, as a result, exhaust gases from the engine escape, and the manifold must be replaced.
When is it necessary to replace and remove the exhaust manifold on a VAZ-2114
Huge temperature changes are the main problem faced by the exhaust manifold and the gasket, for which it is removed. The collector itself is made of a special grade of cast iron; it can withstand high temperatures (up to 800-900 degrees) , however, these are critical values, after which the collector may warp or crack.
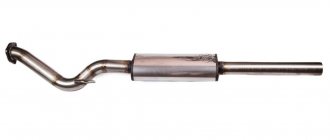
Exhaust manifold VAZ-2114
Its main task is to collect exhaust gases and distribute them into the exhaust pipe of the muffler.
Replacing or dismantling the VAZ-2114 exhaust manifold is necessary in the following cases:
- Mechanical damage to the collector.
- Warping and loss of tightness at the junction with the cylinder head.
- Burnout of the gasket between the head and the manifold.
- The appearance of cracks as a result of engine overheating.
- Replacing the collector with a device of a different configuration, adapted to a more severe operating mode.
In the event that we are not going to participate in high-speed races for the prize of the head of the regional traffic police, replacing or dismantling the collector may be necessary in a number of cases.
Tools and materials for dismantling
There are a number of symptoms that will indicate that you need to prepare to remove the exhaust manifold:
- increased noise level in the engine compartment , the engine produces a characteristic, loud sound in any operating mode;
- breakthrough of exhaust gases into the engine compartment and sometimes into the cabin;
- reduction in engine power due to a mismatch between the exhaust gas outlets in the cylinder head and in the manifold.
Many people decide to replace the standard manifold with a “tuning” one, made of stainless steel and having a different configuration, thereby wanting to increase engine power and reduce the resistance that the standard manifold provides to exhaust gases. As a rule, the most common reason for dismantling a unit is gasket burnout .
Exhaust manifold gasket
The manifold gasket on the VAZ-2114 is made of pressed reinforced asbestos and is designed to ensure a tight connection between the block head and the manifold flanges. Asbestos is used to correct the coefficient of thermal expansion of the aluminum alloy from which the head is cast and the cast iron from which the manifold is cast. At high speeds and under prolonged loads, the gasket may burn out. Then its replacement and dismantling of the collector are inevitable.
To dismantle the manifold, you will need a standard set of tools, a set of sockets with extensions, and WD-40 penetrating lubricant or its equivalent. In case of broken studs, a stud extractor, drill, drill bits and a set of taps will be useful. A day or two before dismantling the collector, it is worth moistening all the fasteners several times, this will significantly simplify the removal procedure .
Do-it-yourself exhaust manifold and gasket replacement
Basically, the exhaust manifold on a VAZ 2109 car has to be removed in order to change the gasket, since it often burns out; in the place where the gasket burned out, exhaust gases begin to escape and go directly under the hood. And the sound gets louder, which is not very pleasant. To remove the manifold on the nine, you first need to:
- Remove the air filter with housing
- Remove the carburetor.
- Remove the intake manifold
From the tools we will need a 13mm spanner, a 13mm deep socket, a ratchet, and an extension cord.
We unscrew the four nuts of the exhaust manifold, which are attached to the exhaust pipe, clearly shown in the picture.
We move the pants a little to the side, pulling them off the stiletto heels. Then we unscrew the three fastening nuts that remain. Because when removing the dust intake manifold, six nuts were unscrewed.
We remove the exhaust manifold of the VAZ 2109 from the studs; this should not cause you any problems.
Changing the manifold gasket
You may find that the gasket is stuck to the block, in which case you need to pry it off with a knife or a thin screwdriver and remove it from its seating location.
After which a rather unpleasant picture is revealed to us.
We remove the remnants of the old gasket on the surface of the cylinder block using a special spray, apply it to the entire area and wait about twenty minutes.
If traces remain, then remove with a thin blade. You can also put the surface in order using a zero.
After completing the procedures, we proceed to install the gasket, carefully put it on the studs and install the collectors in the reverse order.
The price of the VAZ 2109 exhaust manifold is about 1500-1700 rubles.