Generator bearing VAZ 2115
The generator on the car serves to ensure the normal operation of all elements of the electrical circuit in its composition, as well as to recharge the battery while the engine is running. All its malfunctions lead to the fact that the engine eventually stops starting, and it becomes impossible to move the car.
Replacement
How to remove the generator bearing?
On devices from different manufacturers, this process is carried out in different ways, and the bearings of the Bosch generator are most easily replaced. Car enthusiasts often ask the question of how to change a bearing in a generator. So, this is done in the following way:
1) First of all, you need to disconnect the wire from the negative terminal of the battery and all the wires from the generator itself, and it is best to label each wire.
2) Next, you need to remove the generator from the engine. This is done like this: unscrew the three fastening points, turn the part towards the engine and loosen the drive belt.
3) Then remove the belt.
(How to remove/install the alternator belt?) When the alternator is removed from the engine, it is necessary to continue all work on the workbench. It is worth noting that before you start all the work, you need to buy a generator bearing, and for this you need to know the size of the generator bearing in order to purchase a suitable one. Next, you should disconnect the brush holder, unscrew all the long bolts and remove the back cover. The generator bearing must be removed from the rotor shaft along with this cover.
4) The next step is to carefully remove the stator and unscrew the nut from the pulley side.
5) Then remove the pulley and the impeller using a puller.
6) Then you need to remove the front cover, it is better to do this using a press. The front bearing of the generator can be removed together with the cover, or separately, depending on the type of generator design.
How to install the generator bearing?
Install the generator bearing only using a press, and never use hammers or blows. It is important that the bearing itself sits completely in place, then install the impeller and pulley on the shaft. The next step is to put the rear bearing of the generator with the cover in place, again, do not use any blows, only using a press.
Instructions: replacing generator brushes.
The generator belt whistles, the material is available at the link.
Number
| Marking | Part no. | Assembly that uses a bearing |
How to change
The generator must be disconnected from the power supply (battery). We remove the belt. Using wrenches, unscrew the fastening nuts. Next, remove the film and take out the sleeve. Carefully remove the generator.
Next, we will proceed to more sophisticated and complex work, directly disassembling the generator. This is not an easy task, but if you try, even a person with no experience can handle it.
— Having unscrewed the nuts on the generator body, remove the cover and carefully remove the regulator responsible for the voltage and brushes.
— We separate the stator from the cover, we do this extremely carefully so as not to disturb the copper winding. There are cases when the housing is affected by rust and the stator cannot be separated. You need to take a hammer, an impact screwdriver and make very precise blows to separate them into blocks.
- Once the generator is separated from the stator, the rear and front bearings can be seen. Now you can change the bearing on the generator.
— Then everything is simple, remove the deformed generator bearing and install a new one.
— Installation and assembly of the generator is performed in the opposite order.
What is the best way to install a bearing on a generator?
When replacing a bearing, it should be noted that installation is best done using a press, rather than trying to press the bearing in with hammer blows. The bearing should sit firmly in place, after which the pulley and impeller can be installed.
When buying a bearing, check with the seller what model of car it is designed for, since bearings have different sizes. It is necessary to check the belt tension to ensure there is no voltage loss. If after all the above procedures, the problem has not been solved, then you need to look for the problem in other places.
The generator itself may also have faults that need to be repaired. If you can’t solve all these problems yourself, it’s probably still worth turning to highly qualified craftsmen.
Source: vz15-up.ru
When is it necessary to disassemble a VAZ-2107 generator?
Disassembling the unit is often required if you need to determine what is wrong with the generator and repair its individual components. There are several reasons why a generator can burn out:
- The windings overheated and were damaged due to high temperatures.
- A short circuit has occurred between the turns.
- The body broke.
Before disassembling the device, you first need to be able to remove it yourself. How to do this correctly without damaging other components?
- Place the machine on the inspection pit or lift it from above onto a lift for convenience.
- Remove the negative terminal from the battery.
- Disconnect the plug that goes to pin number 61.
- Carefully remove the insulation cover and, using a 10mm wrench, disconnect the terminal from terminal number 30. Remove the wiring.
- Pull out the VAZ-2107 alternator belt.
- Using a 17mm wrench, unscrew the nuts and remove the adjustment bar.
- Unscrew the nut that is attached to the bottom, remove the bushing and bolt.
- Now you can remove the generator itself. The work of removing the device is completed.
Lada 2115 modified stock › Logbook › tell me the dimensions of the generator bearings
Good day everyone!) I’ll be brief - tell me what bearings are on the generator shafts? Gernerator - stock, from the factory, KZATE - 9402.3701, tried googling, no results, asked in the store, and received the answer - “there are different bearings there!, It’s better to take it apart, look and choose! “Why should I just find out what bearings are sitting there, disassemble the generator?, then put it back together, go for spare parts and then disassemble it back? — the seller remained silent on this question))) then, in addition to bearings, you will need slip rings, a diode bridge, and this tablet with brushes)
Issue price: 1,000 ₽
see also
Comments 25
Same gene, I'm going to sort out the bearings, which ones did you like? I don’t want to take it apart again...))
I changed it too. I bought 3 types, they said one would definitely fit, and the other of these two. and whichever one doesn’t fit you bring back.
If there is a hex socket on the shaft where the pulley is, then 302 and 202; if not, then 303 and 202.
ah, that's how it is. thank you very much!) I already wanted to take it apart) thank you very much!)
I have the same gene, I have a desire to make it 90 ampere, and then the bearings need to be changed. I barely figured out which ones to install.
how to make 90 A?
Selection and search of bearings for a car generator
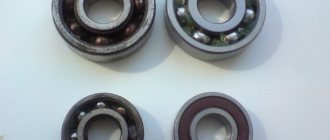
Many motorists operating older cars with mileage of more than 100,000 km have probably encountered the need for repair or scheduled maintenance of the generator. And, as is known, bearings are subject to the greatest wear in the entire generator structure. Diagnosing generator bearing failure is often not at all difficult. If an extraneous hum appears during engine operation, increasing as the number of revolutions increases, then one of the sources of its origin may be the generator bearing. For a more accurate diagnosis, it is necessary to loosen the generator belt tensioner, then remove the belt and release the generator pulley. Next, we start the engine and, if the hum disappears, then the reason is clear. The generator bearing needs to be replaced.
Replacing generator bearings is a labor-intensive, but moderately complex technical operation. Therefore, many motorists carry out repairs and maintenance of the generator themselves, without resorting to the services of auto repair shops. This solution has both pros and cons. The main advantage is that replacing the generator bearings yourself allows you to save a certain amount of money. Of all the costs, only the cost of purchasing bearings will fall on the shoulders of the car enthusiast. The disadvantages include the fact that when carrying out the work you will certainly need a special tool, for example a hydraulic press and various pullers, without which you will have to work hard and be smart. Another important point is the correct choice of bearing for the generator. And DAS LAGER specialists will help you understand this difficult issue.
The most convenient option would be to perform the work in the following sequence:
- Remove the generator from the car;
- Unscrew all fasteners, disconnecting the stator, rotor, diode bridge, etc.
- Remove the front and rear generator bearings;
- Identify bearings by the markings on them. If the markings have not been preserved, then perform identification by taking the installation dimensions;
- Purchase the necessary bearings from a trusted supplier;
- Install new bearings into the seats and assemble the generator in the recommended order.
And if the process of disassembling and assembling the generator does not raise any special questions, then choosing the right bearing is not so easy. Below we present the most common bearing options used in generators of various automobile brands. So, the design of a standard generator includes two bearings - front and rear. The front bearing of the generator is usually more powerful. This is due to the fact that the front bearing bears the entire main load. This load appears due to the action of a tense drive belt on the generator pulley. The pulley transfers the load to the shaft, and the shaft, in turn, acts on the bearing. Different manufacturers use different bearings when producing generators. We have identified the most popular ones from the total number. The following bearings are often installed in Russian generator models:
6302-2RS
has dimensions
15x42x13.
Its domestic analogue is designated as 180302 or simply called 302nd closed.
This bearing is used as a front bearing on older generators. One of the places where it is installed is the generators of VAZ2110 and VAZ2112 cars. 6303-2RS
has dimensions
17x47x14
.
Its domestic analogue is designated as 180303 or simply called 303rd closed. This bearing is used as a front bearing on newer generators. One of the places where it is installed is the generators of VAZ2110 and VAZ2112 cars. 6202-2RS
has dimensions
15x35x11
.
Its domestic analogue is designated as 180202 or simply called 202nd closed. This bearing is used as a rear bearing on newer generators. One of the places where it is installed is the generators of VAZ2110 and VAZ2112 cars. 6203-2RS
has dimensions
17x40x12
.
Its domestic analogue is designated as 180203 or simply called 203rd closed. This bearing is used as a rear bearing on newer generators. One of the places where it is installed is the generators of VAZ2110 and VAZ2112 cars. 6003-2RS
has dimensions
17x35x10
.
Its domestic analogue is designated as 180103 or simply called the 103rd closed. This bearing is used as the rear bearing of the generator. One of the places where it is installed is the generators of VAZ2110 and VAZ2112 cars. 62202-2RS
has dimensions
15x35x14
. Its domestic analogue is designated as 180502 or simply called 502nd closed. This bearing is used as the rear bearing of the generator. One of the places where it is installed is the generators of VAZ2110 VAZ2112 VAZ2115 cars.
How to replace brushes on a removed generator
With the generator removed, work on replacing the brushes will be much easier. Having access from all sides, it is easy to examine the wear of the brushes and replace them. The main problem in this option will be removing the generator from the car. You need to unscrew the generator mounting bolt, loosen the belt tension, remove it and unscrew the mounting bolts connecting the generator to the engine housing. If you can get the generator from above, consider yourself lucky. There are often cases when, to remove the generator, you have to remove not only the air filter and pipes, but even the radiator.
First of all, you need to clean the mounting area of the brush holder from dirt and dust. You can wipe it with solvent and then blow it with compressed air. After this, you need to remove the brushes; to do this, you need to unsolder them. Leaving the generator without brushes, be sure to clean all contacts and check the springs for elasticity. It is advisable to polish the slip ring after this.
The replacement itself consists of unsoldering the old wires from the used brushes and soldering them to a new set. When carrying out this operation, you must be careful, since the material of the brushes is very fragile. After installing the brushes on the seat, you should make sure that they move freely.
Installation of new brushes should be done in the reverse order, after which the generator is assembled and installed on the car. It is recommended to change the generator bearings when replacing the brushes. When installing a generator on a car, the main thing is to correctly adjust the belt tension. If the tension is insufficient, the belt will slip on the rollers.
It happens that the computer in the car begins to show a malfunction of the generator immediately after replacing the brushes. This occurs due to insufficient grinding in of new parts. During operation they will rub in and the error will disappear. If the error persists, the reason is that the case is stuck due to excess dirt. This problem can easily be eliminated by blowing the parts with compressed air. Before checking the operation of the generator, be sure to inspect the brushes for chips and cracks. New parts often have manufacturing defects.
It happens that the brushes are replaced together with the relay and generator regulator. In this case, the replacement process proceeds as follows:
- The negative terminal is disconnected from the battery;
- You need to remove the rubber tip from the positive wire;
- The generator is dismantled (if necessary, the air filter housing must be removed);
- You get a brush block with a relay regulator;
- The fixing springs are removed;
- The brushes are unscrewed;
- All associated wiring is disconnected;
- A new block is being installed.
The generator is connected only after checking the absence of defects on the new brushes. After assembly, we put the generator in place, tighten the belt, connect the battery and start the car.
see also
Battery charging lamp is on
- 5 0 11k
Car generator circuit
- 97 2 163k
Strut support bearing
- 77 1 91k
Repair of VAZ 2115 generator
- 3 0 7k
Generator malfunctions - signs, diagnostics, causes, testing
- 785 12 627k
Current to power conversion calculator
Convert how many amperes a kW has online. Calculator for converting current amperes to power watts
In a modern car, the generator provides current to the entire power supply system: powering the engine, lighting devices, and recharging the battery. On VAZ 2113/2114/2115 cars, generators of type 5102.3771 and 94.3701 are installed. Both generators are a three-phase AC electric motor with electromagnetic excitation, with a built-in rectifier unit and voltage regulator. The generator on cars of the Samara and Samara-2 family is traditionally located in the same way as on the “Classic”, on the right side of the engine compartment - near the headlight on the passenger side.
Basic aspects of do-it-yourself maintenance and repair of a generator on a VAZ 2115
The purpose of the generator unit is to convert mechanical energy into electric current, which is used to power the electrical equipment of the machine. If the VAZ 2115 generator for some reason refuses to function or does not work correctly, this will affect the performance of the car as a whole. We will tell you more about malfunctions and repairs of the unit below.
Tips for replacing the VAZ 2114 generator bearing
Before disassembling the generator, it is necessary to purchase the necessary spare parts that are out of order or rusty. You can only understand which bearing has failed by disassembling the unit. Therefore, when replacing a bearing, it is better to purchase a pair of bearings at once; fortunately, they are not expensive; a large bearing from the VAZ manufacturer with article number 180303 is about 150 rubles and a small bearing with article number 24940220 is about 60 rubles. You can also purchase a set of analog bearings from PILENGA, article number PWP0201, costing 110 rubles.
The price is indicated for spring 2021 in Moscow and the region.
Care should be taken when reassembling the generator. It is important not to miss a single detail and to connect the electrical contacts correctly. In addition to the correct installation of bearings, it is also necessary to correctly install the brushes and check the belt tension.
Of course, every car owner has the right to choose the method of troubleshooting, for example, replacing the bearing with your own hands or contacting a specialized workshop. If you decide to repair the generator yourself, you will need the following tools:
- hammer;
- flat and Phillips screwdriver;
- chisel;
- WD 40 lubricant;
- a set of new bearings for the VAZ 2114 generator;
- keys to “8”, “13”;
- special puller;
- ratchet with a set of attachments “13”, “14”, “15”, “32”.
Open the hood. Loosen the tightening of the coupling bolt nut. Remove the negative cable from the battery.
Source: etlib.ru
Bearing VAZ 2101-07, VAZ 2108-099 front generator 302
Dear customers, in order to avoid errors when sending the VAZ 2101-07 bearing for the front 302 generator, in the “Comment” line indicate whether the rotor shaft on the pulley side has an internal hexagon or not, the model of your car, the year of manufacture.
The generator is designed to charge the battery. If it is faulty, then it is possible to drive the car, but the battery will drain all electronics, which will ultimately lead to the battery becoming unusable. The result of a generator failure will be disastrous, since you will have to shell out a considerable amount of money to buy a battery.
If you hear extraneous noise in the form of a metallic ringing, then most likely the bearings need to be replaced. It can only be detected after removing the generator.
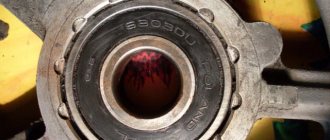
To check the front bearing, you need to rotate the front cover of the generator. In this case, it is necessary to hold the pulley with your hand. If there is noise that does not correspond to the normal operation of the mechanism, there is play or “sticking”, the bearing must be replaced.
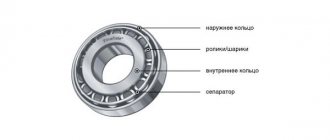
1 - pulley; 2 — segmental key; 3 — front cover of the generator; 4 — outer bearing mounting washer; 5 — front bearing of the rotor generator; 6 - rotor; 7 — coupling bolt; 8 - stator; 9 — rear bearing of the rotor generator; 10 — buffer sleeve; 11 — back cover of the generator; 12 — insulating bushings; 13 - bolt; 14 - voltage regulator; 15 — generator rectifier block; 16 - capacitor; 17 — contact bolt; 18 - bolt; 19 - bolt; 20 — inner bearing mounting washer; 21 — fan impeller.
The front bearings on generators for injection VAZs are different, except for 6302s; more often there are generators with a 6303rd front bearing.
The main distinguishing feature of generators is the rotor shaft.
If the rotor shaft on the pulley side has an internal hexagon, then the diameter of the shaft and the hole in the pulley is 15mm and the bearing there is No. 6302 with dimensions 15x42x13mm. If the shaft is without a hexagon, then the diameter of the shaft for the pulley is 17 mm, respectively, and the pulley has the same, increased size. In such generators, the front bearing is already No. 6303 with dimensions 17x47x14mm.
REASONS FOR CHANGING BRUSHES
In a car generator, most parts are constantly in motion, which causes friction and wear. The reasons for changing brushes may seem very varied, but this should be done during routine vehicle maintenance. On VAZ 2114 it is advisable to change them after 50 thousand kilometers traveled. But as a rule, few people remember about this event, and this breakdown comes as a big surprise to them. There are also markers that signal an imminent breakdown; we will arrange them in order of the most frequent possibility of occurrence:
To check the functionality of the brushes, it is not even necessary to remove the entire generator from the car. To carry out diagnostics, it is enough to remove the negative terminal from the battery, remove the voltage regulator from it and visually evaluate how much the brushes protrude from their seat. If their size is less than five millimeters, then they must be urgently replaced with new ones, otherwise unforeseen consequences can be expected at any time.
Replacing the bearing of the VAZ 2114 generator
In addition to the fact that a car is a means of transportation, it is also a source of a wide variety of sounds. Sounds can tell a lot to an experienced owner. Many can easily make a diagnosis without even opening the hood or looking under the bottom. It is enough, as an experienced doctor, to listen to the nature of the noise, and the malfunction is clear in the palm of your hand. Some nodes cannot be diagnosed any other way. This is especially true for bearings. Today we will be interested in the generator bearing.
Content:
Replacement
The process of replacing old brushes with new ones does not take much time and does not require special knowledge. The only thing you need to prepare are the tools:
Without removing the generator
If you are sure that the problem with the car breakdown is a malfunction of the generator brushes, then you can do without removing it.
With the generator removed
Poor charging of the car can be caused not only by the brushes, but also by the alternator belt. To eliminate this point, when replacing brushes, you should remove it to check the condition of the belt.
First, we dismantle the unit.
Let's move on to the brushes
Generator bearing and belt diagnostics
While the generator is running, with or without noise, it is rarely noticed. But as soon as it stops producing current, its absence is immediately noticed. The battery charging light comes on and the search for a fault begins. But it was enough to just listen to the sounds that the generator makes, and the trouble could have been avoided.
Replacing the VAZ 2114 generator bearing may be required as early as 60-80 thousand km. It all depends on how much the owner pays attention to such little things as the tension of the generator drive belt. First of all, this is what affects the resource of the generator. For prevention, let's check the degree of belt tension.
An ordinary eight-cylinder engine, which costs 2114, does not require special maintenance skills. On the tenth family, the belt is tensioned through a tension roller, but in 2114 there is none of this, and the belt itself no longer drives any mechanisms or assemblies. There is no power steering or air conditioning compressor. It's simple, the main thing is to buy the right belt. Its index is 21082-3701720, and it is better to take Gates or Bosch. Such a belt costs the same as two domestic ones, but its service life is longer. A German belt will cost 530 rubles.
GENERATOR DEVICE
First you need to see the device of the VAZ 2114 generator.
Generator device
All its parts are harmoniously located in a single housing, which is covered on all sides with protective covers. The base part of the housing also provides a base for the stator winding. No matter how massive the generator may seem, it is actually quite light, since most of the parts are made of light alloys, for example, duralumin. Since during operation of the generator it heats up quite strongly, special holes are provided in its housing for air cooling with a counter flow of air. In its front part, in the direction of travel, special rolling bearings are inserted on which the rotor rotates.
The connection diagram of the VAZ 2114 generator is such that from its output terminals the wires go to the battery, which ensures its recharging and energy storage. The generator will start working immediately after starting the engine, since the battery spends a significant part of the energy on turning on the starter and the first revolution of the crankshaft, the voltage on it drops to 9 volts and it needs to be recharged immediately.
Alternator belt tension VAZ 2114
The tension of the generator belt is checked on a long branch, and the force should be about 10 kgf. To more or less accurately determine the force, you can use a simple household steelyard. If the belt deviates by no more than 10 mm at this force, the tension is fine. If it is less, the belt will be overtightened and this may end badly for the generator bearing, to which we are already returning.
But even if the alternator belt has always been in perfect condition, has not slipped or been overtightened, there is a possibility that the bearing may sing. Moreover, setting the sound source is quite simple. If a suspicious hum appears, it is enough to make sure that it is a bearing, since there are plenty of singers in that area. This includes the timing belt, the front cover bearing, the pump, and the timing belt tension roller. To accurately determine the malfunction, it is enough to remove the belt from the pulley and start the engine for a short time. If the noise disappears, it is our bearing that is making noise.
GENERATOR REPAIR
Now we need to figure out how to quickly replace the generator brushes on a VAZ, how to remove the generator from the car and other relevant nuances. By the way, it should be noted that problems with the generator drive belt can also be the cause of all the troubles with the electrical equipment of the machine, which are described above.
A poorly tensioned belt, however, quickly manifests itself - it begins to squeal, especially when the car accelerates sharply. This is due to the belt slipping over the pulleys on the crankshaft and the unit. To check the tension, you can simply try to turn the belt; it should bend minimally. And if during the inspection you also find cracks, then the entire belt will have to be changed.
VAZ 2114 generator bearing numbers
Once we were convinced that bearing replacement was inevitable, all that was left was to simply select the bearing and replace it. In general, everything is simple, but with the huge number of fakes that flood the market, it would not hurt to know the dimensions of the bearing so as not to get into trouble. Since there are only two ways to find out the dimensions of the bearing - remove the generator and measure it with a caliper, or ask knowledgeable people. Knowledgeable people say that: the front bearing of the generator has an internal diameter of 17 mm and an external one of 47 mm; the rear bearing has an inner race with a diameter of 15 mm, and its seat is 35 mm; The width of the bearing race of the VAZ 2114 generator is 11 mm at the rear and 14 mm at the front.
The front bearing should be marked 6302, and the rear bearing - 6202. The price of a generator bearing for a VAZ 2114 should not be higher than 220 rubles. Although, depending on your luck. And also, if you are too lazy to play with pressing the bearing out of the cover, as an alternative, you can buy a cover assembled with a bearing. It will cost no more than 400 rubles, and the replacement will be much more pleasant.
Generator repair
You will need: a screwdriver, a 10mm wrench.
1. Disconnect the wire from the “–” terminal of the battery.
2. Remove the generator from the car (see “Removing and installing the generator”).
3. Mark the relative positions of the generator covers.
4. Press out the three latches...
5. ...and remove the plastic casing.
6. Remove the two screws securing the voltage regulator.
7. Remove the voltage regulator with brush holder...
8. ...and disconnect the block with the wire from the regulator output.
9. Remove the four screws securing the rectifier unit and the screw securing the capacitor.
10. Bend the three leads of the stator winding so that they make it possible to remove the rectifier unit.
11. Remove the rectifier unit with the capacitor.
12. To replace the capacitor, unscrew the contact bolt nut, remove the washer and spacer sleeve. Remove the capacitor wire lug from the contact bolt.
13. Remove the four tightening screws (the screws are tightened with a large torque). Spring and flat washers are installed under the screw heads.
14. Using a screwdriver, remove the generator cover from the slip ring side.
15. Clamp the generator rotor in a vice (not too tightly so that the rotor does not rotate) and unscrew the pulley mounting nut. Remove the spring washer and pulley.
16. Remove the thrust washer.
17. Remove the rotor from the drive side cover.
18. Remove the spacer ring from the rotor shaft.
19. Inspect the slip rings. If they have burrs, marks, scratches, signs of wear from brushes, etc., sand the rings. If the damage to the rings cannot be removed with sandpaper, you can grind the rings on a lathe, removing a minimum layer of metal, and then grind them.
20. Check the resistance of the rotor winding with an ohmmeter (tester) by connecting it to the slip rings. If the ohmmeter shows infinity, it means there is a break in the windings and the rotor needs to be replaced.
21. Check with a test lamp whether the winding is shorted to the rotor body. To do this, turn on the test lamp to a 220 V AC power supply (you can use a battery and a 12 V lamp). Connect one wire to the rotor body, the second to each ring in turn. In both cases, the lamp should not light. If in at least one case the lamp is on, it means that a short circuit has occurred and the rotor must be replaced.
22. Remove the stator from the front cover housing. There should be no traces of the armature touching the stator on the inner surface of the stator. If there is wear, the bearings or generator covers must be replaced.
23. Check if there is a break in the stator winding. To do this, turn on the test lamp to a 220 V AC power supply (you can use a battery and a 12 V lamp). Connect a test lamp one by one between all winding terminals. In all three cases the lamp should be on. If the lamp does not light up, there is a break in the winding. Replace stator or winding.
24. Check if the stator windings are shorted to the housing. To do this, turn on the test lamp to a 220 V AC power supply (you can use a battery and a 12 V lamp). Connect the lamp to the terminal of the stator winding, and the wire from the current source to the stator housing. If the lamp lights up, it means there is a short circuit and the stator or winding needs to be replaced.
25. Inspect the drive-side generator cover and bearing assembly. If, when rotating the bearing, play is felt between the rings, rolling or jamming, the protective rings are damaged or there are traces of lubricant leakage, cracks are found in the cover, especially in the places where the generator is attached, it is necessary to replace the cover assembly with the bearing (the bearing in the cover is rolled).
26. Check the ease of rotation of the bearing on the slip ring side. If, when rotating the bearing, there is play between the rings, rolling or jamming, the protective rings are damaged, or there are signs of lubricant leakage, the bearing must be replaced. To do this, use a puller to press the bearing off the rotor shaft and press on a new one using a suitable mandrel, applying force to the inner ring of the bearing.
Bearing replacement, instructions
Now for the procedure. There should not be any particular difficulties in dismantling the generator. Now that we have the generator in our hands, we can start disassembling it, but we will have to disassemble it completely. To do this, it is advisable to have a vice, and the process itself schematically looks like this:
- Remove the back cover.
- Remove the diode bridge.
- Remove the brushes.
- Unscrew the pulley nut, holding it in a vice through an elastic spacer so as not to damage it.
- Attention! Be sure to mark the covers with a marker so as not to disturb the alignment.
- Use brake fluid or magic WD40 to treat the tightening bolts and the cover mounting areas.
- Unscrew the tightening bolts and remove the covers.
- Use a wooden punch to knock out the anchor from the cage on both sides.
- Use old bearings instead of mandrels to press in new ones.
It is done. The bearings are pressed in, now all that remains is to put everything back together so that the rotor does not touch the stator. After installing the generator and a new belt, we check the voltage at the battery terminals, if as a result the generator runs quietly, the voltage is at least 14 V, we can consider the mission completed. Good luck to everyone!
Source: ladamaster.com
| Generator bearings (VAZ 2110-2115) | ||
| 180202 | 24940220 | Rectifier side support bearing |
| 180302 | 24940230 | Support bearing on the drive side (old-style KATEK generator) |
| 180202 | 24940220 | Rectifier side support bearing |
| 180303 | 24940230 | Support bearing on the drive side (new model KATEK generator) |
| 180103 | 24940220 | Rectifier side support bearing |
| 180303 | 24940230 | Support bearing on the drive side (Iskra generator) |
Lada 2114 › Logbook › Lost charging, replacing the generator brush assembly (brushes)
The other day I noticed that after starting the engine, it was not charging.
After 30 seconds of engine operation, after re-gasping it appears. I came to the conclusion that it was time to change the brush assembly. Everyone never got around to stopping by and buying brushes. This morning before going to work I noticed that the charger had completely disappeared. I still had to urgently buy a unit. (Like the law of meanness, I just arrived at work and the charger appeared)
These are the readings given by the onboard when the engine is running. We begin to treat the patient.
(To begin with, of course, disconnect the positive terminal from the battery, so as not to cause a short circuit and fire.) Next, unscrew the positive wire on the generator
Unscrew the positive wire from the generator
We begin to dismantle the protective casing of the generator, under which the cause of our illness is located (brush assembly)
Unscrew the two bolts and disconnect the wiring going to the brushes.
This is, in fact, the reason for the lack of charging, or rather, the brushes have run out.
Sample of an old brush assembly.
This is what the new brush assembly with cap looks like
For comparison, old and new brushes. (how long should the brushes be)
Be sure to check the stem at anchor. (the place where the brushes come into contact with the generator shaft)
In my case, I need to grind the anchor... the offset is quite large. But to do this you need to remove the generator. Unfortunately, there is simply no time or opportunity for this, since it needs to be clamped into a lathe. so I’ll install the brushes like this (knowing in advance that they won’t last for a long time) ASSEMBLY IN THE REVERSE ORDER!
The result is obvious! All work took about 15-20 minutes
Likes 15 Shares: Subscribe to car