January 22, 2016 Lada.Online 203 867 12
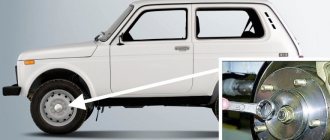
The problem with standard Niva wheel bearings (VAZ 2121, 2131) is that they need to be constantly adjusted during vehicle operation. If this is not done in time, they will fail, creating a howl or hum when moving. You can save yourself from such problems by installing non-adjustable hubs or double-row bearings.
Why is replacement necessary?
There are some signs indicating that the front wheel bearing on the Niva needs to be replaced. The very first sign is a strange sound, different from normal when moving on the road.
If it appears, you should pay attention to the following points:
- Wheel overheating.
- The front wheels send vibrations through the steering wheel and body.
- When driving at high speed, the car pulls to the sides.
- It is difficult for the driver to control the steering wheel when driving off-road.
- When you turn the steering wheel, you can hear the crunching of the wheels (even with the engine off).
Even the presence of one sign may indicate that the front hub of the Niva 2121 requires replacement. A damaged bearing will cause the suspension ball joint to fail and the axle shaft to break. This can cause the car to roll over when driving fast.
Most Niva 2121 bearings fail at 100,000 km. mileage, even with declared wear resistance. This is due to the poor condition of the roads and the constant use of the vehicle in difficult conditions. In addition to natural causes of failure, improper installation of the bearing, insufficient lubrication and excessive tension can affect it.
Is it possible to replace the front wheel bearing of a Niva Chevrolet with your own hands?
It is recommended to entrust installation to professionals. However, if you have a set of tools and free time, it is quite possible to perform the replacement yourself. Before starting repairs, you need to visit a car wash and wash the front suspension especially thoroughly. The second important step is the correct dismantling of the part. To do this, you need to block the wheel and remove the bolts that secure the wheels. Further:
- first, use a jack to suspend and secure the front part of the car;
- then remove the wheel along with the brake pads;
- unscrew the piston pin of the swing arm;
- we take out the bolts that secure the ball joints;
- screw the hub together with the hinges.
And also interesting: Front suspension Niva VAZ 21213, 21214, 2131 lada 4×4 "
The fact that the wheels on a Chevrolet Niva rotate smoothly is determined by the presence of bearings in the hubs. They can stand on both the front and rear wheels. Bearings are designed to reduce friction.
If such bearings fail, the wheel warps and the rubber begins to wear unevenly and quickly. If the bearing is damaged while the car is moving, the wheel will simply lock and stop rotating. For this reason, it is important to pay timely attention to bearings, especially on the Chevrolet Niva, since the car is an SUV and therefore experiences heavy loads on the chassis.
At this point, the process of replacing the wheel bearings on a Chevrolet Niva can be considered complete. After assembly, you should check the ease of rotation of the wheel.
Checking the wheel bearing
As mentioned earlier, the first thing that appears is an unusual sound when driving on the road. You can accurately determine the breakdown by turning the steering wheel. When moving to the left, the car skids to the right. The same thing happens when turning right.
Check bearing wear when driving at low speeds of 15 km/h. If, when turning the steering wheel to the left, the characteristic sound disappears, a part on the corresponding wheel has broken. Does the sound disappear when moving in the other direction? This means the problem is in the right bearing.
A more accurate diagnosis can be made by lifting the car with a jack:
- Turn the engine into 4th gear, accelerating the VAZ to 70 km/h. A broken wheel can be identified by ear - it will crack.
- Turn off the engine and wait until the wheels stop completely.
- The wheel, previously identified as broken, is rocked in different directions. If there is even slight play, the bearing must be replaced.
Play may be caused by wear on the suspension or control system. You need to ask an assistant to hold down the brake pedal and rock the wheel again. If the play remains when pressed, the problem is in the suspension. Otherwise, the issue is bearing wear.
Niva, wheel bearings
In general, I remember how last year I installed my hubs, even then I had the idea of converting the front bearings to more reliable double-row non-adjustable ones. In general, after this you can forget the problem of the front bearings. The bearing is best installed from Moskvich 2141, the price of the issue is 700-1000 rubles. Instructions and drawings are taken from Nivoforum
Part 1 (preparatory)
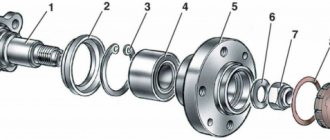
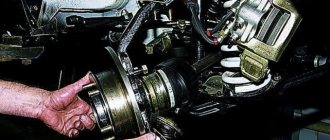
We disassemble the front suspension, remove the steering knuckles, remove (as a rule, we take them out, not knock them out or press them out, they fall out of there themselves) the hubs from the knuckles. We make sure that the inner race, at least the inner bearing, has already rotated on the hub journal. A hub that is unsuitable for installing standard bearings will live its second life with a foreign bearing. We knock out the wheel studs and remove the brake disc from the hub. We check the integrity of the splines inside the hub; if there is wear, it is better to replace the hub. We check the condition of the neck under the oil seal (not important). We inspect the brake discs for wear and cracks. If the surface looks like plowed virgin soil, then they can be ground. If there are cracks, replace. We measure the thickness. If it is more than 10 mm, then they are still suitable, if less, but have not yet reached 9 mm, we think, either leave them like that or replace them. We take out the oil seals from the knuckle, knock out the outer races of the bearings, knock out the ball bearings (if they are normal, then press them out), remove, unscrew everything from the steering knuckle, wash it clean, wipe it with a cloth, check that the seat cones for the balls are in good condition and... give it to the turner along with the hub, drawings and magarych
Now, installing the retaining rings in grooves A (see drawing of the knuckle), we obtain a design for discs with an offset of 46 mm +- 11 mm. In grooves B – 52 mm +- 11 mm. That is, for those who ride on 15-inch wheels, option A is more suitable, for 16-inch wheels – option B. You can, of course, go beyond these tolerances, but in this case the bearing will work in a not entirely optimal mode, read “with overload."
For meticulous lovers of mathematics, I will say that in option B the section axis will not coincide with the standard one by exactly 1 mm; an adjustment was made for this millimeter after assembly, since the brake disc was very close to the brake caliper from the inside.
A few notes for the turner
We carefully read the drawings and comments on them. In the drawing of a standard fist, the base surface is indicated by a callout. All dimensions when making grooves are tied to it. That is, we measure the distance from it to the end of the fist, after which we recalculate the dimensions from the end. IT IS IMPORTANT! Fists differ in size, there is a risk of missing. The outer diameter of the knuckle in the drawing does not correspond to reality, so do not delude yourself that you can push a “zdaaar powerful bearing” there. The hub is drawn without a flange and a hole for the CV joint shaft.
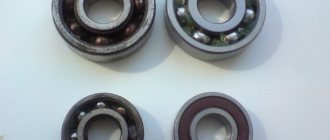
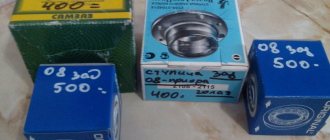
Selection of spare parts
Bearing from the front hub of Moskvich 2141, number 256908. It is better to take an imported one of better quality. The same bearing was installed on some models of foreign cars. For reference, I took Kraft, it says (I don’t know if it’s true or not) that it’s made in USA. SKF didn't find it, otherwise they would have taken it. Retaining rings are also from Moskvich When purchasing rings, check their thickness, otherwise out of 4 pieces I came across one that was not 2 mm thick, but 3 mm
Each hub requires one bearing and two circlips.
Part 2 (optional)
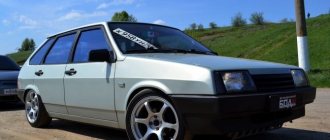
While the excess metal is being removed from the knuckles and hubs, you can paint the brake flaps and calipers in cheerful colors. For example, I painted the flaps yellow and the calipers red. Now the car looks prettier, and, like, a hint of tuning
Part 3 (assembly and final)
1. We take the parts from the turner, not forgetting to say “thank you.”
2. We wash the fist to remove shavings and blow it with a compressor (cleanliness is the key to health). We mount the brake flap on the fist. IMPORTANT! Once the hub is pressed in, it can no longer be installed! We install one retaining ring into the groove based on the selected pattern A or B. We take a screw puller (or a long bolt with a nut, you can order them from the same turner) to install the bearings on the chisels. We press the bearing into the fist. ATTENTION! In this case, a hammer is no help! Place the retaining ring on the other side of the bearing. We install the original hub seals. ATTENTION! We don’t hammer them in all the way and all the way, but the inner one is flush with the seat, the outer one is recessed by 1-2 mm. There is nothing for them to rest against, so we work CAREFULLY! We put Litol-24 under the seals. Of course, you don’t have to bother with these seals and lithol, but no one will refuse additional protection
3. Mount the brake disc with studs on the hub. We take studs specifically for the front hub (they have knurling far from the head). It is convenient to recess the stud using a wheel nut, twisting it along the stud. We take the assembled hub and put a washer on it, narrow 4 mm, for option A, or universal 10 mm, for option B. THIS IS IMPORTANT! If you forget about the washer, then you will have to change the bearing; after pressing out, the seal on the bearing dies irrevocably. BE CAREFUL! Using the same puller, press the hub into the bearing. We put the inner washer on the hub. After pressing, a slight play of the bearing is possible. There is no need to despair, it will disappear after tightening the hub nut. If it doesn’t disappear, it means you got a low-quality bearing, then you’ll have to repeat all the work again or drive with this play.
4. Next, we assemble everything in the reverse order as we took it apart. We mount the balls, brake calipers, install the fist on the machine, etc. Don’t forget to check the condition of the brake pads. We are tightening the hub nut for now, tightening will be later.
5. After placing the machine on the wheels, tighten the hub nut to a torque of 28 kgf.m. (it seems that according to the manual for AZLK 18-20 kgf.m., but this is debatable, we read the details in the ZR magazine. I can imagine what emotions a person who is used to adjusting bearings on Niva experiences. The nut can be locked. As practice has shown, this is not It’s necessary to do this, they won’t unscrew anyway. But it’s better to lock it anyway so that I don’t have hiccups later
Steps for replacing a wheel bearing yourself
To replace the wheel bearing of a VAZ 2121, it is necessary to position the front part of the vehicle above an empty space, which will provide unobstructed access to the necessary parts. You can place the machine on a lift or above an inspection hole.
The process of replacing a part takes place in the following sequence:
- First of all, remove the wheel, then remove the caliper from the pad guide. The bottom of the car must be fixed so as not to damage the brake.
- Remove the boot, wheel bearing nut and tapered bushing.
- Using a chisel, bend the stopper of the nut that secures the front knuckle lever. In the same way - the rear.
- Using a spanner wrench 19, remove both nuts and the stopper plate.
- The lever is moved away from the fist and the brake hoses are disconnected.
- Remove all the fasteners and the fist itself, and then disconnect the hub base from it.
After completing all the processes, it is necessary to disconnect the bearing from the base:
- Remove the steering knuckle, ball joints, hub assembly and brake disc.
- Disconnect the steering knuckle from the hub with the brake disc, and then remove the mounting bolts.
- Separate the hub from the brake disc by screwing the nut onto the stud and remove it. Also separate all the studs from the parts.
- Separate the hub from the brake disc and use a chisel to knock out the mud ring.
- Using wrench 10, unscrew the bolt of the protective casing and remove it.
- Remove the seal and inner ring of the bearing. Do the same with the other part.
The hub base must be completely cleaned of used lubricant, after which a fresh compound is applied to the inner surface and a new bearing. All elements are installed step by step in reverse order. When filling the hub base, all parts must be thoroughly compressed using a pipe of suitable diameter.
Tuning the chassis of the VAZ 2121, modernizing the suspension of the VAZ 2131, tuning the chassis of the Niva 2131, VAZ 2121. Tuning VAZ cars is an increase in the factory characteristics of the car. Refinement of the Niva 2121 is, first of all, the installation of new bumpers, crankcase protection, and a winch. If desired, the owners of these SUVs install additional fog lights. Our sections describe instructions and tips for modifying the Niva 2131 of various units, such as the transfer case, etc. Even a car enthusiast can do complex tuning of vases with his own hands. You will also find categories for engine tuning, gearbox tuning, interior and exterior tuning, as well as many photo reports of VAZ 2121 tuning. Thanks to interesting solutions, Niva tuning will give you a lot of pleasure and benefits. If you have photos of tuning vases, send them to us by email.
I want to immediately answer the question: “why is such a rework necessary?” The fact is that on Niva the wheel bearings are two tapered bearings (on each hub, i.e. there are four in total), the tension is provided by a wheel nut, which is tightened with a certain torque. When tightening, it is necessary to control the runout of the brake disc using a micrometer... but this is wise! But in fact, almost all motorists, and even more so “servicemen,” tighten it like this: spin the wheel (brake disc), tighten the hub nut, tighten it... tighten it... and so on until a given moment (at best). As a result, quick bearing failure! In addition, this operation has to be carried out when replacing a CV joint or simply after a strong side impact on the wheel, for example on a high curb. In short, I was fed up with all this and I decided to replace the package of Nivov bearings with a double-row front wheel bearing of the Moskvich 2141 (No. 2141-3103020), as I learned, this bearing is also installed on some foreign cars. The overall dimensions of the VAZ 2121 bearing (37*72*37) allow it to be installed in the Niva’s front hubs, subject to some “alterations”. It is necessary to slightly reduce the landing diameter of the hub itself to 37 mm. And bore the steering knuckle! This is the most difficult process because... requires coordinate grinding (to make an ideal seat for a new bearing). You can, of course, get by with a simple lathe and a good turner (it will be MUCH cheaper!), but I decided not to skimp on quality and turned to professionals in this matter, who, in turn, made all the parts I needed for a “tidy” sum. You also need special support washers with a thickness of 10.5 mm. (see drawings below). Now a little more about all this: We remove and completely disassemble the old Niva 2121 hubs, clean everything from dirt. We go to the bearing store and buy the double-row bearing No. 2141-3103020 we need or its imported equivalent in the amount of 2 pieces. Personally, I bought American bearings from the “Craft” company, number: CR4172370, if I’m not mistaken. We will also need two retaining rings from the front wheel bearings of the Moskvich-2141 car (No. 366553-15), they can be of different thicknesses, so we be sure to buy them in advance. If you have chosen the cheap option, then we take the drawings and go to the turner and spend a long, long time persuading him to take on this task... Then we carefully monitor the quality of the work. After everything is ready, we try to press in the bearing and begin assembling. If you choose the expensive option, contact some organization related to high-precision machining, explain the situation, give them all the parts (bearings, retaining rings) and go home, wait for the result. Personally, I turned to people who had already done similar alterations (in Akademgorodok), and for a very “no small” amount of money they re-sharpened the hubs to fit new bearings, bored (or rather ground) the steering knuckles, made 4 pieces of support washers, and at the same time corrected the “jamb” with a neck for the oil seal on one of the hubs, ground the seats for the brake disc on the hubs, and also pressed new bearings into place and installed retaining rings. Next, having received a set of ready-made parts, we begin to assemble! Because The bearings have their own rubber seal, so there is no need for standard seals. But I still recommend installing them (you can use the cheapest ones), if only to limit the entry of water and dirt into the steering knuckle. We assemble the hub and brake disc Niva 2131. In this case, it is better to take a new brake disc (or an old one, if there is little wear on it!). The fact is that to replace the brake disc on a Niva, you need to remove the hub of the VAZ 2131, and these new bearings can only be pressed out against the inner race - i.e. After this, the bearing becomes no longer suitable for use!!! Next, we press the hub into the bearing (in the steering knuckle), not forgetting to install the support washers (one between the journal under the oil seal on the hub and the bearing, the second is installed later, on the other side of the bearing, between the bearing and the CV joint.)! We assemble the entire assembly and install it on the car. Now we tighten the hub nut with a large torque (about 200 Nm), as they say: “from the heart”! And from now on we go and enjoy...
Upgraded hub
Special support washers
Upgraded steering knuckle with pressed bearing
Set of upgraded parts
Bearing in the steering knuckle (outer side of the knuckle)
The bearing is in the steering knuckle (inner side of the knuckle), the retaining ring in the groove is clearly visible!
The inner part of the knuckle after assembly, showing the outer support washer under the oil seal
Steering knuckle and hub assembly!
Drawing of a modernized hub
Drawing of a modernized steering knuckle (sectional view)
Drawing of a thrust washer (2 pieces are needed for each hub)
Adjusting the wheel bearing on a VAZ 2121
After replacing the front wheel bearing of Niva 2121, it is necessary to adjust it. Before this, an hour indicator is attached to the steering knuckle. Its leg rests against the wheel hub near the adjusting nut. Place spanners on the studs using the rings and secure them with wheel nuts. Use the keys to turn the hub in the direction of the axis and check the amount of displacement using the previously installed indicator.
If it is more than 0.15mm, you need to remove the nut and readjust the bearing:
- Use your beard to straighten the jammed nut belt.
- Use a spanner wrench 27 to remove it and install a new one.
- Tighten the nut to a torque of 2.0 kgf.m, while simultaneously turning the hub in different directions. Then loosen and tighten again to a torque of 0.7 kgf.m.
- Loosen the adjusting nut 20-25˚ and check the bearing clearance. It should not exceed 0.08mm.
Upon completion of work, the nut must be locked.
Converting the hub to a double-row bearing
Do you want to modify your Niva, but have a small budget? Then we’ll show you how to remake the front hubs on a Niva with your own hands. Required:
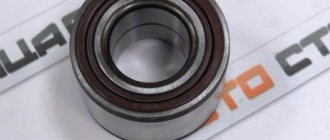
- double-row bearing from Moskvich 2141 (catalog number: 2141-3103020), or an analogue from Craft (article: CR4172370);
- two retaining rings from the same vehicle (part number 366553-15).
We take the drawings and seek the services of a turner. The master must bore the hub to fit new bearings, grind the steering knuckles and make parts according to the diagram. By the way, some Niva 4x4 owners also use the AUDI 74x40x74 wheel bearing, in this case only the steering knuckles are ground.
After the parts are manufactured, all that remains is to press in the double-row bearing and reassemble the already non-adjustable hubs. At the end of the work, tighten the hub nut with a large torque “from the heart”. Their adjustment is no longer required, you can forget about the hum and howl while driving!
Have you ever encountered a similar modification to the Niva hub? Leave recommendations and reviews about your options for upgrading the VAZ 2121, 2131. Let us remind you that the domestic SUV has other shortcomings, which are also eliminated by modifications. You can also find information about the car you are interested in by its content.
Key words: Niva front suspension
The content of the article :
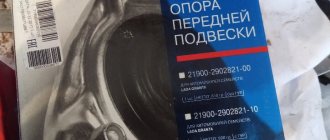
“Reinforced” hub unit for Niva with reinforced hub 2123 (24 splines) from VolgaAvtoprom
I purchased this product:
An initial inspection showed the presence of strange holes through which water freely gets to the bearing bypassing the seal...
Holes past the seal
I called the manufacturer to clarify why they were needed, and why the instructions did not say to seal them. To which I was told that these are technological holes for pressing out the inner race from the hub. Then I began to wonder why such tricks were needed. It turned out that the hub shaft with a diameter of 40.03 (personally measured) was made supposedly to prevent the hub race from turning... Although it should be -0.01 ... -0.02 in order to be able to remove the hub without disassembling the bearing.
VolgaAvtoProm has a conditionally dismountable unit (not dismountable) - each time an expensive bearing must be replaced. Because it comes apart and the clip remains on the hub.
What else can you do?
The Niva 4x4 wheel bearing is not very durable. It often breaks down and requires repair. In order not to think about constantly replacing the front wheel bearing of the VAZ 2121, you can use alternative bearings, for example, double-row ones.
They have advantages over the standard ones in the VAZ 2121:
- They do not require adjustment or lubrication of the unit. All necessary work is carried out at the factory.
- They have high wear resistance.
- Do not allow arbitrary rotation of the wheels when driving.
- They have a long service life.
Of course, before installing a double-row bearing, you need to bore the hub to the desired size. And the parts are quite expensive. But this is compensated by a long service life, eliminating the need for constant repairs.
Replacing a Niva 2121 wheel bearing is quite simple. It only requires having the necessary tools and strictly following the instructions. Replacement must be carried out immediately if at least one sign of wear is detected. Otherwise, the car may roll over while driving.