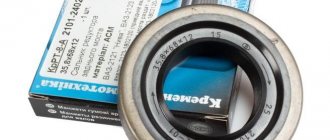
In order to connect the wheel to the shaft, a hub is installed in the vehicle structure. While driving, this wheel assembly is most subject to loads and wear. Over time, the backlash increases and axial vibration of the wheel appears. The reason for this may be the Niva Chevrolet wheel bearing and this problem can be solved simply by tightening the wheel nut. But any part does not last forever, so over time, tightening may not help and the wheel will stop rotating and a complete replacement will be required.
Signs that replacement is needed
There are two main signs that indicate replacement is necessary:
- There was a knock and play in the hub area
- There was a strong hum and grinding noise in the hub area
But in order to accurately understand the reason for the appearance of extraneous noise, you need to disassemble this mechanism and inspect it.
Replacement
To make a replacement, carefully do the following:
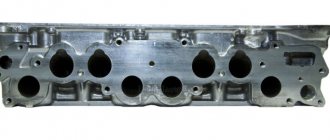
- If this is the front wheel, then the Niva Chevrolet front hub is removed. To do this, the car must be placed on a level surface and jacked up on the replacement side. Then disconnect the pads from the caliper. Unscrew the nut on the axle. We remove all spare parts from the wheel. Take a skein and disconnect the hub from the brake disc.
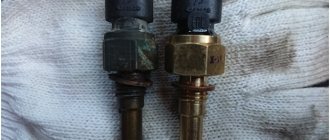
- We remove the bearing. To do this, remove the plate and oil seal from the inside. Take a cleat and a hammer and remove the inner bearing
- We install a new one. Replacing bearings must be changed on both sides at once, and it does not matter whether it is the rear or front wheels. In order not to damage the body, pressing must be carried out using a wooden plate and a pipe.
- Putting the unit back together. Reassembly must be done in reverse order.
Purpose and design of a wheel bearing
Bearings serve a dual function. On the one hand, they provide support for an axis, shaft or other element of rotation. On the other hand, they convert sliding friction into rolling friction. The wheel bearing is designed to ensure uniform rotation of the wheel hub. This is the connecting link between the hub and the axle of the car. Note that these elements ensure rotation of not only the front, but also the rear wheels.
Any bearing has the same basic structure:
- Outer ring (outer race);
- Inner ring (inner race);
- Guide for rolling elements (cage);
- Conical, cylindrical or spherical elements).
Bearings of modern imported cars have a more complex structure. Typically, their inner race is part of the hub, and the design itself contains electronic sensors. They are characterized by an increased service life. Russian manufacturers have not yet reached such technology, so they use simpler devices.
Simplifying a unit negatively affects its reliability. Moving elements are especially sensitive to sharp impacts that chassis parts receive when driving over uneven surfaces.
Chevrolet Niva traces its history back to the regular Niva or VAZ 2121, which entered the assembly line more than 40 years ago. In turn, this VAZ SUV was developed on the components and assemblies of the VAZ 2106 and has many design solutions in common with it - both successful and dubious. The weak point was the ball bearings of the rear axle shaft.
The bearing is located inside the rear axle housing closer to the hub and is pressed tightly onto the axle shaft. The second end of the axle shaft fits freely into the differential of the rear gearbox and is not fixed there by anything. On the wheel side, the axle shaft is secured with a plate with 4 bolts. Therefore, when driving off-road or installing wheels of larger diameter, both axial and radial forces act on the bearing itself.
Main reasons for failure:
- careless off-road driving, especially in combination with sudden impacts;
- overcoming fords and moisture getting inside the bridge;
- oil seal wear and oil leakage from the rear gearbox;
- displacement of the locking ring due to its incorrect installation or defect;
- radial runout of the axle shaft (usually occurs due to deformation of the shaft itself);
- damage to the landing pads on the axle shaft or inside the axle stocking;
- installation of wheels with a larger diameter and offset than those recommended by the factory.
(as well as the rear) Chevrolet Niva has exactly the same design as old cars, and their repair and replacement are carried out according to the same scheme. Initially, you should go to any car wash, where you should thoroughly wash the entire front suspension under high pressure. For crossovers, this advice is especially important.
- The front of the car is raised using a jack;
- The corresponding wheels, brake pads and calipers are dismantled;
- The hinge pin is untwisted and pressed out using a special tool;
- The bolts from the hinges and nuts are removed.
- After this, you have the opportunity to examine the part for damage and make appropriate repairs. Regardless of whether you plan to replace the bearings, you should change the seals.
After removal, the inner race along with the rollers must be thoroughly washed with kerosene. After this, you will be able to visually assess the bearing damage. It is worth remembering that these parts are replaced only in pairs.
- There is no possibility of adjusting the backlash using a nut (tightening does not help);
- The rollers and clips are heavily scratched;
- Overheating is detected and a hum is observed.
If you observe one of these signs, you need to get new bearings for your Chevrolet Niva. Otherwise, only the lubricant and oil seal need to be changed. Pressing occurs using special nozzles. Do not throw away the old clip, as you will need it to install the new part. If difficulties arise, you can always find one of the many videos on the Internet that demonstrate this process.
Unregulated
As a rule, the Niva has a standard adjustable hub, which requires periodic adjustment. But in order to get rid of this inconvenience, non-adjustable hubs for the Chevrolet Niva were developed, which have such positive qualities as:
- No maintenance required. They don't need to be adjusted
- The bearing in the device does not rotate
- It is filled with special lubricant from the factory, so there is no need to lubricate it.
- Due to the fact that the work occurs thanks to the ball bearing in the unit, friction is reduced
- There is no wear on the seat in the rotary cam
- Not adjustable as it is tightened from the factory
- No need to change the bearing
- Long service life which is equal to 100-120 thousand kilometers
Therefore, thanks to all the positive characteristics listed above, many car owners change the standard part to a non-adjustable one.
It is also worth noting that the non-adjustable part can be produced as a reinforced Niva Chevrolet hub, which solves the problem of wear of the oil seals on the steering knuckle. It is best to choose companies such as VolgaAvtoprom, IVECO, OmegaInterAuto.
The main disadvantage of this unit is its high price, but by installing this part you can forget about the problems that appear in the standard element. By installing a reinforced version of your SUV, the cross-country ability will increase and reliability will increase, and having a standard set of tools, you can make an independent replacement without any problems.
Installing new bearings in the steering knuckle
Manufacturers do not lubricate their bearings and rings very generously, so you will have to add the missing amount of grease yourself. Litol-24 in an amount of 40 g is suitable, apply lubricant to the separator and rollers before replacing the Niva front hub.
- We insert a new outer race of the inner and outer roller bearing into the prepared hole of the steering knuckle. We press the clips on both sides, in the same way as they were installed at the factory.
- Next, apply lubricant to the raceways and spread it in an even layer.
- We insert the inner race and close it with an oil seal. Lightly press the boot with a mandrel of the required size. We do the same on the other side, install the clip and boot.
- Now we insert the hub into the steering knuckle, namely into the holes of the installed roller bearings.
- The hub must be inserted smoothly and without distortion. In some cases, depending on the actual mounting diameters, pressing through a press will be required. In this case, a spacer was used.
Read news about the new Niva
- How to bleed the brakes on a Niva yourself? "
- Tuning Niva 2121 with your own hands (photo video) - Self-repair of cars
- Official dealers of LADA 4×4 5 doors. in Togliatti - Official website of LADA
- Chevrolet Niva buy from an official dealer in St. Petersburg, new Chevrolet Niva 2021, 2021 from RUB 409,300.
- Reasons for the failure of Haval sales in Russia
- Tuning pistons TDMK Niva 21213
- What to choose Chevrolet Niva or UAZ Patriot
- New Lada Niva Cross Coupe 2020–2021 (Lada Niva Cross Coupe) - New cars 2021-2022, car news on Avtokama.biz
Converting the hub to a double-row bearing
Do you want to modify your Niva, but have a small budget? Then we’ll show you how to remake the front hubs on a Niva with your own hands. Required:
- double-row bearing from Moskvich 2141 (catalog number: 2141-3103020), or an analogue from Craft (article: CR4172370);
- two retaining rings from the same vehicle (part number 366553-15).
We take the drawings and seek the services of a turner. The master must bore the hub to fit new bearings, grind the steering knuckles and make parts according to the diagram. By the way, some Niva 4x4 owners also use an AUDI 74x40x74 wheel bearing, in this case only the steering knuckles are ground.
After the parts are manufactured, all that remains is to press in the double-row bearing and reassemble the already non-adjustable hubs. At the end of the work, tighten the hub nut with a large torque “from the heart”. Their adjustment is no longer required, you can forget about the hum and howl while driving!
Have you ever encountered a similar modification to the Niva hub? Leave recommendations and reviews about your options for upgrading the VAZ 2121, 2131. Let us remind you that the domestic SUV has other shortcomings, which are also eliminated by modifications. You can also find information about the car you are interested in by its content.
Key words: 4x4 front suspension
Found an error? Select it and press Ctrl Enter..
- Which car brands have the highest share of corporate sales?
- Installation of tweeters (tweeters) in standard places of Lada Vesta
- Photo Lada Kalina NFR
- An example of tuning a Lada 4×4 for 1.5 million rubles
Car "Niva"
“Niva” is perhaps one of the most popular SUVs, not only in Russia, but also abroad. Since the late seventies, this car began to be produced. The very first model was named VAZ-2121.
Also interesting: LADA Niva – Operating manual – Official LADA website
It was almost impossible for an ordinary resident of the Soviet Union to get this car: almost eighty percent went for export, and the remaining twenty were released one by one. At the price at that time, this model was second only to the Volga, that is, the car that was used by the state apparatus as the main car.
In the mid-eighties, Niva cars with Soviet racers inside took all three prizes at the Australian rally raid. Sales of the car soared: in Australia itself - twofold, in Europe - fourfold or more, depending on the country.
Indeed, this was a new word in the annals of the development of light SUVs, and it was written precisely by Soviet designers.
Hub repair: popular mistakes and misconceptions
Connoisseurs of tuned cars are often able to make radical changes to their cars. And few restrictions exist for them. Owners of Niva Chevrolet are no exception. Tuning fans also took a look at the design of the front hub assembly. Often on online forums in discussions you can find advice (and even corresponding training videos) about replacing the bearing using a hub mechanism that has a steering knuckle from a VAZ 2121 car, since it is believed that this design is better in terms of reliability.
However, this is a misconception. Yes, tightening will occur without any difficulties, but this will make it impossible to adjust the camber of the front wheel of the car. The fact is that each fist has distinct differences in size and axial angles. But much more stupid are the tips that require turning the hub and shaft on a lathe.
Repairs such as replacing a wheel bearing in a field can be done independently without much difficulty. Wheel bearings on the VAZ 2121 and Chevrolet Niva have a very short resource due to the suspension design, compared to other all-wheel drive vehicles, therefore, these parts need to be given increased attention in order to identify the fault in time.
Replacing a wheel bearing in the field does not involve anything complicated if you follow the instructions strictly. Anyone, even a novice car owner, can cope with such repairs. Not all vases have wheel bearings changed the same way. The design of the Niva car hub differs from the design of other VAZ models, so the process of replacing the bearing will also have its differences.
Symptoms and identification of a worn wheel bearing
When the life of the hub bearing is running out, a hum is clearly audible when driving, this is the main sign. If you listen, you can understand which direction this hum is coming from. When driving at low speeds, it is not too noticeable, and it can easily be confused with noise from rubber, but as speed increases, the hum increases, which is reminiscent of flying in an airplane. You can’t drive with a humming bearing, because soon it may simply break into pieces, and this implies a lot of other problems.
Also interesting: How to bleed the brakes on a Niva yourself? "
If there is an assumption that the bearing has exhausted its service life, then you can check this with the car parked. To do this, you need to jack up the wheel whose bearing is suspected and pull the wheel vertically with your hands. If there is play, then the bearing is most likely to blame.
Necessary tools for work
- Jack and supports. To replace the front bearing, you need to lift both wheels, otherwise the stabilizer will interfere, pinching the suspension elements;
- Wrench for unscrewing wheel nuts;
- Flathead screwdriver. To remove the protective cap;
- Head 27;
- Locksmith's beard. To straighten the collar of the hub nut;
- Hammer;
- Wrenches for 10, 17, 19 and 22;
- Chisel and wooden spacer. To avoid damaging other parts when knocking out;
- Vise;
- A piece of pipe for pressing in bearing retaining rings.
Bearing replacement process
- Loosen the nuts on the wheel where replacement is planned and jack up both wheels of the axle. Remove the desired wheel;
- We dismantle the caliper and guide. To avoid damaging the brake hose, we tie the caliper to the upper arm with wire;
- Having removed the protective cap, use a 27mm head to unscrew the hub bearing nut and remove the conical bushing;
- Using a chisel, unbend the locking plate of the front and rear lever mounting nuts. Using a 19mm wrench, unscrew the front and rear nuts securing the lever. After this, remove the locking plate;
- When the lever is released, it must be moved away from the steering knuckle, freeing the brake hose;
- Disconnect the ball joints (upper and lower) from the lever;
- Now you can remove the entire steering knuckle assembly, along with the ball joints and the brake disc, by removing it from the CV joint splines;
- Separate the steering knuckle from the hub with the brake disc. If the parts do not separate freely, then we clamp the fist in a vice and, using a soft metal drift or chisel, through a spacer from wood, knock out the hub with the brake disc;
- Next, pull out the bolts securing the lever and knock down the protective ring with a chisel;
- Using a 10mm wrench, unscrew the bolt that secures the casing and remove the casing itself;
- We hold the fist in a vice and, using a flat-head screwdriver, pry up and remove the wheel bearing seal. There is a metal ring behind the oil seal, we also remove it;
- The next step is to remove the inner ring of the outer bearing assembly from the well. Next, we also remove the oil seal, metal ring and inner bearing ring assembly;
- Using a punch and a hammer, we knock out the metal rings of the outer and inner bearings. At this point, dismantling is considered complete.
After cleaning the well from old grease, you can proceed to installing a new bearing. Replacing a wheel bearing in a field occurs in the reverse order; it is only important not to forget to fill it with fresh Litol 24 grease and, after installing the steering knuckle on the car, adjust the clearance in the bearings.
Thematic materials:
What happens if you pour gasoline into a diesel engine? Car engine cooling system What malfunctions prohibit the use of a car Orion on-board computers Pressure reduction valves, selection and operation issues Installation of additional headlights Reviews: Chrysler engine on a Gazelle Electronic speedometers for a car
103583
If you notice an error, select a piece of text and press Ctrl Enter
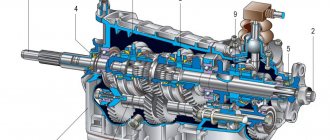
Front hub design on Niva Chevrolet
The hub on a car is the element that connects the wheel and the drive shaft. It has two bearings, which reduce the friction force when rotating on the shaft.
Diagram of hub assembly.
This gap may increase over time and due to wear and tear of parts. In this case, the wheels begin to vibrate on the axles, which is the cause of premature tire wear. To correct the situation, the wheel bearings should be changed in a timely manner.
Hub assembly on steering knuckle
The product is a complex-shaped part that rotates on a pair of tapered roller bearings. Their outer diameter is pressed into the steering knuckle. The standard equipment of the Chevrolet Niva includes adjustable hubs. In it, the bearing clearance depends on the position of the adjusting nut.
The latter is equipped with a fixation belt that prevents spontaneous loosening or tightening of the threaded connection. This mechanism requires adjustment during maintenance. An incorrectly adjusted unit wears out quickly:
- Excessive tightening torque makes it difficult for the wheel to rotate, leading to overheating and destruction of the bearings.
- A loose nut causes play and knocking noise in the bearings. Impact loads accelerate wear of the roller metal.
The drive axle shaft transmits torque to the hub due to the presence of splines on the inside of the central hole.
There are 22 of them in the standard design, and 24 in the reinforced design. The second, more durable type of design is equipped with double-row bearings from IVECO trucks. Reinforced hubs are used on VAZ 2121, 2123, 2131, 21213 and 21214.
https://www.youtube.com/watch?v=RdXcXbHjaRI
Some owners re-equip their cars by equipping them with hub units themselves. This avoids damage in the form of broken splines. However, this modification is fraught with drawbacks. The strength of the standard hub is lower than that of the transfer mechanism parts. Therefore, it serves as a kind of “fuse” against overload.
Also interesting: Front axle. VAZ 21213, 21214 (Niva)
The mounting design for the rear wheels of the Chevrolet Niva is radically different from the front. No hubs are used here. The wheel is attached to the flange of the axle shaft, which rotates in a special bearing.
Torque is transmitted from the rear axle gearbox to the wheels through a spline connection. However, in this case, the splines are cut not in the hub, but in the gears of the gearbox.