The information may be useful to someone! Saved it on the blog so I don't have to look for it. Everything seems to be short and clear. Amplifier settings.
How to set up an amplifier? 1. Selecting the amplifier sensitivity level Roughly speaking, volume (although this is not entirely true). By turning the knob from a larger number to a smaller one, we increase it.
2. Low pass filters - filters out Low frequencies High pass filters - filters out High frequencies
Let's say, by setting the low-pass filter control to 50 Hz, the speaker will receive frequencies up to 50 Hz.
Attention: on different amplifiers, options are possible - either it will be a selector with a choice of filter type and one regulator, or separate regulators for the high-pass filter and low-pass filter. In some amplifiers, it is possible to turn on both filters, so by turning on the low-pass filter and the high-pass filter, we can get a bandpass filter. For example, by setting the low-pass filter to 200 Hz and the high-pass filter to 50 Hz, the acoustics will reproduce a signal in the range from 50 to 200 Hz, respectively
Some older amplifier models have fixed filters. Filtering is selected using the selector.
3. Sabsonic. For the most part, it is necessary for subwoofers (in bass reflex design) But it can also be used as a high-pass filter.
There are also subsonics with a fixed filtering frequency
4.Bass Boost Allows you to increase the volume at a certain frequency
Attention: the bass boost frequency is usually fixed. But on some amplifiers there is an additional control that allows you to select the required frequency.
There are also bass boosts with a fixed gain.
5.Phase regulator Serves to coordinate the operation of the subwoofer with the front. And in general, for more precise adjustment. There are also fixed phase regulators
6.Filter slope The selector allows you to select the slope of the filter slope.
Please do not consider the following text as a user manual. Here I tried to explain “what’s what” in a brief and more accessible language. When setting up an amplifier, turn on your head and be reasonable! I am not responsible for any damage caused to you. If you are not sure that you can do this yourself, contact a specialist
If you have component or coaxial acoustics [two speakers in front and two in rear] 5.25″, 6.5″, 6x9″ and other popular sizes, then the setup is as follows: As a rule, such acoustics are not capable of reproducing ultra-low frequencies (there is a Subwoofer for this, so select the high-pass filter on the pair of channels where it is connected. Set the high-pass filter control to 60-80 Hz. Next, turn “Gain” to minimum. And set the volume on the head unit to almost maximum. Next, turn up Gain until distortion appears. Be careful. More fine-tuning is is to find a compromise between the "loudness" and "bass" of the speakers, with the main thing being the absence of distortion in the sound.Using the gain and high-pass filter, adjust the sound that you like best, alternately adjusting the gain and filtering frequency.
For subwoofers and similar bass speakers, everything is similar, except that here we use a low-pass filter, i.e. the goal is to prevent the subwoofer from producing higher frequencies. Typically, when tuning, choose 50-80 Hz. If you have a FI body, then it is advisable to use a subsonic. If there is a phase control, take the time to turn it and listen. Perhaps in some position the subwoofer will play louder and faster.
The meaning of the final setting should be this: each speaker should play its own frequency range. If, for example, you have a subwoofer and a front, then, as a rule, the high-pass filter frequency for the speakers and the low-pass filter frequency for the subwoofer are set to the same. Those. Let's say the subwoofer plays up to 80 Hz, and the front is already from the same 80 Hz. This is usually the case, but not always the case. Remember that you create the sound for yourself. Customize it the way you like it best.
Level - level - you set the input sensitivity of the amplifier. You set the volume to 3/4 on the GU and slowly increase the Level until distortion appears and turn it back a little until the distortion disappears and leave it there.
Music for setup and testing
Regardless of what style of music will most often be listened to through the car's audio system, the subwoofer must be configured optimally for all areas that are characterized by a low frequency spectrum. It is divided into two types of low frequencies:
- useful lows - add richness;
- Parasitic lows are not perceptible to the human ear, but are felt on a physical level in the form of mild discomfort.
The setting involves precisely getting rid of or reducing parasitic lows, the frequency of which is from 30 to 40 Hz. They are mainly used in electronic music compositions and are a characteristic feature that should not be removed. Therefore, it is not advisable to use electronic music for tuning. The optimal material for testing would be to use compositions with classical instruments. This will allow you to compare the sound of familiar instruments and determine spurious sound frequencies, since bass lower than 30 Hz is rarely found in classical music.
There are also special programs for tuning speaker systems, tone generators that help configure a car subwoofer as accurately as possible by playing sound in a user-specified frequency range.
Bassboost
Bassboost - increases the volume at a certain frequency, usually 40-45 Hz.
When using a bass boost, the chance of burning the subwoofer increases sharply, since clipping occurs much earlier. In most cases, bassboost is not needed and if you are a beginner, then just accept the rule “Don’t touch bassboost!”
Experienced people can use it to increase the frequency response shelf in order to draw out dips in certain frequencies, but these are already deep settings and the effect does not always justify the risk.
First step: turning on the LPF filter
LPF (Low Pass Filter) is a low-pass filter that allows the speakers to play the bass specified during setup, while attenuating the presence of high sound frequencies. It can be located on the car's head unit or amplifier and is designated LPF or LP.
It must be turned on in the low frequency range 50-63 Hz. This parameter will be further adjusted after the settings of the remaining filters have been set. If the LPF filter is located both on the car radio panel and on the subwoofer amplifier, you only need to turn it on on one device. It would be rational to choose a radio, since adjustments on the amplifier are a little more difficult.
Second step: adjusting the subwoofer speaker frequency
The frequency filter controls the subwoofer's playback frequency. It looks like a gear (phase shifter) with a hole for adjustment with a screwdriver in the center and is designated Subsonic. Adjusting this filter will remove low frequencies that are beyond the audibility range of the human ear and increase the service life of the subwoofer cone by preventing oscillations beyond the limits of capabilities. It is optimal to adjust the frequency five parameters lower than the standard bass reflex frequency of the subwoofer, which is indicated in its technical documents.
Third step: adjust output sensitivity
The output sensitivity adjustment filter also looks like a wheel for scrolling with a screwdriver and is designated “GAIN” or “LEVEL”.
There is a misconception that this parameter is responsible for the volume of the subwoofer, in fact this is not the case, even though when set to the upper positions the volume does increase. This filter is responsible for the coordinated operation of the head unit and subwoofer, and is configured using a specific method that has four simple steps:
- set the controls on the radio and amplifier to minimum and the sound signal will sound to check;
- the volume gradually increases until the first distortions in the sound appear, after which it returns to the last position at which there was a clear sound;
- then the regulator on the amplifier rotates upward until the first sound distortions appear;
- as soon as distortions appear, the regulator returns to the extreme position at which they did not exist.
Fourth step: adjusting the acoustic phase
In order for the bass to sound in harmony with the other frequencies protruding from the front speakers and at the same time there is no perceived separation on the sides of the car, you need to correctly adjust the acoustic phase. This parameter is adjusted according to the driver’s personal feelings and is regulated by the Acoustic phase phase shifter, which is located on the front panel of the amplifier. You should gradually rotate the filter adjustment phase shifter clockwise until the front speakers and subwoofer begin to play in the same plane/acoustic phase (there will be no sensation of separate bass output from the rear). To check compositions, you need to listen to them in the driver's seat, where the sound separation is always more noticeable.
Watch the setup video:
Types of car amplifiers
- Two-channel amplifier. This device is designed to provide sound to two speakers (front or rear) and a subwoofer. It is very rare that channels are divided into four speakers.
- Four-channel amplifier. Can provide sound from four speakers or two speakers and a subwoofer.
Important!
When connecting two speakers per channel and a subwoofer on another channel, it is very difficult to achieve clear sound.
- Five-channel amplifier. You can connect four speakers and a subwoofer to it. Each element connects to its own channel. The disadvantage of such a device is that most of the amplifier's power goes to the subwoofer, as a result of which the sound will be uneven. Low frequencies will go off scale if there is a lack of high frequencies.
- A monoblock is a device designed to amplify sound going only to a subwoofer.
Fifth step: adjusting the frequency junction
The final stage of setup is to adjust the sound of the midbass and subwoofer to a harmonious, comprehensive sound of music. During the preliminary setup, the LPF parameters were already set, which may have a difference with the low frequencies of the front speakers. Because of this, noticeable gaps may occur during playback. For example, if the LPF was set to 50 Hz, and the front speakers are running at 100 Hz, the sound will occur with a frequency dip in the range from 51 to 99 Hz. This does not mean that the filter will cut them off completely. It only smoothly reduces the sound of frequencies lying outside the specified parameter, and does not cut them out completely, but it is still too noticeable to the ear. To eliminate this effect, additional correction should be made using the LPF filter parameter. To do this you need:
- Play music rich in low frequencies through the speaker system.
- Turn the filter phase shifter several positions counterclockwise. This adjustment evens out the sound.
- If the dips are still noticeable. then the filter phase shifter rotates three phases in a clockwise direction.
Tips for setting up a subwoofer
- Haste and proper setup of the speaker system are incompatible things. You should set aside several hours of free time for high-quality setup.
- It is best to check the sound on known or favorite tracks, where you can definitely distinguish the correct sound from the distorted one.
- To check the tracks, you should listen to them with the doors and windows closed in the driver's seat, this way you can catch the slightest defects.
- Do not limit yourself to checking on one track; it would be best to carefully listen to several compositions of different genres and with a different set of sound frequencies.
- There are no specific parameters to which filter metrics need to be set. This article provides only the optimal and most popular parameter settings. It is necessary to configure based on personal taste preferences, monitoring the harmonious sound of the front midbass and subwoofer head.
By adjusting all the filters in this manner, you can achieve a loud subwoofer sound, while it will work harmoniously, without blocking the overall musical tone. This setting is suitable for all musical genres and will help expand the range of their sound.
Source
How to set up a subwoofer in a car
The subwoofer is an important part of the car music system. Working at high power and low frequencies, it gives the sound a rich and rich sound. Conventional acoustic speakers have a number of limitations in the range of reproduced frequencies. They are not able to provide deep bass, without which musical fragments lose their strength and expressiveness. Speakers are divided into passive and active devices. A passive subwoofer consists of a loudspeaker specifically designed to reproduce low frequencies, a crossover filter, and an enclosure. Such a system requires a low frequency amplifier. The LF system can be connected to the terminals of a multi-channel amplifier or a separate amplifier can be provided for it. The active system for reproducing low frequencies has a special amplifier with a filter system. It is built into the housing where the woofer is located. In order for the car's sound system to work correctly, you will need to configure the subwoofer in the car.
Connection diagrams
The equipment is tuned after installation of the equipment. The connection is easy to do yourself using standard circuits.
Two-channel and four-channel amplifiers
A 4-channel amplifier is a combined system consisting of 2 two-channel amplifiers. The circuit for connecting the amplifier to the radio can be used for both of these designs. The four-channel option is the most common, because allows you to connect 4 speakers or 2 speakers and a subwoofer at the same time. The acoustics are connected using a thick cable. The wiring diagram is indicated in the equipment instructions. By default, the amplifier will operate in stereo mode, which requires a load of 2 ohms or 4 ohms.
When connecting a subwoofer, the acoustics will operate in mono mode. In this case, the voltage comes simultaneously from 2 channels, so a subwoofer with a resistance value of 4 ohms is suitable. Indicators for connecting the polarity of plus and minus are present on the amplifier itself.
Single channel amplifier
This type of amplifier is used to connect to a subwoofer. A distinctive characteristic of this type is the increased power of the equipment. The monoblock belongs to class D amplifiers, in which there is a filter for cutting frequencies.
The installation and connection diagram of the monoblock are simple. This type of amplifier has two outputs (plus and minus); if there is one coil, just connect the speaker to it. If there are two columns, sequential connection is used.
How to set up a car subwoofer
The low-frequency component of the audio range is a narrow frequency band that starts from approximately 18-20 Hz and ends at 120-150 Hz. It is in this range that any subwoofer operates. Correctly setting up a subwoofer in a car is an important process on which the quality of low frequency reproduction will depend. If the sound system is not tuned, then the bass notes will “scatter” and lose pressure and richness. Instead of a rich and thick bass, a monotonous boom will be heard from the speaker, which, according to impressions, is in no way connected with the melody.
Setting up a subwoofer in a car depends on several factors:
- Speaker installation location
- Its power
- Operating frequency range
Typically, subwoofers in a car are installed in the luggage compartment or under the seat. If the column is installed under the seat, then too much power, if the system is not configured, can cause negative sensations for the driver and passengers.
Preparation
Before installing the amplifier, you need to inspect the interior and prepare the necessary tools and circuitry. First of all, you should pay attention to the choice of installation location in the car. Not only comfort, but also the quality of the sound signal depends on this.
The amplifier generates a large amount of heat, so it is recommended to install the device in an area with sufficient air circulation. It is not advisable to install equipment sideways or upside down, or cover it with rugs or other materials.
The length of the connecting wires is calculated depending on the installation location of the system and speakers. On average, 5 m are needed to connect equipment installed in the trunk and 3 m for all speakers. You can install the system under the driver's seat - this will help reduce the length of the wires by 1-2 m. The wires are laid under the trim, so all calculations should be carried out in advance.
Necessary materials:
- Wires for installation. There is a simple way to select the wire cross-section for power supply and interconnection. To supply power, wires corresponding to the power of the equipment plus 30-33% are suitable due to low efficiency. The calculation is done using the formula: I=P/U, where I is current, P is power, U is voltage. It is recommended to purchase wires with a small margin depending on the quality of the insulation.
- Fuse. Choosing the right fuse will eliminate the risk of fire in the event of a short circuit. The cable is installed next to the battery. The fuse power should not exceed 50A. The most suitable types of fuses are AGU and ANL.
- Interconnect cable. This cable is used for audio connection. The quality of the cable determines the purity of the signal from the amplifier. When choosing, it is recommended to pay attention to the strength of the RGA connector and strong insulation.
To set up the equipment, you will need screwdrivers of different sizes and a knife for stripping cables and wires.
How to properly set up an active subwoofer in a car
By reproducing low frequencies, the unit allows you to expand the dynamic range of any musical work. Speakers located in the doors or on the front panel are not designed to reproduce bass confidently. A properly configured subwoofer copes well with this task. The car bass amplifier panel contains several adjustments that allow you to fine-tune the low-frequency speaker system. Setting up an active subwoofer in a car on an amplifier includes the following adjustments:
- Gain (Level) – input sensitivity
- Sub Sonic – low pass filter
- Phase – phase adjustment
- LPF (Low pass filter) – low pass filter
- BassBoost – increase the volume in a narrow frequency band
To know how to properly configure an active sub, you need to understand what each adjustment is responsible for.
How to adjust a subwoofer
In order to adjust the subwoofer in the car interior, you can use special CDs designed for tuning car speaker systems. A disc is placed in the car radio on which a sequence of tracks is recorded. They record reference signals from the audio frequency generator with high quality. Using such recordings, you can correctly set the cutoff frequencies of the high- and low-pass filters, adjust the balance and phase.
In car services, they can correctly configure the low-frequency unit using special computer programs to configure the subwoofer in the car.
Optimal settings for a subwoofer
How to set up a subwoofer in a car using an amplifier. Input sensitivity is not a volume control, although increasing it will also increase the volume. The “Gain” function matches the levels of the head unit and the active subwoofer amplifier. The handle is made to fit a slot for a screwdriver and can have digital designations, for example, from 0.2 to 5.0 V. There are several methods for matching levels. If you don’t have an oscilloscope at hand, then the correct setting of the subwoofer is done by ear. A good quality music signal with a low volume level is supplied to the subwoofer input. First, the “Gain” knob is set to minimum. Next, the volume on the head unit is slowly increased until audible distortion appears. The level is then reduced until a clear sound appears. The “Gain” is adjusted in the same way, increasing the signal level until distortion appears and “turning it back” a little.
When playing music fragments, the recording may contain very low overtones or infra-low frequencies. These sounds are practically not perceived by the human ear, but the electromagnetic system of the speaker senses them, and the diffuser reacts to them. At such low frequencies, the cone stroke increases and at high volume levels the voice coil may fail. To cut off such parasitic vibrations, an infra-low frequency filter or “SubSonic” is built into the subwoofer. This car subwoofer control cuts off all frequencies from 25-30 Hz and below. The filter is adjustable and next to the knob the cutoff frequency is indicated, which can be selected within the range of 10 Hz-50 Hz. This adjustment is not available on all active subwoofers.
Sound waves emitted by speakers located in different places reach the listener differently. In this case, the sound picture loses its integrity and is heard blurred, since the individual sound streams are shifted in phase relative to each other. Adjusting the “Phase” is needed to eliminate this defect and synchronize the subwoofer with the rest of the speaker systems. The easiest setting is to listen to music, with an assistant turning the adjustment until you get the best sound. To fine-tune the phase, you will need a sine wave generator. First you need to change the polarity of the speaker. Then feed the signal to the general amplifier and the subwoofer. Rotate the “Phase” control to achieve the quietest sound. This will mean that the speakers are out of phase. Then restore the correct polarity. The phase is adjusted correctly.
Tuning - Amplifier - Intermediate Frequency
Setting up an intermediate frequency amplifier includes checking the transistor modes and adjusting the amplifier stages and the lumped selection filter.
After setting up the intermediate frequency amplifier, they begin to set up the high-frequency part of the receiver, which includes the local oscillator, preselector (antenna and grid) circuits, and if the receiver has a high-frequency amplification stage, then additionally the high-frequency circuits of this stage. Setting up this part of the receiver consists of adjusting (by the organs or circuit elements provided for this purpose) all high-frequency circuits to ensure frequency overlap within the required range and to ensure the necessary coupling between the local oscillator circuits and the corresponding high-frequency circuits in the remaining circuits of the receiver.
To configure the intermediate frequency amplifier, you need GSS-6 and IV-4 or a tube voltmeter. To fine-tune the amplifier circuits, you must turn off the AGC system. This can be achieved by short-circuiting the AGC filter capacitor (C53 in Fig. 15 - or by applying a signal to the input of the adjustable stage such that the voltage amplitude at the input of the AGC rectifier will be less than the delay voltage.
When describing the setup of the intermediate frequency amplifier, we assumed that it used industrial intermediate frequency filters with inductive coupling between the circuits. In such filters, the distance between the coils is set to obtain the required degree of coupling. Usually this connection is chosen equal to the critical one, at which the greatest gain is obtained, and the resonant characteristic remains single-humped.
Setting up the probe involves setting up the intermediate frequency amplifier.
Setting up the AM path begins with setting up the intermediate frequency amplifier.
After setting up the low-frequency part of the receiver, they move on to setting up the intermediate frequency amplifier.
After making sure that the detector is operating normally, proceed to setting up the intermediate frequency amplifier.
The constancy of sensitivity and range selectivity in a superheterodyne is explained by the constant tuning of the intermediate frequency amplifier, as a result of which its amplification and selective properties remain essentially constant for any frequency of the received signal.
The generator is intended for tuning high-frequency paths of amateur radio broadcasting receivers, in particular for tuning intermediate frequency amplifiers, arranging frequency ranges, tuning input circuits, and testing sensitivity at any point in each range.
If a measuring instrument (an AC voltmeter or other indicator) is connected in parallel to the speaker, then according to its readings, the adjustment of the intermediate frequency amplifier is more accurate than by ear. The last method is very convenient in practice.
All other considerations and comments that were set out in section 10 remain valid and should be followed in the case of setting up the intermediate frequency amplifier by station.
By turning on the GSS at the input of the adjustable stage lamp, set the GSS frequency on the tuning scale equal to the min of the adjustable range. The modulation coefficient and the amplitude of the output voltage of the GSS is selected in the same way as when setting up an intermediate frequency amplifier. Using the receiver tuning knob, the rotor of the block of variable capacitors that tune the amplifier circuits is set to the maximum capacitance position. The rotor of the tuning capacitor is turned to the middle overlay. Then, by moving the core of the loop coil, the maximum IV reading is achieved.
In the absence of IV, instead of it, you can use istulzozat N LV or a tuning indicator in the same way as it was used when tuning an intermediate frequency amplifier. The tuning of the high-frequency amplifier begins with its last stage, and in each stage - with the shortest wavelength range, if sectioned coils are used in the circuit. If there are separate coils for each range, then the order of tuning by range can be any.
The receiver must receive this entire frequency band, otherwise the higher frequencies of the modulating signal are cut off and the transmission is distorted. However, the selectivity of the receiver on the adjacent channel depends on the bandwidth of the intermediate frequency amplifier, and the narrower the bandwidth, the better the selectivity. Thus, tuning an intermediate frequency amplifier consists not only of tuning its circuits to the intermediate frequency, but also of obtaining the required bandwidth, which depends on the shape of the resonant curve of this amplifier.
How to set up a monoblock for a subwoofer in a car
A monoblock or single-channel amplifier is designed to connect only one speaker system, so such models are often used for subwoofers. The device has exactly the same adjustments as a multi-channel amplifier, so setting up the blocks is no different.
An important step is to jointly set up the subwoofer on the amplifier. The fact is that the front speaker amplifier also has filters, the settings of which may not match. If the filter on the subwoofer cuts off all frequencies above 60 Hz, and the filter on the front speaker amplifier cuts off all frequencies below 100 Hz, then a dip in the amplitude-frequency response will form between the two devices and frequencies in the range of 60-100 Hz will simply not be reproduced. This can be avoided by adjusting the cutoff frequencies of the two filters so that they slightly overlap each other. The quality of playback deteriorates both at the dip and at the hump of the frequency response. Setting up a subwoofer in a car is for dummies. Professionals use measuring equipment and more complex techniques.
Midbass and subwoofer adjustments
As practice shows, the subwoofer setting should be done so that the woofer fits well with the front speakers, there are no frequency dips, etc. In other words, it is not enough to adjust the subwoofer, since the midbass speakers will also require adjustment.
For proper tuning, you will need to make the frequency response section smooth by slightly changing the cutoff frequencies LPF and HPF. This is done both by ear and with the help of an RTA analyzer. The main thing is to achieve dense and spacious sound so that there is no “dropout” in frequencies.
How to adjust a subwoofer in a car
Most car enthusiasts do not have the necessary measuring equipment to properly configure the subwoofer. All settings are performed “by ear”, so to obtain a satisfactory result you need to follow some recommendations. Music for setting up a subwoofer in a car should be carefully selected. To adjust the low-frequency path, you should not use electronic music played on a synthesizer. To auditorily assess the sound quality at low frequencies, you need to play fragments of classical music with wind and string instruments.
Electronic sound is rich in artificial overtones, which do not allow you to objectively evaluate the sound, especially at low frequencies. There is no need to rush when making adjustments, as some settings will have to be repeated several times to get the desired result. In general, high-quality setup can take several hours. There is no need to use unfamiliar musical passages when tuning. It is better if the classic work is well known. To objectively evaluate the complex sound of car acoustics, you need to be in the driver’s seat inside the car. All interior windows and doors must be closed. You need to check the sound on several works where different musical instruments are used. How to set up a subwoofer in a car video.
How to properly set up a passive subwoofer in a car
Setting up a passive subwoofer in a car begins with the manufacture of the box for the woofer. You can purchase a passive radiator, but many car enthusiasts prefer to make this design with their own hands. The passive system is available in two versions: a closed box and a box with a bass reflex. In turn, bass reflexes are divided into slot and pipe-shaped. Compared to a closed box, bass reflex systems have greater efficiency. In addition, the slot bass reflex, after assembling the box, is not subject to any adjustment. The phase shifter, made in the form of a pipe, can be adjusted by lengthening or shortening the structure. The passive bass reflex does not have electrical settings, so the settings of the head unit and amplifier are used to obtain the necessary parameters.
How to properly adjust a subwoofer in a car. When making a homemade subwoofer, a lot depends on the diameter of the acoustic head. A speaker with a 12" cone will be more active at low frequencies than a speaker with a 10" cone.
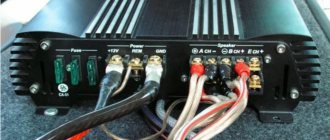
Amplifier connectors
+12V connector – it is supplied with power from the battery. A fuse must be installed between the battery and the amplifier.
REM – control connector, designed to create a connection with the radio. The equipment through this wire will turn on and off along with the radio.
GBD – mass connector. The wire should be as short and thick as possible.
Line connectors – designed to connect speakers and a subwoofer. The subwoofer can be connected with a bridge into two linear connectors: the minus of the subwoofer is connected to the minus of one connector, and the plus of the subwoofer is connected to the plus of the second connector. We connect the remaining “+” and “-” in the connectors (you must read the instructions, since this operation is not required for all devices).
RCA (tulips) – for connecting the head unit.
Changing the oil in an automatic transmission: how to choose. Read more here.
What are the reasons for high fuel consumption? Let's figure it out with us.
How to set up a subwoofer in a car radio
Setting up a radio and subwoofer in a car includes a number of sequential operations. First, using the HPF high-pass filter on the head unit, you need to cut off the low frequencies that are fed to the front speakers. If a subwoofer is installed in the car, then the cutoff frequency can be selected within the range of 80-120 Hz and the attenuation slope is 24 dB per octave. The subwoofer on the radio is adjusted using the LPF low-pass filter. To do this, select the “Subwoofer Control” item in the menu. There are three parameters to set here:
- Filter cutoff frequency
- Volume level
- Attenuation slope
These values are set by ear when playing your favorite musical styles. The settings for different radios may differ, but in general they are the same.
How to set up an amplifier (monoblock) for a subwoofer with your own hands.
Hello everyone, in this article we will talk about competently setting up a monoblock or amplifier that reproduces your subwoofer. The setup is not as complicated as it seems at first glance. Each amplifier has several “Knobs”. These are the basic settings. We will talk about them.
1) The parameter that is present on all amplifiers is called GAIN or also Level. In simple terms, this is the volume of your subwoofer. Some amplifiers come with a separate volume control.
2) LPF filter.
This filter is responsible for cutting off HIGH frequencies, for example from 50 Hz to 40000 Hz. Often this parameter is set to 70-90 Hz. (That is, if you set it to 70 Hz, then your subwoofer will not go above 70 Hz)
3) SUBSONIC filter.
This filter cuts all low frequencies. Your subwoofer does not play below 15 Hz. Or rather, he plays (without subsonic), but a person simply does not hear these frequencies, and the Monoblock takes energy to reproduce these frequencies, which are not effective in our case. And not every subwoofer is ready to reproduce frequencies below 20Hz without consequences.
For example, our subwoofer is installed in a box with a 35 Hz setting. I would cut it 10Hz lower. I set the parameter to 25 Hz. It turns out that we cut off all frequencies from 0 to 25 Hz (the subwoofer will not reproduce them, and the Monoblock stops wasting useless energy). In a separate case, the subsonic is cut to 10 or even 15 Hz. These are lovers of powerful audio systems, and with a hurricane in the cabin.
4)Phase is a phase switching parameter.
Let's assume the Subwoofer starts its work with the first movement up or down. Phase switches the first movement UP or DOWN.
It is needed to connect subwoofers in bridge mode through several monoblocks. (there are 2 subwoofers in one box, each connected to its own monoblock. We set the phase parameter on two monoblocks so that the subwoofers begin to move in ACT with each other.
5) BASS BOOST parameter.
The most favorite “crank” for inexperienced loud bass lovers. They put it on MAX and enjoy the “Distorted” fart (Sorry, but I can’t call it anything else)
Bass boost is a bass amplifier, but few people know that when low frequencies increase, the amplifier loses its efficiency and begins to reproduce coarse distortion.
The subwoofer receives these distortions in the form of wheezing and sticking, and the result is a CLIP of the subwoofer. And the CLIP destroys the subwoofer. The same applies to any bass amplifiers of this parameter on various radios, and other devices such as smartphones, tablets, etc.
BASS BOOST is harmful to your speakers! We always set this parameter to MIN
Source
Gain\Level
Receive (sensitivity) is often confused with volume, but this is not entirely true.
Earn is the adjustment of the amplifier's input sensitivity for stereo matching. But let's not go into the desert and look at this setting from the point of view of a user utility.
Sometimes the volts (V) reading on the regulator can be misleading. The fact is that sensitivity is measured in volts. The lower V, the higher the sensitivity, the louder the speaker will sound, and vice versa.
To get started, it will be useful to watch a clear video about how the gain on your amplifier works:
Adjusting gain by ear (method 1)
Have a good subwoofer, don't use an equalizer and various bass boosters, forget about bass boost on the amp - so before you adjust the volume, make sure it's all turned off!
Set the volume control to minimum and play the music you usually listen to. Turn the volume down 3/4 of full, if you hear distortion in the sub at first, stop and turn the volume down a couple of notches. Switch to amplifier. Have your assistant slowly turn the gain control up until you hear no more distortion, and when you do, stop turning it up and turn it down 10%.
Adjusting gain by ear (method 2)
If you don't trust your hearing and are afraid of not hearing changes over time, then use a more accurate method - using the sinuses.
If you are tuning a subwoofer, use 40 Hz, if your enclosure is tuned above 40 Hz or you have a closed box, then use 50 Hz, (download sine waves in the “Downloads” section). To adjust the mid-range amplifier gain, use 315 Hz.
A sine wave, or tone (in our case), is a tone signal of a certain frequency, the changes in sound of which can be easily heard.
Set the gain to minimum, turn on the sine wave, and turn up the stereo volume. When the tone changes, stop and turn it down a couple of notches (set the volume control to this value if your stereo has that feature). Switch to amplifier. Similar to the first method, increase the gain. When the sound changes, stop and turn it down 10%.
Adjusting Gain Using a Multimeter or Oscilloscope
Adjusting the gain level using the instruments is a smart and precise match. This does not strain either the speaker or the ears. Details about this setting are shown in the YouTube video:
Please note that when setting with a multimeter, you must ensure the wattage rating specified by the amplifier manufacturer.