How to set the ignition on a 4t scooter? Problems with ignition of a 4-stroke engine can appear for various reasons, but they all lead to the same result - the engine stops starting. But the lack of a timely spark may not be the only reason that the engine does not start. To make sure that it is the ignition that is causing the engine failure, it is necessary to check all other possible faults that may interfere with engine operation and eliminate them. Breakdowns may occur in the ignition system, the causes of which can arise from both the mechanical and electrical side. Using simple techniques, you can determine whether the problem is a mechanical fault or an electrical component. At home, you can fix any breakdown in the ignition system of a 4-stroke scooter engine.
How to set the ignition on an Alpha moped: step-by-step instructions with photos and videos
The stability and reliability of starting the engine of an Alpha moped depends on several factors, including correctly configured ignition.
The absence of problems due to an incorrectly configured unit guarantees ease of driving the vehicle at any time of the year - it will start at every kickstart without any extra effort. You will need to adjust the ignition only if the moped was purchased very cheaply and needs to be restored to working condition. The electrical equipment system (and, accordingly, spark supply) consists of the following elements:
According to statements, there is no need to adjust the ignition after purchasing a new vehicle, but in reality everything is somewhat different - the conditions of transportation and storage impose their own problems. Most likely, you will have to eliminate the consequences of incorrect ignition settings - in Alpha vehicles it is set on the principle of too much advance. In addition, disassembling the engine inevitably entails the need to adjust the ignition without fail.
You just need to follow the instructions for disassembling and reassembling the moped to achieve an optimal result that will last until the next time the engine is dismantled for maintenance or replacement. Uncertain operation of the engine while driving causes not only discomfort, but also troubles in the form of an increased accident risk on a busy highway, where a sudden stop is extremely dangerous.
Alfa moped switch
In this part of the article, we will look at the pinout feature of the switch for the Alpha moped (and, to boot, the Delta), and also find out the purpose of each wire. All information is presented in the diagram below.
It is noteworthy that the same switches can be installed on mopeds of various brands of Chinese production, since there are a lot of Alpha clones.
As we can see, the pinout of this switch is very simple.
Pinout
- Black and yellow wire 1
goes to the ignition coil. - Black-red wire 2
is responsible for power. - Contact 3
is missing in principle. - Black and white wire 4
is responsible for turning off the engine and goes to the ignition switch. - Blue-white pin 5
goes to the Hall sensor. - The last, green pin 6
is ground.
Alfa moped wiring diagram : features of domestic operation
With the development of trade relations between Russia and China, in addition to traditional knitted goods and consumer electronics, various auto and motorcycle equipment began to be imported en masse to our country. And since the domestic motorcycle industry was experiencing a decline, the new items were to the taste of motorcyclists and began to be purchased en masse for their own needs.
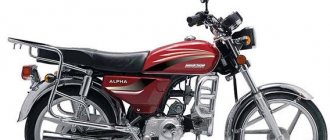
Classic look of the Alpha
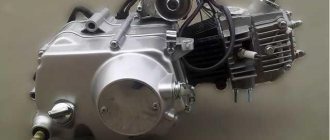
Of particular interest is the ALPHA moped with an air-cooled engine, which is sold in the Russian Federation as “ Alpha”
110cc" or "
Alpha
49". The numbers in the name indicate the engine displacement:
- 49 cc four-stroke air-cooled engine. cm, power 4.5 hp;
- 110 cc four-stroke air-cooled engine. cm, power 7 hp.
Mopeds, due to their external resemblance to motorcycles, differ from scooters, although they represent a separate class. However, the combination of technical parameters, ease of do-it-yourself maintenance and low operating cost have made this moped a sales leader on the Russian motorcycle market.
For reference: in China, several manufacturers assemble the ALPHA model. Among them are Horse, Chong Qing Bull, WONJAN, Omaks and a number of others. Companies such as AVM and SMoto also assemble mopeds in Russia. At the same time, the wiring diagram of the Alpha is identical, regardless of the location of assembly.
Signs and causes of moped motor malfunction
Among the main manifestations of a breakdown of the ignition system are the following factors:
Setting up a timely spark supply will also extend the operation of the piston system and the entire engine in general due to the absence of gasoline accumulation inside the engine - carbon deposits do not increase, leading to coking and unusability of the engine in general.
Incorrectly set ignition is associated with other problems, including the installation of the piston system. The reasons for the failure of the moped ignition are:
It is necessary to constantly monitor the condition and correct connection of the ignition coil, since it is this part that increases the voltage, resulting in a spark. Lack of sufficient voltage prevents a spark from forming and starting the moped engine. There is a way to diagnose the ignition coil to understand what needs to be replaced, and not just adjusted correctly. You need to take a tester (multimeter) to measure the levels. It is worth considering that a digital tester is preferable, since the needle may not pick up the slightest fluctuations.
The tester probes need to be connected to the terminals of the ignition coil, and the multimeter itself must be switched to resistance measurement mode. After this you will need to apply voltage. An indicator of up to 5 Ohms is considered normal (but not lower than 0.5 Ohms) - the optimal level. Next you need to do everything with the secondary winding:
Checking the ignition coil with a multimeter
The norm for the secondary winding is two to three kilo-ohms. If the indicators do not correspond to those mentioned above, you will need to replace the ignition coil, and not just adjust the corresponding system.
Video on how to check the ignition coil on a moped:
Start setting up the ignition on a moped
Using a strobe light, you will need to check for the presence of measuring marks on the ignition timing. Thanks to this, you can find problems with the moped in advance, so as not to disassemble it too much. There will be two wires coming out of the strobe: the first is connected to the vehicle's power source, the other must be connected to the spark plug (this is the induction wire).
Strobe with wires
To complete the task, you need to warm up the engine, and then:
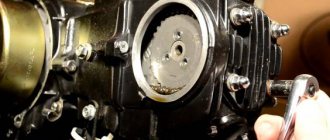
The result of this operation is a reduction in costs in terms of spare parts that may not be needed. If you don’t have a strobe light, borrow one for a short time from those vehicle owners who have one, so as not to spend money on a tool just for one use. To find the measuring marks, you will need to inspect the generator flywheel along with the flywheel housing - they can be easily found. The main difficulty lies in the non-standard arrangement of marks on Alfa brand mopeds. Otherwise the process won't be too complicated.
Video on how to correctly set the marks and ignition in general:
Setting the ignition timing
This operation will need to be carried out if the risks do not correlate with one another. It is recommended to use a strobe light that has a sensor for counting crankshaft revolutions. If this element is missing, you will need to check the engine starting at idle speed.
To learn how to quickly adjust the carburetor on a moped, watch the video:
Complete ignition settings are carried out as follows:
Everything is put together in reverse order. Ignition must be either synchronized or slightly advanced (but literally by a fraction of a second). The advantage of the latter method lies in the fact that the spark is produced a little earlier than the piston inside the cylinder reaches its top dead center. This manipulation results in a low increase in power and easier engine starting, which is especially important in regions with temperature changes and simply in the cold.
Useful videos with step-by-step instructions:
Ignition setup steps
The first possible breakdown is checked with a stroboscope; to do this, you need to check whether there are measured risks in the ignition synchronization. Rarely does anyone have an expensive strobe light for free use, but if you have the opportunity to ask your friends for it, then it’s better to start working with this check.
In order to start checking the synchronization of the marks on the system, you need to thoroughly warm up the moped motor. There is no need to strain the moped too much.
Connecting a strobe
After this, you should connect the strobe. If the technician is working with the device for the first time, he must first carefully study the operating instructions. Two wires come from the device, one of which should be connected to the moped’s power supply, and the second induction wire is connected to the spark plug.
A simple strobe for setting up the ignition of a moped
As soon as a spark appears on the spark plug during startup, the bright light of the strobe will indicate this. Now you should direct this light that appears to the location of the measuring marks and see how they are located relative to each other. If everything is correct, the risks are exactly the same, then the setup went as expected, no further adjustment is required.
Adjusting the ignition timing
If the measuring marks are not synchronously coupled with each other, or they are not visible, then you will have to adjust the start of the moped. More precisely, you will have to adjust the ignition timing. Different models of Chinese mopeds may have different adjustment methods. Therefore, before starting work, it is necessary to study the documentation attached to the moped . Adjustments must be made in accordance with the instructions.
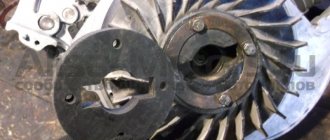
If it is not clear where these measuring marks should be located, you should carefully inspect the generator flywheel, as well as the flywheel housing, and they will immediately show up.
Further work requires a careful approach and strict adherence to safety measures, since you will have to inspect and adjust the system with the engine running.
Equipment Features
Let's return to the strobe light. To operate, you need a type of this device that is equipped with a special sensor for counting the rotation of the hot shaft - this module is worth paying attention to.
Improvement of the ignition system of Alpha mopeds
Modern mopeds and scooters are equipped with an electronic ignition system CDI (from the English Capacitor Discharge Ignition), popular with us since the 70s of the last century and called thyristor or capacitor.
It is based on discharging a capacitor through the primary winding of the ignition coil and an open thyristor to produce sparking in the spark plugs. However, adjustment of the ignition angle (AF) on these mopeds is not provided. The author, through simple changes in the switch block circuit, introduced ultrasonic adjustment, which qualitatively affected the operation of the engine. The ignition system of the Alpha moped is very simple and reliable. But still, it has one significant drawback - the lack of ignition angle adjustment. During operation, when the engine was idling and at low speeds, the ignition system sparked too early. This manifested itself in a strong kickback when starting the engine, and at idle speed it could even stop by pulling the electric starter chain in the opposite direction.
Rice. 1. Switch block diagram
The diagram of the switch block (hereinafter referred to as the switch) of the CDI AC system, installed by the manufacturer on my moped, is shown in Fig. 1. It is shown simplified, but sufficient to understand the principle of its operation as part of the system. Ignition coil T1 with spark plug FV1 is located outside the switch and is shown conditionally. In the process of analyzing the operation of the ignition system, the following feature of spark formation was revealed. When a special protrusion on the generator rotor (flywheel) passes past the induction sensor, two pulses appear at its output and enter the commutator. The first, earlier positive polarity, occurs when the protrusion approaches the sensor, and the second, later negative polarity occurs when the protrusion moves away from the sensor. Sparking (further ignition) in the spark plug occurs from the first pulse entering the switch, and the second (later negative polarity) is not used in the operation of the ignition system. The idea arose to use both impulses in the operation of the system, and so that at low engine speeds the ignition would be later, and at higher speeds it would become earlier. This required the development of both a new circuit and switch design.
Rice. 2. Diagram of the developed switch
The diagram of the developed switch is shown in Fig. 2. In order for the device to respond to pulses of different polarities, the thyristor (VS1, Fig. 1) was replaced by a triac VS1, and a zener diode VD4 was installed to select control pulses. When the engine is idling and at low speeds, the amplitude of the pulses coming from the induction sensor is less than the stabilization voltage of the zener diode VD4, therefore only later pulses of negative polarity pass to the input of the triac VS1, for which the zener diode is connected like a regular diode in the forward direction. As the engine speed increases, the amplitude of the control pulses coming from the sensor increases and at a rotation speed of about 2500. 3000 rpm reaches 12 V. At this moment, the zener diode breaks through from the pulses of positive polarity, and a current begins to flow through the control electrode of the triac VS1, causing opening it. The engine starts to operate at an earlier ignition angle. The speed at which switching from later to earlier ignition occurs depends on the stabilization voltage of the zener diode, so it can be adjusted within a wide range by changing the stabilization voltage from 3.3 to 20.30 V by selecting the zener diode. When selecting, it is necessary, as already mentioned above, to use zener diodes with a direct current-voltage characteristic, like a conventional diode. To increase the spark energy, the capacitance of capacitor C1 was increased to 1.5 μF
The design of the standard switch is non-separable and cannot be repaired (the manufacturer fills the board with the elements with epoxy resin). Therefore, when making a new switch, I used only the plug connector (XP1) from the standard one.
The printed circuit board and the arrangement of elements are shown in Fig. 3. Instead of etching, conductive paths can be cut with a cutter. The width between the tracks is about 2 mm. After assembly, the device is placed in a suitable plastic box. To waterproof the joints, it is advisable to coat them with sealant. It took me about three hours to make the entire structure.
Rice. 3. Printed circuit board and arrangement of elements
Rice. 4. Appearance of the structure
The functionality of the assembled switch is checked using a car strobe light. At low engine speeds, a single mark with an F symbol will be visible in the inspection window located on the left protective cover of the generator rotor. The marks on the flywheel are made in the form of notches and are not very visible. Therefore, when setting up the device, I advise you to outline them with a black felt-tip pen through the viewing window, then they will be clearly visible when illuminated by a strobe light. With an increase in the speed to approximately 2500. 3000 rpm, the ignition angle abruptly switches to an earlier one, and a double risk appears in the viewing window - the engine begins to operate in normal mode. In this case, negative polarity pulses from the sensor, as mentioned above, are ignored by the switch. Since the amplitude of the signal coming from the sensor varies from 1.2 V at the lowest engine speeds to 30.40 V at the highest, you can experiment and select any ignition angle switching frequency. A voltage of 9.12 V approximately corresponds to a frequency of 2500. 3000 rpm, which, in my opinion, is optimal for such mopeds.
How to set the ignition on an alpha moped
The ignition adjustment on the Alpha moped is carried out similarly to the Racer and Delta models, which in the vast majority are equipped with the same power units.
Many owners of these mopeds experience difficulties in this matter, since the specifics of the engines of Chinese mopeds are quite different from the usual Soviet and post-Soviet models.
Alpha's electrical system consists of:
The system itself operates on a single-wire principle: the power source is connected to the consuming node by only one wire , while the functions of the second are assigned to the metal parts of the moped and the steel frame itself.
When wondering how to set the ignition on an Alpha moped, motorcyclists act on two principles:
Correct ignition setting implies a symbiosis of both points. It is important, following all the technical requirements of the manufacturer, to adjust the operation of the starting system according to your personal needs. The exclusive use of manuals (even official ones) is problematic due to constant modifications of the electrical systems of models produced from the assembly line.
[sc:ads3]
Anyone, even a beginner, knows that a precisely set ignition is the key to controllability and high dynamics of a vehicle. In the case of Chinese mopeds, namely Alpha, Delta and Racer, the manufacturer stipulates that the ignition is set exactly from the factory and cannot be adjusted. But in practice everything is somewhat different.
Some owners of these models claim that the ignition on mopeds works in the direction of excessive advance, as a result, the wear of the crankshaft significantly increases. Another part of the drivers of new minibikes comes to the question “how to set the ignition on a moped” even faster, since it is frankly later. The latter, in turn, reduces the accelerator response and leads to increased carbon deposits on the spark plug.
The main difference in the process of setting up the ignition on an Alpha moped is the atypical location of the marks by which it is customary to adjust it. This is where the main difficulties lie.
[sc:ads5]
How to change gears on a motorcycle when braking?
For those just starting to learn to ride on two wheels, the question of how to change gears on a motorcycle can be confusing. Everything in the car looks simple and clear: the shift knob, the clutch pedal. And the motorcycle...
Today we will help readers understand how to switch motorcycle gears, and also describe in detail the entire sequence of actions.
Switching types
When you become the owner of a brand new motorcycle or moped, first of all get to know it. Study the control system, don’t be afraid to “feel” everything, push and turn. Scientists have proven that human hands have their own memory. And the more they remember, the better they will be at controlling a motorcycle.
On most models, in order to downshift, you need to lower the pedal down. And to increase the speed of the motorcycle, it should be raised.
A little advice: before starting the motorcycle engine, switch to neutral. If first or reverse gears are engaged during start-up, the motorcycle may move forward or backward. This will cause an accident and injury. Neutral speed is usually located between first and second. To turn it on, you need to press the pedal down and lightly lift it up.
The process involves the clutch lever (not available on all models) and the shift pedal. The lever is located on the steering wheel, to the left of the driver.
Modern two-wheelers use two gear shift systems - manual and semi-automatic.
Changing the engine torque is done using a pedal, which in one position or another increases or decreases it. We invite our readers to get acquainted with each of the systems in turn.
Mechanical and automatic
So, the operating principle of the mechanical gear shift system is as follows:
- gaining momentum;
- gas is turned off;
- the clutch handle is pressed;
- the gear shift pedal is set to the desired position;
- the clutch is released;
- the gear shift pedal is released;
- the number of revolutions (gas) is added.
There is no need to make sudden movements. Motorcycle and moped engines react very sensitively to them. The transition from one gear to another should be smooth.
In a semi-automatic system there is no clutch, so to change from one speed to another you need to turn off the gas (reset it) and smoothly press or lift the pedal. It all depends on whether the driver increases the engine gear ratio or decreases it.
Having figured out how to change gears correctly, let's look at specific examples of the main situations that occur on the roads when riding a motorcycle.
Smooth start
There are two ways to start moving: a smooth start or a quick start.
The first one looks like this (we describe the sequence for a mechanical system as for a more complex one):
- the switch is in neutral position;
- the engine starts at idle speed;
- first gear is engaged;
- gas is added - the engine speed increases to 3000 units;
- At the same time, the clutch is smoothly released and movement begins.
Only after mastering a smooth start can you move on to learning a fast one. It differs only in that the engine speed immediately increases from 4000 to 8000 revolutions. But in this case, if an inexperienced driver changes the speed too sharply, the motorcycle rears up.
To avoid this, professionals advise keeping your right foot on the rear brake pedal. This will help keep the car from falling and protect the driver from injury.
Speed Boost
Having started in first gear, for which the gas is removed and the pedal is pressed down, the driver shifts to a higher speed. Next, we proceed as described above - turn off the gas, squeeze the clutch (if it is a mechanical system) and switch to second speed.
They should be changed gradually, without skipping over the indicators. Otherwise, the transmission system will very soon fail.
Professionals advise changing to a higher gear at high engine speeds. And turning the clutch on and off must be done quickly. Otherwise, the engine will “stumble,” which again will not benefit it. In addition, the motorcycle will jerk, and this is very dangerous at high speed.
Professionals also recommend remembering that the clutch will be smooth if the engine speed is increased by 500-1000 units compared to the one at which the shift begins. And they also advise not to stop accelerating when changing to a higher gear.
Speed reduction
Engine speed is reduced when braking, as well as before stopping a motorcycle or moped.
The quick switch process looks like this:
- the number of revolutions decreases (by 2000-3000 from those that were);
- the clutch is depressed (if it is a manual);
- gear changes;
- the clutch is released.
In order for the switching to be smooth, the number of revolutions must be reduced by 500-1000 units from the existing one. Otherwise, the motorcycle may jerk, again causing a serious accident and injury.
Beginner motorcyclists, when braking, switch speeds gradually, from high to low (5, 4, 3, 2, 1). But sometimes there are situations on the roads when you need to use the brake instantly. In this case, it is recommended to use so-called aggressive braking. With it, the gears are lowered immediately, for example, from fourth to second or from fifth to third, and the engine speed is reduced to the permissible minimum. However, with this method, the rear wheel of the motorcycle begins to slip, and this frightens many novice motorcyclists.
Let’s make a reservation that a beginner will not be able to immediately master such braking.
But over time, professionals advise to study this method properly. It may come in handy later on the road.
lediznaet.ru