You should also check for a spark when turned out. Resistance is measured between ground and a black wire with a red stripe.
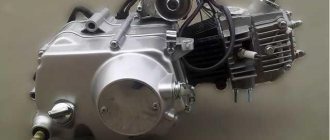
To do this, you need to disengage the clutch, simultaneously reduce the engine speed and engage second gear. For example, the Kovrov Motor Plant abandoned its own production of power units and installed the Lifan engine on its models.
The operation of the motor is blocked by interrupting the spark supply from the coil. Electrics on an Alpha moped
Electrical equipment Adjust the sound signal by rotating the screw on the front cover of the signal.
For products with an instrument panel containing a tachometer, we publish part of the diagram, which also has differences in the controls. Place the gear shift control knob or lever in neutral.
Generators can also be different: 2-coil tachometer with two wires, 6-coil tachometer with three wires. As a result, the relay regulators will differ.
Spark plug Its function is simple - to create a spark and ignite the mixture inside the cylinder. Until the battery is discharged, the scooter will work, and then the engine can only be started by charging the battery or replacing it with a new one.
With the gearshift mechanism properly adjusted and in neutral, there should be no sound of the clutch rubbing against the gears while the engine is running. Clean the brake pads.
ALFA 110: Problem with starter and light
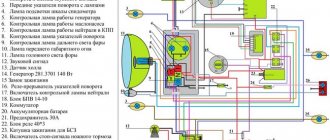
Electrical diagram of Delta 50 mopeds without tachometer
The photo below shows a schematic diagram of the Alfa, Delta moped and other mopeds that do not have a tachometer.
Electrical diagram of Delta 50 mopeds without a tachometer. Download from the link below
Please note that the provided electrical wiring diagrams do not differ significantly: they all show the starter, generator, ignition switch and other electrical equipment components. Differences may be in DC or AC lighting power supply, etc. , regardless of the model. For example, Alpha 110 mopeds that are identical in appearance may have slightly different wiring.
Generators can also be different:
- 2-coil (tachometer with two wires)
- 6-coil (three-wire tachometer)
As a result, the relay regulators will differ.
However, any electrical wiring diagram for the Alpha and Delta moped given above will be useful when repairing and tuning the electrical connections of the scooter.
Source
We recommend reading:
Another electrical connection diagram from the spare parts catalog for the Delta. Features of electrical equipment. The wiring for the Delta and all electrical equipment is quite traditional. However, this is exactly what will help toughen the motorcycle owner in the face of eternal breakdowns and make him a real ace in the electricity of his motorcycle.
The starting relay receives a thick red wire from the positive terminal of the battery. There are models where the motorcycle is completely converted to direct current, but these are old models and they are quite rare. ALPHA WIRING! ALPHA 110! MOPEDA WIRING
Electrical diagram of Delta 50 mopeds without tachometer
The photo below shows a schematic diagram of the Alfa, Delta moped and other mopeds that do not have a tachometer.
Electrical diagram of Delta 50 mopeds without a tachometer. Download from the link below
Please note that the provided electrical wiring diagrams do not differ significantly: they all show the starter, generator, ignition switch and other electrical equipment components. Differences may be in DC or AC lighting power supply, etc. , regardless of the model. For example, Alpha 110 mopeds that are identical in appearance may have slightly different wiring.
Generators can also be different:
- 2-coil (tachometer with two wires)
- 6-coil (three-wire tachometer)
As a result, the relay regulators will differ.
However, any electrical wiring diagram for the Alpha and Delta moped given above will be useful when repairing and tuning the electrical connections of the scooter.
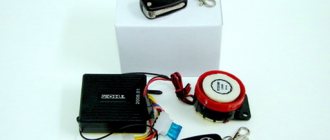
Did you like the article? Follow our channel for new ideas of useful car tips. Subscribe to us in Yandex.Zen. Subscribe.
With the development of trade relations between Russia and China, in addition to traditional knitted goods and consumer electronics, various auto and motorcycle equipment began to be imported en masse to our country. And since the domestic motorcycle industry was experiencing a decline, the new items were to the taste of motorcyclists and began to be purchased en masse for their own needs.
Ignition circuit elements.
Egnition lock. Shuvav, city
It is shown simplified, but sufficient to understand the principle of its operation as part of the system.
The audio signal supply voltage is constant. The idea arose to use both impulses in the operation of the system, and so that at low engine speeds the ignition would be later, and at higher speeds it would become earlier.
Ignition coil 2. Although the ignition switch has 3 positions, the electrical circuit uses only 2.
The moped gained great popularity in Russia and the CIS countries primarily because of its ridiculous price. Ignition circuit elements.
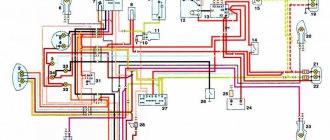
Alfa 72cc moped wiring diagram with tachometer
The difference between them is the number of wires wound and the colors. The ignition switch is nothing more than a regular multi-position switch. The image will open in a new window. The ignition system of the Alpha moped is very simple and reliable.
Thanks for the idea! If you pick apart the compound with which the printed circuit board is filled, you will find that the main relay is an electronic circuit consisting of a BTR thyristor, a diode bridge on 1N diodes, a powerful 1N diode, as well as several wiring elements: electrolytic capacitors, low-power SMD transistors, resistors and a zener diode .
Moped maintenance
Like any vehicle, Alpha mopeds require routine maintenance, the essence of which boils down to:
- Replacement of parts and assemblies whose service life has expired;
- Setting up and restoring the factory parameters of the main components and assemblies;
- Visual inspection of the moped to identify damage.
Chinese engines quite confidently “maintain” 20,000 km on our domestic fuels and lubricants without breakdowns or overhaul of the piston group. The main thing is to change the oil in a timely manner, especially during the break-in period.
If you do not operate the moped in harsh conditions (winter, cross-country racing, etc.), then all oil seals and rubber seals will also last a long time.
Tip: Change your air filter often. This will save the carburetor and make it easier to start the engine in all operating modes.
Service Features
Unfortunately, suppliers of motorcycle equipment do not always take into account the specific features of a particular type of vehicle, assuming that low price is more important. In particular, the majority of mopeds supplied to Russia under the ALPHA brand are not designed for our climatic and road conditions.
This manifests itself in the following:
- Most mopeds are used off-road (in rural areas, for trips to nature, fishing, etc.). And factory tires, alloy rims, springs and shock absorbers are not designed for such loads;
- The quality of gasoline and oil is also far from ideal, which affects the performance parameters of the moped;
- The moped is not intended for operation at sub-zero temperatures.
Advice: The wiring of the Alpha moped especially suffers from harsh climates, since its insulation is made of cheap plastic. At sub-zero temperatures it becomes brittle and breaks down. Experienced owners, after purchase, replace it with rubber-insulated wiring.
In the same way as wiring for an Alpha moped, other “diseases” of Alpha mopeds can be cured with the help of replacement. In particular:
- Factory tires are replaced with more wear-resistant ones;
- Alloy wheels are replaced by traditional spoked rims;
- Shock absorbers are reinstalled from domestic motorcycles.
The relay clicks, but the ATV does not start
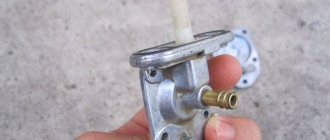
How to properly connect the fuel pump on a scooter after repair or replacement, we will consider further. read more "
A common problem is that a scooter or moped starts with a kickstarter, but refuses to start with an electric starter. Let's consider all possible causes and methods for eliminating them. read more "
Of the trio of Japanese manufacturers, Suzuki scooter carburetors are perhaps the most capricious. Let's look in detail at how to properly connect carburetors to the engines of the following scooters read more "
Causes of heat seizure: read more »
For the average scooter user, the easiest way to test the voltage regulator is with the scooter engine running and can be done within one minute. Let's look at how to do this correctly using a regular multimeter. read more "
The scooter clutch assembly is equipped with bearings, ball, needle, and their combinations, which are the most common. Let's take a closer look at how to replace clutch bearings on a scooter. read more "
If, when you press the brake lever of the hydraulic brake system of the scooter, the brake caliper cylinder does not receive the necessary force to adequately press the brake pads to the disc and stop the scooter at lightning speed while moving, it is obvious that air has entered the system read more »
Safety while driving is ensured, among other things, by informative and precise steering. Only correct adjustment of the steering column can ensure smooth turning of the steering wheel without jamming or vibration. read more "
This material will be useful to all owners of a wonderful scooter - Honda Lead 90 with an HF-05 engine. The material contains all the data, technical characteristics, nominal and limiting parameters for the engine read more "
Replacing the drum brake pads of a scooter is necessary if the linings on the pads are worn out, the pads themselves are defective, and also in some cases when the operation of the scooter with the current pads is unsatisfactory due to the poor quality of the pads. So, let's look at the process of replacing the brake pads of a scooter drum brake. read more "
In the design of a scooter you can find a large number of oil seals of various sizes, designs and densities, but they all have the same task - to maintain the tightness of the connections read more "
Let's look at a simple example of how to use available tools to check the performance of the clutch within a few minutes and, if necessary, replace it. read more "
This material is intended for beginners. Here you will learn how to inspect the variator and rollers of the Honda Lead AF-20 scooter at home, using ordinary improvised tools that every scooterist has. read more "
Valuable advice
It is no secret that the insulation of the wires is made of cheap plastic and it is better to replace the insulation with rubber before it crumbles after a few rains. The two networks in Chinese motorcycles do not intersect, therefore, when disassembling the power supply of the on-board network of the electric starter, headlights, turn signals and stop, you should remember several points:
- The green wire is always ground or, as it is also called, ground.
- Pink and yellow (two yellows) come from the generator, where there is still alternating current.
- Blue comes from an impulse from a magnetic sensor.
- Black and red – battery power.
They all go into a big black rope. The colors are fixed and it’s easier to remember what they belong to than to have to decide for a long time where they come from and where they go. There are two main coils: under the steering wheel and next to the battery, under the shield. If next to the battery you can still determine what is coming from where, then under the steering wheel the wiring of the Alpha moped begins to resemble Narnia: everything is lost there and the colors change. Wiring from this point spreads throughout the motorcycle, providing power.
Read also: Ford Kuga brake fluid
Features of electrical equipment
Unlike domestic motorcycles and mopeds, Alfa already in its basic version has a number of advantages:
- Electronic 12V ignition;
- Electric starter;
- Electronic tachometer on the instrument panel.
For reference: electronic ignition ensures trouble-free engine starting and stable operation in all operating modes. A simple circuit and the ease of replacing failed components with your own hands greatly simplifies the use of the vehicle.
Energy sources
The moped uses a circuit with a battery power source. The manufacturer does not recommend its operation without a battery, and the wiring diagram for the Alpha moped is additionally equipped with a relay regulator (see also the wiring diagram for UAZ 31512).
Scooter starter malfunctions: identifying and fixing the problem
The presence of a starter in a scooter, unlike a car, is not mandatory. However, it makes life much easier for the driver, adding a little comfort while working. Everyone knows that the starter works thanks to the battery, and it consists of:
The principle of its operation is no different from any other starter, although some breakdowns may differ from the usual ones.
Why doesn't the starter work?
Initially, you need to exclude battery discharge from the list of possible breakdowns. If this were the case and the battery suddenly became low, you would hear a peculiar sound when you press the “start” button. This sound indicates that the starter is not engaged with the bendix and is running without load, idle. If you still hear this sound when starting up, do certain things:
In most cases, these points will help you solve the problem with your scooter.
However, there may be other breakdowns, which in themselves are considered more serious when compared to a dead battery. We are talking about audible clicks when the starter operates. This is a deeper problem and it is necessary to look for its causes.
Causes and solutions
Step 1: With the ignition on, try honking the horn. If everything worked out and you could hear a loud and ringing sound, everything is fine, you can start the engine. If the sound was very quiet or could not be heard at all, there were problems with the battery or power supply (recharge the battery, clean the terminals).
Step 2. When you press the engine start button, you hear the sound of the relay turning on. If yes, then try bridging the power terminals of the relay. If there is no sound, disconnect the relay from the power supply, and then use the wires to connect the battery and starter.
Step 3. Once you have connected the starter, it works fine. If yes, then you just need to replace the relay. If not, check the contacts of the start button, the wires from the starter, and replace all worn parts.
Step 4. If, after you bridge the power terminals of the relay, the starter begins to operate normally, replace the relay. If not, then you are faced with a more serious task: you need to disassemble the starter and check the condition of its parts (brushes, windings and springs).
By analyzing your scooter breakdown using these simple steps, you can easily identify and fix the breakdown. Of course, you don’t have to worry too much about this and just bring your scooter to a service station. But at the same time, you will spend your money and will not be able to gain that invaluable experience that you will gain when diagnosing and repairing yourself.
Alpha as standard has
- Electric starter.
- Electronic ignition 12V.
- Electronic tachometer on the dashboard.
- A simple diagram of the electrical equipment of an alpha moped allows you to replace failed elements with your own hands.
The source of energy in the Alpha moped is the battery. Additionally, a relay regulator is installed. The wiring is protected against voltage surges. The six-coil generator maintains voltage at any engine speed, and also ensures uninterrupted operation of the lighting and alarm systems.
Installation of additional lighting fixtures is not provided. Also, you cannot replace lamps with more powerful ones. The absence of complex connections in the electrical circuit allows even a novice to carry out repairs, which also affects the popularity of Alpha.
An electronic tachometer on the dashboard improves vehicle controllability and increases ride comfort. The low cost of Alpha leads to the fact that many factory components are not of high quality. Thus, the wiring insulation is made from cheap plastic. As practice shows, operation in the harsh Russian climate leads to the insulation cracking .
That is why many recommend replacing the factory plastic wiring with a new one with rubber insulation immediately after making the purchase. In this way you can insure yourself against various operational problems.
The problem with the Chinese Alpha motorcycle is in several things: shock absorbers, metal and wiring. The rest is replaced by the owner quickly enough (oil, gasoline, factory tires). It is the wiring that has many possible breakdowns and forces owners of Chinese mopeds to spend a lot of nerves trying to fix it. As a result, the wiring of the Alpha moped very soon begins to look like some kind of bird’s nest and you can’t do without a diagram. How to sort out tangled wires?
Read also: Lenses for xenon headlights
conclusions
Chinese-made mopeds are simple and easy to use. We hope that the video in this article along with the original wiring diagrams will help you in maintaining your two wheeler. And the tips will help you avoid mistakes (see also the Java 638 wiring diagram).
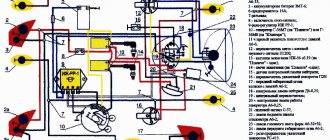
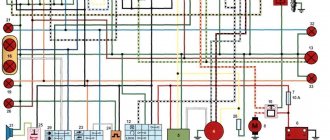
Electrical diagram of mopeds Alpha, Delta, Orion
1 — ignition module (CDI); 2 — ignition coil; 3 — spark plug; 4 - generator; 5 - voltage regulator; 6 - battery; 7 - fuse; 8 — starter; 9 — “Start” button; 10 - starting relay; 11 — tachometer; 12 - ignition switch; 13- brake light; 14 — gearbox neutral indicator; 15 — instrument lighting; 16 — headlight; 17 — high beam indicator; 18 — rear clearance; 19 — left turn indicator; 20 — left turn indicator; 21 — right-hand rotation indicator; 22 — right turn indicator; 23 — direction indicator switch; 24 — relay-interrupter; 25 — button to turn on the sound signal; 26 — handbrake brake light switch; 27 — foot brake brake light switch; 28 — digital gearbox speed indicator; 29 — light switch; 30 - light switch; 31 - security alarm; 32 — digital speed indicator switch; 33 — sound signal; 34 — front clearance
How to adjust carburetor stroke
This carburetor setting gives the correct mixture during the power stroke. This setting needs to be done when:
- If you have ridden or ridden your moped and have black carbon deposits on the unscrewed spark plug;
- If you set off and the moped doesn’t pick up speed well, and when the spark plug is unscrewed, you have white carbon deposits.
The working stroke is regulated by a needle installed in the carburetor throttle valve. To do this, we need to unscrew the throttle valve nut and remove the throttle with the needle from the carburetor.
The needle has 5 grooves. When purchasing a new Alpha moped. The fixing plate is located on the middle groove.
If you have a lean mixture, white carbon deposits on the spark plug, then you need to fix the plate down one notch. Thus, we raise the needle by one notch and increase the amount of fuel entering the combustion chamber.
And vice versa. If you have an enriched mixture and black carbon deposits on the candle, then the needle needs to be lowered down.
After this procedure, we install the needle in place, assemble the carburetor and try to ride it. We look at the behavior of the moped engine after adjustment, and go for a ride.
The end result of correctly adjusting the carburetor stroke should be brown carbon deposits on the spark plug.
How to Check the Starter Relay on a Chinese Scooter
How to check the starter relay on a scooter
Posted September 1, 2016
The main obstacles of the relay . Problems with the electric starter itself are not considered
Why is the pipe shit?
I disassembled my relay , unwinded the entire winding, re-wound it, cleaned the contacts, and now for the 5th year everything has been fine with the relay, my brain doesn’t work at all, there’s just no point in buying a new one, because there’s no guarantee of how long it will last enough again
I have a Skymoto Spider 50 scooter and this is the relay clicks and the starter doesn’t turn, but if you connect the direct wire from the battery, the starter turns and the relay has already been changed. What could be the reason.
Tell me, my starter turns but doesn’t turn, I can take a video and post it, what should I do? battery is charged
the relay clicks and the spark disappears?
I like and subscribe
Where is the starter relay on a Suzuki Adreas 110
storm 50, when the ignition is turned on, the starter does not work, the emergency lights do not work, turns in general as if there is no battery, it starts with the kick starter and everything works, what could be the matter. the fuse is intact
the scooter does not charge the battery how to find out the reason
On Glushak Shit Pipe!))) Well, you need to buy a multimeter.
I have such a problem, the scooter racer is generally Chinese, it won’t start from the starter , I took it apart and got to the relay in general there is a spark, but there is no “ whack, whack ”, the battery is charged, what could be the problem?
Thank you Krasava helped.
I have the following question: when you press the starter button, the relay just clicks once and the starter doesn’t turn, this happened rarely before, but now I just can’t start it from the starter ; I measured the voltage on the battery at 13.1 volts, but with the starter it starts normally.