Why do you need valve adjustment on an Alpha moped? The engine of the FMB 139 moped is equipped with a gas distribution mechanism with the camshaft located in the cylinder head. The valves are driven by rocker arms. During engine operation, the valves experience thermal expansion, so a small gap is provided between the rocker arm and the valve to compensate for thermal expansion. Insufficient or excessive clearance may cause serious engine damage.
The negative effect of incorrect clearances accumulates gradually and can cause valve burnout, seat destruction, decreased compression, overheating and deformation of important timing components. Adjusting the valves on the Alpha moped should be done several times a season. If the thermal clearances are set incorrectly, a characteristic knocking sound may appear when the engine is running, which is also a reason for adjusting the valves.
How to set timing marks on an alpha moped
Checking the timing belt by marks on the Delta EX 50 moped engine 1P39FMB (139FMB)
Comments from those interested:
Roman Khimchenko 2 weeks. reverse And if it doesn’t match WHAT to do
Vladimir Voronov 2 weeks. reverse Set it to match.
Valentin Sidorov 1 month ago Thanks for the video. Features of the engine timing The valves on the Alpha moped are made How to set the ignition. Everything is described carefully and clearly, in Russian. 598 Removing the generator rotor on an alpha alpha moped. how to remove Remove the generator. How to replace the starter chain on an alpha moped video. I can’t remove the rotor on the alpha moped, there is no seal on the market, I haven’t found it, so I’m thinking about the best way to remove it, has anyone removed it and in what ways. If you continue to make videos like this, I will be all for it!
Vladimir Voronov 1 month ago This is nice. )) And of course there will be new videos, just wait a little.
Danil Pugachev 1 month ago no, we don’t even know where the head with the boiler is attached, we installed two gaskets, we thought it wouldn’t knock, the valves knock loudly when you turn the starter, okay, thanks for the hint
Vladimir Voronov 1 month ago Yes! Another thing, don’t install two gaskets; it won’t make things any better; an increase in the combustion chamber will result in a drop in power.
Danil Pugachev 1 month ago no, we don’t even know where the head with the boiler is attached, we installed two gaskets, we thought it wouldn’t knock, the valves knock loudly when you turn the starter, okay, thanks for the hint
Hunter38767 3 weeks reverse And if you have a 50cc head and a 72cc piston, then you need to change the head.
Danil Pugachev 1 month ago no, we don’t even know where the head with the boiler is attached, we installed two gaskets, we thought it wouldn’t knock, the valves knock loudly when you turn the starter, okay, thanks for the hint
Hunter38767 3 weeks reverse Two gaskets are not allowed, look, the valves may be overtightened, unscrew the two caps on the head, and look at the gap, it should be 0.05 on the feeler gauge. But if they hit the piston, then there is no gap.
Sergey Vasiliev 1 month back Vadim, thank you, I read a lot of useful information, thank you, I will be glad to see new videos on alpha, I’m really looking forward to it
Arkady Novoselov 1 month back, well done, thank you for you!
Danil Pugachev 1 month ago no, we don’t even know where the head with the boiler is attached, we installed two gaskets, we thought it wouldn’t knock, the valves knock loudly when you turn the starter, okay, thanks for the hint
Signs of improper valve adjustment
If the thermal gaps are too large, this can cause a characteristic knocking or ringing sound that occurs when the engine is running. Loss of compression can also be an indirect consequence of improper valve adjustment. Indirect consequences of incorrect valve settings may be an increase in fuel consumption with a decrease in power due to depressurization of the valves, as well as loss of synchronization of their operation, when the operation of the valves begins to advance or lag behind the piston operation cycles.
When and why to check the circuit
Manufacturers recommend checking every 1,000 kilometers. Under intense loads, if you have to travel hundreds of kilometers per day, inspection is required much more often. But by installing a high-quality chain, the motorcyclist will be able to reduce the number of checks.
Just by looking at the moped from the outside, it is not difficult for a specialist to determine if the chain is not tensioned correctly. Such an error when servicing a moped can lead to a break in the chain during a trip. Over-tightening occurs quite often and, despite the presence of lubrication, leads to accelerated wear of the chain. As a result, the suspension begins to work incorrectly. Over time, the hub may fail.
A poorly tensioned chain also often causes breakdowns. When moving, it will fluctuate greatly, and as a result, difficulties will arise with switching speeds. The shock load on the gearbox gears and rear hub will increase. The chain can lock the wheel axle by wrapping around it. Such a breakdown can lead to a serious accident.
The transmission of torque from the motor to the rear wheel in Alpha mopeds is carried out through a chain drive. This mechanism uses two stars connected by a chain. The first sprocket is connected to the gearbox, the second to the rear wheel.
The degree of tension changes as the pendulum moves along an arcuate path by the length of the suspension stroke. When stretching, it is important to remember that there should be a margin of 2-3 centimeters in length. Maximum tension is achieved when the following elements are lined up:
- pendulum axis;
- secondary shaft;
- wheel axle.
Video on this topic
repair of alpha tensioner 149 fm.
Replacing timing rollers 139FMB (1P39FMB)
Why does the timing chain rattle in Racer Alpha? and how to remove it!
Subscribe to the channel and post how!
#41 How to determine the alpha chain stretch of a magnifying glass?
Subscribe to the channel) Link to vk-https: //vk.com/id352703079 My group vk-https: //vk.com/club116536286.
Modification of Delta with a tricky time change
How to replace the oil pump sprocket without disassembling the clutch basket. Chinese moped Delta 72cc.
replacing a Gm chain in an ALFA moped
Spare parts for scooters in Belarus Online store in Belarus https://scooterbaza.by/ Group in contact https://vk.com/scooterbaza.
Alpha 110 (Change timing chain)
They brought in a moped (Alpha 110) with a complaint about a foreign knocking noise in the engine, as it turned out that it was loose timing chain. Foam.
Replacing the camshaft tensioner and Delta timing belt
Repair of a Chinese moped. There was a strong blow to the engine.
Alpha 110 (Replacement of magnet chain)
Foam filter for Alfa moped https://goo.gl/MF6F3b Digital thermometer.
How to Tension the Timing Chain on an Alpha Moped
Content
Photo report: how to check the drive chain of a scooter?
In life it is always like this: one wonderful thing, another bad. The same principle applies to various types of manual transmissions. Chain transmission was no exception. On the one hand, there is nothing simpler, more reliable, simpler, more compact and cheaper than a chain drive.
On the other hand, we get endless hemorrhages with chain stretching, sprocket wear, endless cleaning and lubrication, maintenance and stretching of the chain itself. But nothing can be done, the gearbox has many advantages over other types of mechanical gears, since these types of gears are used almost everywhere.
In general, now we will not talk about the chain drive as such, but about a method for diagnosing chain synchronization, which drives the scooter .
To change or not to change?
Let's say you're using most of your engine: you're replacing gaskets, crankshafts, gaskets and other things, but you're hesitant about replacing your timing chain with a new one. There is no doubt in your mind that you should replace it with a new one as soon as possible. And now I will explain why.
See for yourself: the average lifespan of a chain is approximately 18,000-20,000 km (personal experience), which is approximately the same as the average life of the engine itself. And for example, after driving 6000 km, the crankshaft jammed or the engine leaked, or something else that required complete disassembly of the engine. Naturally, you disassemble the engine, replace the crankshaft with a new one and leave the chain, which by that time has exhausted a third of your resource.
READ How to Twist Mileage on Accent
So what's going on? After 12,000 km the chain will fail and become unusable and the crankshaft and other parts will start to work and you will, if not want, have to halve the engine again through one chain. It's necessary? The chain is a consumable item. Never skimp on this!
check
Personally, I never check the time. I just throw them in the trash, no matter how wonderful they seem to me. For me it's a chain. This is a consumable item, the same as a spark plug, oil or oil seal. But if it's important to you or money is stressful, you can use your old grandfather.
Alpha tensioner repair
alpha
Tensioner repair £149.
We stretch the chain along its length, squeeze it with our fingers and try to position it in a horizontal position.
- If the chain traces an arc that closely resembles a 90 degree angle, then throw it in the trash
- If the chain is slightly bent and describes a small arc, then such a chain is quite suitable for further use
READ Replacement Timing Chain Volkswagen Jetta 1.4
To be clear, I took a new and very worn chain, connected them and checked for horizontal bending. As you can see: the new chain (above) has made a slight arc and is worn and no good, like snot, almost 90 degrees.
The worn chain was almost an inch longer than the new one.
How to replace the chain of scooters?
It's very simple, friends: remove the engine from the frame, disassemble it and replace the chain with a new one. There are no special secrets in this, and there are also no special ways to cheat fate without disassembling the engine. The chain can only be replaced by completely disassembling the engine.
Sure, there's that little thing on YouTube that shows an old chain , then chains on a new one, connects both chains, pulls the old one, starts a new one, and then rips the whole thing back, but that's porn. I don’t suffer from such fools, since the result of such repairs is not always predictable.
The timing chain is not intended to be riveted or riveted in any way. It can be easily twisted or twisted while riveting and this is the correct way to ensure that the chain in the engine is pushed against the sprocket and luckily it can work and possibly bend the valve. And one more thing: a beginner will not be able to rivet a quality network. This work is not as simple as it might seem at first glance. So don’t suffer from debris, but disassemble the engine.
READ Replacing Timing Chain Honda Cbr 600 Rr
How to set the chain to pull?
But you won't receive or configure it, and it won't interfere with Google or Yandex searches with such queries. The chain in the scooter engine is tensioned automatically. And if it is stretched so far that it begins to fly or jump through its teeth, feel free to disassemble the engine and replace it with a new one. There are no miracles there.
And I’ll prove it to you now. The chain tension in the engine is carried out using a special tensioner, which operates in a fully automatic mode. When the chain tensioner rod
is stretched And the more the chain is stretched, the larger the rod appears. But! The stock has a limited run: it travels about a third of its course on a completely new chain, and then when it stretches, it goes all the way, and then it won't work anymore. Therefore, the chain will no longer pull! And all your attempts to correct the situation will lead to nothing.
Valve adjustment on Alpha
I want to touch on an interesting topic that everyone has heard about, but not everyone understands its essence - let's talk about valve adjustment.
A little theory.
First, a little theory. Where did the need to adjust the valves come from and why is the thermal gap needed?
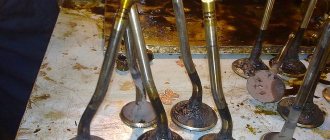
Any four-stroke engine has at least two valves: an intake valve, through which the working mixture enters the combustion chamber, and an exhaust valve, through which exhaust gases exit. Part of the valve is constantly located in the combustion chamber and therefore the valve becomes very hot. And as we know from school physics courses, bodies expand when heated. Moreover, the stronger the heating, the greater the expansion.
The valves in the engine are always in a “spring-loaded” state, while the valve plate is pressed very tightly to its seat - the valve seat, this ensures the tightness of the valve closure.
To open the valve, you need to press on it. In our case, the valve is pressed by a rocker arm, which moves under the influence of the camshaft cam.
Now let’s imagine that the engine is cold (it stood for several hours and all the parts cooled down to “room” temperature). If you start the engine, the valves will begin to heat up quickly and, as a result, lengthen. If you do not leave it room for expansion (the gap between the rocker arm and the valve stem), then the moment will come when the valve will elongate so much that it will not fit tightly to its seat and will begin to leak gases from the combustion chamber. This leads to a loss of engine power and can also lead to overheating and burnt valves.
For this reason, a gap is left between the valve and the rocker arm. Engine manufacturers calculate how much the valve lengthens when the engine is running and give the value of this gap in the operating instructions. Thus, at the operating temperature of the valve, the gap will be minimal, so that the valve can close completely, but at the same time the rocker arm would be almost close and the valve would open as wide as possible and there would be no impact (“clattering”) of the rocker arm on the valve.
IMPORTANT: the gaps are set on a cold engine , when the valve has not yet had time to lengthen.
What happens if the valves are adjusted incorrectly?
Very often on various forums questions are asked: “What will happen if the valves are adjusted incorrectly?” There are two possible options:
- If the gap is too large, this is the most harmless option. If the gap is too large, then the valve shank and rocker arm will wear out more, since the rocker arm will hit the valve with a running start. The valve opening height will decrease slightly, due to this the filling of the combustion chamber will deteriorate, and the engine efficiency will drop, but these changes are hardly noticeable. The engine sound will also be stronger and a characteristic clattering sound will appear. In general, engine operation will not be affected.
- If the gap is too small, when the valve heats up, it will “press” against the rocker arm and the valve will no longer fit tightly to the seat. The fuel-air mixture and exhaust gases will escape through the resulting gap. The release of exhaust gases will cause the valve to overheat and burn out. Engine compression will drop and, as a result, efficiency.
Thus, a gap that is too small is much more dangerous than a gap that is too large. It is for this reason that it is not recommended to set the gaps “by ear” without using feeler gauges, because if there is a feeler gauge between the rocker arm and the valve, there will be a gap between the rocker arm and the valve, unless of course you clamp it with great force.
Why combine tags?
The valves must be adjusted in a position where the rocker arm does not press on the valve stem, that is, the valve is closed. When a four-stroke engine is running, both valves are closed at the end of the compression stroke, so for ease of adjustment, align the mark on the camshaft sprocket with the mark on the head housing. This position corresponds to the top dead center - the end of the “compression” stroke and the beginning of the “power stroke” and both valves are closed at this moment and can be adjusted.
By and large, it is not necessary to clearly combine these marks, because both valves close already at the beginning of the compression stroke and do not open until almost the end of the power stroke, that is, the valves are closed at least half a revolution. That is, there is nothing to worry about if you “overshoot” the mark a little, or if you don’t reach it a little (within reasonable limits, of course).
For some reason, some “craftsmen” in their video instructions combine the “T” mark on the crankshaft flywheel (apparently because it is there). To adjust the valves, this is not at all necessary, because for one revolution of the camshaft, the crankshaft makes two revolutions, and the mark will coincide twice: once at the end of the compression stroke, and the second time at the end of the exhaust stroke (when the exhaust valve is still open and the intake valve is preparing to open).
What should the valve clearance be on an Alpha?
The intake valve clearance on most engines is usually less than the exhaust valve clearance. This is due to the fact that the intake valves heat up less due to their cooling by fresh air flows.
The thermal clearance of the intake valve for the 139FMB engine is 0.03 mm. The exhaust valve must have a clearance of 0.05 mm.
From theory to practice.
It's actually quite simple:
- The engine must be cold. If not, wait a couple of hours for it to cool down to “room” temperature.
- Place the moped on the center stand. Turn off the ignition (so as not to accidentally start the engine).
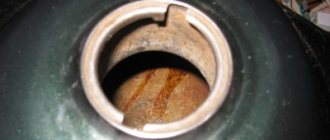
- Unscrew the side cover of the engine head. It is better to stock up on a spare gasket, since the gasket usually breaks when removing this cover. Or you can put it on a heat-resistant sealant.
- By rotating the crankshaft, we align the mark on the head sprocket with the mark on the head body. The crankshaft can be turned either with the kickstarter leg (but this is inconvenient, since the kick is on the right side of the moped, and the mark is on the left). You can unscrew the plug on the generator cover and rotate the crankshaft through it by putting the “head” on the nut securing the generator rotor. To make it easier to rotate the crankshaft, you can unscrew the spark plug.
- Using a 17 wrench, unscrew the head plugs intended for adjusting the valves. One cover is on top, the second is on the bottom.
- Unscrew the lock nut of the adjusting screw with a 9mm wrench and slightly unscrew the adjusting screw.
- We take a flat feeler gauge (0.03 mm for the intake valve or 0.05 mm for the exhaust valve) and insert it between the valve stem and the adjusting screw.
- Carefully tighten the adjusting screw so that the probe moves with slight resistance, but does not “bite”.
- Holding the adjusting screw, tighten the locknut and check that the gap has not changed.
- We perform a similar operation with the second valve.
- We put everything back together and start the engine to check that everything is done correctly and there are no oil leaks anywhere.
how to tighten the timing chain on an alpha moped
Photo report: How to check the timing chain of a scooter?
It’s always like this in life: one thing is great and the other is bad. Exactly the same principle applies to various types of mechanical transmissions. Chain transmission is no exception here. On the one hand, there is nothing simpler, more reliable, lighter, more compact and cheaper than a chain drive.
On the other hand, we get endless hassle with stretching the chain, wear of the sprockets, endless cleaning and lubrication, maintenance and tensioning of this very chain. But there is nothing to be done, the chain box has a lot of advantages over other types of mechanical transmissions, which is why these types of transmissions are used almost everywhere.
In general, now we will not talk about the chain drive as such, but about the method of diagnosing the timing chain driving the camshaft of a scooter engine .
Gas distribution mechanism of the FMB 139 engine
The gas distribution mechanism of the FMB 139 engine is equipped with a camshaft located in the cylinder head. The valves are arranged vertically and V-shaped and are driven by a rocker arm, which in turn is driven by the camshaft lobes. This system is very similar to the Moskvich 412 timing belt, only there is only one cylinder and two valves.
The camshaft is driven by a chain drive. It, in turn, is driven by a gear located on the axis of the generator rotor, which is the axis of rotation of the crankshaft.
Tools for replacing a chain on a moped
Open-end and box-end wrenches are used. In total, you will need four keys with a diameter of 10, 14, 17 and 24 millimeters. Depending on the moped model, instead of a diameter of 24, you may need 22 mm. If you have sockets and ratchets, you can replace some of the keys with them.
To tension the chain you will need wrenches 10, 14, 17 and 24
Just in case, it is better to stock up on a flat-head screwdriver; it will allow you to lift the bolts if they cannot be removed by hand.
Adjustment of valves
Setting the valve clearances on a scooter is not a difficult job, especially when there are instructions. To get started, you will need a set of probes, open-end wrenches, sockets and a socket wrench with a square (usually a 3.5 wrench). That's all you need for the repair. If you don’t have something, borrow it from a neighbor or buy it. They will still be useful to you in the near future after the next 4k km run. The set of necessary tools depends on the scooter itself, but you can also use existing tools. We will use pliers, a Phillips screwdriver, wrench heads for 8, 9 and 13. We will also take a feeler gauge to set the valve clearance, we need 0.05 and 0.1 mm.
Adjustment Tips
It is best to adjust the valve clearances on a 4t scooter in the morning, if it is summer outside. Because the scooter must be cold. But it should not be frozen, so in winter it is advisable to warm it up a little. As a rule, in most mopeds the timing design is very simple and has only one distributor shaft in the engine head. With this design, the valves are adjusted using screws. It is for them that a spanner wrench with a square is needed. These screws are screwed into the end of the rocker arms and press against the end of the valve stems. This small distance between the end of the adjusting screw and the end of the valve stem is the thermal clearance of the valve.
Valve adjustment is necessary if:
- The moped has traveled 4000 km or more since the previous regulation.
- Extraneous noise is heard from the engine (knocking, ringing).
- It's very difficult to gain momentum.
- It's difficult to start a moped.
- If the moped does start, it constantly stalls.
LITTLE BIG. FARADENZA (official video)
Subscribe
Opened 3 days ago
#128544; ANTI-POSITIVE RUSSIAN TOUR #128544; 19.10 Moscow vk.com/littlebig_stadium 26.10 St. Petersburg vk.com/littlebigice buy tickets here: www.littlebig.info/ 04.10 Surgut vk.com/littlebig_surgut 05.10 Tyumen vk.com/littlebig_tymen 06.10 Ekaterinburg vk.com/ekb_littlebig 09 .10 Izhevsk vk .com/littlebig18 10.10 Kazan vk.com/little_big_kzn 12.10 Nizhny Novgorod vk.com/little_big_nn 13.10 Kirov vk.com/little_big_kirov 15.10 Yaroslavl vk.com/club169324976 16.10 Ivanovo vk.com/club16932503 3 17.10 Cherepovets vk.com/littlebig_35 08.11 Krasnoyarsk vk .com/event169050668 09.11 Irkutsk vk.com/event169050994 11.11 Tomsk vk.com/littlebig_tomsk 12.11 Kemerovo vk.com/event169050627 13.11 Novosibirsk vk.com/littlebig_novosib 15.11 Barnaul vk.com/even t169050518 16.11 Omsk vk.com/littlebig_omsk2018 18.11 Chelyabinsk vk. com/littlebig74 11.19 Ufa vk.com/little_bigufa 20.11 Samara vk.com/littlebig_smr 22.11 Saratov vk.com/event169047067 23.11 Volgograd vk.com/event169048052 25.11 Rostov vk.com/event169048121 2 6.11 Krasnodar vk.com/event169048172 27.11 Voronezh vk.com /littlebig_vrn18
How to set the timing phase and what is ignition timing
Our VKontakte group In this video I will tell you how the ignition timing differs from. A LITTLE BIG: : com/littlebigbandofficial soundcloud: soundcloud.com/littlebigrussia vk: vk.com/littlebigband twitter: twitter.com/LITTLEBIG_BAND website: thelittlebig.com Send by email Booking (Ru, USA) Booking (Europe): 33,608 815 807 Fabristi www.base-productions.com Music: Ilya Prusikin, We Love Lyrics: Ilya Prusikin, Alina Pasok, Eldar Dzharakhov LITTLE BIG production: Idea: Alina Pasok Script: Alina Pasok, Ilia Prusikin, Eldar Dzharakhov Director: Alina Pasok, Ilya Prusikin Co-director: Yuri Muzichenko Additional director: Alexander Pavlov Executive producer: Anastasia Antipova Line producer: Ekaterina Mironova Stylist and art director: Vadim Ksenodokhov Stylist assistant: Rada Sokolova Location: Dmitry Chernov Coordinator: Ivan Veselov Assistant: Eduard Gaisin, Roman Konshin, Ivan Savchenko Casting: Anastasia Antipova, Vasilisa Lubenko Actor coordinator: Vasilisa Lubenko MUAH: Masha Francisch Assistant Muah: Anna Sokolova Hairdresser: Svetlana Tilishevskaya Gaffer: Stas Gerasimov Lighting technician: Pavel Ilyuk, Igor Savchenko Editing: Alina Pasok, Ilia Prusikin Color: Dmitry Novikov VFX , CG: Maxim Semenov Sound design: Stas Kravets
How to adjust and tension the chain?
There’s no way you can tighten it or adjust it, and you don’t bother Google or Yandex search with such queries. The chain in the scooter engine is tensioned automatically. And if it has already stretched to such an extent that it begins to fly off or jump over the teeth, feel free to disassemble the engine and replace it with a new one. There are no miracles.
And I will prove this to you now. The chain in the engine is tensioned using a special tensioner, which operates in a fully automatic mode. As the chain stretches, And the more the chain stretches, the more the rod will come out. But! The rod has a limited stroke: on a completely new chain it comes out about a third of its stroke and then, as it stretches, it comes out completely and then it won’t come out anymore. Therefore, the chain will no longer be tensioned! And all your attempts to correct the situation will lead to nothing.
Valve adjustment on Alpha:
Thank you! I finally found an article where everything was explained in detail about valve adjustment, and I learned a lot of useful things for myself.
The exhaust valve requires different clearances.
Thank you for your comment. I checked the instructions for my moped: yes, indeed the gap is 0.03 mm for the intake valve and 0.05 mm for the exhaust valve. Corrected the article.
the authors made me laugh))))) first write that “By and large, it is not necessary to clearly combine these marks, because both valves close already at the beginning of the compression stroke and do not open until almost the end of the power stroke, that is, at least half a turn the valves are closed.”, and then write the standard instruction “4. By rotating the crankshaft, we align the mark on the head sprocket with the mark on the head body. ..." IMHO it is necessary to set marks in any case to prevent the timing chain from being pulled out
What's so funny? I wrote that there is no point in looking at the mark on the crankshaft; it is enough to align the mark on the head to be sure that the valves are closed. And by half a revolution I mean crankshaft revolutions. I don’t argue that it is sometimes necessary to check whether the crankshaft marks match, especially when there are problems with the engine’s operation. But this has nothing to do with valve adjustment.
Timofey, you are right….that’s what marks exist for, to tune in to them.
These marks are needed to check and correctly install the timing chain. If, when adjusting the valves, you accidentally slightly overshoot the mark, it’s not a big deal. This was exactly the point of the paragraph about marks.
Timofey, you are right….that’s what marks exist for, to tune in to them.