Reasons for removing the rear wheel
A scooter, like any other vehicle, is subject to the laws of physics. Parts wear out and require repair. Vehicle wheels are no exception. At first glance, removing the rear wheel from a moped is easy. And it is held on by just one nut. But this is a misleading impression. In order to get to the rear wheel rim, the owner will have to work hard, removing most of the plastic and parts.
The reasons for removing the rear wheel of a scooter can be very diverse. Most often this is a flat tire, because few motorcyclists have not at least once run their wheel into a sharp object. But in the back of the scooter, in addition, there are many important parts, to access which you will need to disassemble half of the vehicle. What else could be the reason for repairs involving dismantling the rear wheel? Let's list:
- Faulty brake pads. Brakes are the most important part of a motorcycle. If they do not work well, you need to fix the problem as quickly as possible.
- Replacing the old wheel with a new one.
- Wheel balancing.
- Replacement of the gearbox shaft.
- Disc painting.
- Drum brake adjustment.
- Replacing a worn or punctured wheel.
Wheel functions
The wheels of a vehicle play a very important role in safe movement, especially when it comes to any two-wheeled motor vehicles, in particular scooters. After all, worn out tire tread, deviation of tire pressure readings from the norm, as well as any other more serious malfunctions can lead to serious consequences that sometimes cost a human life. Therefore, wheels should be given no less close attention than all other components and assemblies of the scooter.
Scooter wheels must perform the following functions:
- ensuring good grip between the vehicle and the road surface;
- dampen shocks and vibrations while driving;
- carry out full transmission of traction and braking forces created by the scooter.
When we talk about wheels, we mean absolutely all their components and characteristics - tires, wheels, size, type, material of manufacture, etc.
First of all, I would like to say about tires, on which many scooter riders, especially beginners, often try to save money. In this regard, used tires are purchased, which can result in troubles on the road. It is worth noting once again that good tires are one of the fundamental aspects of safe driving.
The tire provides a level of riding comfort as well as maneuverability of the scooter. Thus, used tires can cause accidents, which will entail much higher costs than purchasing new tires in the first place. In appearance, used tires may be ideal, however, this is not a sign of its integrity and quality, since the naked eye can easily not notice minor damage, cord deformation, microcracks in the rubber that violate the tightness of the product.
Read also: Volkswagen Passat B5 reviews
All this can lead to an unexpected tire rupture while driving, which entails negative consequences. Thus, the real savings when purchasing tires can be achieved by brand. After all, the more famous the company that produces tires, the more expensive they are.
Rear wheel removal instructions
How to remove the rear wheel from a scooter? The quickest step-by-step instructions below will help you figure this out:
- Position the scooter so that the rear wheel spins in the air.
- Remove the muffler. To do this, remove the seat and plastic, and then unscrew the nuts that hold the muffler. It is important not to remove them completely, but only to loosen them.
- Using a socket wrench, unscrew the nuts securing the muffler to the cylinder. Remove it from the scooter. In this case, the paranite gasket may be lost, so be careful.
- If the muffler is dirty, it can be cleaned of carbon deposits and dirt. To do this, heat the outside with a blowtorch, and go inside with a stiff metal brush. After all the manipulations, it is better to cover the exhaust hole of the muffler with a clean cloth so that foreign particles do not get into it.
- Most mopeds have a monoshock absorber. If your model has two of them, and they are located in the rear, you need to unscrew the nuts and remove them.
- If you have a rear disc brake, you need to do the same steps: carefully unscrew the brake caliper and move it to the side.
- And now you can proceed directly to removing the wheel. Unscrew the carrier nut using an impact wrench. If you don't have one at hand, a regular screwdriver will do. But in this case, it is recommended to fix the wheel with a wooden beam.
- Remove the wheel from the spline.
To install the wheel, perform all the above steps in reverse order.
How to remove a wheel without removing the muffler
If a scooter has a punctured wheel, it can be replaced without removing the muffler. It is usually secured to the engine with 4 bolts. The exhaust system of some Chinese-made moped models consists of several parts that are connected by fasteners. They can be removed one piece at a time, making tire replacement easier. This recommendation can be used if there is no time or opportunity to carry out the full procedure according to the rules. In the case where the muffler is made in the form of a solid block, the only option is to bend it to the side. This can be done in case of emergency replacement of a broken wheel.
You may be interested in this About tires on the UAZ Bukhanka
If the muffler consists of several compartments, those parts that interfere should be removed. These can be side mounts, knee and plastic. There are variations in designs when it is enough to move the weakened pipe to the cylinder through the gasket. Next, unscrew the fastenings on the sides and remove them so that nothing unnecessary gets in the way.
Important!
Before installing all parts back, check the condition of the gasket. If it has shrunk and cracked, it needs replacement.
Honda scooter repair
The Japanese Honda scooter has long been one of the top three best-selling vehicles with an engine capacity of up to 150 cm³. Modern design, thoughtful and comfortable seat, maneuverable chassis, engine with economical fuel consumption make Honda a favorite of many.
The undoubted advantages of the scooter include a liquid cooling system, a V-shaped transmission, and a 4-stroke engine with one cylinder. Honda mopeds consume approximately 2.5 liters per 100 km, and can reach speeds of up to 100 km/h.
When driving off-road, moped owners often run into sharp objects that can damage their tires. But removing the rear wheel on a Honda scooter can be difficult because of the burnt residue stuck to the splines, which glues the parts together and complicates the dismantling process. In this case, experienced scooter riders advise spraying with WD-40 and then carefully tapping the wheel closer to the center through a piece of wood.
Troubleshooting the Racer scooter
The Racer company entered the world market quite recently. Nevertheless, its products have already attracted the attention of motorists. A distinctive feature of this scooter is the kick starter, which allows you to start it even when the battery is dead. Fuel consumption per 100 km ranges from 2 to 5 liters. The 4-stroke engine has an electronic injection system and can reach speeds of up to 80 km/h.
When repairing wheels, two drum brakes installed at the rear and front make it difficult to remove them. Therefore, the question of how to remove the rear wheel on a Racer scooter is very relevant. To do this, you need to follow the steps described in the “Instructions” chapter, but with one amendment. Before removing the wheel itself, you need to loosen the brake cable, which “sits” on the pads. After this, the procedure should go without much difficulty.
How to install a camera in a scooter tire
I had two unnecessary summer tires and a rim.
In winter, I missed my scooter and decided to make myself “winter” tires, studding them with bolts and nuts. I bought a second disk, as well as the necessary hardware. Since the many holes drilled in the tire do not contribute to its airtightness, I decided to put a tube inside. I did this for the first time, without theoretical preparation, so it didn’t work out right away. I want to talk about this process in detail. So, we have a tire, a wheel and a tube. The tools you will need are a small pry bar and one powerful screwdriver. The screwdriver is used only as an auxiliary tool; all work is done with a pry bar.
Since I had bolt heads sticking out from the back of the tread, I lined the inside of the tire with a soft foam material (I'll write about making winter tires later). But in the normal case this, of course, is not required.
First you need to inflate the camera a little.
Then you need to place the tube inside the tire. An arrow on the side of the tire indicates the direction of rotation. Consider which side is more convenient for you to point your nipple to based on the direction of the splint.
Now you need to take the disk and insert the nipple into its hole. Do not mix up the sides of the disc. The brake is on the left in the direction of travel.
Next, we immerse the disc inside the tire from the nipple side.
Now, while working with a pry bar, you need to alternately pull off the rubber flange on both sides and put it on the seat rim of the disk. You should act gradually, in small steps.
This work must be done extremely carefully, preventing the camera from getting under the tool. Every time you insert the mount under the rim, you need to check with your fingers where the camera is. And move it away from the dangerous point. If you break the camera, you will have to completely disassemble everything and glue a patch.
So time after time we get to the extreme point opposite the nipple. Hop - and you're done.
On one side the tire is mounted. Now we repeat the same thing on the other side, also acting from the nipple.
We are gradually approaching the finish line. We carefully control the process, preventing damage to the camera.
So, the rubber is mounted on both sides. All that remains is to inflate the wheel to about 2 atmospheres. The rubber will sit on both sides of the disc (you will hear a slight pop). Of course, if you didn’t break through the camera while working. Otherwise, instead of popping, there will be hissing... and you will have to take everything apart and start over.
That's all. There are no difficulties, although the work requires strength, nerves and great care.
Please note: This article and the images in it are subject to copyright. Partial or complete reproduction on other resources without permission is prohibited.
Source
How to remove the rear wheel on an Irbis scooter
Another brand of scooters with an engine capacity of up to 150 cm³ is Irbis. The products of this brand are distinguished by their brutal design, two powerful headlights at the front and bright colors. When you see such a scooter on the road, you won’t confuse it with anything else. The largest cubic meter models can reach speeds of up to 90 km/h. Disc brakes bring it to a quick stop under extreme braking. Oil cooling prevents the engine from overheating.
A reinforced suspension with two shock absorbers can cause a lot of problems when removing the rear wheel. To access the tire you will have to first unscrew the muffler mounts and then the rear brake. Irbis scooters are equipped with a monoshock absorber, so there should be no problems in this part.
Preparing to remove the rear wheel of the scooter
dismantling and removing the rear wheel of the scooter by placing the moped on the center stand. We choose a flat surface for this. Before carrying out work, we recommend treating all threaded connections with a liquid such as WD-40 or similar.
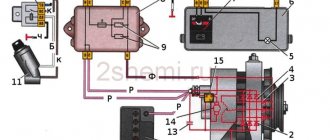
In most cases, to remove a tire, you need to dismantle the muffler with the exhaust pipe, that is, unscrew two nuts from the bottom of the engine (photo above) and loosen the bolts that secure the muffler clamps (position 2 in the figure below).
Removing the rear wheel on a Chinese scooter in some cases (for example, on a Viper Storm 150 with a rear drum brake) does not require dismantling the exhaust pipe, but here everything is individual and even depends on the width of the wheel and tire pressure. In any case, with the exhaust removed, it will be more convenient to remove the wheel rim. By the way, do not lose the paranit gasket, which is installed between the cylinder and the exhaust pipe elbow.
So, after dismantling the muffler, unscrew the lower shock absorber mounting bolt (item 1 in the photo above). We move the stand to the side. Some scooter models have only one rear shock absorber on the variator side, which of course does not need to be unscrewed.
For scooters with a rear disc brake, unscrew the brake caliper (bolts item 4) and move it to the side.
Recommendations from mechanics
You can find many recommendations and discussions on how to remove the rear wheel on a scooter. To make repairs easier, experienced motorists recommend using penetrating lubricant WD-40 (or gasoline in extreme cases), and thoroughly clean the parts from dirt and degrease before installing them. It is also strongly recommended to lubricate the splines with grease. After installing the nut, it is recommended to tighten it firmly, jerkily, but without striking. To hold the wheel in place, instead of a beam, you can use a CVT cover, which will prevent it from turning.
As a last resort, if you are unable to dismantle the wheel yourself, experts recommend contacting the nearest trusted service center. The same should be done if, after removing the parts, you find serious damage to one of them.
Similar chapters from other books
Scooter repair
16. Scooter repair 16.1. Scooter repair. Facings - removal and installation Partial or complete removal of the facings is necessary for most scooter maintenance and repair operations. ATTENTION! The plastic of the scooter is fragile; when removing and installing it, you must
16.1. Scooter repair. Facings - removal and installation
16.1. Scooter repair. Facings - removal and installation Partial or complete removal of the facings is necessary for most scooter maintenance and repair operations. ATTENTION! The plastic of the scooter is fragile; when removing and installing it, care must be taken
16.3. Scooter repair. Air filter - removal, washing and installation
16.3. Scooter repair. Air filter - removal, washing and installation SERVICE INTERVIEWS This operation is recommended to be carried out every 5-6 thousand km of the scooter. Some scooter models use replaceable paper air filters. REMOVAL
16.6. Scooter repair. Battery - removal and installation
16.6. Scooter repair. Battery - removal and installation REMOVAL 1. Using a hex wrench, unscrew the bolt securing the battery compartment cover. 2. Remove the wire from the negative terminal of the battery. 3. Remove the wire from the positive terminal
16.10. Scooter repair. Rear wheel - removal and installation
16.10. Scooter repair. Rear wheel - removal and installation REMOVAL To make it easier to remove the rear wheel, you must first remove the muffler (see p. 108 “Muffler - removal and installation”)1. Place the scooter on the center stand2. Use a socket wrench to unscrew the nut
Read also: Vectra b heater motor
16.11. Scooter repair. Tires - replacement
16.11. Scooter repair. Tires - replacement REMOVAL 1. Remove the cap from the valve and press the spool to relieve pressure in the tire. 2. Remove the wheel (see Front wheel - removal and installation or Rear wheel - removal and installation. 3. Set the tire beads off the landing
16.17. Scooter repair. Dashboard - removal and installation
16.17. Scooter repair. Dashboard - Removal and Installation To remove the scooter's dashboard, you must first remove the front part of the trims (see Facings - Removal and Installation). REMOVAL1. Having disconnected the front part of the scooter facings from the steering wheel, unscrew the two bolts
16.19. Scooter repair. Headlight light - adjustment
16.19. Scooter repair. Headlight light - adjustment 1. The direction of the luminous flux of the headlight is changed by turning the adjusting screw. Adjustment is necessary when the road lighting in front of the scooter is poor, when the headlight beam blinds the driver of oncoming traffic, but
16.20. Scooter repair. Ignition switch - removal and installation
16.20. Scooter repair. Ignition switch - removal and installation REMOVAL Removal of the ignition switch is carried out with the facings of the front part of the scooter removed (see Facings - removal and installation).1. Disconnect the two wire connectors going to the ignition switch. 2. Unscrew two bolts
16.21. Scooter repair. Sound signal - removal, installation and adjustment
16.21. Scooter repair. Sound signal - removal, installation and adjustment REMOVAL To carry out work on the scooter's sound signal, it is necessary to remove the front part of the cladding (see Cladding - removal and installation)1. Remove the terminals of the horn wires. 2. Holding the signal
16.26. Scooter repair. Gas tank and oil tank - removal and installation
16.26. Scooter repair. Gas tank and oil tank - removal and installation Automatic fuel valve: 1 - membrane; 2 - needle; 3 — needle seat; 4 — gas tank; 5 — fuel fitting; 6 — vacuum supply fitting; 7 - spring REMOVAL To dismantle the gas tank and oil tank, you must first
16.27. Scooter repair. Muffler - removal and installation
16.27. Scooter repair. Muffler - removal and installation REMOVAL 1. Holding the fixing nuts with a spanner or socket wrench, use a hex wrench to unscrew the three bolts securing the muffler to the pipe. 2. Using a hex wrench, unscrew the three bolts securing the muffler to the frame and
16.28. Scooter repair. Power unit - removal and installation
16.28. Scooter repair. Power unit - removal and installation REMOVAL Before starting work, we treat the fastening joints that we are going to disassemble with penetrating lubricant, since most of them are constantly exposed to water, dust and, most likely,
16.36. Scooter repair. Starter - removal and installation
16.36. Scooter repair. Starter - removal and installation REMOVAL To dismantle the electric starter parts, you must first dismantle the variator cover, remove the variator belt and drive pulley (see CVT - disassembling and assembling the drive pulley).1. Unscrew the two screws on the front
16.40. Scooter repair. Centrifugal clutch - removal and installation, replacement of pads
16.40. Scooter repair. Centrifugal clutch - removal and installation, replacement of pads. An assistant will be required to perform the work. The variator cover is removed, the V-belt is removed (see Variator belt - replacement). REMOVAL 1. Unscrew the driven pulley nut. This nut is tight
16.43. Scooter repair. Oil seals - replacement
16.43. Scooter repair. Oil seals - replacement Lip seals, or oil seals, are used to seal moving joints of mechanisms, to prevent oil from leaking out of the mechanism and from getting water, dirt and dust into it. The difference between an oil seal and a simple gasket
Results
Every scooter needs repairs from time to time. Malfunctioning of a vehicle not only interferes with a comfortable ride, but also endangers the life of its driver. Repairing a scooter with your own hands is quite simple, if you sit down first and properly understand the details. Sometimes the process may stall at some element, then it is recommended to carefully follow the entire sequence of steps from the very beginning - perhaps a mistake was made somewhere. When replacing a rear wheel, you need to take your time and be careful, and then you will succeed.
Good luck with the repair and good luck on the roads!
Wheel trim
In what cases is tire replacement required:
- Product wear and non-compliance with tread height standards. Typically the standard is 0.8 mm.
- Tires have defects: cracks due to aging or mechanical damage and punctures.
- Presence of tubercles. Blisters appear when driving under high pressure or during an impact. The normal value is 2 atm.
How to install new tires:
- One bead of the tire is placed on the rim. If a camera is used, then sprinkle it with talcum powder and place it inside. The hole must be completely blocked by the valve without displacement. Now you can bead the tire using mounting crowbars. Next, inflate the tires with a regular pump to the standard recommended by the factory for the specific scooter model. These pressures should not be increased.
- If the tire is without a tube, a special compressor is required. To carry out the procedure, you need to deliver a large amount of air in a short period of time.