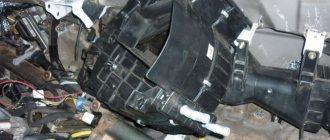
The VAZ 2190 car is initially equipped with an alarm system. Unfortunately, in the Lada Granta the door switch is installed only near the driver. This creates inconvenience when boarding and disembarking passengers at night, since the interior lighting does not turn on. Also, the absence of an additional signal will not allow you to detect a car thief or thief when trying to open the back door of the Lada.
Characteristics of door limit switches Grants
Apart from the driver's side, there are no door limit switches on the Lada Granta in other opening structures. There aren't even any buttons or standard wiring. The operation of these mechanisms determines the activation of the door open lamp, which lights up on the dashboard. Moreover, the interior light and car alarm react to the actions of the driver or passenger. The average cost of limit switches starts from 150 to 200 rubles. Article 1118-3710199 is the original number and its price is lower than its analogues. The Lada Granta has this device, but it all depends on the modification:
- The “Norma” package implies the installation of this device in all door structures.
- The “Standard” package does not imply the presence of limit switches on the seats. There they are replaced with plugs.
- The “Lux” package will delight the buyer with a full set of sensors, even a rear one.
The activation sensor transmits information using light indicators.
Vehicle configuration
Many Lada car owners are faced with factory defects. The modern Granta model was no exception. After purchasing a vehicle, the owner discovers flaws in the alarm system and interior lighting. At the first inspection of the Lada Grant, it turns out that either there is no standard wiring to the door limit switches, or there are no buttons at all.
Electromechanical devices complete a circuit when the door is opened. In this case, power is supplied to the interior lamp. At the same time, a pulse is sent to the signaling circuit. But AvtoVAZ decided to save on such “little things” as limit switches. Owners of a new car need to eliminate these shortcomings themselves.
There are differences in the alarm connection diagrams between different configurations of the VAZ 2190:
- Standard. Instead of buttons, plastic plugs are inserted into the seats. There is no wiring in this modification.
- Lada is normal. The limit switch is on the driver's door, and the remaining mounting holes have plugs, but wiring is installed.
- VAZ 2190 luxury. There is a complete set of end elements in all doors. But only the driver's limit switch turns on the lighting lamp and the door open indicator on the dashboard. When the passenger door is opened, only the lights will come on.
Installation of limit switches on Lada Granta
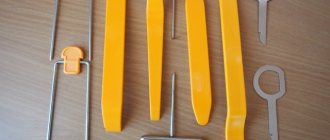
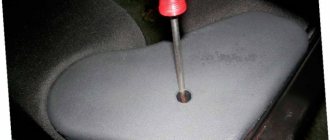
An activation sensor in all doors will provide additional comfort. To carry out the installation procedure, you will need special equipment and available materials: lubricant, rubber tips, screwdriver, rag.
Step-by-step algorithm of actions:
- Remove the rubber tip.
- Open the housing and remove the limit switch.
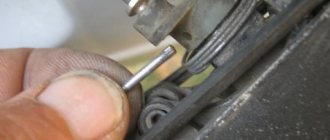
- Remove the block with wires and disconnect.
- Install a new sensor.
- Reassemble.
After the basic steps, you need to check the functionality of the device. To connect the limit switch to the power circuit, you will need to connect two terminals: first “+” and then “-”.
If you need to replace the trunk limit switch, then the instructions are identical, you just need to open the trunk lid.
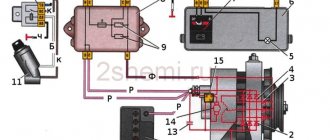
Connection points and alarm installation maps for Lada Granta
Ignition switch: +12 – brown ign1 – blue/black starter – red
Instrument panel: turns – blue and blue/black handbrake – brown/blue (diode breaks)
Driver's threshold: driver's limit switch - red/green, we connect the rest of the doors to it
Under the hood: Tahoe - white/black on the ignition module, the hood tip is in its normal place
Trunk limit switch – we install the connector on the trunk (the limit switch is already in the lock).
central locking .
Photo report on connecting a car alarm to a Lada Granta Luxury package
On the ignition switch: +12 - pink starter - red ignition - blue/black
We connect to the central locking in the driver's door according to the figure below.
We connect to the tachometer on the small connector of the electric power steering - brown/red wire.
In the left threshold we connect to the door and trunk limit switches , turns , and handbrake .
We connect to the hood terminal in the harness that goes under the hood behind the mounting block - white/black wire.
To block, you can use the fuel pump - the gray wire on the back of the mounting block.
To remotely unlock the trunk, connect the negative wire to the red/white wire on the trunk release connector.
Photo report on installing a car alarm on Lada Granta 2011
Photo 1. A mounting block is shown, which is very difficult to remove, since the power steering interferes with unscrewing the screw. But you won't need to do this for installation.
Photo 2. Central locking relay. And we don't need it for installation.
Photo 3. Ignition switch, traditionally VAZ.
Photo 4. Left threshold, in which we take: turns - blue and blue/black; handbrake - brown/blue; fuel pump - gray (there are two of them, don’t confuse them); driver's door - brown/green (and here's the ambush, there are no passenger limit switches and, what's more, having opened all the thresholds, I didn't even find the wiring for them).
Photo 5. The instrument panel, in which you can take the handbrake - brown/blue, and the driver's door, which is already red/green here. An alarm unit can be placed behind the shield; there is plenty of space.
Photo 6. The engine ECU is shown, it is located behind the glove box, from which (right connector) you can take the generator signal - brown / blue.
Photo 7. We attach it to the trunk end - white/black. We put a diode in the gap.
Photo 8. We install the “Eureka” limit switch in the engine compartment in its normal place.
Photo 9. A drive must be installed in the driver's door. The corrugation from the pillar to the door comes from Kalina, you need to disconnect the connector and drill a hole in both halves in the center with a 6mm drill and pull through the wires for the drive.
Finalization of the scheme
The installation or modification scheme will require special equipment to test the electrical circuit. The first place on the list of accessories is a tester and a soldering iron. You will also need a screwdriver, additional wires, electrical tape and a new sensor. When connected, the driver can use the button in the threshold or the door lock contacts.
To do this, you first need to open the sensor housing with a screwdriver and remove the element, remove the block with wires using a screwdriver. Then replace the wire and solder. Insulate the ends and assemble the structure in reverse order. The process is carried out in parallel so that the process involves elements that go to the working positions of the door.
To measure the circuit resistance with a tester, you need to alternately press and release the spherical protrusion.
Method No. 2 (limit switches in locks)
Required
: 4 meters of wire, terminals from the ISO connector of the radio, remove the door trims.
- Remove the block by pressing on the plate.
- Open the plug on the connector.
- Insert the terminals into pins 1 and 3 until they click.
- Remove the block, pull the fungus down.
- Open the plug on the connector.
- Insert the terminals into contacts 1 and 4 (or 4 and 6 depending on the configuration and year of manufacture of the vehicle) until it clicks.
We connect the limit switches parallel to the driver's door limit switch (you can have one wire to ground, the other to the driver's door limit switch).
If you cannot disconnect the connector without removing the lock:
- Remove three bolts securing the lock and one bolt securing the glass guide.
- Remove the door handle and door lock button.
- Disconnect the rods and remove the lock.
source
Design solution to the problem
When replacing or connecting, you only need to restore the originally designed circuit. If no modifications are carried out, then the need to disassemble the locking mechanism and use insulating materials is immediately eliminated. Step-by-step instruction:
- Open the hood.
- Loosen the bolt connections and disassemble the device.
- Unscrew the terminals.
- Connect the wires from the battery.
- Pull the limit switch out of the hole.
- Pull out the switch.
- Stretch the wires and connect them.
- Bring the ends out through the hole.
It is important that the wires are no shorter than ten centimeters.
- Strip the wires.
- Stretch the wires to the threshold to the installation site.
Operating principle of limit switches
Depending on the configuration, the Lada Granta can be equipped with one limit switch (driver's door only) - Standard equipment, or 4 limit switches - Norma+ and Luxury equipment.
Indeed, many Lada Granta car owners have replaced the limit switches in the threshold with switches in the door lock. In winter, limit switches in thresholds often do not respond to door opening due to loss of elasticity of the rubber cap. Also, sometimes there are cases when the limit switches of a Lada Grant in the thresholds themselves trigger when the car turns sharply, when the door may move slightly away from the body.
Switching to limit switches in the door lock eliminates these problems, and it can be done in-house. This will require additional wiring and plugs.
Removing the old limit switches
The old limit switches in the thresholds are removed quite simply. Depending on the design, they are attached either to rubber antennae or to a self-tapping screw.
- In the first case, you just need to carefully pull them towards you, since the switches are held in place by fixing tendrils.
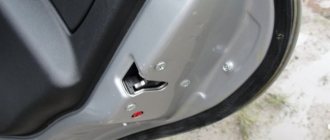
Limit switches with “antennae” type fastening, such limit switches are located on the driver’s door
In the second case, you need to unscrew the end screw.
Self-tapping screw for fastening the end switches, pay attention to the gaps from the end switch to the body
Driver's door switch
On all four doors the principle of removing the limit switches is the same. True, on Grants in the “Standard” and “Norma” trim levels, only the driver’s door limit switch is installed from the factory, while the rest have rubber plugs in the thresholds. The same plug can also be used to seal the empty hole from the left front door end switch removed from the threshold.
Only the driver's door switch is installed from the factory.
Above we wrote about the option of limit switches with a self-tapping screw; this is usually done when they want to install limit switches on all doors. In this case, three limit switches are purchased and paralleled to the driver's door to the positive wire, and the negative wire is a self-tapping screw that will be powered from the car body.
Repair of limit switches
I am inclined to believe that as soon as AvtoVAZ solves the problem with the limit switches, as soon as they start working, then the Lada can become a good car.
This problem dates back to the first Samara, where the quality of individual spare parts was very poor. Owners of nines will confirm that the limit switches there were defective, and here on the Lada Granta, the limit switches were made by the “enemy of the people”. Look what happened to them after three years of operation.
Source
Troubleshooting
Drivers may encounter various types of malfunctions. Even though the sensor is protected, it is not as reliable as the manufacturers claim. In addition to silicone lubricant, other measures can be used:
- Install the spring under the rubber cover. If this element is elastic, it will protect the mechanism even at very low temperatures.
- Remove the protective caps for the winter, but there is a danger that the element will quickly become clogged with dust and dirt.
- Treat with protective liquid.
Often drivers replace their original limit switch with a part from another manufacturer or install a boot. In this case, the body of the new element is inserted into the standard connector and secured with a self-tapping screw.
Methods for solving problems with door limit switches
We will look at a number of fairly simple ways to solve the problems described above, which every car owner can easily put into practice. Thus, if problems arise caused by the operation of limit switches in the winter months, you can resort to the following methods:
- Remove the anthers from the limit switches. Remember that these rubber caps serve a protective function, and therefore when removing them you will have to be very careful about cleanliness. It is recommended to remove the anthers only for a short time, in frosty weather outside.
- Replace the “original” caps with analogues. Anthers from other end caps, for example, Toprun, which are practically a copy of the original Granta caps, are suitable as analogues. However, these anthers are made from materials that do not lose their elasticity at sub-zero temperatures, which is their undoubted advantage. You do not need to change the end switches themselves, only the caps should be replaced.
- Install a spring under the switch boot. For this purpose, springs with a length of approximately 18-20 mm and a diameter of 12-13 mm with a wire thickness of 1 mm can be used. They need to be installed on the limit switch rod, directly under the anthers. A good spring will not allow the cap to be constantly in a compressed state and will not let you down even at a temperature of -40C.
- Lubricate all rubber surfaces with silicone, this will help in relatively mild frosts (about -10C or less).
- Treat the surface with a water-repellent liquid. This measure works in a fairly wide temperature range (up to -50C), but is purely temporary.
How to extend service life
Craftsmen are constantly coming up with new ways to extend the service life of factory elements. Some people put coins under the rubber band, fasten the parts with tape, or insert washers. To prevent the switch from freezing or becoming deformed, there are several effective techniques to consider:
- Spring insert.
- Replacing standard caps with elements from foreign manufacturers.
- Silicone Grease.
You should not assume that these actions will grant immortality to the limit switch, but these measures will significantly increase its service life.
Review of Manufacturer Prices
| Name/article | Price, rub.) |
| Limit switch with cap 1118-3710199 | from 160 |
| 11190-3710200 | —/— |
| Rubber cap 11190-371020600 | from 35 |
| 104035756 | from 175 |
| Dello 3094705636N0 | —/— |
| Hans Pries 104035756 | —/— |
| 11190-371020000 | —/— |
*prices are current as of 10/07/18.
The service life of factory rubber caps is limited, only 1.5 - 2 years. The reason lies in the low quality of materials. In winter, drivers often encounter freezing of the limit switch and hardening of the rubber cap. As a result, lighting activation is delayed. The central lock often blocks the doors due to unstable operation of the limit switch. There are several ways to troubleshoot the problem, which we will discuss below.