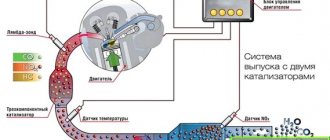
Design features of car headlights
Today, the most popular type of optics tuning is the installation of bi-xenon lenses. They not only improve the light of the headlights, but also give the car a completely different look. In this article we will look at the process of installing bi-xenon lenses yourself using the example of a Daewoo Lanos car.
It was not for nothing that Lanos was chosen as an example. The fact is that lenses cannot be installed in any headlights, but only in those whose glass does not have a pronounced diffuser. Take, for example, the standard headlight of a VAZ 2107. Its glass on the back side is covered with special “ribs”, which are designed to diffuse the light of the lamp so that it does not blind drivers of oncoming cars. The same situation applies to other VAZ models. No, you can install lenses on both the Zhiguli and the Samara, but for this you will have to buy other headlights. Otherwise, you will not achieve the desired effect.
On the inner surface of the standard VAZ 2107 headlight there are special “ribs” that scatter light
But the Lanos has headlights like those of foreign cars - they also have a lens, but the glass in the center is almost smooth. In addition, it is not glass at all, but a special heat- and shock-resistant plastic.
The headlights of the Lanos have almost smooth glass in the center
In all other respects, the Lanos headlights are no different from the headlights of other cars. Their design consists of:
- housings with holder;
- diffuser (glass);
- light sources (lamps);
- reflector (reflector);
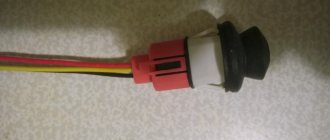
- electrical connectors and wires.
There are three lamps in the Lanos headlight:
- side lights;
- head light;
- direction indicator.
The main lamp of the Lanos headlight is double-filament, i.e., when switching the “low/high” modes, one specific filament works. The light emitted by the lamp is not focused by anything here, but is simply “collected” by the reflector and directed forward.
The Lanos headlight lamp has a two-filament design
Installation examples
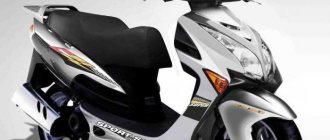
The leaders in installation are domestic cars VAZ 2114, VAZ 2110, Priora. Among the foreign cars are BMW, Mazda 3, BMW E39, Ford Focus. They are also actively installed on motor vehicles, scooters, motorcycles, and ATVs.
..
BMW, BMW
BMW photo
BMW
VAZ 2114
Photo of VAZ 2114
Among domestic cars, the second place in popularity is occupied by angel eyes on the VAZ 2114, the first place is shared by Priors and VAZ 2106, which have round reflectors.
VAZ 2110
Eyes SMD3528 for VAZ 2110
Kalina VAZ
Mazda 3, 6 Mazda 3, 6
Among imported cars, angel eyes are popular on the Mazda 3, Mazda 3. They look especially chic on the Mazda 6, which has 4 circles in each headlight. The RGB LED rings will look interesting and will complement the dimensions of the turn signal.
Mazda 3
Mazda 6
Priora VAZ 2170
The most popular option in Russia is angel eyes on the Priora. The shape of the headlights is well suited for such tuning; the reflectors are round in shape.
Ford Focus, Kuga
The article consists of two parts, this is part No. 2. Read the beginning in part No. 1. How to choose LED eyes
Can I use red lenses?
Technically, the backlight can be any color, but don't choose blue and red. Traffic police officers regard the use of such colors in optics as an imitation of “flashing lights”, and will definitely want to talk to you about this. In extreme cases, they may even take the car to the impound lot. They react calmly to white, yellow or orange “angel eyes” (in most cases). Multi-colored lights are often considered by traffic police officers as a challenge and immediately cause an appropriate reaction.
What are the penalties for violation?
For those who like to argue, here are excerpts from the traffic rules.
For those who are slow-witted, sanctions are provided in the form of fines:
- for citizens - 2.5 thousand rubles;
- for officials - from 15 to 20 thousand rubles;
- for legal entities - from 400 to 500 thousand rubles.
In addition, unauthorized devices and devices are confiscated. The violator also faces a ban on the operation of the vehicle with the removal of the seal.
Traffic police inspectors will probably issue a fine for such tuning.
Why are owners of cars with such tuning fined?
Owners of cars in which such tuning is legally included in the vehicle package should not be afraid of claims from law enforcement agencies. Everything here is legal, correct, fair. But when installing it yourself, you need to be guided by legal acts regulating the lighting of the front and rear of the car. In traffic rules, codes of offenses, government regulations and GOSTs regulating safety requirements for technical condition, angel eyes are not directly mentioned anywhere.
But there is a legal requirement according to which white lights can be used on the front of the car (dimensions and headlights), as well as orange lights for turning lights. Eyes of other colors are not allowed and will result in a fine.
Blue color is outlawed
Therefore, there is no need to install yellow, red, green, purple and other colors in the headlights. We can advise all drivers CAUTION: you need to install angel eyes CORRECTLY, although even this advice does not guarantee problems when passing a technical inspection.
Possible problems with headlights after conversion
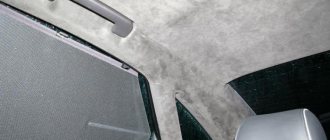
It often happens that after disassembling the headlights, they begin to “sweat”. Small drops of condensation appear on the glass, and water collects at the bottom of the headlight. It is not recommended to drive with such a problem, since the headlights lose their light characteristics, and moisture has a destructive effect on the reflector, lamps, and electrical connections.
Headlights “sweat” due to depressurization
The reason for the headlight “sweating” is its depressurization. Moisture from the air penetrates into the housing, where, under the influence of the temperature created by the lamp during combustion, it turns into condensation.
You can get rid of water droplets only by disassembling the headlight, drying it and further reassembling it using sealant. Additionally, you can place a couple of bags of absorbent or silica gel in the headlight housing, which are used for storing food, clothing, and shoes.
Silica gel will help cope with fogging of headlights
Depressurization of the headlight threatens not only its “fogging”. If the gap between the glass and the housing is significant, dust will also get into the headlight. It will settle on the elements of the headlight, including the lens. The only way to get rid of this problem is by disassembling the headlight and cleaning the lens. To do this, it is better to use medical alcohol and a clean cloth that does not leave lint behind. After cleaning, it is advisable to blow out the headlight housing with a compressor to completely remove dust.
Installing angel eyes with LEDs on headlights with lenses
Angel eyes are sold in different sizes, usually from 60mm to 120mm. The LED angel eyes set contains rings with LEDs, one controller with a connector, and a remote control for changing the color of the angel eyes, including blinking modes. Diffuser caps can be added to the rings for a more traditional, uniform appearance.
“Angel eyes” in headlights with lenses are installed on the housing. It can be pre-painted black to make the rings more visible.It is recommended that the rings be attached at three points at equal intervals. To attach the luminous rings inside the headlight, glue, double-sided tape or special wire are used. Glue has its drawbacks. Vibrations from driving and heat can weaken the adhesive bond. Double-sided tape cannot always be used, since there is not always a suitable surface inside the headlight for secure fastening in this way. It is better to use thin wire for hanging pictures. You need to drill small holes on the lens housing and screw the rings with wire. If you do everything carefully, you get an almost invisible fastening unless you look closely. The advantage of this method of fastening is that it is very reliable and does not weaken from vibrations and heat.
If you choose an adhesive connection as a method of attaching the rings, then apply a thin layer of glue to the back of the ring and to the reflector, in the place where the ring will be installed. Let the glue dry for 10 minutes before pulling the wires through. Gently press the ring into place for 5 minutes. Try not to move the ring until the glue dries.
Will angel eyes replace daytime running lights?
The question of whether it is possible to drive with “angel eyes” instead of DRLs was actively discussed several years ago on all thematic forums. Opinions varied, but most drivers were inclined to believe that “eyes” do not replace running lights. Although in practice, traffic police inspectors almost never pay attention to cars tuned in this way.
Legality of using "glow rings" instead of DRLs
The answer is also mixed regarding the use of “glow rings” instead of daytime running lights. DRLs must be a separate device, so you cannot use dimensions instead of them (clause 19.5 of the traffic rules). “Angel eyes” are located inside the headlight and act as dimensions. In practice, if the brightness of the modernized dimensions is good, then the police will not fine you for them, but it depends on your luck.
Are Angel Eyes Daytime Running Lights? Traffic police inspectors are sure that no
Ring connection
First of all, it is worth considering the rules for using light lights. The “angel eyes” themselves can be classified as daytime running lights. In this case, it is necessary to make the connection in such a way as not to violate the requirements of GOST R 41.48.-2004. This means that the rings and the DRLs themselves must turn on as soon as the engine starts and, accordingly, turn off when it stops.
In this regard, you need to adhere to a certain connection scheme. There are two ways to solve this issue:
- You can use a 5-pin relay and female terminals (you need 4 pieces). In this case, the negative wire of the “eye” is connected to the machine body, and the positive terminal is soldered, after which it is connected to contact No. 30. After this, you need to find the wire under the hood that connects the “dimensions” and the switch. Contact No. 85 is connected to the “+” of the side lamps, and No. 86 is connected to the housing (that is, the relay will be powered simultaneously with the “dimensions”). You will also need to make one more wiring, which will go from “Ignition + 12V” to contact No. 87a. When the ignition is turned on and the dimensions are on, +12V reaches the “eyes” through the closed contacts of relays No. 87a and No. 30 and they begin to burn. As soon as the size switch is turned to the “off” position, the relay is de-energized, and contacts No. 87a and No. 30 open. In this case, the “angel eyes” will go out along with the “dimensions”, as required by GOST. If rings are purchased ready-made, then a current stabilizer is usually included with them. It must be connected between the 30th pin of the relay and the “eyes” themselves. If there is no current stabilizer, then it is better to purchase one, as this will help avoid situations when a voltage surge occurs in the on-board system and devices fail.
- Connect “angel eyes” through the DRL controller. It can be purchased at any specialty store. Then the assembly will be carried out in accordance with a specific diagram, which is demonstrated in detail in the instructions for the device.
If we talk about which connection method is better, then, of course, it is much more convenient to use the DRL control unit. It will help protect against possible overloads. In this case, homemade “eyes” will last much longer.
Types of bilens
Bi-xenon lenses are distinguished by size and generation into the following types:
- G-1 - first generation regular round lenses. They have a diameter of 80 mm and are designed for installation in headlights with an H-type socket. The standard G-1 kit includes two lenses with decorative lighting “angel eyes”, two lamps, mounting elements;
- G-3 - third generation universal bi-xenon lenses. They have a round (sometimes oval) shape (diameter 110 mm) and can be installed in headlights with sockets of type H1, H7 and HB4. The kit includes the same items as the G-1;
- G-5 is the smallest lens. Their diameter is only 64 mm, but their characteristics are in no way inferior to previous generations. G-5 is also universal and can be installed in headlights with H1, H4, H7, HB4 sockets. The composition of the set of these lenses may vary. It all depends on the manufacturer.
First option
Often, when motorists want to make homemade angel eyes, LEDs are used. They perfectly complement the main beam headlights, and their installation does not cause much difficulty.
As for the set of materials and tools, here you will need to take:
5 mm white LEDs;
- a resistor of approximately 330 Ohms and 0.25 W;
- wires for connection;
- plastic rod;
- or a plexiglass rod (diameter from 8 to 10 mm);
- jar or lid (1-3 liters);
- drill with adjustable speed;
- soldering iron;
- silicone glue;
- construction type hairdryer.
Take a rod of suitable length to make a ring out of it. You will need to make holes on the end sides for installing LEDs.
To avoid damaging the rod, it is recommended to wrap it in polyethylene or fabric and then fix it in the machine. This will ensure immobility and the ability to carefully make indentations without scratches.
Typically the holes are made with a diameter of about 6 millimeters. The depth depends on the design of the tube itself. But it is better not to exceed the value of 10 millimeters. To make the body take the shape of an optical device, you can take a jar or a lid from it. By bending around the jar, you will get a perfectly even ring. It is important that the diameter matches the internal diameter of the headlight itself on your car. Using a hair dryer, the body heats up and bends around the jar or its lid. There is no need to completely connect the ends of the tube to each other.
At the next stage, diodes are installed. Here you need to solder a wire of a suitable length to the terminals, which is enough to connect to the power wires outside the car headlight housing. A resistor is soldered onto one wire. As a result, you need to assemble an electrical circuit of LEDs with a serial connection and the resistor itself.
Now insert the diodes into the holes of your tube and secure with glue. The number of LEDs is determined individually.
In this case, you should not count on a bright glow and the ability to replace DRLs. The option is rather decorative.
Why do we need such headlights and how to choose them
The main role of “angel eyes” is aesthetic
A car with upgraded headlights attracts attention, especially at night. There is also a practical component: your car will become more visible to other road users
According to the type of design, there are two types of “eyes”:
- LED or light-emitting diodes - work normally at sub-zero temperatures, have a long service life and, if connected correctly, rarely fail. Ready-made kits are expensive, but you can make them yourself and save several times. You can create “eyes” using plexiglass, LED strip or individual LEDs. The first option is the most accessible and least labor-intensive. We will look at this in our guide;
- CCFL or neon - they shine more evenly (there is heated gas inside the tube), but less brightly. They do not like frost and reach maximum brightness only after 2–3 minutes. To work, you need ignition units, which are fragility. The main advantage is the low price of ready-made kits.
The installation of “angel eyes” literally transformed the Lada Priora
Third method
In theory, it is the simplest, since you are simply buying a ready-made device, which has a diffuser, an ignition unit and other necessary components. It’s just important to choose a quality product, since the Internet offers many options that are not of the best quality.
Eyes based on CCFL rings have proven themselves to be excellent. They have high reliability indicators and are in many ways superior to their LED counterparts.
If we talk about Aliexpress, then I would not advise you to buy ready-made angel eyes based on LEDs. Low-quality products are used here, which can quickly overheat when the head optics are turned on. As a result, in less than a year they will have to be removed due to the significantly reduced brightness level.
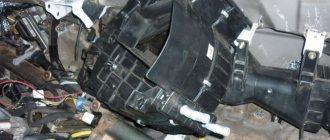
Disassembling headlights
- First you will need to remove both headlights from the car. Remember how everything was attached and connected and collect all the fastening parts in some kind of container so that nothing gets lost.
- It is necessary to remove everything removable from them, since the headlights will need to be heated in the oven.
- In order to disassemble the headlights, they need to be heated and the sealant that connects the two halves softened. Preheat the oven to 130-150 degrees and place the headlight inside. It should stay inside for about 7 minutes. You need to be careful not to overheat the headlight. When removing the headlight from the oven, use an oven mitt to avoid getting burned. Instead of an oven, you can also use a hair dryer.
- Next, you need to immediately carefully divide the headlight into two parts. For more information about disassembling a headlight, read the article “how to disassemble a headlight.”
How to connect a voltage stabilizer (optional)
In the electrical on-board network of the car, the voltage “walks” from 12 to 16 volts. And LEDs do not tolerate such changes well. We soldered a resistor to each LED to regulate the voltage. But for more reliable protection you need a special stabilizer. It’s easier to buy a ready-made version and arrange it into a connection between the “angel eyes” and the on-board network of the car.
Factory version of the voltage stabilizerIf you are an “advanced” electrician, you can solder a simple stabilizer yourself. The L7812CV chip is used as a basis. See the photo below for the connection procedure.
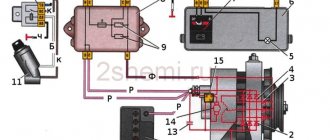
The connection diagram is quite simple
According to this scheme, you need to connect the negative contact of the LED to the ground of the car, and the positive contact to the output of the stabilizer.
Video: connecting a voltage stabilizer for LEDs
The procedure for making and installing “angel eyes” is not easy. Before starting work, evaluate your abilities and capabilities to avoid possible additional costs. Consider whether your actions are legal and what consequences they may lead to. Neatness and cleanliness are required for successful completion of optics tuning. But everyone will notice your efforts.
Step-by-step instructions for making “angel eyes” for cars
First of all, you need to remove the headlight and dismantle the glass. To do this, heat the edge of the headlight glass with an industrial hair dryer to warm up the factory sealant. As an alternative method, you can put the headlight in the oven for 10–15 minutes at a temperature of 60–80 degrees. Then carefully pry the glass along the seam with a flat-head screwdriver until it begins to separate from the headlight. Most likely, you will have to make some efforts, but without “fanaticism” (the glass may break off or burst).
Preheat the sealant and be careful - the glass may break off when removed from the headlight.
The next step is to measure the exact diameter of the required ring and select the appropriate shape. A tin can, bottle, cup or other round object is suitable for this. Just keep in mind that the plastic will have to be very hot for it to begin to bend, so use items that are resistant to high temperatures.
Use pliers and gloves to avoid heat burns
Heat the plastic with a heat gun or in the oven. Please note that the melting point of organic glass is 160 degrees, do not exceed it. Then use pliers to wrap it around the can. Do not let go for 2-3 minutes so that the plastic cools and takes shape.
Now cut off the excess ends and drill holes according to the size of the LED along the ends of the tube.
Drill a hole in each end of the tube
It's time to prepare the LEDs themselves. Connect their positive legs to resistors. As a last resort, you can do without a soldering iron by simply twisting the parts together and clamping them with pliers. But over time, the wire will become disconnected due to constant vibration, and then you will have to disassemble the headlight again.
Connect resistors to the positive terminal of the LED
Connect the negative legs together and further extend them with a two-core wire. Calculate the length so that you can connect to the contacts of the dimensions.
Solder together two negatives and an extension wire
Connect the two negative terminals to the extension wire. Watch the insulation so that the “plus” and “minus” do not connect. It's time to check the functionality of the design. The easiest way to do this is with a 9-volt battery. This can be done simply by connecting the “positive” and “negative” wires to the corresponding battery contacts. If everything is in order, then you can proceed to assembly.
Make sure all connections are secure
Finally insulate all contacts with electrical tape and insert the LEDs into the previously prepared holes at the ends of the tubes. Secure them in place with glue.
Insulate all contacts and connect the LEDs to the ring
For a more dramatic look, make notches on the back of the ring.
Photo gallery: installing LED angel eyes
Now place the finished rings in place. If adjustment is not required, then connect the contacts to the size wires and finally glue the ring. Use a two-part epoxy glue or something special for plastic. The main criterion is excellent adhesion strength so that the part does not fall off later due to constant vibration during movement.
Observe polarity when connecting
Avoid getting excess adhesive on the reflector. You can use small pieces of double-sided tape as an alternative method of fastening. But for good adhesion you need expensive adhesive tape, and its white parts will be visible when illuminated (depending on the design of the headlight).
We install the “angel eyes” in place
The last step is gluing the glass and installing the headlight in its intended place. Apply a moderate coat of sealant around the perimeter of the headlight and attach the glass.
Apply new sealant to the bonded area
Use clamps or other available tools to secure the glass in place. It should fit tightly and dry for about a day (see instructions for the sealant).
Drying time of the sealant is at least 24 hours
How to make good “eyes” with your own hands: tools and materials
Tools required for work:
- an industrial hair dryer - you can also cope without it, but it will be much more difficult;
- pliers;
- flat screwdriver;
- soldering iron - you can use twisted ones, but such a connection will be unreliable;
- electric drill;
- thin metal file;
- gloves;
- tin can or other round shape.
Materials used:
- 4 LEDs at 3.5 volts;
- 4 resistances (resistors) at 220 Ohms;
- insulating tape;
- 2 plastic plexiglass tubes;
- sealant for fastening the headlight glass;
- two-component epoxy adhesive.
Responsibility for alteration of headlights
There is a false opinion that xenon is prohibited in Russia. Actually this is not true. According to the Administrative Code of the Russian Federation, it is prohibited to drive vehicles whose lighting devices do not meet the basic requirements of the Regulations on the admission of vehicles to operation. In other words, altering headlights designed to use incandescent or halogen lamps with the installation of xenon light sources entails administrative penalties. By the way, there are no fines for this. Part 3 Art. 12.5 of the Code of Administrative Offenses for such an offense provides for punishment in the form of deprivation of the right to drive vehicles for a period of six to twelve months with confiscation of lighting devices. So you should think three times before tuning your car’s lighting system.
As you can see, installing lenses is a rather complex and time-consuming process. But the effect of lensed headlights will truly surprise you. As for the legality, it’s up to you to decide whether to drive with old headlights, tune them, risking being deprived of your license, or buy factory lighting fixtures with the appropriate optics.
Results
With this method we get real angel eyes that glow with a continuous LED ring. If you attach the LEDs to the tube with electrical tape, then inside the ring there will be a gap without light, which will negatively affect the aesthetic appearance.
As you can see, the process is long and painstaking, but there are no particular difficulties here. You need basic knowledge of electrical engineering and tools, which should be available to every motorist working on his vehicle.