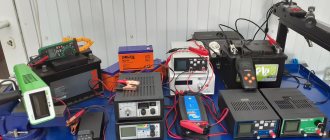
Health Check Tools
First you need to remove the battery from the car and wipe it well from dust.
Next, you need to prepare a number of measuring instruments necessary for the test. Among them:
- multimeter;
- load fork;
- hydrometer;
- several screwdrivers.
To understand the level of acid solution in the containers, you will need a hand-held flashlight. After preparing the listed devices, you can begin checking the health of the battery.
How to use a loading fork - brief instructions
Before you independently check a car battery with a purchased load fork, we recommend that you familiarize yourself with the algorithm of actions using the example of the popular Orion NV-01 device. The sequence consists of the following steps:
- at the first stage, measurements are taken at idle, with the load spirals removed from the chain;
- We attach the alligator clip to the negative terminal;
- Using a measuring probe, touch the positive terminal of the battery;
- We record the current voltmeter readings and compare them with the values from the table.
The second stage of measurements should be carried out with a connected load in the form of resistance spirals. Let's find out how to use a load fork in such circumstances:
connect the probe marked “H” to the positive terminal; hold in contact for about 5–8 seconds; quickly disconnect the connection to prevent overheating and fire; We record the voltmeter value and compare it with the table values.
It would be correct to use a table for load tests.
| Voltage | Approximate charge level |
| more than 10.2 | 100% |
| 9,6 | 75% |
| 9 | 50% |
| 8,4 | 25% |
| less than 7.8 | 0% |
We draw conclusions about the condition of the battery based on the obtained parameters. In some cases, the charge level will be below standard values. The result of this may be a short circuit in the banks. When measurements under load differ significantly from the unloaded state, there is a high risk that the plates are already damaged, and the result is the inability to deliver large currents.
What can you check in the battery?
The battery is a relatively complex device, so checking its health includes testing a number of characteristics, including:
- voltage;
- current strength;
- capacity;
- self-discharge current;
- electrolyte level in reservoirs;
- electrolyte density.
To obtain detailed information about the health of the battery, you should analyze all parameters. However, often just one measurement is enough to understand whether the battery is working.
How to find out the battery charge by the density of the working fluid and the “green window”
The battery mixture characterization method only works with serviced power supplies. It is good for owners of cars with this type of battery, since many of them have to deal with electrolyte. Usually in the arsenal of the owner of such a machine there is something to determine the density of the liquid. A hydrometer serves this purpose.
To obtain the value, the device is immersed in the working mixture through the opening of the jar. The sample is collected using a bulb. The density is determined using the scale on the flask. The corresponding mark is indicated by the upper electrolyte level. To check the discharge, you need to calculate how much the result obtained is less than the nominal value. Every 0.01 g/l corresponds to a loss of about five or six percent. For convenience, you can use the table.
| Density at 100% charge, g/cm3 | Discharge density, g/cm3 | |
| 25% | 50% | |
| 1,29 | 1,25 | 1,21 |
| 1,28 | 1,24 | 1,20 |
| 1,26 | 1,22 | 1,18 |
| 1,24 | 1,20 | 1,16 |
| 1,22 | 1,18 | 1,14 |
The different nominal densities are due to different ambient temperatures. The higher the second one, the lower the first one. Let's look at how to test a car battery using a hydrometer. First you need to know the characteristics of the working fluid. The most common value is 1.27 g/cm3. For example, the electrolyte level in the flask is set at 1.23. The difference is 0.04 g/l. 0.04/0.01=4. 4*5=20% About 20 percent - this is how much energy is lost.
The permissible degree of discharge does not exceed 50%. If the battery test shows a value less than that, then you just need to recharge it. But the density changes depending on the temperature during measurement. An appropriate adjustment must be made for this.
- At temperatures from -55 to -45, reduce by 0.05 g/l;
- From -40 °C to -25 °C - by 0.04 g/l;
- From -25 °C to 11 °C - by 0.03 g/l;
- From -10 °C to -4 °C - by 0.02 g/l;
- From 5 °C to 19 °C - by 0.01 g/l;
- From 20 °C to 30 °C does not change
- From 31 °C to 45 °C increase by 0.01 g/l;
- From 46 °C to 60 °C - by 0.02 g/l.
There is an alternative option to check a maintenance-free car power supply. It is also not universal. There are batteries equipped with a built-in indicator, which is called a “green window”. The latter is located on the side or in the center of the device.
This is the most convenient - no additional devices or actions are required. But not everyone will like the price of the issue. A battery without a built-in indicator is almost 30 percent cheaper. It may be more profitable to purchase an inexpensive voltmeter. If the car owner is of this type, then you can assess the condition of the battery by looking under the hood. The color signal means the following:
- green - full charge;
- white - low level of working fluid;
- black - requires recharging.
It looks like this:
Visual inspection
First, the battery should be carefully inspected. The absence of visible damage immediately eliminates one of the possible causes of battery loss of serviceability - leakage of electrolyte.
And even though the battery is working correctly at the time of inspection, chips and cracks can lead to an early breakdown.
You should pay attention to this first of all when purchasing a new battery to replace the old one. If the case has mechanical damage, this means that storage and transportation to the place of sale were carried out improperly, which may affect the serviceability of the product. To be sure that the new battery will work for a long time, it is better to pay attention to a model without these disadvantages.
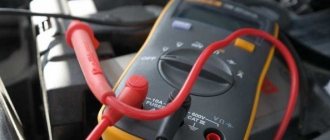
Checking the battery with a multimeter
The simplest test can be carried out with a tester, multimeter or avometer (the so-called tseshka). It will give the battery voltage at rest (without load). Based on these data, we can draw a conclusion about her condition. These data are shown below in photo 1 above.
Checking the battery voltage with a multimeter
To check a car battery with a multimeter, you need to set the switch to the position measuring direct voltage up to 20 volts. Touch the “+” battery with the red probe, and “-“ with the black probe. Nothing bad will happen if you mix up the probes; the voltage will simply be displayed with a negative sign.
Using a tool to check the battery is more difficult in some cases. Some devices require batteries to operate. The probes are installed in the appropriate connectors, and the switch selects the voltage measurement limit. Since the device has several scales, please note that you need to select voltage measurement divisions.
Do not mix up the probes, otherwise the arrow of the device will deviate in the wrong direction.
It is not possible to check the amperage of a car battery with a multimeter. Since the tester can measure 10, well, maximum 20 amperes, and the battery can produce hundreds. Attempting to measure will lead to failure of the device. If you really need to check the amperage, you should use a current clamp.
Another important characteristic is the voltage on the car battery when the engine is running. It should be 13.6–14.2 volts. The measurement is carried out in the same way. A higher voltage will lead to boiling water, a low voltage will lead to insufficient battery charging.
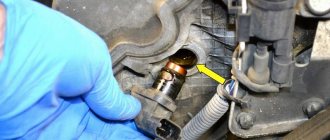
Electrolyte condition
You can understand how stable the serviceability of the power source is by looking at the state of the electrolyte. It should also be checked in cases where voltage and current readings cannot be measured.
To check, you will need a Phillips screwdriver - you will need to unscrew the caps on the jars in which the electrolyte is poured.
Some batteries have a charge indicator that helps determine the condition of the electrolyte - level, density, charge - and give a general idea of the health of the battery in this regard.
In other cases, you can simply check the electrolyte level with a flashlight; you just need to direct the beam into each of the cans. A signal that the battery will soon lose serviceability is exposed plates.
The liquid must always be above the critical level, since otherwise it will lead to the destruction of the grating filler, which, in turn, can cause a short circuit.
Checking electrolyte density
To check the density you will need a device called a hydrometer. It is inexpensive and can be found at any auto parts store. It consists of a flask with a bulb and a pipette, in which there is a flask with sealed shot or mercury. It has a scale on which you can determine the density value.
Density is measured after the battery is charged. After you have fully charged the battery, let it sit for a couple of hours so that gas formation stops and the density of the electrolyte is equalized. Then unscrew the plugs in all battery banks.
It is worth saying here that this operation cannot be performed on maintenance-free car batteries. There, to control the density, a hydrometer is built into one of the cans, but you cannot fully rely on its readings. So, in the case of a maintenance-free battery, its performance can only be checked with a load plug.
Using a bulb, you take electrolyte from each jar one by one so that the float floats freely, and measure the density. There may be slight variation across banks. The average density is 1.27─1.29 g/cm3.
If the density is higher, then you need to dilute the electrolyte with distilled water. If it is less, then you will need to take part of the electrolyte from the jar and add it there with normal density. You can read more about the electrolyte and its role in the battery in the article “What acid is in a car battery.”
Checking the charge level
It is possible to accurately determine the battery charge level when the voltage value at 100% battery charge is known. If the battery is lead, 20-volt, this figure will be 12.7 Volts.
The test can be carried out using any suitable device capable of measuring direct current.
The signal to immediately recharge such batteries will be the voltage value at the terminals of 12 V: this means that the battery has lost half of its charge.
Instructions for verification
The greatest difficulty for car owners is checking the battery with a load fork.
But there is nothing complicated here - just follow the instructions below:
Test without load.
Before taking measurements, disconnect the battery from the charger or remove the machine terminals.
At least seven hours must have passed since the last trip. It is best to check the battery in the morning, after the car has been idle overnight.
Make sure the battery electrolyte level is sufficient. Otherwise, add distilled water.
The load fork is a portable device, so it can be used without removing the battery from the vehicle.
The main thing is that the battery is not cold - the optimal temperature of the device is 20 degrees and above. If it is less, it is necessary to dismantle the power source and bring it into a warm place.
During the inspection process, the plugs on the battery must be tightened (if the product is serviceable).
Then proceed like this:
- Connect the positive wire (with the load plug terminal) to the “plus” of the power source being tested.
- Connect the metal pin (the "negative" terminal) to the negative terminal.
- Pay attention to the indicators that are reflected on the voltmeter display.
During the verification process, you should focus on the following parameters of the device (measurements are made at XX):
- At a voltage of 12.6-12.9 Volts, the battery charge level is 100% (full charge).
- 12.3-12.6 V - 75%.
- 12.1-12.3 V - 50%.
- 11.8-12.1 V - 25%.
- 11.5-11.8 V - full discharge.
If the test shows the battery is 100 percent charged, you can proceed to the next step - taking measurements under load.
Table.
Test under load.
As noted above, this work can be resorted to if the voltage level on the voltmeter is 12.6-12.9 Volts.
First, you need to read the instructions, which contain detailed recommendations from the manufacturer.
The load is connected taking into account the information in the manual, after which the load plug is switched.
Here the algorithm of actions is the same as in the previous case. Please note that when the plug pin touches the “minus” pole, sparking appears due to the flow of large current at the point of contact.
In the test discussed above, the time at which the load plug is connected to the battery does not matter. This nuance is important here.
In the case of measurements under load, the parameters should be taken at the 5th second of the test, after which the plug is immediately turned off.
Keeping the measuring device connected for more than five seconds is prohibited.
During the measurement process, a voltage is displayed on the load plug device, from which one can draw a conclusion about the serviceability and charge level of the power source.
In the case when the voltage is more than 9 Volts, we can talk about the serviceability of the power supply. If this parameter is less, it is worth checking again. If the results are unsatisfactory, you can conclude that the battery has failed.
If the battery is not completely discharged, you can use the load plug to determine the charge level of the power source:
- If the voltage is above 10.2 Volts, this indicates the maximum battery charge;
- At 9.6 Volts, the battery is 75% charged;
- 9.0 V - 50%;
- 8.4 V - 25%;
- If the voltage is less than 7.8 V, the battery is completely discharged.
After the load test, a first test must be carried out. If in this case the voltage does not return to 12.4-12.7 volts, there is a problem with one or more battery banks.
Table.
You should not overuse checking the battery under load, because frequent discharge under high current leads to a decrease in the service life of the product.
During the measurement process, it is forbidden to touch the metal pin, because under the influence of high currents it becomes very hot.
After each subsequent measurement, it is worth pausing for 3-5 minutes to cool the pin.
You can buy a load fork in a store or make it yourself. Moreover, every car owner should have such a product in his garage, because it is impossible to overestimate its capabilities and benefits.
Capacity check
Information about the nominal capacity is necessarily contained on the battery case and in the manufacturer's instructions.
If there are no marks on the batteries, you will have to approximately determine the battery capacity using measuring instruments.
For the procedure you will need:
- 12 V stabilizer (industrial or homemade);
- ammeter;
- stopwatch;
- 12 V device with a power of 100-200 watts
The last point must be completed due to the fact that a car battery has high cold cranking current values.
Before taking measurements, you need to charge the battery 100%.
Sequence for measuring battery capacity:
- A sequential electrical circuit is formed: battery → stabilizer → ammeter → load.
- Start the stopwatch immediately when you turn on the device that consumes electric current, and record the measurements of the ammeter.
- As soon as the stabilizer stops maintaining the voltage at a previously determined level, the stopwatch must be stopped. Its readings, expressed in hours, must be multiplied by the value on the ammeter. The result will be the approximate battery capacity in Ah.
It should be remembered that if the serviceability is normal, and the check is carried out for preventive purposes, the process of determining the actual capacity can last more than one hour.
Do not forget, in addition, that complete loss of charge negatively affects most types of lead power sources.
How to test a battery with a multimeter
A multimeter is one of the most popular and affordable instruments for measuring various electrical parameters. You can check the battery with a multimeter to determine the level of discharge of the battery and the presence of current leaks in it.
If, during inspection of the battery, electrolyte leaks were found on its surface, then most likely there is a current leak through them, leading to rapid self-discharge. Checking the battery for current leakage using a multimeter is very simple:
- Switch the multimeter to voltmeter mode (measure direct voltage up to 20 Volts);
- Connect the red probe of the multimeter (positive) to the positive terminal of the battery, and slowly move the contact of the black probe along the battery body in areas of electrolyte leaks or other contaminants.
- If there are current leaks, you will see voltage readings on the multimeter screen that will be greater than zero.
Even if the multimeter readings indicate that there are no electrical leaks, then electrolyte leaks and other contaminants should still be eliminated using a rag soaked in a 6% soda solution (one tablespoon of soda per glass of warm water).
To check the level of discharge of a car battery with a multimeter, you need, as in the previous case, to turn it on in the DC voltage measurement mode with a limit of up to 20 Volts, and measure the voltage at the battery terminals.
The table below shows the dependence of the voltage at the battery terminals without load on its state of charge:
| Voltmeter readings without load | >12.7 V | 12.5 V | 12.3 V | 12.1 V | <11.9 V |
| Battery charge percentage | 100%! | 75%! | 50%! | 25%! | 0%! |
Thus, if the voltage at the terminals of a battery not connected to a load is less than 12.7 V, this means that it is not fully charged. A voltage of less than 11.9 V indicates that the battery is discharged and will not be able to perform its intended functions in the car.
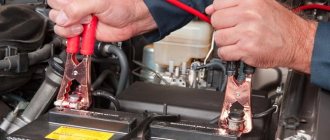
Checking the starting current
One of the main characteristics of a starter battery is its starting current. The indicator is determined in amperes; in cargo batteries its value reaches 1000 A.
It is possible to find out the reverse scroll current using a series circuit, one of the indicators of which is the load of minimum resistance.
Typically, the procedure is carried out on a battery that is fully charged, and it should lose charge no longer than 30 s - provided that the current value is maximum.
How to make your own battery fork
Motorists make many attributes from improvised materials in the garage. Since you can make a load fork yourself, we will consider its most popular option.
The load is a coil from a burnt-out heating device of a couple of kilowatts. This will be a nichrome wire with high resistance. Using the formula U=I*R, we calculate that in practice the spiral will give R=0.12 Ohm. A dozen parallel-connected heater wires will give the required parameters of 1.2 Ohms.
Switch the multimeter to Ohmmeter mode and measure the required length of wire, not forgetting about a margin of a couple of centimeters. We twist everything into a tight bundle and put ceramic insulation on top. For the body we use a U-shaped building profile. We solder the connecting insulated copper stranded wire to the crocodile.
The load output probe should be copper with a diameter of 5–6 mm. We select a digital voltmeter with a button. We put it on the sealant and put a window under it. It is advisable to insulate the handle.
Checking current leakage
Leakage is normal and does not affect the serviceability of the battery when the car is parked and connected to the power supply.
Energy is required for the background operation of devices such as alarms and stereo systems. A switched off engine does not stop the operation of such devices completely.
An abnormal leak can be easily determined by connecting an ammeter between the positive terminal of the battery and the positive wire of the car. After this, on the ammeter scale, electronic or pointer, it will be possible to see the specific amount of current that the car consumes with the ignition off.
Load fork device
Simple load plugs are designed to test 12-volt batteries. This device includes a digital or dial multimeter, load resistance, pin and cable.
The voltmeter is enclosed in a metal case, which also contains one or two load resistances (spiral-shaped). A large cross-section cable with a terminal is connected to the plus. Minus - connected to a metal probe on the body of the load fork. Batteries with a small capacity are tested with one load resistance connected. When the capacity increases, a second spiral is connected. The load, simulating the magnitude of the starter load when starting the engine, is designed for a battery with a capacity of up to 190 A/h and a load current of 100 - 200 A. The operating temperature range is from +1 to +35 degrees.
When working with the load fork, you must adhere to safety regulations and instructions for working with the device.
Checking the condition of plates and cans
Checking for the presence of sulfation or a short circuit can only be done using auxiliary signs, since it is impossible to disassemble the battery and visually inspect it.
Sulfation of the plates will most likely be indicated by the rapid boiling of the electrolyte if electric current is applied to the battery terminals with the force recommended by the manufacturer.
The absence of acid boiling, on the contrary, is a sign that one or both jars are closed (that is, the chemical process in a container with a short circuit will not occur).
Date of issue
To protect yourself from purchasing a battery that has been stored for too long and to save yourself from the need to immediately check the product for serviceability, you need to know how to determine the year of its manufacture.
This is of great importance due to the loss of capacity during self-discharge. There is a high probability of plate sulfation occurring if a discharged battery is stored for an extended period of time.
In most cases, the release date stamp is placed either on the battery handle or on its top cover. It is often difficult for an ordinary user to understand the markings, and in this case, the information provided on the manufacturer’s official portal or in the accompanying documentation will help.
Measuring voltage with a multimeter
If you do not want to check the condition of the battery “by eye”, or simply want to have accurate results in numerical terms, you will need a device such as a multimeter.
We recommend: What are the criteria for choosing wipers?
So, how to check a car battery with a multimeter: the device itself has two probes, one of which is red and the other black. In order to measure the voltage on the battery, you need to put the multimeter in measurement mode and place the red probe against the “positive” terminal, and the black probe, respectively, against the “negative” terminal.
The procedure is carried out on the battery terminals without load. If the battery is properly charged, the result on the device will be about 12.6-12.9 volts. This is the normal voltage that should be present on a fully charged battery. If you mess up the colors of the probes, the number will be the same, it will just be displayed with a minus sign.
If the engine is running, then you can also check the operation of the battery with a multimeter, but in this case it will be checked whether it is working together with the generator, as well as the serviceability of the voltage regulator. When the motor is running, the readings should be slightly higher - from 13 to 14 volts. If the indicator is lower, this will mean charging problems for the battery, and if the indicator is higher, the process of water electrolysis will begin.
There is a method to determine the degree of battery discharge by voltage. Voltage 12.5 - says that the battery is 90% charged!, voltage 12.1 - 50%!, and 12 - 10 percent. Although the method is approximate, it is proven.
It is also advisable to measure with the device “cold”, since a car that has recently been running can give higher values and be misleading. The multimeter checks the degree of charge, but does not provide comprehensive information about its performance. To do this, it is better to use a load fork.
When can you use the battery?
The power source can be operated without hindrance only with normal values of the main characteristics:
- discharge current;
- voltage;
- capacity.
The values of all listed parameters must coincide with the nominal values, or with the values set by the manufacturer (in this case, the capacity may be slightly lower).
If the battery turns the starter well when starting the engine, we can assume that the values of the listed parameters are at the proper level.
Measurements with the engine running
When the engine is running, the multimeter should show from 13.5 to 14.0 V. A voltage greater than 14.2 V indicates a low battery charge, and the generator operating mode is increased. If after 5-10 minutes the situation levels out, then everything is in order with the electrics.
If the voltage does not drop to normal, overcharging and boiling off of the electrolyte may occur. A voltage of 13.0−13.4 V with the engine running and energy consumers (heating, headlights, radio) turned off indicates that the battery is not fully charging.
If the multimeter shows less than 13 V, this means that the generator is not charging the battery. With all consumers turned on, the voltage should not be less than 12.8-13.0 V. If it is less, the battery needs to be changed.
The battery charge level indicates its ability to maintain voltage for some period of time. When the battery is fully charged, even after a week of inactivity, the voltage will not drop much. If the car’s battery is discharged, the charge will not last long.