The stove heating system on the Lada Granta car functions quite well, the owners have no complaints. The stove radiator is reliable and durable. However, there comes a time when the process of metal corrosion begins and the seams peel off. A faulty heating system can cause a lot of trouble, especially in sub-zero temperatures.
Frosting of windows and cold inside the cabin are the first symptoms of unstable operation of the heating system. Prevention is necessary.
Let's look at the step-by-step process of replacing the heater radiator on a Lada Granta car.
Sequence of actions when replacing the Lada Granta heater radiator
Note to the driver!
There are two ways to dismantle the heater radiator on a Lada Grant: according to the instruction manual and the “folk method”. Let's look at each with a specific example.
- We place the car within the perimeter of the repair area, turn off the engine, and open the hood. We provide priority safety measures.
- After the engine has cooled down, we proceed to dismantling the heating system on the Lada Grant without a condenser.
Tools for work
Since the designs of the cars are similar to each other, replacing the stove on a Gazelle will not be much different from replacing the stove on a Renault Logan. Therefore, identical tools will be needed.
In order to replace the heater radiator in a car yourself, you must:
- a screwdriver or screwdriver, the main thing is that it has a cross-shaped and slotted tip;
- wrenches are usually taken as a set;
- a hose with a container for draining coolant;
- rags and a small piece of oilcloth;
Method No. 2: replacing the Lada Granta heater radiator without removing the panel
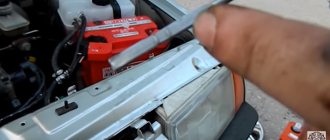
- Unscrew the expansion tank cap and release the pressure in the system.
Expansion tank plug
- We unscrew the plug in the cylinder block and grind the antifreeze into a plastic container.
- We disconnect the block with wires from the pedal unit: brake, accelerator, clutch.
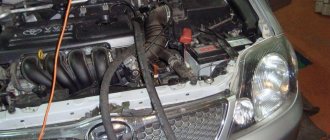
- In the engine compartment, turn off the mass air flow sensor.
Mass air flow sensor
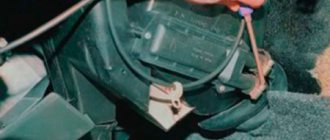
- We saw off the upper and lower pipes of the heat exchanger.
- We recess the pedal module and remove the heater from its original place.
- We clean the seat and blow out the cavity.
- We install the new radiator in its original place.
- We install pipes - connectors.
- Fill in 8.0 liters of pure antifreeze. We start the engine and check the system for leaks.
The process of replacing the radiator of a Lada Granta stove with air conditioning is similar to that described above.
Is it better to do it yourself or contact a service station?
Considering the simplicity of the process, replace the radiator yourself. If necessary, additionally read the recommendations outlined in the article, watch video tutorials, and get advice from specialists.
Undocumented capabilities of the Lada Granta heater
Unlike a number of other foreign cars, the Lada Grant has only four heater control switching modes. For example, there are six of them in Audi and Opel.
The air supply lines are connected in such a way that the windshield is heated at any position of the regulator. There is no such option in domestic transport.
In winter, when the air conditioning is activated, most of the air is automatically directed to the feet, in summer to the windshield for blowing. In Grant the flow is of the same type.
In order to warm up the side windows on the Lada Grant as quickly as possible in winter, you need to redirect the deflectors towards the glass. After the glass has thawed, we move the deflectors to their normal position.
The second speed mode of the regulator is not enough - we transfer it to the third to speed up the frequency.
According to the recommendations in the operating instructions, it is necessary to dismantle the heater when the dashboard is disassembled. However, the method is not as effective as the one presented above.
Signs of a malfunctioning heater radiator
During the operation of a car with a radiator, various problems may arise, as a result of which the heating of the interior usually stops. The most common faults are:
- Air lock in the cooling system. This leads to slightly warm air entering the cabin.
- Blockage in the radiator main channels. In this case, the circulation of antifreeze is disrupted or stopped and cold air begins to flow into the cabin.
- Radiator leak. As a result of mechanical damage (cracks, holes) of the radiator, coolant begins to leak out.
- External contamination of the radiator honeycomb. Contaminated honeycombs significantly reduce the heat transfer of the radiator and the efficiency of the stove.
Air lock in the cooling system
To identify the appearance of an air lock, turn on the heater on a warm engine. If cold air enters the cabin, then most likely the problem is the airing of the system. Due to the accumulation of air in certain areas of the cooling system, antifreeze cannot circulate normally and leads to disruption of the normal operation of the stove. Air locks can cause the engine to overheat and seize.
An air lock can also be determined by a rapid increase in the temperature of the power unit due to disruption or cessation of coolant circulation. If such a malfunction is detected, it should be corrected immediately.
Air may enter the cooling system for the following reasons:
- as a result of a violation of the tightness of connections of system elements;
- when replacing or adding antifreeze;
- in case of wear of the water pump or cylinder head gasket;
- if the valve of the expansion tank plug is faulty.
Due to damage to the cylinder head gasket, an air lock may form in the cooling system.
There are three ways to remove an air lock.
- For domestic cars, loosen the clamp and remove the carburetor heating hose. Then unscrew the cap of the expansion tank and begin to blow into its neck. After antifreeze appears from the removed hose, it is immediately put on the fitting and tightened with a clamp.
- The car is installed at an angle so that the front is higher than the rear. You can use a jack. The expansion tank cap is unscrewed, the engine starts and warms up to operating temperature - the thermostat should open. As the engine warms up, the antifreeze level in the tank decreases and is brought to normal. To increase circulation, you can increase the engine speed. If the antifreeze level has dropped very sharply, you need to quickly add coolant to the tank. The procedure is continued until bubbles stop appearing in the expansion tank. Then the car is lowered and antifreeze is added.
- The engine is warmed up to operating temperature, turned off and all elements are removed to dismantle the heating hose of the fitting assembly. Since antifreeze is hot, this should be done with protective gloves. Then disconnect the hose and wait. When antifreeze begins to flow out of it, the hose is put in place.
On domestically produced cars, the air lock in the cooling system can be removed through the expansion tank
Clogged heater radiator channels
Clogged radiator channels can also cause the stove to heat the air poorly. Since the coolant does not pass through the radiator in this case, the inlet pipe will be hot and the outlet pipe will be cold. Clogged channels can occur in the following situations:
- scale formation as a result of long-term operation of the radiator;
- use of low quality coolant;
- poor quality or defective radiator;
- oil, fuel or debris entering the cooling system.
If it is not possible to replace the radiator with a new one, you can try flushing it. For this purpose, special chemically active compounds are sold in car dealerships. In addition, you can use a solution of citric acid (400 g of acid per 4 liters of water).
The heater can become clogged not only from the inside, but also from the outside.
Radiator leak
The appearance of a leak is usually associated with mechanical damage to the radiator or with the use of low-quality antifreeze. Finding the problem is not difficult. Most car owners in this case immediately replace the radiator with a new one, and the feasibility of repair is determined by the extent of the damage.
Leaks in the radiator are usually associated with mechanical damage
Radiator honeycomb contamination
During operation, the radiator honeycombs may become clogged with debris, dust, dirt, etc. In this case, the stove will work less efficiently. To fully clean the radiator, it will need to be dismantled. Cleaning can be done in two ways:
- water under pressure;
- compressed air.
In the first case, you can use a high-pressure washer with a vario attachment. When using the cutter attachment, the radiator honeycombs may bend. The stream of water should be directed from a distance of 30–50 cm at a right angle. You can use compressed air instead of water, but it will be less effective.
Clogged radiator channels are the main reason for reduced heat transfer.
Review of Manufacturer Prices
Heater parameters: weight 0.5 kg, length 155 x width 167 x height 20 mm.
| Name/article | Price, rub.) |
| Heater radiator 2190-8101060 | From 2400 |
| 21900-8101060-00 | —/— |
| 21900-8101060-10 | —/— |
| 27140-5PA0A | —/— |
| LUZAR aluminum LRh 0190b | From 2100 – 2200 |
| LUZAR LRaC 0190 | —/— |
| LUZAR 482768 | —/— |
| LUZAR 353287 | —/— |
| AvtoVAZ OJSC 429612 | From 2300 |
| with air conditioning for automatic transmission LUZAR 367792 | From 2400 |
| AvtoVAZ OJSC 348402 | —/— |
| LUZAR 466443 | —/— |
*prices are current as of November 21, 2018.
Work order
Replacing the radiator of a VAZ-2114 stove without removing the dashboard allows you to save time, and this does not require any special skills. Let’s immediately make a reservation that part of the torpedo will still have to be disassembled, but the center console will remain in place, and this is the most labor-intensive part of the operation. At the initial stage of work, the side part of the panel on the passenger side is removed; to do this, use a screwdriver to unscrew the screws securing it.
To drain the coolant, you need to unscrew the bolts of the front protection, which is located under the engine compartment. The antifreeze is drained through a special plug located in the cylinder block; to unscrew it, you will need a 13 mm spanner. To prevent it from spilling on the ground or the garage floor, a container is placed under the car. To increase the rate at which antifreeze flows out, you can open the cap of the expansion tank.
Using a hexagon on the passenger side, the torpedo mount is unscrewed, after which it can be easily bent.
Next, you need to unscrew another fastener, located on the passenger side under the lower part of the center console. After this, the torpedo can be easily raised so that it remains in the same position, a stop of suitable length can be installed under it; a block with a cross-section of 50x50 mm and a length of about 40 cm is enough.
In the opened space you can see the heater radiator, which is attached to three self-tapping screws. They must be unscrewed so that it can be safely removed from the socket. In this case, a problem will arise - another self-tapping screw is hidden behind the plastic body of the torpedo, which needs to be unscrewed. To get to it, it is advisable to drill a small hole in the plastic through which you can insert a screwdriver. To do this, you first need to remove the glove compartment. If you try to move the torpedo, you can break the plastic and then removing the heater radiator on a VAZ-2114 will turn into an expensive procedure.
Next, you can proceed directly to dismantling the heater radiator. To do this, remove the clamps and disconnect the pipes, under which it is better to place a small container or rag, since there is still antifreeze in the system, which will spill directly into the cabin. After this, the radiator is removed from the mounting socket without any effort. It is advisable to examine it to see where the damage was and where the antifreeze is leaking from; corrosion damage appears in this place and streaks are visible, which once again confirms that the stove radiator needs to be replaced.
The new heater core fits into place effortlessly and should not cause any problems. It is secured with self-tapping screws, including through a hole previously drilled in the dashboard. In this case, it is advisable to inspect the faucet, since this is another weak point of the heating system. It should be completely dry and the lever should be easy to turn. The glove compartment is installed in place, the dashboard and the removed side panel are screwed to the mounts.
Before adding coolant, you need to check whether the plug on the cylinder block is tightened so that the coolant does not spill out. Fresh antifreeze is poured into the expansion tank to the level; if during operation the level drops, it will have to be topped up.
To carry out the tests, you need to start the engine and, after waiting until it warms up, turn on the heater. It should heat well in different modes, and the interior should remain dry, without stains of spilling antifreeze with a characteristic odor. At first, it is recommended to periodically look at the floor to make sure that all connections are tight and the new radiator is not defective.