Step-by-step instructions for replacing ball joints on a Chevrolet Niva
The car requires constant attention to the main components and parts. In addition to the engine, there are various components that determine comfort and safety during operation. In 90% of cases for SUVs, one of the main components of reliability is the suspension. In turn, the ball joint is one of its integral elements. In most cases, drivers do not need step-by-step instructions for replacing ball joints on a Chevrolet Niva, but for their own safety and to extend the life of the car, it is worth knowing how to make repairs on your own.
Design
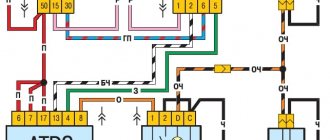
As in the VAZ “classic”, the front suspension of the Chevrolet Niva includes lower and upper arms. Ball joints are attached to each of them, the fingers of which hold the steering knuckles. The ball joint can be upper or lower depending on the installation location (type of lever). However, unlike the “classics”, all four ball joints on the Chevrolet Niva make no difference. The design of the ball joint includes the following elements:
- A conical pin with a thread on one side and a spherical tip on the other.
- Non-separable steel body.
- Two plastic inserts holding the sphere.
Website about joints
To replace the ball joints on a Chevrolet Niva you will have to work a little harder.
The ball joint is one of the most important suspension elements on a Chevrolet Niva, in fact, like on any other car. This detail requires special attention. If you don't notice its malfunction in time, you can get into a lot of trouble.
Signs of malfunction:
- Knock in the front suspension area when driving on uneven roads;
- Creaking when turning the steering wheel;
- Unstable movement of the machine along a straight path;
- Uneven tire wear.
Causes of malfunctions:
- Natural wear and tear;
- Getting under the boot of abrasive substances;
- Increased loads when driving on uneven roads;
- Lubrication production.
Difficulty level: average Execution time: 30 - 40 min Execution frequency: in case of malfunctions
The difference between Chevy Niva ball joints and 2121
Niva cars have 3 generations of suspensions:
1st generation (1977-2009): top and bottom identical ball joints from VAZ 2101 (2101-2904192)
2nd generation (2009-2016): The lower ball joint is from Chevrolet Niva (2123-2904192), and the upper one is original (21214-2904192) (it can be installed above and below on 1st generation Nivas).
3rd generation (2016-…): The upper ball joint with an inclined flange (21214-2904192-02) can be installed on all generations of suspensions only as an upper support, and the lower ball joint with an extended flange (21214-2904082) only on the 3rd generation suspension th generation.
It is important to understand what generation of suspension is on your car.
If we are talking about the 2nd generation suspension (2009-2016) and you want to replace the ball joint (BELMAG art. BM.6132) with a ball joint (BELMAG art. BM.0164) - you can.
If we are talking about the 3rd generation suspension (2016-...) and you want to replace the ball joint BELMAG art. BM.0164 with a ball joint (BELMAG art. BM.6132) - you cannot.
Ball joints are joints that allow the front wheel hubs to rotate relative to the longitudinal axis of the vehicle.
They hold the steering knuckles and fix them, preventing vertical movement.
As a result, when you turn the steering wheel, the wheels turn left and right without losing their rigid connection with the suspension.
Replacing a ball joint on a Chtvrolet Niva
One of the main problems during the operation of Chevrolet Niva cars is the rapid failure and need to replace ball joints. Factory ball joints are much inferior in quality to those supplied to the market by aftermarket manufacturers and, even under normal driving conditions, rarely last more than 10 thousand km.
Ball joint selection.
The best ball joints are considered to be those made in the city of Belebeyevo and bearings of the “Trek” brand, and especially “Trek Champion”. The latter have the greatest pull-out strength (nominal force 5 tons), so they are more reliable when traveling off-road. Foreign analogues are much inferior in quality to parts made in Russia - they have softer metal, lower pressing density, and sometimes a reduced diameter of the ball itself. This is due to the fact that they were developed for European roads, which are much better than ours and driving on them does not have such a destructive effect on the car’s suspension.
When choosing a ball joint, you need to check the condition and amount of lubricant located under the boot. If the grease does not reach the middle of the part of the pin that is under the boot, you need to remove the old grease and fill the boot with new one. Please keep in mind that the better the lubrication, the less wear the support will wear out. The best domestic lubricants are “Litol-24”, “Shrus”, and the best foreign ones are “ER”.
Selection of ball joints
Quite often, ball joints wear out prematurely. To prevent this from happening, you should choose the right spare parts before purchasing. What should be a good ball joint for VAZ 21213? Today there are several proven manufacturers of these parts. However, not all supports are ideal for a car of this brand.
When choosing upper and lower ball joints for a Niva Chevrolet, whenever possible, preference should be given to domestic manufacturers. The Kedr company has proven itself quite well. This company produces high-quality solid forged parts. The manufacturer claims that with normal driving they can last about 75 thousand km. But this is the case if the product is initially found to be defective.
The company BelMag also has good reviews. This company produces two main types of ball joints: budget products and reinforced ones. As for the budget option, in this case, for a relatively low cost, you can purchase high-quality supports that can easily serve up to 50 thousand km. But reinforced products are more durable. They are capable of not wearing out for 70 thousand km.
Motorists must remember that real BelMag products cost a lot of money. Therefore, if you come across suspiciously cheap ball joints with the logo of a given company, then it is best to refuse such a purchase. After all, there are now many fakes on the market that have not undergone heat treatment.
If you plan to frequently drive at high speed, then it is best to give preference to ball joints on a Chevrolet Niva from Trek. Such products are considered very durable. Moreover, they are equipped with special shock protection. They come with boots made of high-quality rubber. Prices for ball joints for cars of this brand are quite high. But both manufacturers and drivers testify to the complete justification of the cost.
How to extend the life of ball joints?
Plastic liners of parts are destroyed under the influence of two factors:
- The shock load that occurs when driving on an uneven road.
- The abrasive effect of dirt.
Impact loads can be reduced by avoiding potholes and reducing speed on uneven roads. But the main thing that affects the life of the hinges is the condition of the boot.
If the rubber band is damaged, dirt gets stuck between the finger and the plastic inserts, quickly grinding down the parts, and a squeaking may occur. To prevent this, it is necessary to regularly check the condition of the anthers and change them if damage occurs.
An important role here is played by the presence of lubricant in the space between the protective cover and the ball. Thick “Litol” lubricates rubbing surfaces. It is even able to protect the liners from dust for some time if the boot is damaged. However, this does not eliminate the need to replace the latter.
Procedure for replacing upper and lower ball joints
For removal and installation you will need:
- jack;
- wrenches or heads for 13, 22 and 27;
- mount;
- hammer;
- metal brush;
- strong wooden support.
You can make it easier to dismantle the ball using a special puller. If you don't have one, you can use a hammer. And be sure to stock up on WD-40. It will help unscrew rusted threaded connections.
Important: the main reason for rapid wear of ball joints is damage to the anthers. Their material dries out over time and loses elasticity. Therefore, the hinges need to be changed along with the anthers.
The procedure for dismantling the supports:
- Jack up the car and remove the wheel.
- Place a wooden support under the lower control arm and lower the machine until the suspension elements are in their standard position.
- Clean the ball joints and mounting threads with a wire brush.
- Treat the threaded connections on the pin and hinge mount with WD-40.
- Remove the rubber brake hose holder from the bracket on the lever.
- Unscrew the nut securing the upper support pin.
- Move the brake hose to the side.
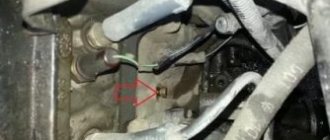
- Using a puller, press the upper ball pin out of the steering knuckle. If there is no special device, knock out the part with hammer blows. To do this, you need to press the ball with a pry bar, tapping the place where the support is attached to the steering knuckle.
- Unscrew the nuts securing the upper arm.
- Remove the ball.
Before dismantling the lower support, it is necessary to unscrew the wheel bearing nut. When removing it, you need to move the steering knuckle to the side, while simultaneously removing the hub from the splines of the outer CV joint.
Installation of ball joints is carried out in the reverse order of removal. Before installing the parts, it is necessary to apply Litol lubricant to the junction of the pin and the body - this will extend the service life of the product.
Replacing the lower support
To remove the Niva 2121 ball joint, jack up the car and remove the wheel, clean all elements from dirt using a metal brush or compressed air, unscrew the adjustable
hub nut (with the cap installed, use a chisel).
Using a 22 mm spanner, unscrew the nut securing the assembly to the steering knuckle (KC).
Place a stop at the lower point of the suspension arm (screw jack, bottle jack, block of wood).
Release the ball mount from the lower arm using two 13 mm wrenches.
Move the PC away from the lever.
Using a puller, press out the ball joint pin.
If you don’t have a special device at hand, insert a block into the space between the upper suspension arm and the rebound buffer bracket, after compressing the spring using a block or jack and tightening the support pin nut. Then hit the PC eyelet with concentrated blows until you get the result.
Before installing new supports, do not forget to fill it with ShRB-4 lubricant.
What are the dangers of driving on worn ball joints?
- The car will fall to the ground. The “bumpiness” that appears in the ball joint between the body and the rod due to the reasons stated above threatens the latter with the usual loss. This will be followed by the wheels going AWOL and the front of the car falling to the ground. This is an unpleasant and troublesome matter.
- A serious accident will occur. The story will be much worse when, while driving along the highway in the flow of traffic, you find that the car refuses to obey the steering wheel and flies into a ditch, a road fence or, God forbid, into oncoming traffic!
Purpose and design features
The ball joint is designed to be able to transmit a control signal from the steering wheel to the wheels. Thus, in clear terms, a ball is a part that provides a direct relationship between the control lever and the wheel hub, as a result of which the wheels rotate.
Structurally, this part in the Chevrolet Niva car is a separate element consisting of two mating parts. One part is a steel pin with a thread on one end and a ball-shaped design on the other. The end with a spherical design is recessed into the body of the part. The inside of the ball housing is filled with a special polymer. The steel finger in the body has the ability to move freely, due to which its actual functioning is carried out. To protect the pin-body connection from dust and various particles, there is a special rubber boot, which wears out over time, which leads to the need for repair work.
Causes of wear
The ball is a fairly strong part, but, like many other elements, it has its weak points. And in a ball joint, this weak point is the rubber boot. If its integrity is violated, then an early breakdown of the ball joint cannot be avoided. Even the smallest cracks in the boot allow water and dust to seep into the joint. When water and dust enter the body of the product, extraneous noise occurs in the area of the front wheels of the Chevrolet Niva. If you hear the sound of slurping or squeaking wheels while driving, then these are the first signs of wear on the ball joint. In this case, replacement is necessary.
Part replacement.
In order to replace the ball joint on a Chevrolet Niva, you need to unscrew several nuts on the back of the wheel, as shown in the figure. When preparing for removal, it is necessary to take into account that several special tools will be useful, in particular a special puller.
The puller may differ slightly from the one shown in the photo, but its main purpose will be the same.
Removing the ball in Niva must be done in a certain order:
- The wheel is raised using a jack. It is necessary to install special stops under the rear wheels to prevent them from rolling away.
- Then use a 22mm wrench to unscrew the fastening nut.
- The lower arm is placed on the stops, the nuts are unscrewed from the ball joint using a 13mm wrench
- The bolts are removed so that the steering knuckle can be retracted
- After this you will need a special puller. With its help, the finger is pressed out of the fist.
- The knuckle is retracted to the side, and the ball is removed from the hub.
- If you don't have a puller, you can carefully knock the finger out of the seat. Do not delay replacement due to the lack of a special tool, as this can lead to serious problems.
Then a new one is installed in place of the old ball and assembly is carried out in the reverse order.
Replacement features
How to remove the old ball joint and put on the new one? This question is also very relevant. After all, it is not enough just to purchase a new product. It still needs to be properly secured in the right place so that it can serve for a long time. But to do this, you need to properly remove the old supports without damaging other parts of the car. Both the lower and upper supports always need to be replaced.
So, how to remove the support on a Niva Chevrolet carefully? For this purpose, prepare in advance a special wrench for removing ball joints. It will not be possible to cope with this matter without him. First, the car is placed on a jack, after which it is necessary to remove the front wheel. Now we take a wrench (in most cases this is a 22 wrench) and use it to carefully unscrew the ball stud fastening nut. Immediately remove the anthers.
Now you should place the key on the stop under the lower arm and unscrew all the fastening nuts of the ball joint housing itself. The only thing left to do is remove all the remaining bolts from the mounting holes and remove the steering knuckle along with the support. Now you need to use a puller to push the support pin out of the fist. Then the fist is moved to the side and the hinge body is removed from the hub. At this stage, the last part of the support is removed.