How to install the clutch disc correctly and which side? Even this can be learned
Awareness of how to correctly and which side to place the clutch disc when repairing or replacing a unit will allow you to avoid repeated disassembly of the unit and prevent the occurrence of additional malfunctions of the car and its elements.
Thanks to the clutch, the vehicle can start smoothly without overloading the power unit, facilitating the normal and long-term operation of its units and gearbox components. The disc is usually replaced along with the entire clutch basket. There are two ways to carry out the work: with and without dismantling the gearbox. The latter method is less labor-intensive and more convenient. The work process is carried out on a lift or inspection pit. https://youtu.be/https://youtu.be/1858lZXHZ-g
_
Replacing the VAZ 2109 clutch with your own hands
If, when starting the engine, noises are heard and vibrations appear, “working jerks” are felt, the pedal stroke has increased, the dynamics of the car have changed, the gasoline consumption has increased, most likely the VAZ 2109 clutch needs to be replaced. Most often, the reason for this is violation of the rules for using the vehicle. For example, the driver likes to start with a slip, or he had to get out of a snowdrift. One of the parts of the unit may also fail. For example, a release bearing. When it "flies" a strong "squeal" is heard. The result is clutch failure.
What exactly needs to be done can be determined by diagnostics at a service station. Or you can see it with your own eyes during dismantling. How to repair this unit yourself will be discussed further.
Required spare parts
To install the VAZ 2109 clutch you will need a new unit. It is better to take models recommended by the machine manufacturer with article numbers 2109-1601000, 801122, 2108-1601085, FR 761. The price of the set depends on the manufacturer and seller, ranging from 2300 to 3600 rubles.
Tools required for repairs
To replace the VAZ 2109 clutch basket you need to prepare the following tools:
- standard set of keys;
- jack.
Do-it-yourself repairs are quite advisable, since the price for replacing a VAZ 2109 clutch as of March 3, 2021, on average in car services is 3.2 thousand rubles.
But self-repair is quite accessible even without an assistant, and without completely removing the gearbox. The principle of repair and the sequence of work are identical for models 2108-2115, so we suggest you see how such dismantling is performed on a VAZ 2114:
Order of Operations
To carry out repair work, you need to place the car on an inspection hole, put it on the handbrake, disconnect the negative terminal to de-energize the on-board network, and remove the engine mudguard. Now you can start disassembling:
- Install a jack that will temporarily replace the front pair of wheels. You need to unscrew the nuts on them, remove the chassis and put them aside.
- To remove the contact part of the ball joint from the hub, you need to unscrew the bolts.
- Instead of the 2 upper conventional bolts, you need to install cylinder head fasteners.
Now you can remove the starter; it is attached to three nuts that need to be unscrewed.
At this stage it is necessary to install a jack under the engine. After this, the side motor support is detached.
After this, you can disconnect the rear engine mount and unscrew the gearshift linkage.
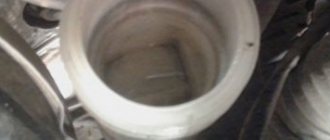
The protective cover must be removed from the clutch.
- The box is secured with several bolts; first you need to unscrew the front one.
- Now the transmission is accessible, the rear nut is unscrewed first.
The gearbox bolts are located on the left wing side, they need to be unscrewed until they stop and the gearbox should be removed
It is important to ensure that the end of the assembly rests on the lever extension. This will create a gap that will allow you to remove the clutch.
Disassembly is complete. At this point, the guide for the clutch remains. It needs to be thoroughly lubricated. After this, you can put the release bearing on the guide.
Subsequent operations are performed in the reverse order of the above steps. Important! There is no need to rush while completing the work. All operations are performed consistently and calmly. Make sure that after assembly there are no “extra” spare parts left.
Let's summarize
If the check shows that the free play is normal, but you doubt your competence in adjusting the unit, contact a service station. Incorrect settings can cause rapid clutch failure. If you want to complete the work yourself, you can find the necessary information on the vehicle manufacturer’s website or in its service book
It is important to complete the work in a timely manner so as not to get into an unpleasant situation on the road. Monitor the service life of clutch parts, for example, the service life of the driven disc is 100 thousand kilometers
But, if a motorist has an aggressive driving style, it can decrease by 2-3 times. How to replace a VAZ 21099 clutch, watch this video:
Article rating:
VAZ 2109 clutch replacementLink to main publication
Related publications
Air conditioning Chevrolet Lacetti
Removing the clutch
How to place the clutch disc correctly and which side to use is a question that often arises among novice motorists who do not pay attention to some nuances when performing work, ignoring which can lead to useless repairs and serious problems with the car.
When starting to remove the unit in question, the following requirements must be met:
- Stop the vehicle with special wedges;
Replacing the clutch at home
Clutch basket VAZ 2109
Before starting to replace the clutch, it is necessary to ensure all conditions for this operation. First you need to raise the car on a jack or lift. This way, you can better see all the damaged parts. After this you need to:
- Remove the exhaust pipe clamp. It comes off very easily. However, if it has never been removed before, you will have to lightly hit it with a hammer from the back side.
- Disconnect the driveshaft.
- Remove the rear flange.
- Unhook the starter (see Repairing the VAZ 2109 starter yourself - an opportunity to save a lot of money). This operation will become available only after all the bolts holding it are loosened.
- You need to start removing the gearbox handle.
- However, first of all, you should disconnect the beard by unscrewing the 3 bolts that hold it in place.
- Remove the rubber band and ring.
- After this you can remove the handle.
- Before you begin removing the clutch, you must unscrew all the bolts that secure it to the engine.
Clutch basket for VAZ 2109
- Unscrew the speedometer cable (see VAZ 2109: how to properly repair the speedometer). Remove two bolts.
- Unscrew the traverse. After this, you can easily remove the box.
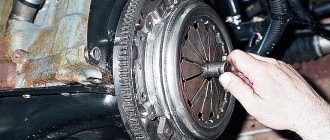
- When all the bolts are unscrewed, you can remove the basket.
- You need to unscrew the bell.
- It is necessary to clean the gaskets with a knife to remove excess sealant.
- Pull out the oil seal. Clean it and put it back in place.
- Insert disc.
- Clean the entire surface and spray with degreaser. This manipulation is necessary so that the sealant fits well and then holds the gaskets.
Clutch basket for VAZ 2109
Apply sealant and install gaskets.
- Put on the bell.
- Remove the clutch bearing (you can remove it using pulling movements). Put a new one in its place.
- Put the gearbox in place.
- Pour in the oil.
Clutch adjustment
You can adjust the clutch as follows:
- Loosen the lock nut so that the adjusting nut can move.
- Using the tension nut, slightly tighten the cable (the car should move forward).
- To control the tightening, you can use the clutch pedal.
If these steps do not fix the clutch, then there is another problem. Perhaps the clutch cable itself needs to be changed.
Replacement
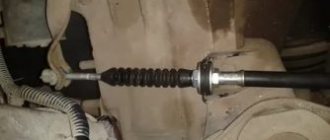
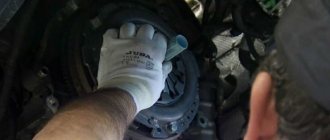
The assembly is installed in a mirror disassembly sequence. First, apply a special lubricant to the bearing hole of the gearbox input shaft, and clean the friction area and the pressure disk with a cloth. Installing the disk in its place is done with the protruding part facing the basket. Pre-applied marks on the housing and flywheel are aligned to prevent imbalance.
During the work, it is necessary to center the driven disk in relation to the crankshaft axis. For this procedure, a special rule is used (simulates the splined part of the input shaft), which should be easily removed after installation. The fastening bolts must be tightened alternately with even force to prevent the casing from moving.
Expert advice
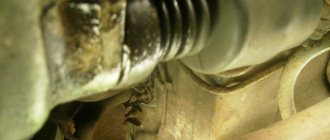
Along the way, some mistakes emerged. This is a grenade with a boot without a clamp. There is also a jamb in the drive, the CV joint boot is torn. The thread on the grenade is bad. The ball joints are still working well, but there is already some wear and tear.
So, don’t be afraid to change the clutch disc, release plate, or basket. If you are making a car for yourself and not for sale, then it is recommended to change everything as a whole. These are the clutch disc, basket, release bearing, drive seal. If you have never changed a box, do not be afraid to take on this task, it is not difficult. The only condition is that when you install the clutch disc, center it.
There is a hole, when you install the clutch disc and press it with a basket, it may move. You will never hit the splines with the input shaft, since the shaft fits into the splines, and the guide is then removed. This is a cylindrical rod, it fits the classic, front-wheel drive. Its diameter is 20 mm, inserted into the flywheel, 15 mm, length 100 mm.
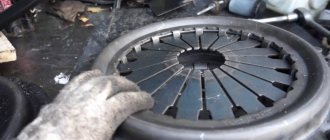
Functions and structure of the clutch disc
On the side of the casing there are three evenly spaced recesses in the shape of a rectangle. Three pressure plate hubs fit tightly into them. This structure guarantees the transmission of torque to the working disk and the ability to move it relative to the axis when the clutch is activated.
Between the pressure disk element and the casing there are 18 springs, placed in pairs, which have versatile curls to prevent the part from jamming. To counteract distortion of the working disk and obtain optimal force, spring elements are placed from the same group. The springs are protected from excessive heating in the event of clutch slipping by washers made of heat-insulating pressed asbestos material.
Spherical nuts with conical springs are attached to the ends of the tail forks of the unit in question, providing some rolling of the element required to dampen the change in the distance between the axles when the disk is retracted. In the grooves of the protrusions of the guide disk element there are three steel levers, which are connected to the disk and support forks by means of needle-type bearings and axles.
About the properties of the structure
Before you completely disassemble all the components, you need to understand how it all works when assembled.
The clutch system is required to perform two functions:
- Briefly disconnecting the car engine from the transmission.
- Smoothly connects the engine back to the transmission during gear changes.
The clutch on the VAZ-2109 also protects the transmission from damage and overload during operation, so this unit must be maintained in working order and damaged parts replaced as soon as damage is discovered.
The “nine” has the simplest single-disc friction system. It works according to this principle:
- While the pedal is not depressed, the driven disc is compressed by a spring mechanism between the flywheel and the drive (pressure) disc. In this state, the clutch is engaged and the speed is transmitted through the system to the gearbox.
- When you press the pedal, a mechanism is activated that disconnects the drive disk from the driven one, the connection between the system elements is lost, so the torque is no longer transmitted further.
In this scheme, we are most interested in several details:
- The driven and driving disks, which very often quickly wear out, causing them to lose the necessary performance properties.
- Drive is a device that drives the unit when the pedal is pressed. If it is faulty, you will experience jerking and vibration when trying to change gear.
- Clutch cable - connects the pedal to the system. Over time, its tension weakens, which causes the effect of incomplete activation of the mechanism.
Some tricks
Experienced drivers advise, when performing the process of replacing the presented unit, to place evenly small dots of glue (moment or high-quality analogues) on the working surface of the basket. The disk is placed on the basket with the springs facing away from you and aligned along the edges. The glue will help secure the parts while they are attached.
Considering how to place the clutch disc correctly and which side, this method involves a slight continuation. After installing the gearbox, you need to engage the gear and squeeze the clutch and turn the mechanism with the starter. This method is suitable for most machines.
About the mass. clutch housing. VAZ 2109
Look at the battery. Two wires come from it from the munus terminal, one (thick) should be screwed to the engine (to the body), the other (thinner) to the body.
Is this how it feels or not?
Yes, this is the crankcase. The wire doesn't have to be attached there. But in any case, there must be reliable contact between the body and the engine.
In the first photo there is an injection car (I can see by the perforated tube that protects the bundle of wires, and where you poke with needle-nose pliers, a rubber plug is placed), and in the second, judging by the fine filter, there is a carburetor engine. Have you lost a lot of weight?) ) Which car is yours?
This wire can be attached to the engine anywhere (it doesn’t matter), the main thing is that it reliably connects the engine and the body. Without this wire, the engine will either not start at all, or will work through the f&*^u
Throw a wire of a suitable cross-section in any convenient place, between the engine and the body, and the battery is a reliable minus for the body.
How to change a clutch: how to install a clutch disc
As you know, a manual transmission is characterized by fairly high reliability and unpretentiousness. For such a gearbox, a very realistic indicator of mileage without repair is about 250-300 thousand km. and more. At the same time, the clutch deserves special attention, as it needs to be changed much earlier for one reason or another.
Replacing the clutch on a manual transmission (unlike a manual transmission) itself is not an extremely complicated procedure, but it does require certain skills and tools. Also, during the installation process, some owners do not know how to install the clutch correctly. Next, we will look at the nuance of how to install the clutch disc when replacing it.
We repair it ourselves (VAZ classic)
We replace the DS and KS on a rear-wheel drive VAZ as follows:
- place the car on a car lift or pit;
- turn off the engine, put the car in neutral gear;
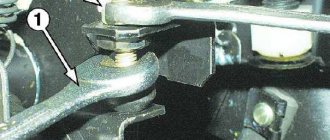
- remove the gearbox lever mounting cover (unscrew the screws);
- we dismantle only the upper part of the gearbox lever; there is no need to remove it completely (we disconnect it at the place marked by the arrow in the figure);
- unscrew the propeller shaft bolts, dismantle the shaft itself (make marks on the cardan and rear axle gearbox - this is necessary in order to secure the shaft according to the same marks during installation to avoid unnecessary vibrations);
- disconnect the speedometer cable from the gearbox, as well as the control center;
- unscrew all the gearbox fasteners (including the traverse), remove the gearbox;
- unscrew the six bolts securing the basket, remove the parts;
- We put new parts in place and put everything back together.
When installing new spare parts, the disk must be centered, otherwise the manual transmission will not fit into place. A factory mandrel or an old “primary” from a “classic” gearbox is used as a center.
Clutch disc installation: what to pay attention to
Let's start with the fact that thanks to the clutch, the car is able to move off smoothly, gears are switched smoothly, which contributes to the normal operation of all elements of the transmission and the internal combustion engine itself, preserving the life of components and assemblies.
Taking into account the fact that the load on the clutch is high, the service life of the clutch itself is, on average, about 100 thousand km. Its wear is indicated by loss of traction, slipping of the clutch, incomplete disengagement of the clutch, difficulties when shifting gears, the clutch pedal may become soft or, conversely, too tight, etc.