I noticed that when driving, the gearbox began to make sounds of rubbing gears. The very first thing that came to mind was to check the oil level in the gearbox. The box on my VAZ 2109 is old, unmaintained, that is, without a dipstick. But there is an easy way to check the oil level in a maintenance-free VAZ 2108 2109 21099 gearbox - this is to remove the speedometer cable drive gear. Through the hole in this gear (it is also called a speed sensor), you can very clearly see how much oil is in the box. I checked the oil level - indeed, the oil in the gearbox had decreased significantly. I also found the reason quickly - the gear shift seal was leaking.
VAZ backstage oil seal leaked
Well, since it's leaking, it needs to be replaced. I went to the market and bought a gear shift rod seal for VAZ 2108 2109 21099. The price of the seal was $1. Now it needs to be replaced. The procedure for replacing the gear shift rod oil seal on a VAZ 2108 2109 21099: 1) Drain the oil from the gearbox into a specially prepared container.
Drain the oil from the VAZ box
To make it drain better, first unscrew the filler plug or remove the speedometer gear. After draining the oil, screw the drain plug back into place. 2) Now we climb under the car and disconnect the universal joint mount from the gear shift lever.
Attaching the cardan to the gear shift lever
3) Pull the boot off the cardan and unscrew the bolt that secures it to the gear shift rod. In my case, this bolt really did not want to unscrew, and the place was inconvenient. You can’t get there with the head; the open-end wrench licks off the edges.
Rescued crimp wrench for brake hoses. 4) After removing the cardan, remove the gearshift rod boot.
Shift rod boot
5) Now you need to get the oil seal of the VAZ 2108 2109 21099. The operating instructions say that this is done with an awl. I didn’t have an awl, but I did have a self-tapping screw, which I screwed into the oil seal and took it out.
We take out the VAZ backstage oil seal
The main thing is to do this carefully, without scratching the stem. 6)Instead of the old one, install a new oil seal on the same side as the old one. Using a tube of suitable diameter, press it to the end.
Installing a new oil seal
7) We install the boot back, screw the cardan. The bolt securing the cardan to the gearshift rod is adjustable. It needs to be screwed in exactly the same way as it was. Otherwise, some gears may not engage. We put the boot on the cardan and connect it to the gear lever of the VAZ 2108 2109 21099. We get into the car and check that all gears engage well. 9) Pour oil into the gearbox. Personally, I do this through the hole for the speedometer gear using a hose and funnel. That's it, the VAZ 2108 2109 21099 rocker seal has been replaced.
The VAZ-2109 rocker is a simple mechanism used to change gears. The driver, applying force in one direction or another, acts through the rocker on the gearbox. This switches on the required speed. Very rarely, the mechanism breaks down and requires partial or complete replacement. Most often the cardan shaft fails. Changing it won't be difficult. But if the rocker itself is broken, you can think about a little tuning - make a short-stroke one. This will require less effort to engage the desired gear.
Why change the backstage?
There are situations when it is necessary to intervene in the gear shift mechanism due to the failure of a component. But there are times when an extreme measure is required - replacing the VAZ-2109 rocker. In these cases, replacement is required:
- An oil leak appeared due to damage to the oil seal. Only the oil seal can be replaced.
- Complete failure of the scenes.
- You have realized the advantages of a short-stroke design and you have the funds for this kind of tuning.
Symptoms of gear shift mechanism failure:
- Increased gearshift lever play. Please note that this behavior may also be caused by a loose cardan. Sometimes the bolt securing it gets screwed out, so to reduce the backlash it is enough to tighten it, and first apply a drop of thread locker.
- Difficult to shift into gear. Sometimes extraneous sounds are heard.
- Gear shifting is not possible.
- Inconsistency between the position of the lever and the selected speed. For example, the back one disappears, and the first one is in its place.
If a slight play appears, it is advisable to carry out diagnostics and identify the breakdown of the unit. Make repairs immediately, otherwise one or more speeds will disappear at the most inopportune moment.
Video
A video from the Garage channel shows the removal of the switch mechanism on an already partially disassembled box.
Source
Manual Transmission
The gear shift positions are shown on the handle. Lift the ring under the lever handle before engaging reverse gear.
When changing gears, fully depress the clutch pedal and release it carefully. It is not recommended to operate the shift lever with one hand, as this increases wear on the gearbox.
When shifting from fifth to fourth gear, do not push the lever sideways to avoid accidentally engaging second gear, which could cause the engine to overspeed .
and will damage it.
Before engaging reverse gear, make sure the vehicle is at rest and that your foot is not on the accelerator pedal. Move the lever from neutral to the right all the way, and then engage reverse gear.
The table below shows the speeds at which the next gear for maximum fuel economy.
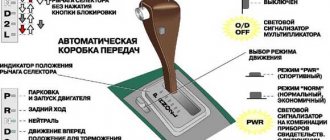
Transmission. Automatic transmission
At the base of the shift lever is an illuminated dial that shows selector range position symbols.
"P" ?? Parking lot "r" ?? Provide regression "N"?? Neutral position
Forward gears:
"D"?? First. 4th gear "3"?? First. 3rd gear "2" ?? First. 2nd gear
"1" ??
First gear
Lever position selection
Depressing the accelerator pedal while moving the selector lever may increase wear on the transmission.
Always keep your foot on the brake pedal when adjusting your driving position. Do not hold the selector lever as this may cause wear to the gearbox.
READ Starter relay VAZ 2109 carburetor where is it located
This position can only be set when the vehicle is stationary. The shift lever and transmission are locked. The engine can be started.
This position can only be set when the vehicle is stationary. You need to press the button on the lever handle.
Wait a few seconds before switching
transfers.
In this position, the engine is disconnected from the gearbox. The engine can be started. To prevent your vehicle from rolling down a hill, apply the handbrake. To avoid overheating of the engine and transmission, set the position to “N” during long vehicle stops (for example, in traffic jams). While waiting for a traffic light, you should set the position to "D"
This position applies when driving under normal conditions. The car leaves in first gear and then automatically shifts between 2nd, 3rd and 4th gears. The shift moment depends on the position of the accelerator pedal and the speed.
In this position, 4th gear is locked. The car starts in first gear and then automatically shifts between 2nd and 3rd gears. Position 3 is recommended when driving on winding roads and in heavy city traffic. When the lever is moved from the "D" position to position 3, the transmission immediately shifts to 3rd gear, which causes a strong braking effect on the engine. This should not be done at speeds above 130 km/h.
This position is recommended when driving on mountain roads. In this case, it is better to use the engine power, and the engine braking effect increases. The transmission automatically shifts between first and second gears. Third and fourth gears are locked.
When moving the lever from position "D" or from position 3 to position 2, the shift from third to second gear occurs only below a predetermined speed to avoid the engine speed increasing to unacceptable values.
This position is recommended when ascending and descending very steep slopes. On the one hand, effective engine braking is ensured; on the other hand, constant gear changes are eliminated, which leads to overheating of the transmission fluid.
If you move the lever from position "D" to position 1, it immediately shifts to 3rd gear; further, since the speed is reduced to 70 km/h, a switch to 2nd gear will occur; and further, when the speed drops to 30 km/h, a transition to 1st gear will occur. Do not set the shift lever to this position at speeds above 130 km/h. Manual driving is also not advisable on icy roads. With this position of the switch lever, there is no shifting to higher gears.
Press the accelerator pedal to the floor (“churn”)
When you press the accelerator pedal to the floor. In the “churn” position, lower to ensure a range, for example, for overtaking. The transition to the next gear occurs only at high engine speeds or when the accelerator pedal is released.
Source
How to replace the oil seal
If you detect an oil leak from the gearbox, carefully inspect the crankcase.
The leak will reveal itself. Lubricant usually leaks out through the CV joint seals and rocker panels. In the latter case, to replace you will need to perform a number of actions:
- Purchase a new VAZ-2109 gearbox seal. Its price is about 100 rubles.
- Drain the oil completely from the gearbox by unscrewing the plug from the bottom using the key “17”. If necessary, you can replace the lubricant later. It is recommended to pull out the upper dipstick to facilitate oil drainage.
- Disconnect the cardan from the rocker arm.
- Remove the boot, use a 10mm wrench to unscrew the bolt securing it to the gearbox rod.
- Using an awl or a thin screwdriver, remove the old oil seal. Inspect it for damage.
- Install the new oil seal using a pipe or large washer to press in.
After replacement, install the boot. Assess the condition of the cardan: if it has too much play, it will need replacement. After carrying out all the work, be sure to check that the speeds are turned on correctly.
Defective parts.
First of all, we carefully examine the shaft itself. The bearing journals should be smooth and shiny without the slightest signs of pitting, grooves, or cavities. If the reason for disassembling the gearbox was the destruction of the front bearing of the secondary shaft, most likely the shaft will have to be thrown away. In such cases, the teeth of the drive shaft gear are most often damaged:
In the photo, the arrow shows the place of greatest wear of the teeth; if such a shaft is installed, the gearbox will make a loud noise. One of the most common malfunctions is clogged ring gear teeth and hub failure. This leads to the transmission being knocked out:
Usually the coupling also suffers:
It is also necessary to carefully inspect the hub. If it’s broken, it’s immediately obvious, but it often happens when the hub is still intact, but the cracks have already started. This will not last long, it definitely needs to be changed. The arrows in the photo show the place where cracks appear:
In addition, there is often a lot of wear at the ends of the hub, in places of contact with the gear.
How to replace the universal joint
In most cases, it is not the rocker itself that fails, but the cardan. Due to its displacement, even a small one, a failure occurs in the gear shift mechanism.
Standard VAZ-2109 scenes are rarely installed during repairs; similar parts from Lada Kalina are used. The replacement looks like this:
- Using two keys set to “13”, unscrew the clamp securing the cardan to the rod.
- Using a screwdriver, pull the boot towards the box housing. If desired, you can remove it completely, and if it has cuts or other damage, replace it with a new one.
- Unscrew the fixing bolt with a “10” key.
- Knock down the cardan with a hammer, strike carefully so as not to damage anything.
- The Kalinovsky universal joint is much more durable and reliable, so install it instead of the standard one.
- Reassemble the entire structure in reverse order. But do not rush to tighten the bolt on the clamp - adjustment is necessary.
Backstage adjustment
There is nothing complicated in the procedure; you can do it yourself, but you will have to run from the pit to the salon.
Yes, it is advisable to do this work in a pit or overpass. You need to act approximately according to this principle:
- Loosen the nut on the clamp.
- Set the gearshift lever to the reverse gear position.
- Set the box rod to the reverse speed position. This is difficult to achieve, so adjustments will have to be made.
- Check how the gears shift. If the rear one is too far to the left, loosen the clamp and turn the cardan counterclockwise. If the fifth speed (including reverse) has gone too far to the right, then the cardan rotates clockwise.
Short-throw slides for "nine"
Such designs were developed exclusively for sports models, but are widely used in production ones. Advantages of the VAZ-2109 short-stroke rocker over the standard one:
- Easier gear shifting.
- The backlash of the gearshift lever is reduced, especially when using a cardan from Kalina.
- You need to either buy it or make it yourself.
- It takes a lot of force to change gears. Despite the smaller stroke, this type of backstage is more suitable for people who are not only strong in spirit.
But you don’t have to buy a VAZ-2109 rocker in stores; you can make a short-shifter from a regular one with little welding skills.
To do this, cut the old rocker in two places and weld pieces of a metal plate to lengthen the arms. The main thing is for the new drawstring to fit into place, so first carefully study the drawing, which shows the locations of the cuts.
The linkage is an important component of the VAZ 2109 gearbox. If it fails or does not work satisfactorily, the linkage can be easily replaced or repaired.
Appearance of the device
There are two types of scenes:
There is no fundamental difference between the two types of units. The advantage of a short-throw is that it provides faster gear changes for a fraction of a second.
Do not believe those who claim that a short walk has a positive effect on dynamics. There is no connection between the rocker and the dynamics of the car. But the short walk has its advantages.
Replacement kit
Problem solving
Many transmission malfunctions that lead to the disappearance or failure of the rear derailleur can be eliminated without removing the unit from the car.
If the cause is a loose coupling bolt securing the clamp to the rod, then to fix the problem you need to:
- Place the car on the lift.
- Loosen the clamp nut completely.
- Place the gear lever in full reverse gear.
- Fully engage reverse gear on the transmission using the crankcase switch.
- Tighten the clamp bolt.
Adjustments behind the scenes
If tightening the clamp does not solve the problem, you need to check the condition of the drive switch parts. One of the reasons why you cannot engage reverse gear may be poorly adjusted traction.
To make changes to the mechanism, you may need the following tools:
- Two 13mm wrenches, preferably ring type;
- Any 10mm wrench or socket;
- Small hammer;
- Slotted screwdriver.
Since behind-the-scenes failure may be caused by worn parts, spare parts may be required:
- Backstage frame;
- Sometimes the stem seal may need to be replaced.
Two people are required to adjust the slides or replace parts. One person must shift gears from the cab, and another must adjust the shift rod stroke.
The procedure looks like this:
- Provide access to the underbody of the car by placing it on a pit or lift.
- Use a 13mm wrench to unscrew the clamp mounted on the rod.
- Remove the rod from the box rod.
- Carefully remove the block using a screwdriver.
- Use a 10mm wrench to loosen the mounting bolt on the power take-off shaft.
- Knock down the cardan shaft with light blows of a hammer. It is important not to damage the shaft.
- Remove the sealing block from the universal connection.
- In case of oil leakage, the oil seal on the box rod must be replaced.
- Install a new shoe (or leave the old one if it is not damaged) and install the universal joint on the shaft.
- Align the hole on the driveshaft with the notch on the shaft.
- Tighten the 10mm clamp and install the pad completely.
- Install the universal joint rod and adjust the travel of the gear shift lever.
- The second person should sit in the driver's seat, place the gear shift in neutral, move it slightly to the right and hold it in this position.
- Then tighten the 13mm clamp nut.
READ How long does a VAZ 2107 engine last?
Typically, this type of gear repair starts to start without problems. In addition, the operation of the entire gear selection mechanism on the VAZ becomes clearer. 2109
.
Video from the author MegaMeyhem shows the replacement process behind the scenes.
Changing the gearbox oil
If the seal on the rod is damaged, oil will leak out of the box body and dirt may get into the box itself. These factors may be the reason why the postback is no longer closed. In addition, the oil in the box loses its properties during operation, so it must first be replaced at least once every 35-40 thousand kilometers. Before replacing, check the condition of the oil in the box. To do this, remove the oil plate installed in the gearbox housing and visually assess the quality of the oil. The presence of metal particles and dirt in the oil on the probe is unacceptable. The oil itself should be quite liquid and not stick to your hands in a thick layer.
Oil glue
You will need the following materials and tools for replacement:
- New oil. When purchasing oil, you need to consider the type of gearbox. The rather rare four-speed transmission requires three liters of oil, the newer five-speed requires 3.3 liters. The oil itself must have a tolerance of 80W-85, this is not important for the manufacturer.
- A tank for draining old oil with a volume of at least 4 liters.
- Funnel with hose for filling new oil or syringe.
- Wrenches 12 and 17 mm of any type.
- Rags and cleaning solvent.
The procedure itself is like this:
- Place the machine with the heated box in the pit.
- Remove the rubber plug from the transmission bleeder valve at the top of the crankcase.
- Clean the valve and plug from dust and dirt. It is convenient to clean parts with thin wire and rags.
- Install clean parts.
- Wipe the bottom of the box with dirt. Unscrew the plug at the bottom of the crankcase.
- Place a container under the drain hole and drain the oil. It drains completely in at least 20-25 minutes.
- Then screw on the drain plug and carefully tighten it with a wrench. The plug and hole should be thoroughly wiped with a rag.
- Fill in fresh oil through the hole in the oil level dipstick in the box.
- When filling, check the oil level, which should usually be between o and “MAX” on the drive shaft.
- If there is an overflow, the oil can be pumped out using a large medical syringe with a tube on the nose.
- It is advisable to check the oil level and appearance within a few days after the change. You should also make sure there are no leaks at the plug and box seals.
In earlier versions of the VAZ transmission, there is no hole for the probe on the front wheel. To fill the crankcase of such boxes with oil, there is a control hole closed with a threaded plug. Filling is carried out using an oil syringe. The oil level is considered normal when the lower edge of the inspection hole is reached.
Replacing the gear selection mechanism
One of the common reasons why the rear gearbox of a VAZ 2109 does not engage is the breakdown of spring 2 installed in a separate mechanism.
READ How to Turn on the Windshield Washer on a VAZ 2107
Gear selection mechanism
To gain access to it, it is necessary to remove and repair the mechanism itself, located inside the box.
A short list of necessary actions:
- Turn off the car.
- Remove the air filter completely.
- Remove the left wheel and unscrew the CV hub nut.
- Drain the oil from the crankcase.
- Remove the two bolts that secure the left joint to the steering cam.
- Unlock and remove the steering knuckle.
- Remove the fist from the braided seams.
- Remove the left disk completely.
- Remove the starter and negative cable from the crankcase.
- Remove the shift and clutch levers.
- Unscrew the cable to drive the speedometer.
- Place the stand under the box body and remove the box support fasteners
- Remove the transmission from the vehicle and disassemble it.
When disassembling the gearbox, it is necessary to check the condition of the gearbox locks, since wear is the main reason why the reverse gear involuntarily jumps out of the gearbox. You can reach the latch without removing or disassembling the box; it is located on the side of the crankcase and is closed with a screw plug. Disassembling the transmission and reviewing the gear selector will also help solve the problem in which the reverse gear
does not turn off on VAZ-
2109.
Spring replacement
Often, owners change the entire prefabricated assembly, which costs on average about 2 thousand rubles. But you can disassemble the mechanism and get it by replacing the spring, which costs up to 50 rubles.
You must do the following:
- Remove the plug from the locking axle and remove the axle itself.
- Unscrew the lever shaft nut.
- Remove the axle and replace the spring.
- Reassemble in reverse order.
Reasons for replacement
There are several situations when the owner of a VAZ 2109 has or wants to get into the design of the gearbox and specifically work with the rocker:
- Oil is leaking due to a damaged rocker seal. It must be replaced;
- The old drawstring was out of order;
- I would like to exchange the long-stroke for a short-stroke in view of its advantages.
Now to the question of when replacing or repairing the backstage is a necessary measure.
- The backlash of the gearbox selector has increased significantly.
- Gears change with difficulty, and when changing speed, extraneous sounds appear.
- It is possible to change gears, but with a lot of effort.
- Speeds change incorrectly. Instead of one, a completely different one turns on.
- It is impossible to turn on all or part of the gears at all.
Even if the resulting play is still insignificant, it is advisable to immediately begin repairs or completely change the drawstring.
Replacing the oil seal
If you find that the oil in the gearbox is gradually disappearing, you can suspect the rocker seal. There is nothing else left to do but change the element.
- First, buy a new shift rod seal. It costs about 70-100 rubles.
- Drain the oil from the box, having prepared a clean container in advance. This is in case you refill the same oil. Although this is an excellent reason for you to change the transmission lubricant at the same time.
- To make sure the oil flows out better, first unscrew the filler plug or remove the speedometer gear. After draining the oil, screw the cap back on.
- We climb under the car and disconnect the fasteners of the gearbox lever driveshaft.
- Pull the boot off the cardan, unscrew the bolts securing it to the gearshift rod. Problematic fasteners that you will have to tinker with.
- After removing the cardan shaft, remove the rod boot.
- We remove the damaged oil seal using an awl or suitable available tools. The main thing here is the stock itself.
- We install a new one in place of the old oil seal and press it with a tube of the appropriate diameter.
- Put the boot back in place and rotate the driveshaft.
- Please note that the bolt securing the cardan to the rod is an adjustment bolt. Therefore, screw it in exactly the same way as before dismantling. Otherwise, some speeds may not turn on.
Causes
Reasons why reversals are bad or difficult may include:
- Loosening of the mounting clamp of the steps, due to which the rod is not long enough to fully engage;
- Reverse speed lock jammed;
- Spring breaks and dirt get into the guide grooves of the gear selection mechanism;
- Unauthorized loosening of the selector mechanism mounting bolts;
- Clamp bolt cut off;
- Worn clutch disc and exhaust bearing;
- Incorrect adjustment of the clutch and clutch pedal;
- The oil level in the box is low or it needs to be replaced.