The motorcycle requires fairly frequent maintenance - in order for its transmission to serve for a long time and not create problems, it is worth periodically cleaning and lubricating the chain, and also changing it approximately every 10-15 thousand kilometers. Replacing a chain on a motorcycle is considered a rather complex operation, and many experts recommend taking this problem to a specialized service station. However, you can change the chain yourself, saving a lot of money. This type of work does not require any special technical skills, but there are many nuances to it. By following the recommendations given in the article, you can achieve reliability and durability of your motorcycle’s transmission.
Tools
To work with the chain you will need a fairly extensive list of tools. The most important tool in this case will be a special chain riveter - such devices are produced by many companies, so finding one will be relatively easy. The cost of the tool varies between 1000–5000 rubles, depending on the manufacturer and the grade of steel used. From some experienced craftsmen we hear that the riveter is successfully replaced with a hammer, chisel and core. This point of view is completely erroneous - it will not be possible to achieve a reliable connection of the chain with their help, and, most likely, it will soon break.
In addition, replacing sprockets and chain will require the following tools:
- Torque wrench with comfortable handle;
- Set of keys and sockets;
- Compact grinder with a diamond blade for metal;
- Grease as well as cleaner and chain oil.
It is better not to neglect the selection of high-quality tools, since it will be very unpleasant if during the work the key breaks in your hands and the motorcycle remains half disassembled. Remember that you will have to replace the chain regularly, so it is worth purchasing a quality set once and then using it for several years.
Dismantling
First you need to remove the chain cover and unscrew all the bolts holding the drive sprocket cover. After removing the plastic covers, attach all fasteners to their original places to prevent their loss. There is always a considerable amount of dirt under the star cover; it is better to wash it using a special spray. After this, rinse the unit with water and gently wipe off any remaining liquid with a non-abrasive cloth.
If replacing the sprockets is on the agenda, you need to loosen their fastenings by unscrewing the corresponding bolts. Here you will need help, since access to the rear wheel sprocket bolts is usually blocked by the pendulum and the motorcycle has to be moved back and forth. Now all that remains is to loosen the rear axle nut - however, there is no need to completely remove any fastenings yet! The motorcycle is mounted on the center stand or trolley, after which you need to finally unscrew the rear axle nut and remove the wheel. Having completed this operation, begin to remove the stars, completely unscrewing the bolts securing them.
To significantly facilitate the installation of a new chain, it is worth cutting the existing transmission mechanism. Some motorcycle models have a special device called a Chain Breaker - just lower it onto the chain and clamp it to knock the pin out of it. If it is missing, the chain can be riveted using the punch included in the riveting kit. However, experienced mechanics say that such a tool breaks too easily, and advise first sawing off the pin heads with a grinder. After this, it will be very easy to break the link - if you do not have all the above tools, you can cut the chain with a hacksaw, although such work will take a lot of time.
If you are interested in how to change a chain using a special tool, then you should know that you do not have to perform complex actions. A bushing for cutting the chain is installed in the riveter's clamping mechanism, after which it is combined with a pin with a sawn head. The clamping bolt is tightened with a pre-prepared torque wrench with a force of 10–12 Nm. All that remains is to insert the punch and screw it in until the pin falls out and the chain breaks.
How to properly replace a chain on an imported motorcycle.
An imported motorcycle has everything going for it: speed, quality of parts, neat appearance (no oil leaks) and undoubtedly power. And it is its power that is the main culprit for the rapid wear of parts such as chains and sprockets, especially if the driver is a fan of sudden starts from traffic lights. And if many bikers have no problems replacing sprockets, many don’t know how to properly replace the chain (X-ring) of an imported motorcycle. On any motorcycle, there comes a time when you need to replace an elongated chain, or even worn sprockets. When you need to change the chain or sprockets on an imported motorcycle, I advise you to find out in detail by reading this article.
Modern chains of imported motorcycles have special seals (X-ring) on each link, which can be damaged if pressed incorrectly. And the pressing itself must be correct and reliable, because the speeds and revolutions on such devices are close to those of an airplane. Here, the experience gained when replacing a chain on a domestic motorcycle will not help, since I have already said that the speeds and powers are different, and the design of the chain itself.
Many bikers simply have nowhere to go to a motorcycle service center, since there are simply no motorcycle service centers in small towns. How to properly change a branded chain on a powerful foreign-made motorcycle with your own hands, we will figure it out in this article.
TOOL SET: 1 — box; 2 - side plate stops for different chains; 3 — rod for pressing and riveting chains (inserted into the clamp bolt); 4 — limiter plate (which is used when assembling some chains); 5 - the clamp itself; 6 — clamp screw; 7 — clamp handle.
Many foreign companies produce fairly high-quality chains. And the company EK Chain, (you can read in detail about the company’s chains and the company itself here), and which is well known for its high-quality chains, and which was the first in the world to come up with O-ring and X-ring chains, produces, in addition to chains, also high-quality kit for their correct replacement. With the help of this kit, you can very easily, and most importantly, efficiently replace the chain on a foreign car at home.
In addition, this company offers locks for all three types of chains, which we will consider in more detail below. You can buy such a set only in large cities (I haven’t come across any in small ones), but for bikers in the outback, I can recommend a second way to purchase - make a purchase in an online store, of which there are now dozens on the Internet, and the goods will come to your mail.
Well, for the most handy craftsmen who categorically do not buy anything, but do everything with their own hands, for such creative people I offer a third method of acquisition, and publish a drawing with which it is easy to make a device for pressing out yourself. And in order not to suffer when making this homemade tool with a grinder, I advise you to order the fixture bracket from a familiar milling machine operator, and to make a bolt (above in the drawing), contact a familiar turner.
Naturally, people who are accustomed to doing everything with their own hands always have a good turner and milling machine in mind. You will also need to make 2 stops (see photo “Tool kit for assembling a chain” just above) of side plates for the chain, and I don’t publish the dimensions, since they are different for different chains. And you will also need to grind out rod 3 for unpressing and riveting the chains, which is inserted into a hole with a diameter of 6 mm of the bracket bolt (clamp). The end of the rod will need to be hardened. Well, the handle for the clamp (bracket) can be made from a pin or bolt of suitable diameter.
We've sorted out the tool, let's move on. Next, let's look at what types of chain locks there are. This is important, since for example chains with a spring lock 5 (see photo below), which are very well known to the owners
CHAIN LOCK FOR LOW-POWER EQUIPMENT: 1 — X-ring rubber seals; 2 — spacer plates (prevent pinching of the X-ring); 3 — chain plate; 4 — chain plate with axles; 5 - spring lock.
low-power domestic equipment, only low-power ones with an engine displacement of no more than 250 cc can be installed on imported motorcycles. You also need to know that chains of different or the same sizes can vary greatly in tensile strength. Be sure to find out what kind of chain and with what tensile strength you need to buy (it is indicated on the package with the chain) in the manual of your motorcycle. In addition, when purchasing sprockets and chains, take into account the country of manufacture of your motorcycle, since for American and European motorcycles, the gear ratio of the chain drive is different (in 99% of cases), as are the fasteners (bolts, nuts).
When assembling the spring lock, we install the spring plate only in the direction of the chain movement (shown by the arrow) - this is important.
CHAIN LOCKS FOR MORE SOLID CAPABILITIES: 1 — rubber sealing rings X-ring; 3 — chain plate; 4 — chain plate with axles; 6 — nuts for crimping the lock.
The remaining two locks are designed for more powerful motorcycles, but differ slightly in the pressing method. One of them has rods that will need to be flared with a clamp, and the second is self-pressing using special nuts (see photo on the left). Which of these two is more preferable is up to you to choose, but if anyone is interested in my personal opinion, then I consider the more reliable option not the one with nuts (self-pressing), but the one with securely flared rods. It is a little heavier during installation, but more reliable. But that's just my opinion. Chains (from high-quality companies) and with a self-pressing lock last a long time and without problems.
Now it remains to describe a little the process of replacing the chain. Before pressing, it is advisable to grind off the rods of the old chain with a grinder, then they will press out very easily. Next, having removed the old chain and placed (stretched) a new one on the sprockets, before assembling any lock, I highly recommend lubricating all its parts (usually a bag of special lubricant, available from reputable companies).
You first need to lubricate the two axes near the plate, and then put the rubber rings on the axles and lubricate them too. Next, we insert the axles into the bushings of the chain links and again lubricate the protruding parts of the axles. Now we put another rubber ring on the protruding parts of the axles and lubricate the rings. And only now we put on plate 3 and after that we press the assembled lock.
unpressing the chain
1 — rubber sealing ring; 2 — side plates; 3 - axes.
A clamp will help to tightly fit or fit the side plate 3 of the chain (here you can also use stops 2 for the side plates - shown in the photo of the tool kit), but you should not compress it too much until you insert special spacer plates 2 between the plate and the chain links. These plates (they come with the chain) will prevent you from pressing the clamp more than necessary and damaging (flattening) the rubber O-rings.
We use a clamp and stops on the side plates.
insert the spacer plates and tighten the nuts
When pressing a self-pressing lock (with nuts), a clamp may not be needed, since we compress the plate with nuts (turn each nut half a turn in turn). But even in this case, be sure to use spacer plates and turn the nuts until they crimp the plate, but without fanaticism, so that later you can pull out the spacer plates without any problems.
After tightening the nuts (we use an 8-socket wrench), unscrew them back and break off the no longer needed protruding ends of the axles using pliers. After this, all that remains is to insert the rubber rings (they are included in the kit of only this type of lock) into the grooves on the tips of the axles (shown in the photo with a red arrow).
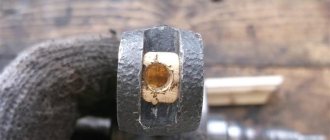
to flatten the tip of the axle, use a hardened cone (shown by an arrow)
How correctly pressed chain locks of a powerful imported motorcycle should look, see the last photo (both types of locks are highlighted in red ovals). That seems to be all. Having changed the chain, you now don’t have to worry that it will break at speed when you apply gas sharply, which means you can use the full power potential built into your device and enjoy its sharp acceleration. Well, also because you did all the work with your own hands. Good luck on the roads!
This is what properly pressed locks look like after assembly.
If this article is useful to you, please share it on social media. networks by clicking the buttons below. Thank you.
RќСЂР°РІРёС‚СЃСЏ
Installation
If you are going to change the sprockets, you can do without cutting the chain, since you still have to install the new gear by hand. However, if they are preserved, this operation can significantly reduce the complexity of the work. If you purchased a new chain from a similar manufacturer, you can simply connect it to the old one to achieve the desired result. Otherwise, you can use strong synthetic thread or wire. The resulting long chain must be pulled over the stars, gradually turning them.
To understand how to replace a chain this way, you need to wait until the old gear part is in contact with the sprockets. Be sure to generously lubricate the engaging splines with grease. Now you can remove the old chain and begin installing the new one. The drive sprocket needs to be put in its place and the mount attached. The next step will be riveting the chain, which is considered the most critical process in the entire replacement procedure.
If you're wondering how to rivet a chain using a hammer and chisel, you can read the tips below and do it manually - but the risk of breaking the gear mechanism is very high. Therefore, it is better to take a special riveter that limits the movement of the splines - this will allow you to keep the seals of the part intact. We generously lubricate the pins with a special chain lubricant, after which we put oil seals on them and lubricate them again. Now you need to thread them into the rollers, install another seal, lubricate it again and secure the lock cover on top. We install this link in the riveter so that the pins fall into a special groove - all that remains is to tighten the clamping bolt until they rest against its base.
Now you need to install a special attachment in the tool for riveting the pins. Press it against the surface of the chain - it is almost impossible to miss, since the tool has a special recess that makes aiming easier. Using a torque wrench, tighten the clamp bolt until the end of free play. Depending on the chain manufacturer, this value can be in the range of 15–20 Nm, but you should focus on a sharp increase in the required force to turn the bolt. Do not try to overtighten the bolt, as this will cause the lock to lose mobility, which will lead to accelerated wear of the transmission.
All that remains is to install the rear sprocket and attach the mount. Now you need to reinstall the wheel in reverse order, but also do not tighten the axle. Check that all parts are in place and that you have not lost any fasteners.
Replacing chain and sprockets
We all know what new stars look like: ordinary, even, symmetrical teeth in one quantity or another.
Leading and following, nothing complicated: everything is new, beautiful and shiny.
But after driving for a couple of dozen hours, you notice that the driving sprocket is pretty worn out, while the driven sprocket is like new and the wear is not noticeable.
Well, let's start with something simple: why the leading star works faster and more. The fact is that the fewer teeth on the sprocket, the more it needs to make a circular movement to cover a particular distance. Simply put, the leading star will go through a greater number of circular cycles in 1 km than the leading one: after all, on average the ratio is 15/41 - a difference of almost three times.
The second reason is just as obvious. Have you ever wondered why open generator covers are made? So that the leading star is open?
Yes, the fact is that if you roll through mud, then dirt is pressed under this very cover, which is not thrown out, but only accumulates and accumulates. At the same time, the drive star spins in a mixture of dirt, grass and sand, which leads to its very rapid wear, which is not at all good.
Naturally, the star needs to be changed, but then you remember that you heard somewhere that you need to change the chain and stars only together. You are right, but only partly.
Let's look into this issue.
If you installed a complete new set - chain and both sprockets - and the drive sprocket is worn out - this is quite normal. As mentioned above, the leading star does a lot of work during the same cycle, so it wears out faster. If at the same time the driven sprocket is not worn out, and the chain is not stretched to the limit, then you can simply change the driven sprocket and continue riding. This can be done up to three times, after which both the stars and the chain should be replaced, because by this moment sufficient wear will appear on the driven star, and, naturally, the chain will stretch, i.e. the axial clearances between the links will increase.
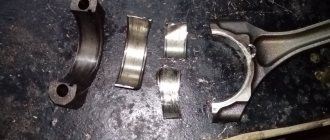
On the sprockets, photos of which are below, the driven sprocket already has a mileage of almost 30 thousand km, just like the chain, but the driving sprocket, unfortunately, is already on its third.
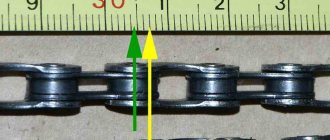
If you consider yourself the smartest, and add a new drive star to a worn-out driven sprocket and an elongated chain, then it will last for exactly a week, after which it will simply be gobbled up. Let's explain why. You set a sprocket for a specific pitch (for example, 420), and your elongated chain already has different, increased axial clearances between the links. Accordingly, her step is no longer 420, but more. So it turns out that you have a stupid mismatch in the steps of the stars, and accordingly, your new star will suddenly be devoured.
Well, the last option: your chain and stars have died, the chain has stretched beyond its limit, and you can safely install a new chain! Handsome guys, you know how to throw money away...
Everything is the same as in the example above. Your worn sprockets no longer match the pitch of the new chain because they are already worn out! Having slammed a new chain onto the damaged sprockets, you immediately doom the chain to instantly stretch: it goes to scrap metal, and yes, don’t be surprised that the chain will also fly off and break through your generator cover, tear off the hall sensor, etc... You need it ?!
Well, here we go again!
A worn out drive sprocket is not critical; it can be replaced up to 3 times.
It is IMPOSSIBLE to use an old chain on new sprockets! The old chain is elongated, the axial clearances between the links are greater than the required sprocket pitch, which leads to rapid wear.
A worn driven sprocket indicates only one thing - the chain and sprocket set need to be replaced. You CANNOT use a new chain on old sprockets - you will instantly stretch the chain and waste your money.
Bottom line: If you want your chain and sprockets to last a long time and avoid problems, follow the advice in the article above.
Ending
The next step will be to adjust the chain - for road motorcycles, 25-35 mm of sagging in the transmission mechanism is considered normal. Depending on what kind of mechanism is used on your motorcycle, you may need to move the axle through a special slot, controlling it using adjusting bolts, or turn the eccentric device. Once you have the desired level of sag, tighten the rear axle nuts and make sure the rear wheel is completely locked.
Now start tightening all the fasteners to the required torque using a torque wrench - you can find all the values in the motorcycle's owner's manual. You should start with the rear sprocket, tightening its bolts crosswise to avoid damaging the threads, fix the front sprocket and check that the chain rotates without significant sagging in a certain area. Before using the motorcycle, the transmission mechanism will need to be lubricated using a special spray.
If you purchased the wrong chain model and need to know how to shorten it, you should use the recommendations above. Using a punch, break the mechanism and remove the required number of links from it. After this, carefully lubricate all components and install the splines, not forgetting the oil seals and rollers of the friction pairs. However, such an operation should be performed only as a last resort - before purchasing a chain, you need to check whether it is suitable for a particular motorcycle model.
Examination
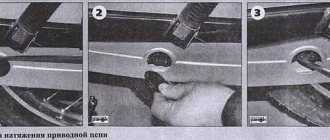
First, you should determine whether your chain needs tension - for this you need to take a control measurement. The motorcycle must be placed on the side stand, removing panniers and other foreign objects from it. As a tool, you should take a tape measure, a ruler or a fairly large caliper. Make sure there is no load on the suspension and start taking measurements.
Very often the question arises, how should the chain be tensioned to avoid accelerated wear of motorcycle components? It is best to check the operating instructions developed by the motorcycle manufacturer, since the standard indicator may be individual for a particular vehicle. If this is not possible, you should use average values equal to:
- 15–25 mm for sport bikes;
- 30–45 mm for domestic equipment and medium-power road motorcycles;
- 35–50 mm for touring motorcycles with a large engine capacity;
- 50–60 mm for motocross motorcycles and off-road vehicles.
When checking, it may be discovered that the actual indicator is outside the acceptable range. In this case, it is necessary to urgently tension the chain to avoid motorcycle breakdown in the near future. In addition, it is worth performing another check, assessing the technical condition of the circuit. Gradually spinning the rear wheel, determine the degree of sagging at each point - if this indicator differs significantly, the part urgently needs to be replaced. If your chain is very stretched, but you need to get to a store or service center, then to adjust you need to choose a position with minimal slack.
Hard work
Replacing the chain cannot be called particularly easy, although this operation does not require any special technical knowledge. The problem is that there are a huge number of nuances - the transmission mechanism can be overtightened, crushed, or simply mounted incorrectly. Therefore, when performing work, you should check all recommendations and use only high-quality tools. If you do not feel confident that you can perform all the procedures correctly, it is better to entrust the chain replacement to specialists. A motorcycle service station will help you make repairs in the shortest possible time, and will also guarantee the reliability of the transmission.