How to tell if replacement is needed
It is clear that the circuit must be changed when there is obvious dysfunction. When the chain wears out a lot, it makes a loud noise. Well, or jumped over the tooth of a star. Or it fell off, which indicates its stretching and wear.
Standard chain lifespans should be close to the lifespan of the scooter engine itself. It's logical. Each owner operates the vehicle differently, but the average chain lifespan is somewhere between 15,000-18,000 km. In a situation where the engine was halved to eliminate other faults, and the chain was immediately replaced after using it for, for example, 9000 km, everything is clear.
There are options for shortening the chain when stretched. But there are some caveats: if the step does not match, the star begins to erase, i.e. the stretched chain eats the camshaft sprocket. If the wear on the star is small, you can isolate the link and ride it a little. You need to do this correctly, adjusting the chain tension with a tensioner, and not forcibly. Otherwise, you will completely damage the chain.
What is typical for a worn chain: A small point: to check, you need to remove it.
The degree of wear can be assessed by the angle of horizontal deflection. If it sags downwards, going almost vertically, change it 100%. The new chain deviates approximately 45 degrees from horizontal. And by laying out the old and new chains on the surface, you will see that the first one will be longer.
Also, the wear of the scooter's timing chain can be indirectly judged by the level of extension of the tensioner rod. Critical wear is when the rod extends completely.
To change or not to change?
Suppose you “overhaul” your engine: you change the seals, crankshaft, gaskets and other devices, but you doubt whether to replace the timing chain with a new one or not. If you doubt it in vain, change it for a new one at the first opportunity. And now I will explain why.
See for yourself: a chain has an average service life of approximately 18,000-20,000 km of a scooter (personal experience), approximately the same as the average service life of the engine itself. And for example, after driving 6,000 km, the crankshaft jammed or the engine leaked, or something else happened that requires complete disassembly of the engine. Naturally, you disassemble the engine, replace the crankshaft with a new one, and leave the chain, which by that time has exhausted a third of its service life.
And what happens? The chain, after 12,000 km, will exhaust its service life and become unusable, but the crankshaft and other parts will be in good order and you, like it or not, will have to again, because of the chain alone, half the engine. Is it necessary? The chain is a consumable item. Never skimp on it!
How to replace the timing chain in an engine
Having decided on such an action as replacing the timing chain of a scooter, you need to decide on how to implement your plan.
There are two replacement options:
How to change, everyone decides for themselves. Both methods, advantages and disadvantages are described in detail below.
With disassembly
You should choose the right tools - generator and variator pullers (you can make them yourself), a kickstarter sprocket puller, 8, 10, 12 and 17 mm sockets, a hammer, two screwdrivers (flat, Phillips).
The engine is removed from its place, the oil is poured out, all parts are wiped and cleaned. Next, remove the muffler and cooling casing. We remove the generator only with a puller. To do this, unscrew the bolts from the impeller and remove it from the rotor. It is necessary to fix the rotor with a puller and unscrew the nut. Then we tear the rotor off the crankshaft journal. Remove the variator cover. Also, secure the impeller with a puller, unscrew the nut, and remove the variator from the axle.
Below the variator is the kickstarter gear. Likewise, a puller is required for it. Then we clean the cylinder connector, valve covers and cylinder head. After unscrewing the bolts on the valve covers, remove it. Next, remove the scooter's timing chain tensioner. After unscrewing the bolts on the cylinder head, we pull out the camshaft bed.
Next, remove the chain from the camshaft and pull it out of bed. To avoid losing the guide bushings that center the parts relative to each other, you need to remove them and put them away. We remove the cylinder head, the cylinder itself, and the piston (to do this, remove the retaining ring and pin from the upper connecting rod head).
After unscrewing the bolts on the crankcase cover, tapping it a little, remove it from the engine. We take out the starter intermediate gear, use a screwdriver and a hammer to unscrew the overrunning clutch nut (clockwise) and remove the gear and housing from the trunnion. We reached the chain!
Remove the protective shield from the oil pump. Place a metal stick under the chain, twist the nut on the oil pump sprocket, remove it and remove the chain.
No disassembly
We take the following tools: a Phillips screwdriver, pliers, a new chain and a special puller. More details about it will be below. We flare the new chain - to do this, use a puller to press the pin out of the joint of the links, but not completely.
A little about the puller
It is called a timing chain puller. It can be made by a turner by turning a threaded extruding pin and rolling a strong pin into it with a diameter similar to that of a chain pin. You can purchase a ready-made bicycle one. Just narrow the pin a little to the desired size.
Remove the cooling casing from the scooter engine, then the cylinder head cover. Next you need to remove the chain tensioner. We remove the camshaft bed, take out the shaft, remove the star.
We take the puller, center it with the pin, and gradually press out the pin. You can press it out completely, it will not be useful. We compare the links of the new and old chains, thread the wire into the seat of the pin and fix the ends of both chains. We turn the cooling impeller counterclockwise, gradually replacing the old chain with a new one.
Then we separate the ends of the chains, throw out the old one, and combine the new links from the ends. We check the alignment, install the pin, and use pliers to carefully press the pin in so as not to damage the new chain. We first check the mobility of the links. We finalize the pin with a puller. Again we control mobility. This point is very important: if you install the pin unevenly and miss it, it will begin to rest against one of the links and squeeze out the next one.
As a result, the subsequent pin or link bends, causing it to jam and become immobile.
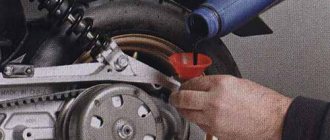
Next, we assemble the engine in reverse order, placing marks on the rotor. When installing the camshaft bed, after tightening the nuts, you need to check the valve clearances with a feeler gauge. Upper valve – inlet: 0.05mm, lower – exhaust: – 0.1. The feeler gauge should fit freely between the valve and the adjusting bolt.
Then install the chain tensioner. We unscrew the bolt on the top of the tensioner, install a screwdriver in the groove, and, turning it, push the rod back. We fix everything else back according to the diagram.
How to set the ignition on a scooter
With minimal experience, but good theoretical knowledge, you can set the ignition yourself. To do this, you just need to strictly follow the instructions below.
The most important part of tuning is to find the correct position for the timing sprocket to sit. In order to find it, they use special marks that are applied at the factory during engine assembly. The desired mark looks like the letter "T". In this position, the piston is at dead center. This is the extreme position after which the piston will return back. You need to rotate the rotor until the protrusion on the crankcase and the letter “T” coincide. This can be done using your hands or a kick starter. An electric starter does not need to be used.
If the piston has only moved down minimally, turn it further until the marks line up. It's not always possible to get the right position the first time. After they match, you need to study the other marks: they are located on the timing star. Usually these are three points or holes that are located on the outside of the star. They form a triangular shape if you connect them visually. Notice that one point is larger than the others. After adjusting the ignition, it should be on top, and the other two marks should remain opposite each other. They must stand horizontally.
Which method is preferable?
It is logical that the first option with complete disassembly of the scooter engine is more complicated and takes more time and effort. But, as you can see, it is more reliable. Firstly, the factory integrity of the circuit is not compromised; secondly, when disassembling the scooter engine, you can see any defects, such as cracks, wear, change the seals, clean the parts.
The second option is more simplified and can be used when you only need to replace the chain. And you are confident in the quality of your work.
Final word
The scooter is a fairly popular vehicle and is in increasing demand. Because it leaves traffic jams behind, has low operating costs and is economical in terms of fuel and lubricants. Many people prefer to do scooter repairs on their own, especially since four-stroke engines are simple and reliable to use. Timely technical inspections, careful operation and the above article will allow you to enjoy riding this miracle of the Asian motorcycle industry for a long time.
Source
Replacing the timing chain on a 139qmb engine the easy way
How I replaced the timing chain on a 139qmb engine of a Chinese scooter, and at the same time checked the possibility of shortening the timing chain
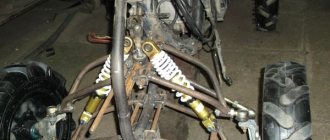
When I first opened the valve cover on the 139qmb engine, shortly after purchasing a used scooter, it was discovered that the timing chain was stretched to the limit and even more. The tensioner was pulled all the way out, but the chain was still loose. with spare parts for scooters in our area, and attempts to find them in stores led to nothing. I've been driving like this so far. But soon there were two instances of the chain slipping on the camshaft or crankshaft sprocket, but in any case in such a situation, having turned off the engine, it was impossible to start it again until the camshaft was installed according to the marks. Since there is still no timing chain Under the cylinder from thick (2 mm) cardboard, under the head - from metal asbestos, also about 2 mm thick. The chain no longer jumped on the teeth, but it was still rather weak. You won't be able to travel like this for long. There was an idea - to shorten the chain by throwing out one link, but then on one site I found an acceptable option for me to purchase a chain through an online store by mail with cash on delivery - honlingzakaz.ru - Timing chain 50cc (139QMB). Simple registration, the only thing is that the minimum order price was no less than 400 rubles and in addition I ordered head and cylinder gaskets. Placed an order by registering on the website (you need a valid e-mail and phone number). After some time they contacted me and I confirmed the order. A week later I received the parcel at the post office.
How to adjust and tension the chain?
There’s no way you can tighten it or adjust it, and you don’t bother Google or Yandex search with such queries. The chain in the scooter engine is tensioned automatically. And if it has already stretched to such an extent that it begins to fly off or jump over the teeth, feel free to disassemble the engine and replace it with a new one. There are no miracles.
And I will prove this to you now. The chain in the engine is tensioned using a special tensioner, which operates in a fully automatic mode. As the chain stretches, the tensioner rod, under the action of an internal spring, comes out of the housing and tightens the chain. And the more the chain stretches, the more the rod will come out. But! The rod has a limited stroke: on a completely new chain it comes out about a third of its stroke and then, as it stretches, it comes out completely and then it won’t come out anymore. Therefore, the chain will no longer be tensioned! And all your attempts to correct the situation will lead to nothing.
Photo report: How to check the timing chain of a scooter?
It’s always like this in life: one thing is good, the other is bad. Exactly the same principle applies to various types of mechanical torque transmissions. Chain transmission was no exception here. On the one hand, there is nothing simpler, more reliable, lighter, more compact and cheaper than a chain drive.
On the other hand, we get eternal “hemorrhage” with stretching of the chain, wear of the sprockets, endless cleaning and lubrication, maintenance and tension of this very chain. But there is nothing to be done, the chain transmission has a lot of advantages over other types of mechanical transmissions, so these types of transmissions are used almost everywhere.
However, today we will not talk about the chain drive as such, but about a method for diagnosing the timing chain driving the camshaft of a scooter engine.
To change or not to change?
Suppose you “overhaul” your engine: you change the seals, crankshaft, gaskets and other devices, but you doubt whether to replace the timing chain with a new one or not. If you doubt it in vain, change it for a new one at the first opportunity. And now I will explain why.
See for yourself: a chain has an average service life of approximately 18,000-20,000 km of a scooter (personal experience), approximately the same as the average service life of the engine itself. And for example, after driving 6,000 km, the crankshaft jammed or the engine leaked, or something else happened that requires complete disassembly of the engine. Naturally, you disassemble the engine, replace the crankshaft with a new one, and leave the chain, which by that time has exhausted a third of its service life.
And what happens? The chain, after 12,000 km, will exhaust its service life and become unusable, but the crankshaft and other parts will be in good order and you, like it or not, will have to again, because of the chain alone, half the engine. Is it necessary? The chain is a consumable item. Never skimp on it!
Examination
Personally, I never check timing chains. I simply throw them in the trash, no matter how awesome they seem to me. For me, a chain is a consumable, just like a spark plug, oil or oil seal. But if you are important, or money is tight, you can use the old fashioned way.
We stretch the chain along its length, hold it with our fingers and try to position it in a horizontal position
For clarity, I took a new and heavily worn chain, put them together and checked for horizontal deflection. As you can see: the new chain (above) described a barely noticeable arc, while the worn and useless chain sagged like snot, almost at an angle of 90 degrees.
The worn chain turned out to be almost a centimeter longer compared to the new one.
How to replace the timing chain of a scooter engine?
It’s very simple, my friends: you remove the engine from the frame, disassemble it and replace the chain with a new one. There are no special secrets in this matter, just as there are no special ways to “cheat fate” and replace the chain without disassembling the engine. The chain can only be replaced by completely disassembling the engine.
The timing chain is in no way designed to be riveted or riveted. During the riveting process, it can easily be pulled or twisted, and this is a sure way for the chain to fly off the sprocket while the engine is running, and then, depending on your luck... Maybe everything will work out, or maybe the valves will bend. And one more point: a beginner will not be able to rivet a chain efficiently. This work is not as simple as it might seem at first glance. Therefore, don’t suffer from bullshit and disassemble the engine.
How to adjust and tension the chain?
There’s no way you can tighten it or adjust it, and you don’t bother Google or Yandex search with such queries. The chain in the scooter engine is tensioned automatically. And if it has already stretched to such an extent that it begins to fly off or jump over the teeth, feel free to disassemble the engine and replace it with a new one. There are no miracles.
And I will prove this to you now. The chain in the engine is tensioned using a special tensioner, which operates in a fully automatic mode. As the chain stretches, the tensioner rod, under the action of an internal spring, comes out of the housing and tightens the chain. And the more the chain stretches, the more the rod will come out. But! The rod has a limited stroke: on a completely new chain it comes out about a third of its stroke and then, as it stretches, it comes out completely and then it won’t come out anymore. Therefore, the chain will no longer be tensioned! And all your attempts to correct the situation will lead to nothing.
Chinese scooter timing chain installation
1. Install a new cylinder head gasket.
ATTENTION!
The cylinder head gasket is made of soft metal (copper, aluminum) and after tightening the cylinder head nuts it is deformed, thereby ensuring a tight connection. Reinstallation of the cylinder head gasket is not permitted.
2. Install the timing chain guide.
3. Install the cylinder head.
4. Set the piston to TDC according to the marks on the flywheel. This is usually the "T" mark on the flywheel. Align the mark with the tide on the engine crankcase.
ATTENTION!
The following operation is one of the most important when assembling the engine. It is important to align all the marks very accurately. An error in installing the chain even by 1-2 teeth will result in the engine not working correctly, and it will probably even lead to serious damage to the timing and cylinder-piston gas parts when trying to start the engine!
5. After making sure that the timing chain has not jumped off the drive sprocket on the crankshaft, install the camshaft into the cylinder head, at the same time putting a chain on its sprocket so that the marks on the camshaft sprocket are parallel to the plane of the edge of the cylinder head, and the cams are directed downward (inside the head).
6. Install the rocker arm support, orienting it according to the installation marks. Lubricate the cams and camshaft bearings.
On the rocker arm support are the letters “EX” - which means “EXHAUST” - release. The "EX" mark should be located above the exhaust valve.
ATTENTION!
• Check the correct axial alignment of the camshaft (make sure that the camshaft bearings are correctly positioned on the beds). Probably, on some scooter models, the holder will have a mark “IN” - “INTAKE” - inlet. Accordingly, the “IN” mark must be located above the inlet valve.
ATTENTION!
If the copper washers are severely deformed (flattened), they must be replaced, since if the washers do not fit tightly due to oil leakage, the pressure in the lubrication system will drop and the motor will quickly fail. Sealing this connection with any sealant is unacceptable.
7. Install sealing copper washers on the studs.
8. Screw on all four cylinder head nuts without tightening them.
9. We recess the working rod of the timing chain tensioner inside the housing.
10. Reinstall the timing chain tensioner and tighten its mounting bolts.
11. Insert the working bolt and the timing chain tensioner spring, tighten it. In this case, you can hear characteristic clicks - the ratcheting mechanism of the tensioner working rod will be activated, which, under the influence of a spring, will come out of the housing and tension the timing chain.
12. Sequentially, crosswise tighten the cylinder head nuts in 3-4 steps. The final tightening torque is 10-15 Nm (More accurate values can be found in the repair instructions for the specific scooter model).
13. Screw in and tighten the additional cylinder head bolts.
14. Using a socket wrench for the central bolt of the flywheel, or with your hands holding the flywheel, slowly turn the engine crankshaft clockwise 3-4 turns to make sure that the timing timing is set correctly and the piston does not collide with the valves.
15. We install the crankshaft at TDC of the compression stroke and once again check the correct installation of the camshaft according to the marks.
17. Rotate the crankshaft several turns and once again check that the valve clearances are set correctly.
18. Install the cylinder head cover and tighten its bolts.
19. Place the crankcase ventilation hose onto the fitting in the cylinder head cover.
20. Install the cylinder cooling casing.
ATTENTION!
Do not forget to remove the paper from the intake manifold if you covered it from dirt during disassembly.
21. Install the inlet pipe assembly with the carburetor.
ATTENTION!
In most cases, when installing an exhaust system, the exhaust pipe gasket will need to be replaced. It is better to replace it with a new one during assembly.
source
Additional actions
If you know how to tighten a motorcycle chain, it wouldn't hurt to check the condition of the sprockets and other transmission parts. If signs of significant wear are detected, they should be replaced immediately, since breakdowns of this type seriously affect the reliability and durability of the motorcycle transmission. If you find that the chain is very stretched, it is better to get rid of it immediately - especially if you like to ride at high speed or perform stunts by tipping the motorcycle onto its rear wheel.
In addition, when regularly tightening the chain, it should also be cleaned and lubricated. It is better to use special products in cans that are supplied under high pressure - they effectively wash away all foreign deposits and also penetrate into all internal parts of the chain drive, contributing to its effective lubrication. The procedures are also performed with the rear of the motorcycle raised, which allows you to quickly spin the wheel if necessary. There are also special devices for cleaning the chain. The device is fixed to the transmission mechanism of the vehicle, after which all that remains is to engage first gear and ensure a continuous supply of cleaning agent to the receiving tube.
The motorcycle is serviced approximately every 500–2000 kilometers, which ensures the reliability and durability of all mechanisms. Every time you clean and lubricate, you should check the degree of chain tension to prevent serious sagging. Experts say that on average, tensioning has to be done every 2–5 thousand kilometers, depending on the operating conditions of the motorcycle. It is worth completely changing the chain every 10–15 thousand kilometers, or more often with an aggressive driving style or with frequent off-road trips. Failure to comply with these deadlines leads to accelerated wear of the transmission and the approach of expensive motorcycle repairs.
About adjusting the ignition of a 4t scooter
Knowing how to set up the ignition of a 4T scooter on your own, you can save time and money, since you will not need to contact a motorcycle repair shop. The procedure is simple, even if you have no experience it takes a little time, but you will need to be patient. Regardless of the type of ignition, an important role is played by how the marks are set.
Correct adjustment is a guarantee of stable and smooth engine operation even in cold weather conditions. Often, in used vehicles, the ignition is broken: this can happen for various reasons, ranging from elementary shaking when driving to improper handling of the equipment. In order for the scooter not to let you down and for you to be able to start it whenever you want, you will need to learn how to carry out this procedure yourself. To do this, you will need to have several keys that allow you to remove the valve cover if the engine is four-stroke.
Setting up the Vision scooter ignition system
If the ignition is knocked out, this may be the reason the scooter does not work. Restoring it is not difficult if you understand how it is done.
Advice: before starting work, carefully check and clean the carburetor: this may be the reason. Adjust the quality of the mixture. In addition, it doesn't hurt to check the spark plugs.
You need to start adjusting by setting the timing belt in the desired position. As a rule, there are marks on it for this purpose; they are set at the factory. The cylinder must be installed at dead center. The mark may be indicated by the letter T or another symbol. Now make sure that the mark installed on the rotor matches the mark found on the magneto. To do this, you need to gently press the kickstarter. The rotor can also be turned using your hands, but this is more difficult.
There are also marks on the timing star in the form of holes or dots; they must be set so that the largest hole is on top and located exactly in the center. The remaining points should be below and located horizontally opposite each other. Setting the ignition advance makes sense if you want to increase the engine's power a little and make it start easily. The adjustment will help make the spark plug produce a spark earlier than the standard time. That is, a spark will appear even before the piston reaches the dead center. In cold weather, a moped configured in this way will start better.
In order to configure the scooter in this way, you will need to repeat the procedure described above. However, there is a difference: the marks should not coincide clearly, and not reach each other by about 0.5 cm. The main difficulty lies in connecting the marks.
Examination
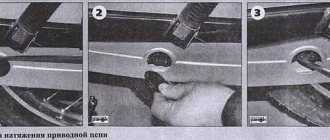
First, you should determine whether your chain needs tension - for this you need to take a control measurement. The motorcycle must be placed on the side stand, removing panniers and other foreign objects from it. As a tool, you should take a tape measure, a ruler or a fairly large caliper. Make sure there is no load on the suspension and start taking measurements.
Very often the question arises, how should the chain be tensioned to avoid accelerated wear of motorcycle components? It is best to check the operating instructions developed by the motorcycle manufacturer, since the standard indicator may be individual for a particular vehicle. If this is not possible, you should use average values equal to:
When checking, it may be discovered that the actual indicator is outside the acceptable range. In this case, it is necessary to urgently tension the chain to avoid motorcycle breakdown in the near future. In addition, it is worth performing another check, assessing the technical condition of the circuit. Gradually spinning the rear wheel, determine the degree of sagging at each point - if this indicator differs significantly, the part urgently needs to be replaced. If your chain is very stretched, but you need to get to a store or service center, then to adjust you need to choose a position with minimal slack.
How to tighten the chain on an Alpha moped?
A distinctive feature of a moped from a scooter is that the former has a chain instead of a belt, so sooner or later quite typical breakdowns occur with Alpha mopeds. The chain tends to stretch over time, after which movement becomes quite problematic. You can tension the chain yourself; no special skills are required. But know that you don’t need to tighten the chain on the Alpha moped too much; the free play should be from 2 to 3 cm, otherwise you will face much bigger problems.
So, if you don’t know how to tighten the chain on an alpha moped, follow the instructions below.
First of all, remove the passenger footrest so that it does not interfere with tensioning. Then place the alpha moped on the center stand. But some experts recommend tensioning under a certain load on the moped, because on the center stand your vehicle will be supported by weight; after tensioning the chain, you will notice that it has become even more tense, like a string. This oversight leads to serious damage; many say that an overtightened chain after 1 thousand km leads to a breakdown of the entire clutch mechanism.
How to set the ignition on a scooter
The ignition system plays an important role: without it, not a single vehicle with a gasoline or diesel engine will move. The quality of engine operation, whether it will start in cold weather, and whether it will work correctly depends on how it is configured. Depending on how the ignition is set and what spark plugs are selected on the scooter, it depends on whether it will go or not. From this material you will learn how to set the ignition on a scooter yourself, what you will need for this, and how to set up a contactless system.
Preparatory work
It is imperative to clean the chain, otherwise tensioning will not work. There is grease on metal surfaces, and dust accumulates on top over time. These contaminants cannot be washed off in ordinary water; you need to use auto chemicals. It is better to choose a product in the form of an aerosol that will not corrode the seals - chain O-rings
If the mechanism is heavily dirty, it is advisable to remove the cover from the drive sprocket. It is important to ensure that the retaining nut is well tightened. The cleaning itself is carried out as follows:
Cleaning the moped chain Now you need to determine the degree of wear of the elements. The chain links should not jam, ideally they move easily. It is also necessary to check the presence and condition of the seals. The sprocket teeth must not be bent, pointed or damaged. Wear on the tooth surfaces may be associated with improper installation of the rear wheel.
To determine the condition of the chain, you need to check whether there are areas where the tension is too high or, conversely, weak. To do this, you need to manually turn the wheel. If such areas are present, it means that the bushings and pins have worn unevenly. In this case, the distance between the pins increases and the chain becomes longer.
Severely worn chain
Often the cause of the appearance of sections with different tensions are problems with other components of the moped. The sprockets may be installed with an incorrectly centered hole or the wrong diameter. Uneven tension may be due to severe wear on the wheel hub or failure of the sprocket hub bearings. But other damage may also be discovered, so it is important to carry out a thorough inspection.
It is easy to determine the degree of wear by the length of the chain. To do this you need to pull it back. It is important to try to pull the chain off the sprocket at the same time. Replacement is required when, when attempting to remove, most of the sprocket tooth becomes visible. If the chain rollers are bent and squeak when driving, it is better to change the part along with the sprockets.
After cleaning, you need to align the rear wheel. This is an easy task if the axis is marked. But the marks sometimes get confused, so additional checking is necessary. As the rear wheel rotates, you need to shine a flashlight and pay attention to the chain. If it does not move straight, it means the installation was not done correctly.
After installing the rear wheel, you need to remember where the marks are located. If they are not symmetrical, this indicates that the marks were applied incorrectly. In this case, you can draw new marks on the reverse side of the chain with a marker. When tightening the rear axle, it is important to push the wrench toward the front wheel.
How to tension a chain on a moped?
One distinguishing feature of a moped from a scooter is that a moped has a chain instead of a belt. Therefore, over time it can stretch. You can tension the chain without any skills, it is not difficult at all, so you can do it yourself. It is recommended not to tighten the chain too much; the free play should be from 2 to 3 cm, otherwise the chain may break. Also, do not forget to lubricate the chain with oil. In order to tension the chain you will need: 4 keys, 10, 14, 17 and 24.
How to tension a chain on a moped? Link to the main publication moped-info.ru
How to set timing marks on an alpha moped
Checking the timing belt by marks on the Delta EX 50 moped engine 1P39FMB (139FMB)
Comments from those interested:
Roman Khimchenko 2 weeks. reverse And if it doesn’t match WHAT to do
Vladimir Voronov 2 weeks. reverse Set it to match.
Valentin Sidorov 1 month ago Thanks for the video. Features of the engine timing The valves on the Alpha moped are made How to set the ignition. Everything is described carefully and clearly, in Russian. 598 Removing the generator rotor on an alpha alpha moped. how to remove Remove the generator. How to replace the starter chain on an alpha moped video. I can’t remove the rotor on the alpha moped, there is no seal on the market, I haven’t found it, so I’m thinking about the best way to remove it, has anyone removed it and in what ways. If you continue to make videos like this, I will be all for it!
Vladimir Voronov 1 month ago This is nice. )) And of course there will be new videos, just wait a little.
Danil Pugachev 1 month ago no, we don’t even know where the head with the boiler is attached, we installed two gaskets, we thought it wouldn’t knock, the valves knock loudly when you turn the starter, okay, thanks for the hint
Vladimir Voronov 1 month ago Yes! Another thing, don’t install two gaskets; it won’t make things any better; an increase in the combustion chamber will result in a drop in power.
Danil Pugachev 1 month ago no, we don’t even know where the head with the boiler is attached, we installed two gaskets, we thought it wouldn’t knock, the valves knock loudly when you turn the starter, okay, thanks for the hint
Hunter38767 3 weeks reverse And if you have a 50cc head and a 72cc piston, then you need to change the head.
Danil Pugachev 1 month ago no, we don’t even know where the head with the boiler is attached, we installed two gaskets, we thought it wouldn’t knock, the valves knock loudly when you turn the starter, okay, thanks for the hint
Hunter38767 3 weeks reverse Two gaskets are not allowed, look, the valves may be overtightened, unscrew the two caps on the head, and look at the gap, it should be 0.05 on the feeler gauge. But if they hit the piston, then there is no gap.
Sergey Vasiliev 1 month back Vadim, thank you, I read a lot of useful information, thank you, I will be glad to see new videos on alpha, I’m really looking forward to it
Arkady Novoselov 1 month back, well done, thank you for you!
Danil Pugachev 1 month ago no, we don’t even know where the head with the boiler is attached, we installed two gaskets, we thought it wouldn’t knock, the valves knock loudly when you turn the starter, okay, thanks for the hint
Professional approach
Many motorcyclists treat chain tensioning as a routine procedure, during which significant tolerances can be made and the position of the rear wheel can be adjusted “by eye”. This approach when setting the required chain tension is unacceptable - all operations must be performed as carefully and accurately as possible, using special tools. If you want to extend the life of the chain and avoid severe wear on the transmission when using the motorcycle in extreme conditions, you should purchase a special laser gauge to set the optimal wheel position. In the most difficult cases, if you cannot understand the structure of the adjusting mechanism or cannot loosen it, you should contact the specialists of a motorcycle service station. They will carry out all the necessary work, providing you with a guarantee of the quality of the result and the reliability of the motorcycle.
Preparation
So that you don’t have green snot later about the fact that the tuning piston does not fit into the crankcase and you were allegedly deceived here - remove the old piston from the engine and measure the hole for the liner with a caliper. If the hole is smaller than the tuning piston sleeve, the “meat” of the crankcase allows it, hands grow from where it is needed - a round file will help you (only before boring - disassemble the engine, assemble the empty crankcase with bolts, bore the hole, make sure that the piston enters the crankcase without problems - wash the parts from shavings and reassemble the engine. Or, as a last resort, coat the crankcase and file with grease to at least somehow protect yourself from sawdust getting into the inside of the engine.)
The hole for the 162QMK engine sleeve (such engines are installed on Chinese scabs, more popularly known as “Leika”) in stock is 65 mm. Without boring, a piston of 57mm (150CC), 61mm (1700CC) and 62mm (180CC) easily fits into this crankcase. You won’t find a 62mm piston on sale during the day, so it was decided to install a regular 61mm piston on this engine.
By the way, for those who do not know, a piston with a diameter of 61 mm can be easily installed not only on the Leica engine, but also on any other Chinese 150 equipped with a 157QMJ series engine. There, if you put your hands to it, you can stick a piston at 62mm, but only if the “meat” of the crankcase allows it. Everything is individual, you need to look at the place. In any case, the distance along the studs is the same for both the 61mm piston and the 62mm piston.
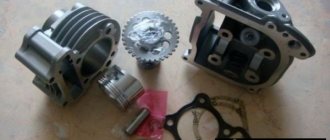
On the 139QMB series engine from a regular Chinese 80-six, you can easily install a piston 39mm (45CC), 47mm (72CC), 50mm (84CC)
From left to right: 39mm (45CC), 47mm (72CC), 50mm (84CC)
Installing piston rings
Remove the set of piston rings from the box. A piston ring set for a Chinese four-stroke scooter usually consists of five items. Three of which are a single assembled oil scraper ring, the other two: upper and lower compression.
A typical set of piston rings looks something like this
Carefully unpack the kit with perfectly clean hands.
In the kit you will find two of the thinnest rings and one thick corrugated ring (expander) - this will be an assembled oil scraper ring that needs to be installed on the piston first.
We place an expander in the lowest groove of the piston
We place thin oil scraper rings in the same groove - one under the expander, the second on top of the expander
We find the lower and upper compression rings in the kit and install them, respectively, in the middle and upper grooves of the piston - with marks on the side surface to the cylinder head (cylinder head). The lower compression ring differs from the upper one in color (not always) and the shape of the working edge (always). In most kits, the lower compression ring is painted black, and its working edge has a slight bevel.
Photo report: Installing a tuning piston on a Chinese 4T scooter
Installing a piston with a larger volume than stock is perhaps the simplest, most affordable, affordable and effective way to significantly increase the maximum speed and power of a scooter. There are, of course, even more effective ways to increase maximum speed and power, but these methods, or rather the hardware, cost simply unrealistic money...
If you charge the engine of the same 139QMB to the maximum, then such tuning before the “increase” cost the client about 35,000 rubles and this does not include work.
It is clear that not everyone can afford such amounts. Yes, even if it’s affordable, what’s the point? It’s easier to buy an old branded scooter and ride it than to charge the “Chinese” and then throw it in the trash after a season. But that's what I think.
Source