Electrical diagram of the car IZH - MOTORCYCLE
Electrical circuits of domestic motorcycles IZH Jupiter-5, Planet, IZH Junker, IZH49. To enlarge the diagram, click on it. You can also download for free and via a direct link an archive with circuit diagrams.
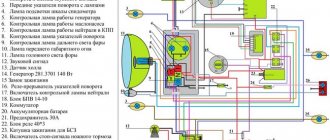
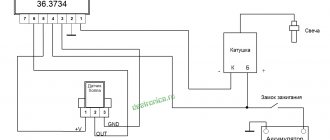
Electrical circuits of the ignition systems of the IZH Jupiter 5 motorcycle
1 - parking light lamp - A 12-4; 2 - high beam - low beam headlight - A 12-45:40; 3 - indicator lamp for generator operation - A 12-1; 4, 5 — speedometer scale illumination lamps — AMN 12-3; 6, 16, 17, 20, 23, 30 — lamps for the direction indicators of the motorcycle and side trailer; 7 - combination switch (right switch); 8 — brake light switch for the front wheel brake; 9 - breaker; 10 — spark plug; 11 — ignition coil; 12 - generator; 13 — rectifier-voltage regulator BPV14-10; 14 — brake light switch for the wheel brake; 15, 19 — side trailer clearance lamps — A 12-5; 18 — brake light lamp for side trailer — A 12-21-3; 21 — motorcycle brake light lamp — A 12-21-3; 22 — motorcycle rear marker lamp — A 12-5; 24 - battery; 25 - fuse; 26 — neutral lamp switch; 27 — ignition switch; 28 — sound signal; 29 — alarm switch (left switch); 31 — turn signal switch; 32 - high beam headlight control lamp - A 12-1; 32 — control lamp “neutral” — A 12-1; 33 - control lamp for direction indicator lights - AMN 12-3; Symbols on the BPV14-10 block (items 12,13): XI - “-” excitation windings; X2 - “-” battery (“ground”); ХЗ - “+” output to the control lamp; X4, X5, X7 - phases of the stator winding of the generator; X8 - “+” of the battery.
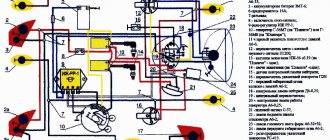
IZh Planeta-5 (electronic ignition system) 1, 13, 28, 32 - lamps A 12-21-3 turn signal lamps; 2, 14, 27, 33 — direction indicator lights; 3 — control lamp A 12-1 “high beam”; 4 - lamp A 12-4 - parking light; 5 - headlight; 6 - lamp A 12-45-40 high beam - low beam headlights; 7 — indicator lamp AMN 12-3-1 direction indicator; 8 — control lamp A 12-1 “neutral”; 9 — control lamp A 12 “oil”; 10 — lamp AMN 12-3-1 speedometer lighting; 11 — speedometer; 12 — instrument panel; 15 - combination switch (right switch); 16 — brake light switch for the front wheel brake; 17 — ignition switch; 18 — sound signal; 19 — turn signal switch; 20 — spark plug; 21 — spark plug tip; 22 — ignition coil; 23 - switch; 24 - fuse; 25 - generator; 26 — sensor; 29 — lamp A 12-21-4 brake lights; 30 — rear light; 31 — lamp A 12-5 of the rear marker light of a motorcycle; 34 — brake light switch for the rear wheel brake; 35 — rectifier-voltage regulator; 36 - capacitor 2200 uF 63V; 37 — battery; 38 — oil supply valve-sensor; 39 — lamp switch “neutral”; 40 - alarm switch (left switch).
Electrical equipment IZH Planet 5
Wiring for IZH Planet 5 includes:
- generator;
- battery;
- ignition system;
- headlights;
- control devices;
- switching elements.
Video: review of IZH Planet 5 wiring
Taken by user Agronom.
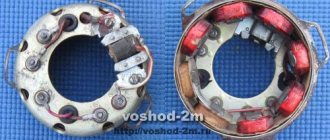
Generator
IZ Planet 5 generator design:
- voltage regulator with rectifier BPV-14-10 - 1;
- rotor - 2;
- stator with windings - 3;
- current collector brushes - 4;
- ignition system cam (battery) - 5;
- ignition system contact unit - 6.
The generator converts the mechanical energy of a gasoline engine into electrical energy, which charges the battery. Alternating current is generated by 3 windings and fed to a rectifier, which converts it into direct current. An additional coil is used as an exciter.
Photo gallery: IZH Planet 5 generator and its design
Battery
To supply all components, a low-power energy storage device of 12 volts is required, since IZH Planet 5 does not have a starter. The purpose of a lead-acid battery is only to supply voltage to the ignition system and the excitation winding of the generator during startup.
Ignition system
In IZH Planet 5, the ignition coil converts low-voltage voltage into high-voltage and transmits it to the spark plug. That, in turn, is responsible for the spark that detonates the fuel. To ensure that detonation occurs only in the desired piston position, there is an ignition chopper.
From the factory, this model is equipped with a classic ignition system, which requires periodic cleaning of the breaker contacts and adjusting the gap between them.
Installing a contactless SG on a motorcycle gives:
- timely powerful sparking;
- reduction of vibration levels;
- reduction in fuel consumption.
Control devices
The following control devices are installed on the motorcycle:
- tachometer, on which there are indicator lights for the headlights and turns;
- speedometer showing total and daily mileage;
- power engine temperature indicator;
- voltmeter.
Headlight and dashboard lamps
Conventional incandescent lamps are installed as lighting equipment and to illuminate the dashboard. Switching elements are responsible for supplying electricity from the battery to the lamps.
The headlight circuit includes lamps:
- headlight (35 watt);
- parking light headlights (4 W);
- control - blue light (2 watts);
- rear brake light (15 W).
Switching elements
Switching elements are various types of switches that close or open an electrical circuit. They can be activated using keys on the dashboard (for example, turn signals) or by sensors.
In IZH Planet 5, the switching elements include:
- turn switches;
- signal key;
- switches for low/high beam headlights;
- neutral sensor;
- egnition lock;
- foot and hand brake sensors.
Original and color wiring diagram for IZH Planet 3
4 years after the appearance of the second Planet (1966), the factory workers made a number of changes to its design, designed to improve the technical parameters and appearance of the motorcycle. This is how IZ Planet 3 was born, which became a real symbol of freedom for many of our compatriots.
Despite its advanced age, IZH Planet 3 still serves its owners well
Differences from the second Planet
For many modern citizens, the information that domestic motorcycle manufacturers worked tirelessly to improve their models in an era of total shortages may come as a surprise.
Note! The fact takes place, moreover, it is supported by official documents, in particular 1970N04P16-17 - this is the outgoing number of the factory newsletter, which described the changes made.
In the photo - official materials of the Izhmash Design Bureau
The new generation motorcycle received:
- Direction indicator lights are a first in domestic practice;
- Semiconductor relay for controlling direction indicators (installed in the headlight);
- New size of wheels and tires (3.50x18 versus previous - 3.25x19);
- New brand increased capacity battery (old one on IZH Planet 2 - ZMT-6);
- And, of course, more engine power. The power unit now developed 18 hp.
Modifications
But the creator engineers did not stop there and, having released the five-millionth car from the production line, presented a modification of the IZH Planet 3-01.
Mirror and safety arches are the distinctive features of the new modification
Among the innovations it should be noted:
- Rear passenger footrests;
- Roll bars;
- Rearview mirror;
- New steering wheel design.
For reference: The buyer paid for the changes out of his own pocket. In particular, the price for IZH Planet 3-01 was 750 rubles, the version with a stroller was 1140, and the “rural version” was even more expensive. Fortunately, care instructions were included with purchase, which made maintenance easier.
Motorcycle Features
The electrical wiring of IZH Planet 3 was designed for 6 volts. It served as the basis for other motorcycle models produced later (see also wiring diagram for IZH Planet 5).
Among the features are:
- Generator G36M7, which was later modified;
- Voltage regulator relay RR-1;
- Ignition coil IZH 56;
- Turn signal relay PC419.
For reference: The installation of markers and turn signals was used for the first time on domestic motorcycles. In general, for its progressive design and high quality, the IZH Planet 3 model received the state quality mark, which can be seen in the video of previous years.
Distinctive features of electrical equipment
The wiring diagram used on IZ Planet 3 was traditional, and the main parameters of the electrical equipment are presented below in the table.
| Ignition system | Battery, ZMTR-10 |
| Mains voltage | 6 volts |
| Electricity source | Generator G-35M7 (later replaced by a modified G-36M8), 45 W |
| Ignition coil | IZH 56 |
| Voltage regulator relay | IZH RR-1 |
| Electrical wiring IZH Planet 3 | Single-wire, with “-” output to ground |
Colored original diagram (clickable)
Lighting devices
The following lighting devices were installed on the IZH Planet 3 motorcycle:
- Left and right direction indicators with A6-6 lamps;
- Turn signal switch P201;
- Turn signal relay RS-419;
- Brake light bulbs A6-15;
- Side light bulbs A6-2;
Appearance of instruments and controls
- Light mode switch with sound signal button P200;
- Transmission position sensor (neutral) with warning lamp A6 0.25;
- Headlight lamp A6-32+32;
- Indicator lamp A6 0.25 generator operation;
- Side light lamp A6-2 (front);
- Speedometer scale illumination lamp A6-1;
Headlight and direction indicators
Attention! For lovers of the “original” and authenticity, the photo below shows the “native” black and white wiring diagram of IZH Planet 3 with a breakdown of all the elements.
Lighting devices for models with a stroller
Added to the existing list:
- Stroller brake light lamp A6-15;
- Stroller size lamp A6-2;
- Right direction indicator for stroller A6-6;
- Front side light of stroller A6-2.
Option with stroller
Note! The standard wiring of the IZH Planet 3 provided for disconnecting the sidecar for operating the motorcycle without it in a two-wheeled version. At the same time, the connecting terminals required care.
In the presented video you can watch the repair of an old motorcycle, which received a new life in capable hands. According to the author of the video, complete restoration cost him the equivalent of $130. Moreover, he did most of the work with his own hands.
Stages of electrical equipment modification
The entire procedure for switching to a battery-free circuit comes down to:
- Replacement of components for 12 volt equipment;
- Remaking the generator, and sometimes borrowing it from another model;
- Replacing lamps from 6V to 12V.
For reference: the wiring diagram on IZH Planet 3 does not change significantly - only the circuits of the generator, coil and voltage regulator relay are replaced.
Generator
The main difficulty in altering the generator lies in the manufacture of a special intermediate ring. This requires the help of a turner - the ring is turned on a lathe.
- Two 6 mm holes are drilled to allow the ring to be secured on the right half of the crankcase;
- To attach the generator to the ring, three M5s are drilled;
- A segment is cut out of the ring to facilitate installation under the partition of the right half of the crankcase;
- Cutouts for the crankcase cover bosses are made on the right and bottom.
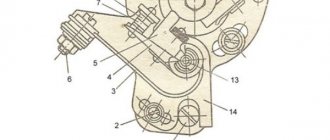
The numbers on the diagram indicate:
- Carter - right half;
- Power unit crankshaft;
- Intermediate flange mounting screws;
- The intermediate flange itself;
- Conical bushing made of sheet metal (S 0.8 mm);
- Generator stator;
- M5 screws for mounting the generator;
- Generator rotor;
- Rotation sensor;
- Rotor mounting bolt.
Electrical diagram
When converted to work without a battery, the wiring diagram of the IZH Planet 3 motorcycle remains standard:
- Wires to electricity consumers (dimensions, brake lights, head lights and instruments) remain unchanged;
- The standard ignition coil is replaced with another one - type B300B;
- The KET-1 electronic switch can be placed in a tool box, which helps protect it from external factors.
Advice: motorcyclists who have done this modification note the undoubted advantages of switching to contactless ignition. The wiring of IZH Planet 3 remains almost unchanged, but there is a complete refusal to use the battery. And the cost of reconstruction is small.
Conclusions: the proposed conversion method has been tested on thousands of motorcycles of domestic owners (see also the IZ Jupiter 5 wiring diagram). And it has proven its worth with trouble-free operation, improved spark generation and reliable engine starting in harsh winter conditions.
Source
Maintenance Features
Often during operation it is necessary to correctly set the gap between the contacts of the breaker. To do this, you need tools and a diagram to see which elements need to be dismantled.
The algorithm of actions is as follows:
- place the motorcycle on the stand;
- turn on neutral;
- unscrew the spark plug from the cylinder;
- remove the engine crankcase cover;
- turn the crankshaft until the contacts are as open as possible;
- using a screwdriver, loosen the locking screw;
- using a special feeler gauge, set the gap to 0.35-0.45 mm and fix it with a screw;
- we collect everything in reverse sequence;
- turn on the ignition and start the engine. Its stable operation at idle indicates that the adjustment has been correctly performed.
In general, all the wiring of IZH Planet 5 is very easy to do with your own hands.
The need for such work often arises when operating a motorcycle:
- in wet weather, driving in the rain for a long time (oxidation or dampness of electrical contacts);
- when traveling over rough terrain, replete with vegetation and bushes (mechanical damage to wiring);
- when used in winter (snow and slush stick to the wires and can damage them).
Often the sound signal suffers during operation. Its malfunctions manifest themselves in the form of deterioration in sound quality.
To restore its functionality, you must perform the following procedure:
- loosen the locknut using an open-end wrench;
- turn on the ignition;
- press the button to turn on the sound signal;
- use a screwdriver to adjust the tone;
- repeat the procedure until we get a clear and loud sound;
- tighten the control nut.
Conclusions: we are confident that this article will help you in servicing motorcycles of the IZH family (see also the article about). Both the attached diagrams and description will help you avoid making mistakes during operation.
While easily fixing mechanical failures, motorcyclists experience difficulties if the electrics fail. It’s completely in vain, the wiring diagram of the planet Izh 5 is not complicated, it’s easy to figure out.
There is no need to have special stands and equipment for repairs. A minimum knowledge of electrical engineering and a simple avometer (tester) is enough; even often you can get by with just a test lamp.
We will tell you in more detail about the main electrical wiring components and possible malfunctions. The Izh Planet wiring diagram makes it easy to find a broken wire or damaged insulation (for example, a bad contact always gets hot).
In this case, we look to see if there is a spark at the coil output and at the output at the spark plug contact. Let's take a closer look at the main wiring components of the Izh Planet.