how to correctly set and adjust the ignition on Izh Planet 5 - prg-rb
how to correctly set and adjust the ignition on Izh Planet 5
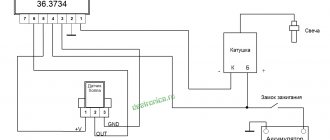
- I'll correct the mistake. when the modulator is not in the hall, it shows -zero.... and when it is there it shows 7V, that’s when the modulator comes out then there’s a spark..
- First, we need to acquire (make, buy, underline what is needed) a special tool. 1) Tester (12 volt light bulb with two wires or a store-bought one) If you have a BSZ installed, it is better to use this tester device. 2) we need a depth gauge; this could be a caliper, or a special device. 3) Feeler gauges for measuring the gap. We set the ignition on the Planet.
Adjusting the electronic ignition system on Izh Planet 5. How to set the ignition on the Planet?
If you are the owner of an IL, the ignition of Planet 5 electronic type can be adjusted in the following way:
- set the advance angle (3.5 mm to the top dead center mark, in this case the sensor will show a pulse only when the modulator leaves the gap);
- start the engine.
If you are the owner of an IZH Jupiter 5 motorcycle, then you will be interested in an article on setting up electronic ignition on an IZH Jupiter 5
As a rule, this option for setting up the ignition on Izh Planet 5 works without problems. Moreover, as a reserve for installing the ignition on Izh Planet 5, you can use a contact system for starting the power unit.
So, we figured out how to set the ignition on the Planet. With proper adjustment of the engine starting system, your motorcycle will start normally, and you will be able to experience all the delights of driving such a two-wheeled vehicle.
how to set the ignition on Izh Planet 5
How to set the ignition on Izh Planet 5
In the Service, Maintenance, Tuning section, to the question of how to correctly set and adjust the ignition on Izh Planet 5, asked by the author Mihon Bejenari, the best answer is to Unscrew the spark plug, install the piston not reaching 2.5-3 mm from TDC, insert a piece of tissue paper between the contacts of the breaker and we will regulate the moment of paper release and the ignition moment.
Answer from 2 replies[guru]
Hello! Here is a selection of topics with answers to your question: how to correctly set and adjust the ignition on Izh Planet 5
Answer from Vladimir Sobolev [guru] First, we need to acquire (make, buy - underline what is needed) a special tool. 1) Tester (12 volt light bulb with two wires or a store-bought one) If you have a BSZ installed, then it is better to use this tester device. 2) we need a depth gauge - this can be a caliper, or a special device. 3) Feeler gauges for measuring the gap. We set the ignition on the Planet. We unscrew the generator cover or completely remove the right crankcase cover, personally I prefer to remove it completely - it’s more convenient for me. Turn clockwise arrows, crankshaft by the generator bolt until the breaker contacts are maximally open, loosen screw 1 (Fig. 1) and, turning eccentric 2, set the gap between the contacts to 0.4...0.6 mm, tighten screw 1. Now, rotating the crankshaft clockwise arrows, set the piston to top dead center (TDC). Then, rotating the crankshaft counterclockwise, install the piston without bringing it to TDC by 3.0...3.5 mm. Having loosened the screws 3 by turning the base 4, establish the beginning of the opening of the contacts, fasten the screws. It is convenient to determine the beginning of the opening of the contacts using a probe. Connect one wire of the probe to ground, connect the second to the hammer terminal of the breaker, turn on the ignition, when the contacts open, the lamp will light up and this will begin to open the contacts. If you have a BSZ, then the point about setting the gap is naturally excluded, the moment of sparking is determined using the above-mentioned device or tester .Using a device: Install the device at the place of the switch, LED “D” should light up when the modulator is not in the DC (Hall Sensor) and go out when entering the DC, this will be the moment of sparking. If you don’t have a device, then you can get by with a tester. Set the tester to measure voltage (to a limit of 20 volts), connect it to the second and third contacts of the DC, the tester should show a voltage of about 7 volts when the modulator is not in the DC, and almost zero when the modulator is in the DC, the moment of transition from 7 V to 0 is the moment of spark formation. Good luck!
Installation and configuration instructions
In IZH Planet motorcycles, be it version 3, 4 or 5, the ignition installation in accordance with the diagram must be carried out using the device that came with the motorcycle. But since it is not so easy to find this device today, we will make do with improvised means. Non-contact ignition is configured by adjusting and setting the gap of the distributor contacts. An equally important nuance is the correct setting of the moment of sparking.
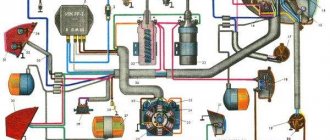
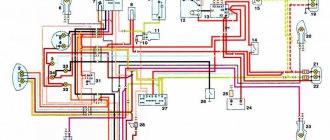
Diagram and designation of parts of the IZH distributor
If your IZH Planet 3 is equipped with a single-cylinder internal combustion engine with a G-36 M generator device, then in this case the procedure for setting the gap is carried out by turning the eccentric, marked in the diagram with the number 1. In this case, bolt 2 according to the diagram must be loosened, and the eccentric itself is turned or right or left. Before setting the BSZ on products from the IZHMASH plant, the crankshaft must be turned. It rotates until the moment of greatest divergence of contacts occurs. It is in this position that the ignition of the IZH Planet 5 is adjusted - you need to ensure that the maximum gap on the contacts is around 0.35-0.45 mm.
According to experts, the ignition system should be adjusted with the cylinder head removed. In this case, the piston itself must be located in a position where it does not reach the dead center; to find out what the clearance should be in this case, you need to use the instruction book. For example, in versions 3 this parameter should be 3.5-4 mm, in Planets 4 - from 3 to 3.5 mm, and in Sports versions - from 3.5 to 3.8 mm. It is in this position that the spark will appear. The adjustment procedure in this case is performed by turning the interrupter assembly, while the bolts marked in the diagram as number 10 must be loosened.
Assembly diagram for IL
Adjusting the ignition, in particular, setting the gaps between the contacts of the interrupter device, should be performed in the following order:
- First of all, the crankshaft is turned by the kick starter.
- One of the interrupting elements is set to the contact opening position. In this case, the bolt marked number 4 in the diagram must be loosened.
- Next, using the eccentric number 3, the gap is set; this figure should be from 0.4 to 0.6 mm. After this, the same actions are carried out with the second pair of contacts.
Read also: Repair of APM Renault Premium
It should be noted that the entire procedure must be carried out with the spark plugs unscrewed. When you place the dipstick in the corresponding hole for the spark plug in the right cylinder, you need to turn the crankshaft with the kick starter. You need to find the top dead center and having found it, you should make several marks on the dipstick - one of the marks should be placed at the level of the hole, and the other should be located slightly higher - about 2-3 mm. After this, the crankshaft must continue to be turned, this is done until the upper mark reaches the position in which the first mark at top dead center was set (video author - Garage in the USSR).
In this position, the elements of the interrupter assembly, which is located on the lower surface, will begin to open. It should be noted that the procedure for setting the contact opening is done by turning the base, but to do this you need to loosen the bolts numbered 2 and 7. And when you can make the adjustment correctly, these screws will need to be tightened. As for directly determining the moment of rupture, it can be detected thanks to a light bulb, which must be connected in advance to the body ground and the distributor terminal.
After the torque on the right cylinder has been set, the same procedure is performed in a similar way only on the left cylinder. In general, the situation is similar, only in this case it is not the lower, but the upper base that rotates, and in this case, bolts 1 and 7 should be loosened.
How to correctly configure the ignition of Izh Planetka 5
It is best to produce and regulate the ignition of the Izh Planetka using a special tool that was once included in the factory kit of each individual model. If you do not have such a tool, use an ordinary caliper.
See:
What will you need to set up the launch system on Izh Planetka 5? The following tools will be useful to you:
- a probe, in other words, a light bulb operating on 12 volts with two wires;
- depth gauge (vernier caliper);
- special feelers for accurately measuring gaps.
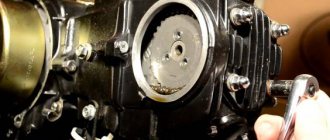
To properly install ignition , you first need to remove the cover from the generator. If necessary, for convenience it is possible to unscrew the right cover on the crankcase.
Next, to adjust the ignition of Planet 5, you should alternately perform the following steps:
- turn the crankshaft clockwise until the moment is correctly set when the breaker opens;
- loosen the bolt slightly, immediately turning the eccentric;
- set the required gaps (0.4. 0.6 mm);
- tighten the bolt again;
- again turning the crankshaft clockwise, set the piston to the TDC mark;
- turning the crankshaft in the opposite direction, place the piston 3.3.5 mm to the TDC mark;
- loosen the bolts;
- set the beginning of contact opening;
- tighten the bolts again and turn on the ignition of Planeta 5.
How to set the ignition on Izh Planeteka 5 without a micrometer
Setting the ignition
on a bike
IZh Planetka
3,
4
and 5 models.
To find the moment when the opening begins, use your light bulb. To do this, you need to connect the light bulb using a wire to ground, and connect the other wire to the terminal. Then you need to turn on the ignition of Planet 5. The engine should start when the contacts open: this will be indicated by a lit light bulb.
See:
Unscrew the bolts a little to set the ignition
on Planetka, you need to turn them all the way (also clockwise). The light bulb won't shine here. Then slowly turn the contacts in the opposite direction again until the light comes on again. At that time a spark should appear. So, of course, adjust the ignition of the Izh Planetka.
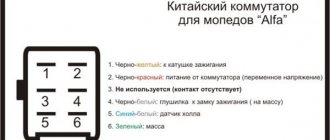
If your bike is equipped with a contactless engine starting system, then there is no need to set gaps, since the moment of spark formation is determined by using a special tester. Under such circumstances, to install the ignition on Izh Planetka 5, you must:
- correctly install the device to measure the voltage (up to 20 volts);
- connect the device to the 2nd and 3rd contacts of the Hall Sensor.
Setting up contact ignition on Izh Jupiter - 5
Let's take a step-by-step look at how to set up contact ignition on this device:
- Align the piston of the desired cylinder: - insert a screwdriver into the cylinder - rotate the crankshaft while holding the screwdriver
- Take a ruler and place it next to the screwdriver.
- Rotate the crankshaft, holding the screwdriver down with your finger so that it is level. We find a dead point.
- Turn the crankshaft in the opposite direction (1.5-2 mm).
- A spark is generated when the cam opens, locate the two adjusting bolts.
- Take a light bulb with two contacts, connect one to ground, the other to the contact.
- Turn on the ignition switch.
- You need to find the moment when the light comes on (the moment it lights up, the start occurs), and when it goes out, the contact closes on the contrary.
- Turn off the ignition, do and adjust the same with the second cylinder